Upgrading and Servicing Guide
Page 18
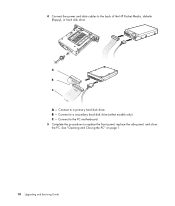
B - Connect to replace the front panel, replace the side panel, and close the PC. C - Connect to the PC motherboard. 5 Complete the procedures to a secondary hard disk drive (select models only). See "Opening and Closing the PC" on page 1. 14 Upgrading and Servicing Guide Connect to the back of the HP Pocket Media, diskette (floppy), or hard disk drive. A B MASTER C SLAVE To CPU A - 4 Connect the power and data cables to a primary hard disk drive.
B - Connect to replace the front panel, replace the side panel, and close the PC. C - Connect to the PC motherboard. 5 Complete the procedures to a secondary hard disk drive (select models only). See "Opening and Closing the PC" on page 1. 14 Upgrading and Servicing Guide Connect to the back of the HP Pocket Media, diskette (floppy), or hard disk drive. A B MASTER C SLAVE To CPU A - 4 Connect the power and data cables to a primary hard disk drive.
Upgrading and Servicing Guide
Page 25
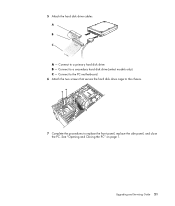
Connect to a secondary hard disk drive (select models only). B - Upgrading and Servicing Guide 21 Connect to a primary hard disk drive. See "Opening and Closing the PC" on page 1. C - A B MASTER C SLAVE To CPU A - Connect to the PC motherboard. 6 Attach the two screws that secure the hard disk drive cage to the chassis. 7 Complete the procedures to replace the front panel, replace the side panel, and close the PC. 5 Attach the hard disk drive cables.
Connect to a secondary hard disk drive (select models only). B - Upgrading and Servicing Guide 21 Connect to a primary hard disk drive. See "Opening and Closing the PC" on page 1. C - A B MASTER C SLAVE To CPU A - Connect to the PC motherboard. 6 Attach the two screws that secure the hard disk drive cage to the chassis. 7 Complete the procedures to replace the front panel, replace the side panel, and close the PC. 5 Attach the hard disk drive cables.
Upgrading and Servicing Guide
Page 26
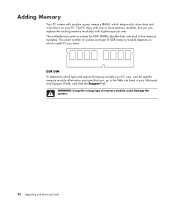
...double data rate dual in your PC. Adding Memory Your PC comes with random access memory (RAM), which temporarily stores data and instructions on which model PC you can replace the existing memory module...have. The exact number of sockets and type of memory module could damage the system. 22 Upgrading and Servicing Guide WARNING: Using the wrong type of DDR memory module depends on your Warranty and...Support link. The PC ships with higher-capacity ones. The motherboard contains sockets for specific memory module information and specifications, go to the Web site listed in -...
...double data rate dual in your PC. Adding Memory Your PC comes with random access memory (RAM), which temporarily stores data and instructions on which model PC you can replace the existing memory module...have. The exact number of sockets and type of memory module could damage the system. 22 Upgrading and Servicing Guide WARNING: Using the wrong type of DDR memory module depends on your Warranty and...Support link. The PC ships with higher-capacity ones. The motherboard contains sockets for specific memory module information and specifications, go to the Web site listed in -...
Upgrading and Servicing Guide
Page 27
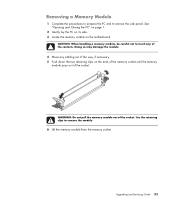
WARNING: Do not pull the memory module out of the contacts. Upgrading and Servicing Guide 23 Removing a Memory Module 1 Complete the procedures to prepare the PC and to remove the module. 6 Lift the memory module from the ... the ends of the memory socket until the memory module pops out of the way, if necessary. 5 Push down the two retaining clips on the motherboard. Doing so may damage the module. 4 Move any of the socket.
WARNING: Do not pull the memory module out of the contacts. Upgrading and Servicing Guide 23 Removing a Memory Module 1 Complete the procedures to prepare the PC and to remove the module. 6 Lift the memory module from the ... the ends of the memory socket until the memory module pops out of the way, if necessary. 5 Push down the two retaining clips on the motherboard. Doing so may damage the module. 4 Move any of the socket.
Upgrading and Servicing Guide
Page 30
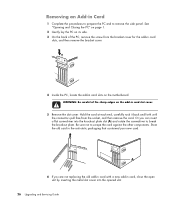
... the knockout plate. A 6 If you can insert a flat screwdriver into the opened slot. 26 Upgrading and Servicing Guide Or you are not replacing the old add-in card with a new add-in card slots on the motherboard. Be sure not to remove the side panel. Store the old card in card slot...
... the knockout plate. A 6 If you can insert a flat screwdriver into the opened slot. 26 Upgrading and Servicing Guide Or you are not replacing the old add-in card with a new add-in card slots on the motherboard. Be sure not to remove the side panel. Store the old card in card slot...
Upgrading and Servicing Guide
Page 32
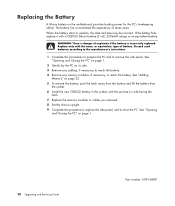
..., if necessary, to reach the battery. WARNING: There is incorrectly replaced. See "Opening and Closing the PC" on page 1. 2 Gently lay the PC on the motherboard provides backup power for the PC's timekeeping ability. See "Opening and Closing the PC" on page 22. 5 To remove the battery, push the latch away... you removed. 8 Set the chassis upright. 9 Complete the procedure to replace the side panel, and to close the PC. See "Adding Memory" on page 1. 28 Upgrading and Servicing Guide Part number: 5991-6989 The battery has an estimated life expectancy of seven years.
..., if necessary, to reach the battery. WARNING: There is incorrectly replaced. See "Opening and Closing the PC" on page 1. 2 Gently lay the PC on the motherboard provides backup power for the PC's timekeeping ability. See "Opening and Closing the PC" on page 22. 5 To remove the battery, push the latch away... you removed. 8 Set the chassis upright. 9 Complete the procedure to replace the side panel, and to close the PC. See "Adding Memory" on page 1. 28 Upgrading and Servicing Guide Part number: 5991-6989 The battery has an estimated life expectancy of seven years.


