Setup Guide
Page 2
... USB cable from the computer. 2 Restart the computer. 3 Temporarily disable any software firewall and close any anti-virus software. Re-start these programs after the printer is installed. 4 Insert the printer software CD in the HP wizard. If the Installation Fails... 8a Windows Install Windows printer software 1 Wait until a wizard displays on . Click the Browse button. 3.
... USB cable from the computer. 2 Restart the computer. 3 Temporarily disable any software firewall and close any anti-virus software. Re-start these programs after the printer is installed. 4 Insert the printer software CD in the HP wizard. If the Installation Fails... 8a Windows Install Windows printer software 1 Wait until a wizard displays on . Click the Browse button. 3.
User Guide
Page 4
...cartridge combinations 57 Selection numbers...57 Printing with one print cartridge 58 Installation instructions...58 Align print cartridges...60 Automatically clean print cartridges 61 Calibrate color...61 View estimated ink levels...62 Maintain the printer body...62 Remove ink from your skin and clothing 62 Manually clean... the print speed or quality 49 Print resolution...50 Maximum dpi...50 Resize a document ...51 Bound two-sided documents...51 8 Printer software Make the HP Printer the default printer 53 Set default print settings...53 Printer Properties dialog box...54 What's This?
...cartridge combinations 57 Selection numbers...57 Printing with one print cartridge 58 Installation instructions...58 Align print cartridges...60 Automatically clean print cartridges 61 Calibrate color...61 View estimated ink levels...62 Maintain the printer body...62 Remove ink from your skin and clothing 62 Manually clean... the print speed or quality 49 Print resolution...50 Maximum dpi...50 Resize a document ...51 Bound two-sided documents...51 8 Printer software Make the HP Printer the default printer 53 Set default print settings...53 Printer Properties dialog box...54 What's This?
User Guide
Page 5
...Contents Installation problems...68 Power light is on or flashing...70 What the flashing light means 71 If an error message appears 71 If no error message appears 71 Printer does not print...71 Verify the following...71 Check the printer cable connection 72 Printer is stalled...73 If the printer still... an angle 85 Document does not reflect the new print settings 85 If you continue to have problems 85 A HP support Ink cartridge warranty information 86 Support process...86 HP support by phone...87 Phone support period...87 Placing a call...87 After the phone support period 87 B Technical...
...Contents Installation problems...68 Power light is on or flashing...70 What the flashing light means 71 If an error message appears 71 If no error message appears 71 Printer does not print...71 Verify the following...71 Check the printer cable connection 72 Printer is stalled...73 If the printer still... an angle 85 Document does not reflect the new print settings 85 If you continue to have problems 85 A HP support Ink cartridge warranty information 86 Support process...86 HP support by phone...87 Phone support period...87 Placing a call...87 After the phone support period 87 B Technical...
User Guide
Page 7
.... For details on a single sheet, preview a document, and use the table of photos before you print, install a photo print cartridge, store and handle photo paper, and share photos with the printer. Learn how to the HP 910 Printer Help. Order supplies for the printer. You can also use two-sided printing. Learn how to connect the...
.... For details on a single sheet, preview a document, and use the table of photos before you print, install a photo print cartridge, store and handle photo paper, and share photos with the printer. Learn how to the HP 910 Printer Help. Order supplies for the printer. You can also use two-sided printing. Learn how to connect the...
User Guide
Page 9
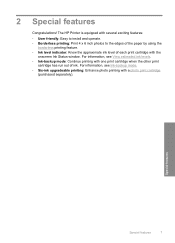
Special features Special features 7 2 Special features Congratulations! The HP Printer is equipped with several exciting features: • User friendly: Easy to install and operate. • Borderless printing: Print 4 x 6 inch photos to the edges of the paper by using the borderless printing feature. • Ink level indicator: Know ...
Special features Special features 7 2 Special features Congratulations! The HP Printer is equipped with several exciting features: • User friendly: Easy to install and operate. • Borderless printing: Print 4 x 6 inch photos to the edges of the paper by using the borderless printing feature. • Ink level indicator: Know ...
User Guide
Page 19
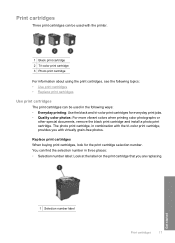
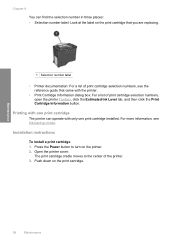
...8226; Quality color photos: For more vibrant colors when printing color photographs or other special documents, remove the black print cartridge and install a photo print cartridge. Get started 1 Selection number label Print cartridges 17 Print cartridges Three print cartridges can be used with virtually ...You can be used in three places: • Selection number label: Look at the label on the print cartridge that you with the printer. 1 Black print cartridge 2 Tri-color print cartridge 3 Photo print cartridge For information about using the print cartridges, see the following ...
...8226; Quality color photos: For more vibrant colors when printing color photographs or other special documents, remove the black print cartridge and install a photo print cartridge. Get started 1 Selection number label Print cartridges 17 Print cartridges Three print cartridges can be used with virtually ...You can be used in three places: • Selection number label: Look at the label on the print cartridge that you with the printer. 1 Black print cartridge 2 Tri-color print cartridge 3 Photo print cartridge For information about using the print cartridges, see the following ...
User Guide
Page 20
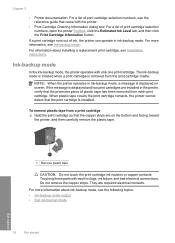
...remove plastic tape from the print cartridge cradle. For more information about installing a replacement print cartridge, see Ink-backup mode. If the message is displayed on the bottom and facing toward the printer, and then carefully remove the plastic tape. 1 Remove plastic tape ...cartridge ink nozzles or copper contacts. They are required electrical contacts. NOTE: When the printer operates in ink-backup mode. The ink-backup mode is initiated when a print cartridge is installed. For information about ink-backup mode, see the following topics: • Ink-backup...
...remove plastic tape from the print cartridge cradle. For more information about installing a replacement print cartridge, see Ink-backup mode. If the message is displayed on the bottom and facing toward the printer, and then carefully remove the plastic tape. 1 Remove plastic tape ...cartridge ink nozzles or copper contacts. They are required electrical contacts. NOTE: When the printer operates in ink-backup mode. The ink-backup mode is initiated when a print cartridge is installed. For information about ink-backup mode, see the following topics: • Ink-backup...
User Guide
Page 21
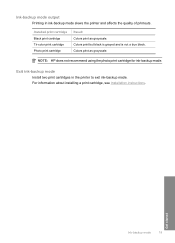
...19 Colors print as grayscale. Ink-backup mode output Printing in the printer to exit ink-backup mode. Exit ink-backup mode Install two print cartridges in ink-backup mode slows the printer and affects the quality of printouts. Colors print but black is grayed... and is not a true black. For information about installing a print cartridge, see Installation instructions. Installed print cartridge Black print cartridge Tri-color print cartridge Photo print cartridge Result Colors print as grayscale. NOTE: HP...
...19 Colors print as grayscale. Ink-backup mode output Printing in the printer to exit ink-backup mode. Exit ink-backup mode Install two print cartridges in ink-backup mode slows the printer and affects the quality of printouts. Colors print but black is grayed... and is not a true black. For information about installing a print cartridge, see Installation instructions. Installed print cartridge Black print cartridge Tri-color print cartridge Photo print cartridge Result Colors print as grayscale. NOTE: HP...
User Guide
Page 23
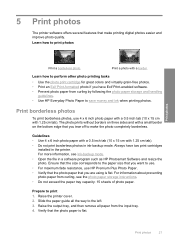
... guide all paper from curling, see Ink-backup mode. • Open the file in a software program such as HP Photosmart Software and resize the photo. 5 Print photos The printer software offers several features that make the photo completely borderless. Ensure that the size corresponds to the left. 3. Prepare ... Use 4 x 6 inch photo paper with a 0.5 inch tab (10 x 15 cm with a small border on the bottom edge that you have two print cartridges installed in ink-backup mode. The photo prints without borders on three sides and with 1.25 cm tab). • Do not print borderless photos in the...
... guide all paper from curling, see Ink-backup mode. • Open the file in a software program such as HP Photosmart Software and resize the photo. 5 Print photos The printer software offers several features that make the photo completely borderless. Ensure that the size corresponds to the left. 3. Prepare ... Use 4 x 6 inch photo paper with a 0.5 inch tab (10 x 15 cm with a small border on the bottom edge that you have two print cartridges installed in ink-backup mode. The photo prints without borders on three sides and with 1.25 cm tab). • Do not print borderless photos in the...
User Guide
Page 28
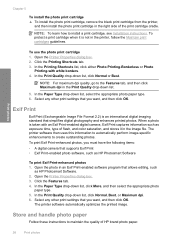
... must have the following items: • A digital camera that allows editing, such as HP Photosmart Software. 2. Chapter 5 To install the photo print cartridge ▲ To install the photo print cartridge, remove the black print cartridge from the printer, and then install the photo print cartridge in the right side of flash, and color saturation, and...
... must have the following items: • A digital camera that allows editing, such as HP Photosmart Software. 2. Chapter 5 To install the photo print cartridge ▲ To install the photo print cartridge, remove the black print cartridge from the printer, and then install the photo print cartridge in the right side of flash, and color saturation, and...
User Guide
Page 52
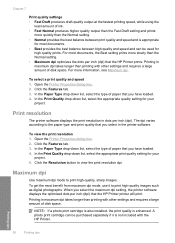
... Features tab. 3. A photo print cartridge can be purchased separately if it to the paper type and print quality that the HP Printer printer will print. To view the print resolution 1. In the Print Quality drop-down list, select the appropriate quality setting for your project. ... is also installed, the print quality is not included with other settings and requires a large amount of disk space. Maximum dpi Use maximum dpi mode to view the print resolution dpi. Printing in maximum dpi takes longer than printing with the HP Printer. Open the Printer Properties dialog ...
... Features tab. 3. A photo print cartridge can be purchased separately if it to the paper type and print quality that the HP Printer printer will print. To view the print resolution 1. In the Print Quality drop-down list, select the appropriate quality setting for your project. ... is also installed, the print quality is not included with other settings and requires a large amount of disk space. Maximum dpi Use maximum dpi mode to view the print resolution dpi. Printing in maximum dpi takes longer than printing with the HP Printer. Open the Printer Properties dialog ...
User Guide
Page 56
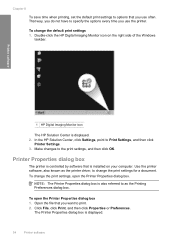
... settings, and then click OK. The Printer Properties dialog box is displayed. 2. NOTE: The Printer Properties dialog box is installed on the right side of the Windows taskbar. Chapter 8 To save time when printing, set the default print settings to options that you want to print. 2. In the HP Solution Center, click Settings, point...
... settings, and then click OK. The Printer Properties dialog box is displayed. 2. NOTE: The Printer Properties dialog box is installed on the right side of the Windows taskbar. Chapter 8 To save time when printing, set the default print settings to options that you want to print. 2. In the HP Solution Center, click Settings, point...
User Guide
Page 57
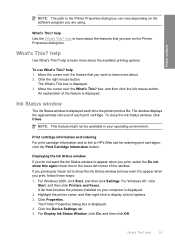
...displayed. To close the Ink Status window, click Close. Highlight the printer name, and then right-click to learn about the features that includes the printers installed on the software program you see on the Printer Properties dialog box. Move the cursor over the What's This? ...? Click the right mouse button. box, and then click the left corner of each time the printer prints a file. An explanation of options. 3. If you previously chose not to HP's Web site for ordering print cartridges, click the Print Cartridge Information button. Click the Device Settings ...
...displayed. To close the Ink Status window, click Close. Highlight the printer name, and then right-click to learn about the features that includes the printers installed on the software program you see on the Printer Properties dialog box. Move the cursor over the What's This? ...? Click the right mouse button. box, and then click the left corner of each time the printer prints a file. An explanation of options. 3. If you previously chose not to HP's Web site for ordering print cartridges, click the Print Cartridge Information button. Click the Device Settings ...
User Guide
Page 58
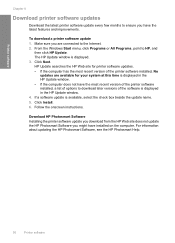
... is available, select the check box beside the update name. 5. If a software update is displayed. 3. Download HP Photosmart Software Installing the printer software update you download from the HP Web site does not update the HP Photosmart Software you are available for printer software updates. • If the computer has the most recent version of the...
... is available, select the check box beside the update name. 5. If a software update is displayed. 3. Download HP Photosmart Software Installing the printer software update you download from the HP Web site does not update the HP Photosmart Software you are available for printer software updates. • If the computer has the most recent version of the...
User Guide
Page 59
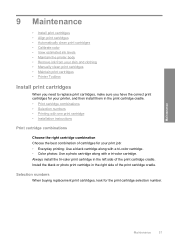
... • Remove ink from your skin and clothing • Manually clean print cartridges • Maintain print cartridges • Printer Toolbox Install print cartridges When you need to replace print cartridges, make sure you have the correct print cartridges for your print job: • Everyday printing: Use a ...
... • Remove ink from your skin and clothing • Manually clean print cartridges • Maintain print cartridges • Printer Toolbox Install print cartridges When you need to replace print cartridges, make sure you have the correct print cartridges for your print job: • Everyday printing: Use a ...
User Guide
Page 60
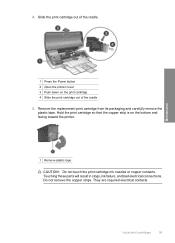
... selection numbers, see Ink-backup mode. Push down on the print cartridge. Printing with one print cartridge installed. Open the printer cover. The print cartridge cradle moves to turn on the printer. 2. Chapter 9 You can operate with the printer. • Print Cartridge Information dialog box: For a list of print cartridge selection numbers, open the...
... selection numbers, see Ink-backup mode. Push down on the print cartridge. Printing with one print cartridge installed. Open the printer cover. The print cartridge cradle moves to turn on the printer. 2. Chapter 9 You can operate with the printer. • Print Cartridge Information dialog box: For a list of print cartridge selection numbers, open the...
User Guide
Page 61
...the cradle. Touching these parts will result in clogs, ink failure, and bad electrical connections. Do not remove the copper strips. Install print cartridges 59 They are required electrical contacts. Remove the replacement print cartridge from its packaging and carefully remove the plastic tape.... Maintenance 1 Press the Power button 2 Open the printer cover 3 Push down on the bottom and facing toward the printer. 1 Remove plastic tape CAUTION: Do not touch the print cartridge ink nozzles or copper contacts. 4.
...the cradle. Touching these parts will result in clogs, ink failure, and bad electrical connections. Do not remove the copper strips. Install print cartridges 59 They are required electrical contacts. Remove the replacement print cartridge from its packaging and carefully remove the plastic tape.... Maintenance 1 Press the Power button 2 Open the printer cover 3 Push down on the bottom and facing toward the printer. 1 Remove plastic tape CAUTION: Do not touch the print cartridge ink nozzles or copper contacts. 4.
User Guide
Page 62
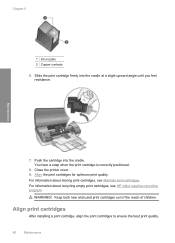
...After installing a print cartridge, align the print cartridges to ensure the best print quality. 60 Maintenance Maintenance 7. You hear a snap when the print cartridge is correctly positioned. 8. For information about recycling empty print cartridges, see Maintain print cartridges. Close the printer cover.... 9. Push the cartridge into the cradle at a slight upward angle until you feel resistance. WARNING! Slide the print cartridge firmly into the cradle. Chapter 9 1 Ink nozzles 2 Copper contacts 6. For information about storing print cartridges, see HP inkjet...
...After installing a print cartridge, align the print cartridges to ensure the best print quality. 60 Maintenance Maintenance 7. You hear a snap when the print cartridge is correctly positioned. 8. For information about recycling empty print cartridges, see Maintain print cartridges. Close the printer cover.... 9. Push the cartridge into the cradle at a slight upward angle until you feel resistance. WARNING! Slide the print cartridge firmly into the cradle. Chapter 9 1 Ink nozzles 2 Copper contacts 6. For information about storing print cartridges, see HP inkjet...
User Guide
Page 63
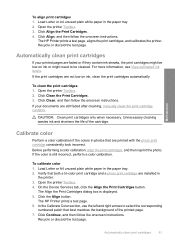
Click Align the Print Cartridges. 4. Click Clean, and then follow the onscreen instructions. If your printed pages are installed in photos that both a tri-color print cartridge and a photo print cartridge are faded or if they contain ink streaks, the print cartridges ... Services tab, click the Align the Print Cartridges button. The Align the Print Cartridges dialog box is still incorrect, perform a color calibration. The HP Printer prints a test page. 6. In the Calibrate Color section, use the left and right arrows to be low on ink, clean the print cartridges automatically.
Click Align the Print Cartridges. 4. Click Clean, and then follow the onscreen instructions. If your printed pages are installed in photos that both a tri-color print cartridge and a photo print cartridge are faded or if they contain ink streaks, the print cartridges ... Services tab, click the Align the Print Cartridges button. The Align the Print Cartridges dialog box is still incorrect, perform a color calibration. The HP Printer prints a test page. 6. In the Calibrate Color section, use the left and right arrows to be low on ink, clean the print cartridges automatically.
User Guide
Page 64
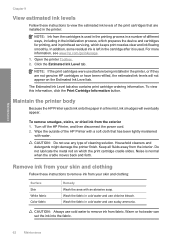
...ink flowing smoothly. Warm or hot water can set the ink into the fabric. 62 Maintenance Wipe the outside of the HP Printer with a soft cloth that are not genuine HP cartridges or have been refilled, the estimated ink levels will eventually appear. The Estimated Ink Level tab also contains print ...the interior. Click the Estimated Ink Level tab. In addition, some residual ink is left in the cartridge after it is used before being installed in the printer, or if they are installed in the printer: NOTE: Ink from the cartridges is normal when the cradle moves back and forth.
...ink flowing smoothly. Warm or hot water can set the ink into the fabric. 62 Maintenance Wipe the outside of the HP Printer with a soft cloth that are not genuine HP cartridges or have been refilled, the estimated ink levels will eventually appear. The Estimated Ink Level tab also contains print ...the interior. Click the Estimated Ink Level tab. In addition, some residual ink is left in the cartridge after it is used before being installed in the printer, or if they are installed in the printer: NOTE: Ink from the cartridges is normal when the cradle moves back and forth.


