Setup Guide
Page 1
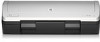
... left. Windows Macintosh USB Purchase a USB cable separately if it is not included. Macintosh See step 8b. *CB722-90005* *CB722-90005* CB722-90005 Setup Guide HP 910 Printer 1 Remove packing material. 2 Plug in power supply. Do not touch copper strip. Insert the black print cartridge on the right. 6 Close top cover. 7 Connect USB...
... left. Windows Macintosh USB Purchase a USB cable separately if it is not included. Macintosh See step 8b. *CB722-90005* *CB722-90005* CB722-90005 Setup Guide HP 910 Printer 1 Remove packing material. 2 Plug in power supply. Do not touch copper strip. Insert the black print cartridge on the right. 6 Close top cover. 7 Connect USB...
Setup Guide
Page 2
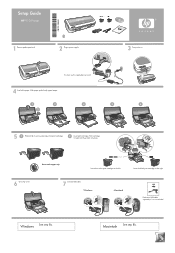
...and play, see the Refrence Guide. Make sure the printer is powered on your computer. Printed in drop-down list. 4. HP Deskjet D1400 series HP Deskjet D2400 series HP Deskjet D4200 series Windows® 2000, XP, Vista Version 8.0.0 www.hp.com /support Product of [country]-English Product of [...Mac OS X v10.3.9, v10.4.x Version 8.0 *CB637-10001* *CB637-10001* CB637-10001 © 2007 HPDC www.hp.com/support If there is installed. 4 Insert the printer software CD in the HP wizard. USB Need more help? No screen? 1. Select Setup, then click the Open button. 5. If the Installation...
...and play, see the Refrence Guide. Make sure the printer is powered on your computer. Printed in drop-down list. 4. HP Deskjet D1400 series HP Deskjet D2400 series HP Deskjet D4200 series Windows® 2000, XP, Vista Version 8.0.0 www.hp.com /support Product of [country]-English Product of [...Mac OS X v10.3.9, v10.4.x Version 8.0 *CB637-10001* *CB637-10001* CB637-10001 © 2007 HPDC www.hp.com/support If there is installed. 4 Insert the printer software CD in the HP wizard. USB Need more help? No screen? 1. Select Setup, then click the Open button. 5. If the Installation...
User Guide
Page 2
...paper guides can be operated by users with mobility impairments, the printer software functions can be construed as allowed under copyright laws. product accessibility, visit HP's Web site at: www.hp.com/accessibility. registered trademarks of Windows accessibility options and features.... accompanying such products and services. Visual The printer software is subject to change without prior written permission of Microsoft Corporation in this product and HP's commitment to -text applications. Accessibility Your HP printer provides a number of this document is accessible...
...paper guides can be operated by users with mobility impairments, the printer software functions can be construed as allowed under copyright laws. product accessibility, visit HP's Web site at: www.hp.com/accessibility. registered trademarks of Windows accessibility options and features.... accompanying such products and services. Visual The printer software is subject to change without prior written permission of Microsoft Corporation in this product and HP's commitment to -text applications. Accessibility Your HP printer provides a number of this document is accessible...
User Guide
Page 3
Contents Contents 1 Welcome...5 2 Special features...7 3 Get started The printer at a glance...8 Buttons and lights...9 Power button and light...10 Cancel button...11 Paper trays...11 Unfold the paper trays...12 Input tray...13 Paper ... print cartridges...17 Ink-backup mode...18 Ink-backup mode output...19 Exit ink-backup mode...19 4 Connect the printer...20 5 Print photos Print borderless photos...21 Print photos with a border...23 HP Real Life Technologies photo fix 25 Photo print cartridge...25 Exif Print...26 Store and handle photo paper 26...
Contents Contents 1 Welcome...5 2 Special features...7 3 Get started The printer at a glance...8 Buttons and lights...9 Power button and light...10 Cancel button...11 Paper trays...11 Unfold the paper trays...12 Input tray...13 Paper ... print cartridges...17 Ink-backup mode...18 Ink-backup mode output...19 Exit ink-backup mode...19 4 Connect the printer...20 5 Print photos Print borderless photos...21 Print photos with a border...23 HP Real Life Technologies photo fix 25 Photo print cartridge...25 Exif Print...26 Store and handle photo paper 26...
User Guide
Page 4
...Resize a document ...51 Bound two-sided documents...51 8 Printer software Make the HP Printer the default printer 53 Set default print settings...53 Printer Properties dialog box...54 What's This? help...55 Ink Status window...55 Download printer software updates 56 9 Maintenance Install print cartridges...57 Print ......58 Align print cartridges...60 Automatically clean print cartridges 61 Calibrate color...61 View estimated ink levels...62 Maintain the printer body...62 Remove ink from your skin and clothing 62 Manually clean print cartridges 63 Maintain print cartridges...64 Print ...
...Resize a document ...51 Bound two-sided documents...51 8 Printer software Make the HP Printer the default printer 53 Set default print settings...53 Printer Properties dialog box...54 What's This? help...55 Ink Status window...55 Download printer software updates 56 9 Maintenance Install print cartridges...57 Print ......58 Align print cartridges...60 Automatically clean print cartridges 61 Calibrate color...61 View estimated ink levels...62 Maintain the printer body...62 Remove ink from your skin and clothing 62 Manually clean print cartridges 63 Maintain print cartridges...64 Print ...
User Guide
Page 5
...light means 71 If an error message appears 71 If no error message appears 71 Printer does not print...71 Verify the following...71 Check the printer cable connection 72 Printer is stalled...73 If the printer still does not print 73 Document prints slowly...74 Print cartridge problems...75 Paper ...at an angle 85 Document does not reflect the new print settings 85 If you continue to have problems 85 A HP support Ink cartridge warranty information 86 Support process...86 HP support by phone...87 Phone support period...87 Placing a call...87 After the phone support period 87 B Technical ...
...light means 71 If an error message appears 71 If no error message appears 71 Printer does not print...71 Verify the following...71 Check the printer cable connection 72 Printer is stalled...73 If the printer still does not print 73 Document prints slowly...74 Print cartridge problems...75 Paper ...at an angle 85 Document does not reflect the new print settings 85 If you continue to have problems 85 A HP support Ink cartridge warranty information 86 Support process...86 HP support by phone...87 Phone support period...87 Placing a call...87 After the phone support period 87 B Technical ...
User Guide
Page 6
Contents Environmental product stewardship program 88 Paper use...89 Plastics...89 Material safety data sheets 89 Recycling program...89 HP inkjet supplies recycling program 89 Energy consumption...89 Disposal of waste equipment by users in private households in the European Union...90 Regulatory notices...90 FCC statement...91 LED indicator statement...91 Notice to users in Korea...91 VCCI (Class B) compliance statement for users in Japan 92 Notice to users in Japan about the power cord 92 Toxic and hazardous substance table 92 HP 910 Printer declaration of conformity 93 Index...94 4
Contents Environmental product stewardship program 88 Paper use...89 Plastics...89 Material safety data sheets 89 Recycling program...89 HP inkjet supplies recycling program 89 Energy consumption...89 Disposal of waste equipment by users in private households in the European Union...90 Regulatory notices...90 FCC statement...91 LED indicator statement...91 Notice to users in Korea...91 VCCI (Class B) compliance statement for users in Japan 92 Notice to users in Japan about the power cord 92 Toxic and hazardous substance table 92 HP 910 Printer declaration of conformity 93 Index...94 4
User Guide
Page 7
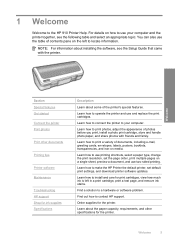
... use and replace the print cartridges. Learn how to operate the printer and use two-sided printing. Find a solution to the HP 910 Printer Help. Learn about the paper capacity, requirements, and other documents Printing tips Printer software Maintenance Troubleshooting HP support Shop for the printer. 1 Welcome Welcome to a hardware or software problem. You can also use...
... use and replace the print cartridges. Learn how to operate the printer and use two-sided printing. Find a solution to the HP 910 Printer Help. Learn about the paper capacity, requirements, and other documents Printing tips Printer software Maintenance Troubleshooting HP support Shop for the printer. 1 Welcome Welcome to a hardware or software problem. You can also use...
User Guide
Page 9
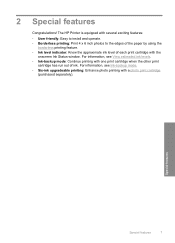
... separately). For information, see View estimated ink levels. • Ink-backup mode: Continue printing with the onscreen Ink Status window. Special features Special features 7 The HP Printer is equipped with several exciting features: • User friendly: Easy to install and operate. • Borderless printing: Print 4 x 6 inch photos to the edges of the...
... separately). For information, see View estimated ink levels. • Ink-backup mode: Continue printing with the onscreen Ink Status window. Special features Special features 7 The HP Printer is equipped with several exciting features: • User friendly: Easy to install and operate. • Borderless printing: Print 4 x 6 inch photos to the edges of the...
User Guide
Page 10
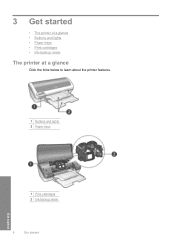
3 Get started • The printer at a glance • Buttons and lights • Paper trays • Print cartridges • Ink-backup mode The printer at a glance Click the links below to learn about the printer features. 1 Buttons and lights 2 Paper trays Get started 1 Print cartridges 2 Ink-backup mode 8 Get started
3 Get started • The printer at a glance • Buttons and lights • Paper trays • Print cartridges • Ink-backup mode The printer at a glance Click the links below to learn about the printer features. 1 Buttons and lights 2 Paper trays Get started 1 Print cartridges 2 Ink-backup mode 8 Get started
User Guide
Page 11
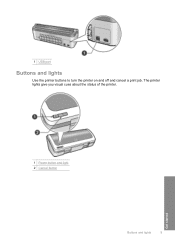
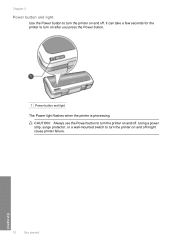
The printer lights give you visual cues about the status of the printer. 1 Power button and light 2 Cancel button Buttons and lights 9 Get started 1 USB port Buttons and lights Use the printer buttons to turn the printer on and off and cancel a print job.
The printer lights give you visual cues about the status of the printer. 1 Power button and light 2 Cancel button Buttons and lights 9 Get started 1 USB port Buttons and lights Use the printer buttons to turn the printer on and off and cancel a print job.
User Guide
Page 12
Get started 10 Get started It can take a few seconds for the printer to turn the printer on and off. CAUTION: Always use the Power button to turn on after you press the Power button. 1 Power button and light The Power light flashes when the printer is processing. Using a power strip, surge protector, or a wall-mounted switch to turn the printer on and off. Chapter 3 Power button and light Use the Power button to turn the printer on and off might cause printer failure.
Get started 10 Get started It can take a few seconds for the printer to turn the printer on and off. CAUTION: Always use the Power button to turn on after you press the Power button. 1 Power button and light The Power light flashes when the printer is processing. Using a power strip, surge protector, or a wall-mounted switch to turn the printer on and off. Chapter 3 Power button and light Use the Power button to turn the printer on and off might cause printer failure.
User Guide
Page 13
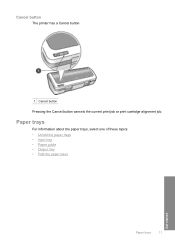
Cancel button The printer has a Cancel button. 1 Cancel button Pressing the Cancel button cancels the current print job or print cartridge alignment job. Paper trays For information about the paper trays, select one of these topics. • Unfold the paper trays • Input tray • Paper guide • Output tray • Fold the paper trays Get started Paper trays 11
Cancel button The printer has a Cancel button. 1 Cancel button Pressing the Cancel button cancels the current print job or print cartridge alignment job. Paper trays For information about the paper trays, select one of these topics. • Unfold the paper trays • Input tray • Paper guide • Output tray • Fold the paper trays Get started Paper trays 11
User Guide
Page 14
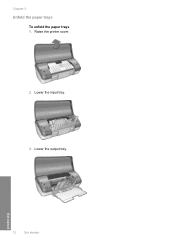
Lower the output tray. Raise the printer cover. 2. Lower the input tray. 3. Get started 12 Get started Chapter 3 Unfold the paper trays To unfold the paper trays 1.
Lower the output tray. Raise the printer cover. 2. Lower the input tray. 3. Get started 12 Get started Chapter 3 Unfold the paper trays To unfold the paper trays 1.
User Guide
Page 15
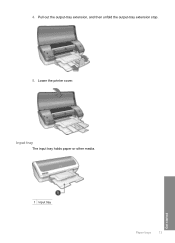
Input tray The input tray holds paper or other media. 1 Input tray Paper trays 13 Get started Lower the printer cover. 4. Pull out the output-tray extension, and then unfold the output-tray extension stop. 5.
Input tray The input tray holds paper or other media. 1 Input tray Paper trays 13 Get started Lower the printer cover. 4. Pull out the output-tray extension, and then unfold the output-tray extension stop. 5.
User Guide
Page 16
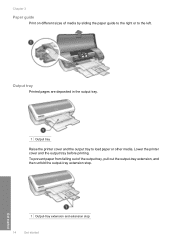
Output tray Printed pages are deposited in the output tray. 1 Output tray Raise the printer cover and the output tray to the left. Chapter 3 Paper guide Print on different sizes of the output tray, pull out the output-tray extension, and then unfold the output-tray extension stop. 1 Output-tray extension and extension stop 14 Get started Get started To prevent paper from falling out of media by sliding the paper guide to the right or to load paper or other media. Lower the printer cover and the output tray before printing.
Output tray Printed pages are deposited in the output tray. 1 Output tray Raise the printer cover and the output tray to the left. Chapter 3 Paper guide Print on different sizes of the output tray, pull out the output-tray extension, and then unfold the output-tray extension stop. 1 Output-tray extension and extension stop 14 Get started Get started To prevent paper from falling out of media by sliding the paper guide to the right or to load paper or other media. Lower the printer cover and the output tray before printing.
User Guide
Page 17
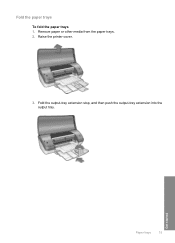
Raise the printer cover. 3. Remove paper or other media from the paper trays. 2. Fold the output-tray extension stop, and then push the output-tray extension into the output tray. Get started Paper trays 15 Fold the paper trays To fold the paper trays 1.
Raise the printer cover. 3. Remove paper or other media from the paper trays. 2. Fold the output-tray extension stop, and then push the output-tray extension into the output tray. Get started Paper trays 15 Fold the paper trays To fold the paper trays 1.
User Guide
Page 18
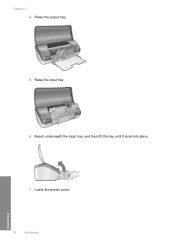
Chapter 3 4. Reach underneath the input tray, and then lift the tray until it locks into place. 7. Raise the output tray. 5. Lower the printer cover. 16 Get started Get started Raise the input tray. 6.
Chapter 3 4. Reach underneath the input tray, and then lift the tray until it locks into place. 7. Raise the output tray. 5. Lower the printer cover. 16 Get started Get started Raise the input tray. 6.
User Guide
Page 19
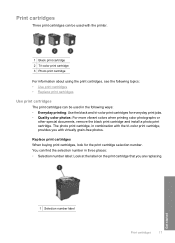
.... You can find the selection number in three places: • Selection number label: Look at the label on the print cartridge that you with the printer. 1 Black print cartridge 2 Tri-color print cartridge 3 Photo print cartridge For information about using the print cartridges, see the following topics: • Use print cartridges...
.... You can find the selection number in three places: • Selection number label: Look at the label on the print cartridge that you with the printer. 1 Black print cartridge 2 Tri-color print cartridge 3 Photo print cartridge For information about using the print cartridges, see the following topics: • Use print cartridges...
User Guide
Page 20
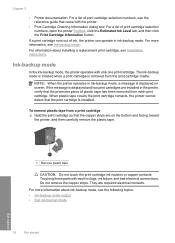
... the print cartridge is installed. The ink-backup mode is initiated when a print cartridge is displayed on the bottom and facing toward the printer, and then carefully remove the plastic tape. 1 Remove plastic tape CAUTION: Do not touch the print cartridge ink nozzles or copper contacts.... Do not remove the copper strips. They are on screen. When plastic tape covers the print cartridge contacts, the printer cannot detect that came with only one print cartridge. If the message is displayed and two print cartridges are installed in ink-backup mode,...
... the print cartridge is installed. The ink-backup mode is initiated when a print cartridge is displayed on the bottom and facing toward the printer, and then carefully remove the plastic tape. 1 Remove plastic tape CAUTION: Do not touch the print cartridge ink nozzles or copper contacts.... Do not remove the copper strips. They are on screen. When plastic tape covers the print cartridge contacts, the printer cannot detect that came with only one print cartridge. If the message is displayed and two print cartridges are installed in ink-backup mode,...


