HP 6715b Hard Drive Cover - Compaq Business Notebook
HP 6715b Hard Drive Cover
Related Manual Pages


Similar Questions

How To Restart A Hp Pavilion Ze5200 Without A Recovery Disk Or A Hard Drive
I recently got this laptop an I turned it on an it wouldnt boot up it just keep doin nothin so I tri...
I recently got this laptop an I turned it on an it wouldnt boot up it just keep doin nothin so I tri...
(Posted by Hootiedav903 7 years ago)

Hard Drive
what hard drive is suitable for my HP PAVILION DV1000
what hard drive is suitable for my HP PAVILION DV1000
(Posted by lovestruck2949 12 years ago)

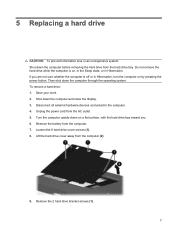
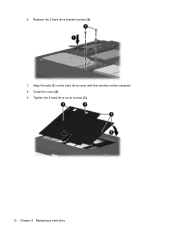
Remove Hard Drive
I'm replacing the keyboard in my dv7-3058dx and one of the screws for the keyboard I believe is unde...
I'm replacing the keyboard in my dv7-3058dx and one of the screws for the keyboard I believe is unde...
(Posted by twhitehouse 12 years ago)
Related Terms
The following terms were also used when searching for HP 6715b Hard Drive Cover - Compaq Business Notebook:- hp compaq 6715b notebook pc
- hp 6715b laptop
- 6715b memory
- 6715b laptop
- 6715b notebook
- 6715b drivers
- 6715b battery
- hp 6715b notebook
- hp 6715b battery
- 6715b review
- hp 6715b drivers
- rm350ut aba
- 6715b ac adapter
- 6715b keyboard
- 6715b power supply
- hp 6715b memory
- 6715b manual
- 6715b memory upgrade
- hp 6715b ram
- hp compaq 6715b ac adapter
- 6715b specs
- 6715b power adapter
- 6715b service manual
- hp 6715b ac adapter
- hp 6715b manual
- 6715b adapter
- 6715b ebay
- hp 6715b keyboard
- 6715b replacement battery
- hp 6715b adapter
- hp 6715b review
- hp 6715b specs
- 6715b 9 cell battery
- 6715b audio drivers
- 6715b bios
- 6715b bios download
- 6715b bios password reset
- 6715b bios reset
- 6715b bios update
- 6715b bios updates
- 6715b charger
- 6715b cmos battery
- 6715b cmos battery replacement
- 6715b cooling fan
- 6715b cpu support
- 6715b cpu upgrade
- 6715b disassembly
- 6715b docking station
- 6715b driver
- 6715b driver download
- 6715b driver download bios
- 6715b driver downloads
- 6715b drivers audio
- 6715b drivers audio xp home
- 6715b drivers support
- 6715b drivers windows 7
- 6715b drivers windows xp
- 6715b drivers xp
- 6715b dvd rom driver
- 6715b extended life battery
- 6715b fingerprint
- 6715b fingerprint driver
- 6715b freezes
- 6715b graphics card
- 6715b graphics driver
- 6715b hard drive caddy
- 6715b hard drive cover
- 6715b hard drive upgrade
- 6715b high definition audio drivers
- 6715b high definition audio drivers xp
- 6715b hp
- 6715b hp laptop
- 6715b hp motherboard
- 6715b hp specs
- 6715b laptop images
- 6715b laptop parts
- 6715b laptop price
- 6715b laptop reviews
- 6715b laptop specs
- 6715b laptops
- 6715b memory slots
- 6715b memory specs
- 6715b motherboard
- 6715b network driver
- 6715b parts
- 6715b parts list
- 6715b power cord
- 6715b power down
- 6715b power down ati quick
- 6715b power on password
- 6715b price
- 6715b quick specs
- 6715b ram
- 6715b recovery disk
- 6715b recovery partition
- 6715b release date
- 6715b remove keyboard
- 6715b reviews
- 6715b screen resolution
- 6715b sleep issues
- 6715b spec
- 6715b specifications
- 6715b support
- 6715b usb drivers
- 6715b user manual
- 6715b user reviews
- 6715b user's guide
- 6715b vista docking drivers
- 6715b windows 10
- 6715b windows 7
- 6715b windows 7 drivers
- 6715b windows 7 drivers support
- 6715b wireless
- 6715b wireless adapter driver
- 6715b wireless driver
- 6715b wireless drivers
- 6715b wireless problem
- 6715b wireless switch
- 6715b won't start
- 6715b xp drivers
- 6715b year
- 6715s drivers
- compaq 6715b drivers
- compaq 6715b manual
- hewlett packard 6715b
- hp 6715b
- hp 6715b audio drivers
- hp 6715b bios
- hp 6715b bios download
- hp 6715b bios reset
- hp 6715b bios update
- hp 6715b bios updates
- hp 6715b charger
- hp 6715b cmos battery
- hp 6715b compaq laptop
- hp 6715b cooling fan
- hp 6715b cpu support
- hp 6715b disassembly
- hp 6715b docking station
- hp 6715b driver
- hp 6715b driver downloads
- hp 6715b drivers audio
- hp 6715b drivers audio xp home
- hp 6715b drivers support
- hp 6715b drivers windows 7
- hp 6715b drivers windows xp
- hp 6715b drivers xp
- hp 6715b ebay
- hp 6715b extended life battery
- hp 6715b fingerprint
- hp 6715b fingerprint driver
- hp 6715b freezes
- hp 6715b graphics card
- hp 6715b graphics driver
- hp 6715b hard drive caddy
- hp 6715b hard drive cover
- hp 6715b hard drive upgrade
- hp 6715b high definition audio drivers
- hp 6715b high definition audio drivers xp
- hp 6715b laptop price
- hp 6715b laptop specs
- hp 6715b laptops
- hp 6715b memory slots
- hp 6715b memory specs
- hp 6715b memory upgrade
- hp 6715b motherboard
- hp 6715b parts
- hp 6715b power adapter
- hp 6715b power down
- hp 6715b power down ati quick
- hp 6715b power supply
- hp 6715b price
- hp 6715b quick specs
- hp 6715b recovery disk
- hp 6715b recovery partition
- hp 6715b release date
- hp 6715b remove keyboard
- hp 6715b replacement battery
- hp 6715b reviews
- hp 6715b screen resolution
- hp 6715b service manual
- hp 6715b sleep issues
- hp 6715b spec
- hp 6715b specifications
- hp 6715b support
- hp 6715b user manual
- hp 6715b user reviews
- hp 6715b vista docking drivers
- hp 6715b windows 10
- hp 6715b windows 7
- hp 6715b windows 7 drivers
- hp 6715b windows 7 drivers support
- hp 6715b wireless adapter driver
- hp 6715b wireless driver
- hp 6715b wireless drivers
- hp 6715b wireless problem
- hp 6715b wireless switch
- hp 6715b won't start
- hp 6715b year
- hp 6715s drivers
- hp compaq 6715b
- hp compaq 6715b manual
- hp laptop 6715b
- hp rm350ut aba
- hp rm350ut#aba
- rm350ut aba battery
- rm350ut aba drivers
- rm350ut aba hp
- rm350ut aba number
- rm350ut aba specs
- rm350ut#aba
- rm352ut aba
- rm352ut aba number
- rm352ut hewlett packard laptop
- rm352ut warranty
- rm352ut#aba
- rm353ua aba
- rm353ua aba number