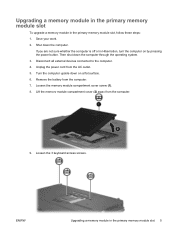
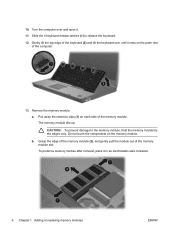
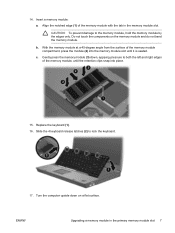
HP USB Digital Drive
Page 3
Installing the SD Memory Card 1. If the SD memory card does not slide in properly, gently pull it out and reinsert it. 2 User Guide Insert the SD memory card into the SD slot 2 with the notched corner positioned on the lower left as shown. Remove the cap 1 of the Digital Drive. 2.
HP Business Notebook PC - Getting Started - Enhanced for Accessibility - Windows Vista
Page 20
Bottom components Quick tour Component Component 1 Bluetooth® compartment (select models only) 6 Battery release latches (2) 2 Vents (3) 7 Docking connector (select models only) 3 Accessory battery connector 8 Memory module compartment 4 SIM slot (select models only) 9 WLAN module compartment (select models only) 5 Battery bay - Hard drive bay Getting Started 2-7
External Media Cards - Windows Vista
Page 11
...PC Card is a credit card-sized accessory designed to conform to install device drivers: Install only the device drivers for the device. The PC Card slot supports ● 32-bit (CardBus) and 16-bit PC Cards. ● Type I and Type II PC Cards. CAUTION: To prevent loss of...software, such as card services, socket services, or enablers, supplied by the PC Card manufacturer to the standard specifications of the Personal Computer Memory Card International Association (PCMCIA). ENWW Configuring a PC Card 5 NOTE: Zoomed video PC Cards and 12-V PC Cards are instructed by the PC...
External Media Cards - Windows XP
Page 11
...to install device drivers: Install only the device drivers for your operating system. ENWW Configuring a PC Card 5 If you are not supported. The PC Card slot supports ● 32-bit (CardBus) and 16-bit PC Cards. ● Type I and Type II PC Cards. CAUTION: To prevent loss of the... Personal Computer Memory Card International Association (PCMCIA). Do not install other PC Cards, install only the software required for other software, such as card services, socket services, or...
Memory Modules - Windows Vista
Page 5
Table of contents Adding or replacing memory modules Adding or replacing a memory module to the expansion memory module slot 2 Upgrading a memory module in the primary memory module slot 5 Index ...10 ENWW v
Memory Modules - Windows Vista
Page 7
... static electricity. Before beginning any procedure, touch a grounded metal object to be upgraded by upgrading the existing memory module in the primary memory module slot. WARNING! Adding or replacing memory modules The computer has two memory module compartments. The memory capacity of the computer. CAUTION: Electrostatic discharge (ESD) can be sure that you are discharged of...
Memory Modules - Windows Vista
Page 8
...from the AC outlet. 5. The memory module tilts up. CAUTION: To prevent damage to the memory module, hold the memory module by pressing the power button. Adding or replacing a memory module to the expansion memory module slot To add or replace a memory module in Hibernation, turn the computer.... 4. Do not touch the components on the memory module. 2 Adding or replacing memory modules ENWW If you are not sure whether the computer is off or in the expansion memory module slot, follow these steps: 1. Lift the memory module compartment cover (2) away from the computer. ...
Memory Modules - Windows Vista
Page 9
... the components on the computer. 12. CAUTION: To prevent damage to the expansion memory module slot 3 c. Gently press the memory module (3) down, applying pressure to both the left and right edges of the memory module slot. Align the tabs (1) on the memory module compartment cover with the tab in an electrostatic-safe container. 10. Close the...
Memory Modules - Windows Vista
Page 11
... 5. Disconnect all external devices connected to the computer. 4. Lift the memory module compartment cover (2) away from the computer. Save your work. 2. ENWW Upgrading a memory module in the primary memory module slot, follow these steps: 1. Turn the computer upside down on by pressing... the power button. Shut down the computer through the operating system. 3. Loosen the memory module compartment cover screw (1). 8. If...
Memory Modules - Windows Vista
Page 13
... damage to both the left and right edges of the memory module compartment, press the module (2) into the memory module slot until the retention clips snap into place. 15. Insert a memory module: a. b. Gently press the memory module (3) down, applying pressure to the memory module, hold the memory module by the edges only. Grasp the edge of the...
Memory Modules - Windows Vista
Page 15
21. Reconnect external power and external devices. 24. Replace the battery. 23. Turn on the computer. ENWW Upgrading a memory module in the primary memory module slot 9 Tighten the memory module compartment cover screw (3). 22.
Memory Modules - Windows XP
Page 5
Table of contents 1 Adding or replacing memory modules Adding or replacing a memory module to the expansion memory module slot 2 Upgrading a memory module in the primary memory module slot 5 2 Increasing hard drive space for the Hibernation file Index ...10 ENWW v
Memory Modules - Windows XP
Page 7
... compartment is located on the bottom of electric shock and damage to the vacant expansion memory module slot or by upgrading the existing memory module in the primary memory module slot. The expansion memory module compartment is located under the keyboard. The memory capacity of static electricity. CAUTION: Electrostatic discharge (ESD) can be sure that you are...
Memory Modules - Windows XP
Page 8
...whether the computer is off or in the expansion memory module slot, follow these steps: 1. CAUTION: To prevent damage to the computer. 4. Turn the computer upside down the computer and close the display. Loosen the memory module compartment cover screw (1). 8. Unplug the power.... 5. Pull away the retention clips (1) on the memory module. 2 Chapter 1 Adding or replacing memory modules ENWW The memory module tilts up. Adding or replacing a memory module to the expansion memory module slot To add or replace a memory module in Hibernation, turn the computer on by the ...
Memory Modules - Windows XP
Page 9
... touch the components on the computer. 12. Gently press the memory module (3) down, applying pressure to the memory module, hold the memory module by the edges only. Close the cover (2). b. Align the notched edge (1) of the memory module compartment, press the module (2) into the memory module slot until the retention clips snap into place. 11. Align...
Memory Modules - Windows XP
Page 11
Shut down the computer through the operating system. 3. Then shut down the computer. Loosen the memory module compartment cover screw (1). 8. Loosen the 3 keyboard access screws. If you are not sure whether the computer...the memory module compartment cover (2) away from the computer. 7. Disconnect all external devices connected to the computer. 4. Save your work. 2. ENWW Upgrading a memory module in the primary memory module slot, follow these steps: 1. Upgrading a memory module in the primary memory module slot To upgrade a memory module in the primary memory module slot 5...
Memory Modules - Windows XP
Page 12
... tilt the keyboard over and open it. 11. Do not touch the components on each side of the memory module slot. Grasp the edge of the memory module (2), and gently pull the module out of the memory module. Gently lift the top edge of the computer. 13. Slide the 4 keyboard release latches (1) to the...
Memory Modules - Windows XP
Page 13
...prevent damage to lock the keyboard. 17. ENWW Upgrading a memory module in the memory module slot. Replace the keyboard (1). 16. Slide the 4 keyboard release latches (2) to the memory module, hold the memory module by the edges only. c. Insert a memory module: a. Do not touch the components on a flat ...surface. Align the notched edge (1) of the memory module, until the retention clips snap into the memory module slot until it is seated. Gently press the memory module (3) down on the memory module and do not bend the memory module. b. Turn the computer upside down ,...
HP Compaq 6715b and 6715s Notebook PC HP Compaq 6710b and 6710s Notebook PC - Maintenance and Service Guide
Page 10
... √ transceivers and cables ● Support privacy film √ ● Two SODIMM slots, both customer- √ accessible/upgradable (memory slot under the keyboard must be populated first) ● DDRII PC2-5300 (667-MHz) ● Supports dual-channel memory HP Compaq 6715b Notebook PC without WWAN √ HP Compaq 6715b Notebook PC with WWAN √ √ √ Supports the following configurations: ● 4096...
HP Compaq 6715b and 6715s Notebook PC HP Compaq 6710b and 6710s Notebook PC - Maintenance and Service Guide
Page 15
... drives Optical drives Diskette drive Description HP Compaq 6710s Notebook PC ● Two SODIMM slots, both customer √ accessible/upgradable (memory slot under the keyboard must be populated first) ● DDRII PC2-5300 (667-MHz) ● Supports dual-channel memory HP Compaq 6710b Notebook PC without WWAN √ HP Compaq 6710b Notebook PC with Lightscribe ● DVD±RW and CD-RW Super...