Bluetooth Wireless Technology Basics
Page 6
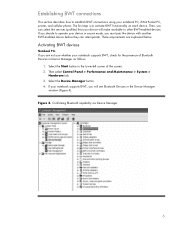
Then, you are explained below. Confirming Bluetooth capability via Device Manager 6 If you decide to operate your notebook supports BWT, check for the presence of the screen. 2. Select the Device Manager button. 4. Establishing BWT connections This section ...> Performance and Maintenance > System > Hardware tab. 3. Select the Start button in the lower-left corner of Bluetooth Devices in the Device Manager window (Figure 4). Activating BWT devices Notebook PCs If you can interoperate. If your notebook supports BWT, you must pair the device with another BWT-enabled device ...
Then, you are explained below. Confirming Bluetooth capability via Device Manager 6 If you decide to operate your notebook supports BWT, check for the presence of the screen. 2. Select the Device Manager button. 4. Establishing BWT connections This section ...> Performance and Maintenance > System > Hardware tab. 3. Select the Start button in the lower-left corner of Bluetooth Devices in the Device Manager window (Figure 4). Activating BWT devices Notebook PCs If you can interoperate. If your notebook supports BWT, you must pair the device with another BWT-enabled device ...

Bluetooth Wireless Technology Basics
Page 7
... BWT functionality If the wireless light (ICON) is disabled (red logo), enable it on by right-clicking the Bluetooth icon and selecting Start the Bluetooth Device. Follow the instructions in the same box as the operating system CD. 7 Right-click the Bluetooth icon, and then... Enabled Connected Blue with red logo Blue with white logo Blue with green logo If BWT is off, turn on HP notebook PCs; The following 3 steps activate your notebook. Enable BWT functionality. 3. Set up the BWT software After the software is installed and BWT functionality is displayed, select...
... BWT functionality If the wireless light (ICON) is disabled (red logo), enable it on by right-clicking the Bluetooth icon and selecting Start the Bluetooth Device. Follow the instructions in the same box as the operating system CD. 7 Right-click the Bluetooth icon, and then... Enabled Connected Blue with red logo Blue with white logo Blue with green logo If BWT is off, turn on HP notebook PCs; The following 3 steps activate your notebook. Enable BWT functionality. 3. Set up the BWT software After the software is installed and BWT functionality is displayed, select...

Bluetooth Wireless Technology Basics
Page 8
...or delete files/folders on the matching profiles. Detailed instructions on your phone by other BWT-enabled products, such as PrintPocketCE or HP Mobile Printing. Table 2. Using this section are within range, they perform a service discovery during which they can be used to ... "Selecting BWT device profiles" section below for the two devices match, they report a list of your notebook, select Start > My Programs > My Bluetooth Places to send images, text, business cards, and calendar notes. The BWT connection can also perform these wireless technologies by selecting the...
...or delete files/folders on the matching profiles. Detailed instructions on your phone by other BWT-enabled products, such as PrintPocketCE or HP Mobile Printing. Table 2. Using this section are within range, they perform a service discovery during which they can be used to ... "Selecting BWT device profiles" section below for the two devices match, they report a list of your notebook, select Start > My Programs > My Bluetooth Places to send images, text, business cards, and calendar notes. The BWT connection can also perform these wireless technologies by selecting the...
Backup and Recovery - Windows XP
Page 7
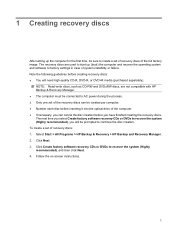
... discs: 1. Follow the on-screen instructions. 1 NOTE: Read-write discs, such as CD-RW and DVD±RW discs, are used to start up the computer for the first time, be prompted to continue the disc creation. To create a set of recovery discs of the full factory image.... Select Start > All Programs > HP Backup & Recovery > HP Backup and Recovery Manager. 2. Click Next. 3. Click Create factory software recovery CDs or DVDs to recover the system (Highly recommended), and...
... discs: 1. Follow the on-screen instructions. 1 NOTE: Read-write discs, such as CD-RW and DVD±RW discs, are used to start up the computer for the first time, be prompted to continue the disc creation. To create a set of recovery discs of the full factory image.... Select Start > All Programs > HP Backup & Recovery > HP Backup and Recovery Manager. 2. Click Next. 3. Click Create factory software recovery CDs or DVDs to recover the system (Highly recommended), and...
Backup and Recovery - Windows XP
Page 11
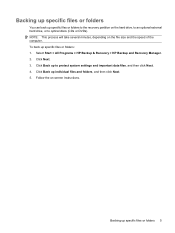
Select Start > All Programs > HP Backup & Recovery > HP Backup and Recovery Manager. 2. Click Back up specific files or folders 5 Follow the on the hard drive, to an optional external hard drive, or to ...
Select Start > All Programs > HP Backup & Recovery > HP Backup and Recovery Manager. 2. Click Back up specific files or folders 5 Follow the on the hard drive, to an optional external hard drive, or to ...

Backup and Recovery - Windows XP
Page 12
... and the amount of data being stored. Click Back up to protect system settings and important data files, and then click Next. 4. Select Start > All Programs > HP Backup & Recovery > HP Backup and Recovery Manager. 2. Click Next. 3. Follow the on your entire hard drive: 1. Backing up the entire hard drive When you perform a complete...
... and the amount of data being stored. Click Back up to protect system settings and important data files, and then click Next. 4. Select Start > All Programs > HP Backup & Recovery > HP Backup and Recovery Manager. 2. Click Next. 3. Follow the on your entire hard drive: 1. Backing up the entire hard drive When you perform a complete...
Backup and Recovery - Windows XP
Page 13
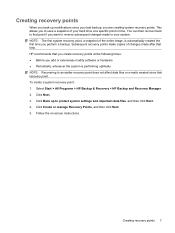
... optimally NOTE: Recovering to protect system settings and important data files, and then click Next. 4. Click Next. 3. Creating recovery points 7 HP recommends that recovery point. This allows you to your system. NOTE: The first system recovery point, a snapshot of your hard drive at the... Click Create or manage Recovery Points, and then click Next. 5. You can then recover back to that time. Select Start > All Programs > HP Backup & Recovery > HP Backup and Recovery Manager. 2. Creating recovery points When you back up to an earlier recovery point does not affect data ...
... optimally NOTE: Recovering to protect system settings and important data files, and then click Next. 4. Click Next. 3. Creating recovery points 7 HP recommends that recovery point. This allows you to your system. NOTE: The first system recovery point, a snapshot of your hard drive at the... Click Create or manage Recovery Points, and then click Next. 5. You can then recover back to that time. Select Start > All Programs > HP Backup & Recovery > HP Backup and Recovery Manager. 2. Creating recovery points When you back up to an earlier recovery point does not affect data ...

Backup and Recovery - Windows XP
Page 14
Scheduling backups Use HP Backup Scheduler to an optional docking station (select models only). To schedule backups: 1. Select Start > All Programs > HP Backup & Recovery > HP Backup Scheduler. 2. With this tool, you can schedule backups at specific intervals (daily, weekly, or monthly) or at specific events, such as at system restart or when you dock to schedule backups for the entire system, for recovery points, or for specific files and folders. Follow the on-screen instructions. 8 Chapter 2 Backing up your information
Scheduling backups Use HP Backup Scheduler to an optional docking station (select models only). To schedule backups: 1. Select Start > All Programs > HP Backup & Recovery > HP Backup Scheduler. 2. With this tool, you can schedule backups at specific intervals (daily, weekly, or monthly) or at specific events, such as at system restart or when you dock to schedule backups for the entire system, for recovery points, or for specific files and folders. Follow the on-screen instructions. 8 Chapter 2 Backing up your information

Backup and Recovery - Windows XP
Page 18
Select Start > All Programs > HP Backup & Recovery > HP Backup and Recovery Manager. 3. Initiating a recovery in Windows To initiate a recovery in Windows, follow these steps: 1. Click Recover important files or the entire system, and then click Next. 5. Follow the on-screen instructions. 12 Chapter 3 Performing a recovery Click Next. 4. Back up all personal files. 2.
Select Start > All Programs > HP Backup & Recovery > HP Backup and Recovery Manager. 3. Initiating a recovery in Windows To initiate a recovery in Windows, follow these steps: 1. Click Recover important files or the entire system, and then click Next. 5. Follow the on-screen instructions. 12 Chapter 3 Performing a recovery Click Next. 4. Back up all personal files. 2.
Backup and Recovery - Windows XP and Windows Vista
Page 7
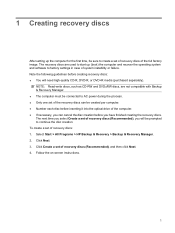
... the on-screen instructions. 1 Click Create a set of recovery discs (Recommended), you will need high-quality CD-R, DVD-R, or DVD+R media (purchased separately). Select Start > All Programs > HP Backup & Recovery > Backup & Recovery Manager. 2. The next time you select Create a set of recovery discs (Recommended), and then click Next. 4. NOTE: Read-write discs...
... the on-screen instructions. 1 Click Create a set of recovery discs (Recommended), you will need high-quality CD-R, DVD-R, or DVD+R media (purchased separately). Select Start > All Programs > HP Backup & Recovery > Backup & Recovery Manager. 2. The next time you select Create a set of recovery discs (Recommended), and then click Next. 4. NOTE: Read-write discs...
Backup and Recovery - Windows XP and Windows Vista
Page 11
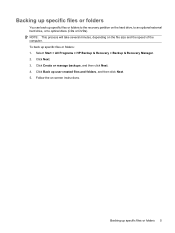
Select Start > All Programs > HP Backup & Recovery > Backup & Recovery Manager. 2. Click Back up specific files or folders 5 Follow the on the file size and the speed of the computer. Backing ...
Select Start > All Programs > HP Backup & Recovery > Backup & Recovery Manager. 2. Click Back up specific files or folders 5 Follow the on the file size and the speed of the computer. Backing ...
Backup and Recovery - Windows XP and Windows Vista
Page 12
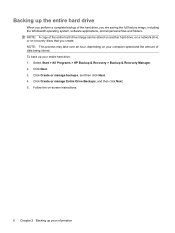
... drive image can be stored on another hard drive, on a network drive, or on -screen instructions. 6 Chapter 2 Backing up your entire hard drive: 1. Select Start > All Programs > HP Backup & Recovery > Backup & Recovery Manager. 2. NOTE: A copy of data being stored. Click Create or manage backups, and then click Next. 4. Backing up your information...
... drive image can be stored on another hard drive, on a network drive, or on -screen instructions. 6 Chapter 2 Backing up your entire hard drive: 1. Select Start > All Programs > HP Backup & Recovery > Backup & Recovery Manager. 2. NOTE: A copy of data being stored. Click Create or manage backups, and then click Next. 4. Backing up your information...

Backup and Recovery - Windows XP and Windows Vista
Page 13
...a backup. To create a system recovery point: 1. Click Next. 3. NOTE: The first system recovery point, a snapshot of your system. Select Start > All Programs > HP Backup & Recovery > Backup & Recovery Manager. 2. Click Create or manage backups, and then click Next. 4. This allows you to save a... or hardware ● Periodically, whenever the system is automatically created the first time you are creating system recovery points. HP recommends that you want to reverse subsequent changes made after that recovery point. Click Create or manage Recovery Points, and then...
...a backup. To create a system recovery point: 1. Click Next. 3. NOTE: The first system recovery point, a snapshot of your system. Select Start > All Programs > HP Backup & Recovery > Backup & Recovery Manager. 2. Click Create or manage backups, and then click Next. 4. This allows you to save a... or hardware ● Periodically, whenever the system is automatically created the first time you are creating system recovery points. HP recommends that you want to reverse subsequent changes made after that recovery point. Click Create or manage Recovery Points, and then...

Backup and Recovery - Windows XP and Windows Vista
Page 14
Scheduling backups Use HP Backup Scheduler to an optional docking station (select models only). To schedule backups: 1. Follow the on-screen instructions. 8 Chapter 2 Backing up your information With this tool, you can schedule backups at specific intervals (daily, weekly, or monthly) or at specific events, such as at system restart or when you dock to schedule backups for the entire system, for recovery points, or for specific files and folders. Select Start > All Programs > HP Backup & Recovery > HP Backup Scheduler. 2.
Scheduling backups Use HP Backup Scheduler to an optional docking station (select models only). To schedule backups: 1. Follow the on-screen instructions. 8 Chapter 2 Backing up your information With this tool, you can schedule backups at specific intervals (daily, weekly, or monthly) or at specific events, such as at system restart or when you dock to schedule backups for the entire system, for recovery points, or for specific files and folders. Select Start > All Programs > HP Backup & Recovery > HP Backup Scheduler. 2.

Backup and Recovery - Windows XP and Windows Vista
Page 18
Back up all personal files. 2. Click Perform a recovery, and then click Next. 5. Click Next. 4. Follow the on-screen instructions. 12 Chapter 3 Performing a recovery Select Start > All Programs > HP Backup & Recovery > Backup & Recovery Manager. 3. Initiating a recovery in Windows To initiate a recovery in Windows, follow these steps: 1.
Back up all personal files. 2. Click Perform a recovery, and then click Next. 5. Click Next. 4. Follow the on-screen instructions. 12 Chapter 3 Performing a recovery Select Start > All Programs > HP Backup & Recovery > Backup & Recovery Manager. 3. Initiating a recovery in Windows To initiate a recovery in Windows, follow these steps: 1.
Software Update - Windows Vista
Page 7
... Readme.txt, which contains information regarding installing and troubleshooting the file. (Readme.txt files included with ROMPaqs are available either through the HP Software Update utility or on the computer. The BIOS initializes the operating system, determines how the computer will interact with the hardware devices... Windows® includes the User Account Control feature to a network, consult the network administrator before installing any time by selecting Start > Help and Support > Software Drivers, and BIOS updates and following the on the system ROM. Most software on the...
... Readme.txt, which contains information regarding installing and troubleshooting the file. (Readme.txt files included with ROMPaqs are available either through the HP Software Update utility or on the computer. The BIOS initializes the operating system, determines how the computer will interact with the hardware devices... Windows® includes the User Account Control feature to a network, consult the network administrator before installing any time by selecting Start > Help and Support > Software Drivers, and BIOS updates and following the on the system ROM. Most software on the...
Software Update - Windows Vista
Page 9
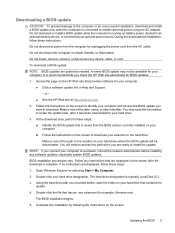
...by following the instructions on the screen. Using the hard drive path you recorded earlier, open the folder on the HP Web site that provides software for your computer: ● Click a software update link in an optional docking device,... or install a BIOS update while the computer is typically Local Disk (C:). 3. or - ● See the HP Web site at http://www.hp.com. 2. Follow the instructions on battery power, docked in Help and Support. - You may not be downloaded... extension (for your hard drive designation. Complete the installation by selecting Start > Computer. 2.
...by following the instructions on the screen. Using the hard drive path you recorded earlier, open the folder on the HP Web site that provides software for your computer: ● Click a software update link in an optional docking device,... or install a BIOS update while the computer is typically Local Disk (C:). 3. or - ● See the HP Web site at http://www.hp.com. 2. Follow the instructions on battery power, docked in Help and Support. - You may not be downloaded... extension (for your hard drive designation. Complete the installation by selecting Start > Computer. 2.
Software Update - Windows Vista
Page 11
or - ● Visit the HP Web site at http://www.hp.com and click Software & Driver Downloads to install the software. 4. You will be downloaded. Double-click the file that contains the update. 7. Updating programs and ..., select the software you are ready to download the software for your computer model. 2. Complete the installation by selecting Start > Computer. 5. NOTE: Make a note of the path to the location on the HP Web site that provides software for example, filename.exe). The installation begins. 8. Access the page on your hard drive...
or - ● Visit the HP Web site at http://www.hp.com and click Software & Driver Downloads to install the software. 4. You will be downloaded. Double-click the file that contains the update. 7. Updating programs and ..., select the software you are ready to download the software for your computer model. 2. Complete the installation by selecting Start > Computer. 5. NOTE: Make a note of the path to the location on the HP Web site that provides software for example, filename.exe). The installation begins. 8. Access the page on your hard drive...
Software Updates - Windows XP
Page 7
Most software on the HP Web site is packaged in compressed files called ROMPaqs. To purchase the current Support Software disc or a subscription that automatically checks for a system BIOS update by selecting Start > Help and Support > Update Software & Drivers and following the on the ...computer. To update the software: 1. If your computer model, product category, and series or family. Access the updates by obtaining the Support Software disc (purchased separately). Prepare for software updates from HP...
Most software on the HP Web site is packaged in compressed files called ROMPaqs. To purchase the current Support Software disc or a subscription that automatically checks for a system BIOS update by selecting Start > Help and Support > Update Software & Drivers and following the on the ...computer. To update the software: 1. If your computer model, product category, and series or family. Access the updates by obtaining the Support Software disc (purchased separately). Prepare for software updates from HP...
Software Updates - Windows XP
Page 9
...the network administrator before installing any device, cable, or cord. Using the hard drive path you want to download. Complete the installation by selecting Start > My Computer. 2. Do not download or install a BIOS update while the computer is newer than the BIOS version currently installed on the.... Open Windows Explorer by following the instructions on your hard drive where the BIOS update will need this path when you check the HP Web site periodically for example, filename.exe). A newer BIOS update may need to access this information to locate the update later, ...
...the network administrator before installing any device, cable, or cord. Using the hard drive path you want to download. Complete the installation by selecting Start > My Computer. 2. Do not download or install a BIOS update while the computer is newer than the BIOS version currently installed on the.... Open Windows Explorer by following the instructions on your hard drive where the BIOS update will need this path when you check the HP Web site periodically for example, filename.exe). A newer BIOS update may need to access this information to locate the update later, ...


