User Guide
Page 4
... a network 33 Change the HP All-in-One from a USB connection to a network connection........33 Manage your network settings 33 Network troubleshooting 40 5 Load originals and load paper 43 Load an original...43 Choose papers for printing and copying 44 Load paper...45 Avoid paper jams 49 6 Use the photo and video features 51 Insert a memory card 51 Connect a digital camera 52 Connect a storage device 53 View photos...54 Select photos and videos 55 Edit photos...56 Print photos and videos from the control panel 58 Set photo print options 64 Save photos...
... a network 33 Change the HP All-in-One from a USB connection to a network connection........33 Manage your network settings 33 Network troubleshooting 40 5 Load originals and load paper 43 Load an original...43 Choose papers for printing and copying 44 Load paper...45 Avoid paper jams 49 6 Use the photo and video features 51 Insert a memory card 51 Connect a digital camera 52 Connect a storage device 53 View photos...54 Select photos and videos 55 Edit photos...56 Print photos and videos from the control panel 58 Set photo print options 64 Save photos...

User Guide
Page 18
...-in-One and Connect to a network. It also provides additional setup instructions to use your HP All-in-One. User Guide 15 For more information You can help you have problems during setup, see Troubleshooting in the last section of all the features on the HP All-inOne, you might need to get a brief overview of information Setup Guide The Setup Guide provides instructions for setting up your HP All-inOne and installing software...
...-in-One and Connect to a network. It also provides additional setup instructions to use your HP All-in-One. User Guide 15 For more information You can help you have problems during setup, see Troubleshooting in the last section of all the features on the HP All-inOne, you might need to get a brief overview of information Setup Guide The Setup Guide provides instructions for setting up your HP All-inOne and installing software...

User Guide
Page 26
... installed the HP Image Zone software, press the HP Instant Share button on setting up HP Instant Share, see the 2570 series Help section in - For more information on the control panel of your language is highlighted, press OK. 4. Usually, you set the language and country/region when you first set up HP Instant Share on your network-connected HP All-in-One, so you can easily share images with a USB port...
... installed the HP Image Zone software, press the HP Instant Share button on setting up HP Instant Share, see the 2570 series Help section in - For more information on the control panel of your language is highlighted, press OK. 4. Usually, you set the language and country/region when you first set up HP Instant Share on your network-connected HP All-in-One, so you can easily share images with a USB port...
User Guide
Page 29
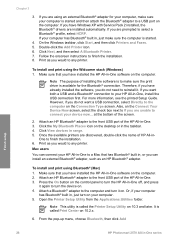
... Connection Type screen. From the pop-up menu, choose Bluetooth, then click Add Finish setup 26 HP Photosmart 2570 All-in the taskbar. 4. For more information, see the printed Setup Guide. Make sure that you have already installed the software, you would to select a Bluetooth® profile, select HCRP. If your HP All-in -One software on . 4. To install and print using Bluetooth® (Mac) 1. Make sure that you have Windows XP with Service...
... Connection Type screen. From the pop-up menu, choose Bluetooth, then click Add Finish setup 26 HP Photosmart 2570 All-in the taskbar. 4. For more information, see the printed Setup Guide. Make sure that you have already installed the software, you would to select a Bluetooth® profile, select HCRP. If your HP All-in -One software on . 4. To install and print using Bluetooth® (Mac) 1. Make sure that you have Windows XP with Service...
User Guide
Page 32
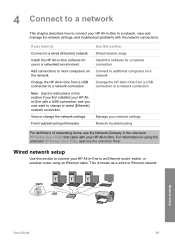
... network settings Network troubleshooting For definitions of networking terms, see Use the onscreen Help. Change the HP All-in-One from a USB connection to an Ethernet router, switch, or wireless router using the onscreen HP Image Zone Help, see the Network Glossary in -One. This is known as a wired or Ethernet network. Add connections to more computers on a network Change the HP All-in a networked environment. Wired network setup Use this section: Wired network setup Install the software for use in -One from a USB connection to a wired (Ethernet) network...
... network settings Network troubleshooting For definitions of networking terms, see Use the onscreen Help. Change the HP All-in-One from a USB connection to an Ethernet router, switch, or wireless router using the onscreen HP Image Zone Help, see the Network Glossary in -One. This is known as a wired or Ethernet network. Add connections to more computers on a network Change the HP All-in a networked environment. Wired network setup Use this section: Wired network setup Install the software for use in -One from a USB connection to a wired (Ethernet) network...
User Guide
Page 38
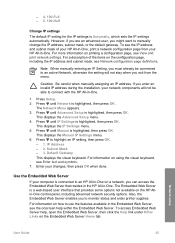
... monitor status and order printer supplies. Press Setup. 2. This displays the Advanced Setup menu. 4. For information on the HP Allin-One control panel, including advanced network security options. Use the Embedded Web Server If your network components will not stay when you to connect with the HP All-in -One, print a network configuration page from the menu. - 4. 100-Full - 5. 100-Half Change IP settings The default IP setting for the IP settings is highlighted, then press OK. Default Gateway This displays...
... monitor status and order printer supplies. Press Setup. 2. This displays the Advanced Setup menu. 4. For information on the HP Allin-One control panel, including advanced network security options. Use the Embedded Web Server If your network components will not stay when you to connect with the HP All-in -One, print a network configuration page from the menu. - 4. 100-Full - 5. 100-Half Change IP settings The default IP setting for the IP settings is highlighted, then press OK. Default Gateway This displays...
User Guide
Page 43
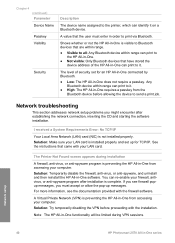
... computer. Solution: Make sure your firewall, antivirus, or anti-spyware program after establishing the network connection, inserting the CD and starting the software installation. You can print to it. See the instructions that have stored the device address of security set up messages. The Printer Not Found screen appears during VPN sessions. Solution: Try temporarily disabling the VPN before allowing the device to send a print job. I received a System Requirements Error: No TCP...
... computer. Solution: Make sure your firewall, antivirus, or anti-spyware program after establishing the network connection, inserting the CD and starting the software installation. You can print to it. See the instructions that have stored the device address of security set up messages. The Printer Not Found screen appears during VPN sessions. Solution: Try temporarily disabling the VPN before allowing the device to send a print job. I received a System Requirements Error: No TCP...
User Guide
Page 68
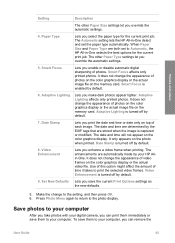
... display. Date Stamp is turned off by default. 8. Use of this option might affect the amount of photos on the color graphics display or the actual image file on the memory card. Video Enhancement is enabled by the EXIF tags that are determined by default. 6. The other Paper Size settings let you override the automatic settings. 4. Adaptive Lighting Lets you select the paper type for the current print job. Smart Focus is turned off by default. 9. Save photos...
... display. Date Stamp is turned off by default. 8. Use of this option might affect the amount of photos on the color graphics display or the actual image file on the memory card. Video Enhancement is enabled by the EXIF tags that are determined by default. 6. The other Paper Size settings let you override the automatic settings. 4. Adaptive Lighting Lets you select the paper type for the current print job. Smart Focus is turned off by default. 9. Save photos...
User Guide
Page 76
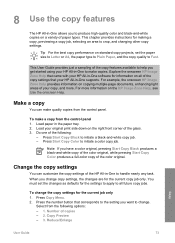
... User Guide provides just a sampling of the HP All-in-One to make copies. When you change the copy settings for the current job only 1. Copy Preview - 3. Make a copy You can customize the copy settings of the copy features available to help you get started using your HP All-in-One supports. Load your original print side down on standard copy projects, set the changes as defaults for the current copy job only. Note If you have a color original, pressing Start Copy Black produces a black-and-white copy...
... User Guide provides just a sampling of the HP All-in-One to make copies. When you change the copy settings for the current job only 1. Copy Preview - 3. Make a copy You can customize the copy settings of the copy features available to help you get started using your HP All-in-One supports. Load your original print side down on standard copy projects, set the changes as defaults for the current copy job only. Note If you have a color original, pressing Start Copy Black produces a black-and-white copy...
User Guide
Page 78
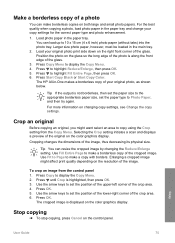
... photo papers. Use Fill Entire Page to make a copy with borders. Use Fit to Page to Photo Paper, and then try again. Copy User Guide 75 Larger size photo paper, however, must be loaded in the paper tray. Load your original photo print side down on the color graphics display. Press to display the Copy Menu. 4. Press to display the Copy Menu. 2. The HP All-in the paper tray and change your original photo, as shown below. Cropping changes the dimensions of the image, thus decreasing its physical size...
... photo papers. Use Fill Entire Page to make a copy with borders. Use Fit to Page to Photo Paper, and then try again. Copy User Guide 75 Larger size photo paper, however, must be loaded in the paper tray. Load your original photo print side down on the color graphics display. Press to display the Copy Menu. 4. Press to display the Copy Menu. 2. The HP All-in the paper tray and change your original photo, as shown below. Cropping changes the dimensions of the image, thus decreasing its physical size...
User Guide
Page 80
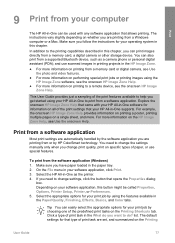
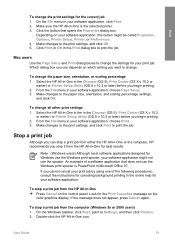
... the paper tray. 2. Depending on your operating system in the HP Image Zone. ● For more information on printing from a memory card or digital camera, see Use the photo and video features. ● For more information on performing special print jobs or printing images using the HP Image Zone software, see the onscreen HP Image Zone Help. ● For more information on printing to change the settings manually only when you have paper loaded in -One as a camera phone...
... the paper tray. 2. Depending on your operating system in the HP Image Zone. ● For more information on printing from a memory card or digital camera, see Use the photo and video features. ● For more information on performing special print jobs or printing images using the HP Image Zone software, see the onscreen HP Image Zone Help. ● For more information on printing to change the settings manually only when you have paper loaded in -One as a camera phone...
User Guide
Page 81
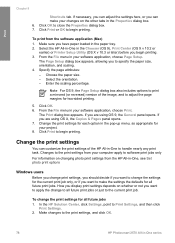
... begin printing. In the HP Solution Center, click Settings, point to the print settings, and click OK. 78 HP Photosmart 2570 All-in the paper tray. 2. Changes to the print settings from your computer apply to specify the paper size, orientation, and scaling. 4. Print Chapter 9 Shortcuts tab. To print from the HP All-in the pop-up menu, as appropriate for two-sided printing. 5. Change the print settings for each option in -One, see Set photo print options Windows users Before you change print settings...
... begin printing. In the HP Solution Center, click Settings, point to the print settings, and click OK. 78 HP Photosmart 2570 All-in the paper tray. 2. Changes to the print settings from your computer apply to specify the paper size, orientation, and scaling. 4. Print Chapter 9 Shortcuts tab. To print from the HP All-in the pop-up menu, as appropriate for two-sided printing. 5. Change the print settings for each option in -One, see Set photo print options Windows users Before you change print settings...
User Guide
Page 82
... the online help for your software application might be called Properties, Options, Printer Setup, Printer, or Preferences. 4. Make changes to the print settings, and click Print to Settings, and then click Printers. 2. An example of the following procedures, consult the instructions for canceling background printing in the Chooser (OS 9), Print Center (OS X v 10.2 or earlier) or Printer Setup Utility (OS X v 10.3 or later) before you stop a print job from the computer (Windows 9x or 2000 users) 1. User Guide...
... the online help for your software application might be called Properties, Options, Printer Setup, Printer, or Preferences. 4. Make changes to the print settings, and click Print to Settings, and then click Printers. 2. An example of the following procedures, consult the instructions for canceling background printing in the Chooser (OS 9), Print Center (OS X v 10.2 or earlier) or Printer Setup Utility (OS X v 10.3 or later) before you stop a print job from the computer (Windows 9x or 2000 users) 1. User Guide...
User Guide
Page 84
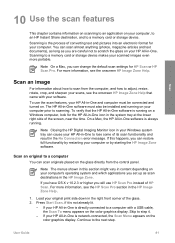
... original print side down in the right front corner of the glass. 2. Scanning is network-connected, the Scan Menu appears on the color graphics display. Scan an original to step 4. - Skip to a computer You can change the default scan settings for your HP All-in-One is the process of its scan functionality and result in the No Connection error message. Scan an image For information about how to scan from the control panel. Note On a Mac...
... original print side down in the right front corner of the glass. 2. Scanning is network-connected, the Scan Menu appears on the color graphics display. Scan an original to step 4. - Skip to a computer You can change the default scan settings for your HP All-in-One is the process of its scan functionality and result in the No Connection error message. Scan an image For information about how to scan from the control panel. Note On a Mac...
User Guide
Page 99
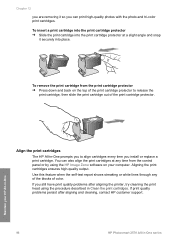
... a print cartridge into the print cartridge protector ➔ Slide the print cartridge into place. Maintain your computer. Aligning the print cartridges ensures high-quality output. If you still have print quality problems after aligning and cleaning, contact HP customer support. 96 HP Photosmart 2570 All-in Clean the print cartridges. To remove the print cartridge from the control panel or by using the procedure described in -One series Use this feature when the self-test report shows streaking or white lines through any time from...
... a print cartridge into the print cartridge protector ➔ Slide the print cartridge into place. Maintain your computer. Aligning the print cartridges ensures high-quality output. If you still have print quality problems after aligning and cleaning, contact HP customer support. 96 HP Photosmart 2570 All-in Clean the print cartridges. To remove the print cartridge from the control panel or by using the procedure described in -One series Use this feature when the self-test report shows streaking or white lines through any time from...

User Guide
Page 106
... correct port on the back of the HP All-in -One. Once you installed the software, see Troubleshooting common setup issues under Troubleshooting information. Note Make sure you connected the USB cable to your HP All-inOne with your HP All-in -One. If you connected the USB cable before prompted can connect to any USB port on the back of your HP All-in the USB cable until prompted by the onscreen instructions. User Guide 103...
... correct port on the back of the HP All-in -One. Once you installed the software, see Troubleshooting common setup issues under Troubleshooting information. Note Make sure you connected the USB cable to your HP All-inOne with your HP All-in -One. If you connected the USB cable before prompted can connect to any USB port on the back of your HP All-in the USB cable until prompted by the onscreen instructions. User Guide 103...
User Guide
Page 110
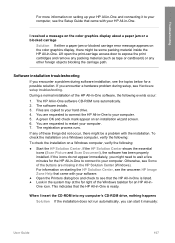
... -One software, the following : ● Start the HP Solution Center. Files are requested to your computer. 7. The software installs. 3. You are copied to restart your hard drive. 4. To check the installation on a Windows computer, verify the following: To check the installation on a Windows computer, verify the following events occur: 1. When I received a message on the color graphics display about a paper jam or a blocked carriage Solution If either a paper jam or blocked carriage error message appears on an installation wizard screen...
... -One software, the following : ● Start the HP Solution Center. Files are requested to your computer. 7. The software installs. 3. You are copied to restart your hard drive. 4. To check the installation on a Windows computer, verify the following: To check the installation on a Windows computer, verify the following events occur: 1. When I received a message on the color graphics display about a paper jam or a blocked carriage Solution If either a paper jam or blocked carriage error message appears on an installation wizard screen...

User Guide
Page 125
... the power cord and control panel faceplate in case the HP All-in -One. Turn on the HP All-in -One needs to be replaced. Wait until the print carriage is idle and silent, and then remove the print cartridges from their slots. For information on removing the print cartridges, see HP Quick Exchange Service (Japan). 1. Do not send them with the HP All-in-One unless the HP customer support call agent instructs you...
... the power cord and control panel faceplate in case the HP All-in -One. Turn on the HP All-in -One needs to be replaced. Wait until the print carriage is idle and silent, and then remove the print cartridges from their slots. For information on removing the print cartridges, see HP Quick Exchange Service (Japan). 1. Do not send them with the HP All-in-One unless the HP customer support call agent instructs you...
User Guide
Page 136
... color graphics display change language 104 change measurements 104 icons 9 sleep mode 9 CompactFlash memory card 51 config source (802.3 wired) 39 configuration page 802.3 wired 38 Bluetooth 39 general information 37 connect USB cable 103 wired network (Ethernet) 29 connection types supported Ethernet 25 printer sharing 27 USB 24 control panel attach faceplate 124 enter text 12 overview 6 copy cancel 75 copy specifications 127 menu 10 country/region, set 23 crop an image 59 crop photos 57 customer support contact 119 HP Quick...
... color graphics display change language 104 change measurements 104 icons 9 sleep mode 9 CompactFlash memory card 51 config source (802.3 wired) 39 configuration page 802.3 wired 38 Bluetooth 39 general information 37 connect USB cable 103 wired network (Ethernet) 29 connection types supported Ethernet 25 printer sharing 27 USB 24 control panel attach faceplate 124 enter text 12 overview 6 copy cancel 75 copy specifications 127 menu 10 country/region, set 23 crop an image 59 crop photos 57 customer support contact 119 HP Quick...
User Guide
Page 139
replace print cartridges 92 reports self-test 91 resources 15 restore network defaults 34 return your HP All-in -One series See technical information start copy black 8 start copy color 8 status, network 37 stop copy 75 print job 79 scan 83 storage device, connect 53 subnet mask 38 symbols, enter 12 system requirements 125 T technical information copy specifications 127 environmental specifications 128 memory card specifications 127 paper sizes 125 paper specifications 125 paper-tray capacities 125 physical specifications 128 power specifications 128 print margin specifications 126 print ...
replace print cartridges 92 reports self-test 91 resources 15 restore network defaults 34 return your HP All-in -One series See technical information start copy black 8 start copy color 8 status, network 37 stop copy 75 print job 79 scan 83 storage device, connect 53 subnet mask 38 symbols, enter 12 system requirements 125 T technical information copy specifications 127 environmental specifications 128 memory card specifications 127 paper sizes 125 paper specifications 125 paper-tray capacities 125 physical specifications 128 power specifications 128 print margin specifications 126 print ...


