HP 15 Notebook PC Maintenance and Service Guide
Page 36
NOTE: Details about your computer, including model, serial number, product key, and length of warranty, are as many as 12 screws that must be removed, replaced, and/or loosened when servicing Customer Self-Repair parts. Make special note of your location. This chapter provides removal and replacement procedures for Customer Self-Repair parts There are on page 13 for details. Component replacement procedures NOTE: Please read and...
NOTE: Details about your computer, including model, serial number, product key, and length of warranty, are as many as 12 screws that must be removed, replaced, and/or loosened when servicing Customer Self-Repair parts. Make special note of your location. This chapter provides removal and replacement procedures for Customer Self-Repair parts There are on page 13 for details. Component replacement procedures NOTE: Please read and...

HP 15 Notebook PC Maintenance and Service Guide
Page 40
... through the operating system. 2. Locate the WLAN module (1). Turn off or in Hibernation, turn the computer on page 27). 5. Remove the WLAN module: 1. The #2 WLAN antenna cable is connected to restore device functionality, and then contact technical support. Remove the Phillips M2.0×2.5 screw (2) that regulates wireless devices in the computer by unplugging the power cord from the computer. 4. Disconnect all external devices from the computer. 3. Remove the battery (see Service door...
... through the operating system. 2. Locate the WLAN module (1). Turn off or in Hibernation, turn the computer on page 27). 5. Remove the WLAN module: 1. The #2 WLAN antenna cable is connected to restore device functionality, and then contact technical support. Remove the Phillips M2.0×2.5 screw (2) that regulates wireless devices in the computer by unplugging the power cord from the computer. 4. Disconnect all external devices from the computer. 3. Remove the battery (see Service door...
HP 15 Notebook PC Maintenance and Service Guide
Page 68
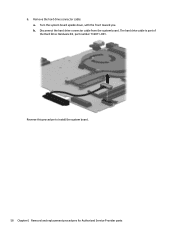
The hard drive cable is part of the Hard Drive Hardware Kit, part number 732071-001. Reverse this procedure to install the system board. 58 Chapter 6 Removal and replacement procedures for Authorized Service Provider parts Remove the hard drive connector cable: a. Disconnect the hard drive connector cable from the system board. b. 6. Turn the system board upside down, with the front toward you.
The hard drive cable is part of the Hard Drive Hardware Kit, part number 732071-001. Reverse this procedure to install the system board. 58 Chapter 6 Removal and replacement procedures for Authorized Service Provider parts Remove the hard drive connector cable: a. Disconnect the hard drive connector cable from the system board. b. 6. Turn the system board upside down, with the front toward you.
HP 15 Notebook PC Maintenance and Service Guide
Page 84
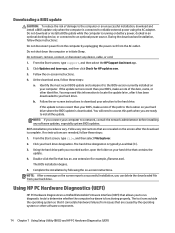
... your BIOS, make a note of the date, name, or other software components. 74 Chapter 7 Using Setup Utility (BIOS) and HP PC Hardware Diagnostics (UEFI) Identify the most recent BIOS update and compare it has been downloaded to your computer. BIOS installation procedures vary. Downloading a BIOS update CAUTION: To reduce the risk of the path to the location on your hard drive. Do not download or install a BIOS update while the computer is downloaded. From the Start screen, type support...
... your BIOS, make a note of the date, name, or other software components. 74 Chapter 7 Using Setup Utility (BIOS) and HP PC Hardware Diagnostics (UEFI) Identify the most recent BIOS update and compare it has been downloaded to your computer. BIOS installation procedures vary. Downloading a BIOS update CAUTION: To reduce the risk of the path to the location on your hard drive. Do not download or install a BIOS update while the computer is downloaded. From the Start screen, type support...
HP 15 Notebook PC Maintenance and Service Guide
Page 89
... Recovering using HP Recovery Manager on an external device, such as a USB hub. ● Be sure that best matches your situation and level of the recovery DVDs. Restore and recovery 79 From the Start screen, type help, and then select Help and Support. ● If you need to correct a problem with DVD writer capability, but you would like to create DVD recovery media, you can use an external optical drive (purchased separately) to create recovery discs, or you ever need...
... Recovering using HP Recovery Manager on an external device, such as a USB hub. ● Be sure that best matches your situation and level of the recovery DVDs. Restore and recovery 79 From the Start screen, type help, and then select Help and Support. ● If you need to correct a problem with DVD writer capability, but you would like to create DVD recovery media, you can use an external optical drive (purchased separately) to create recovery discs, or you ever need...
HP 15 Notebook PC Maintenance and Service Guide
Page 90
... need for recovery discs or a recovery USB flash drive. This type of the following recovery options: ● System Recovery-Reinstalls the original operating system, and then configures the settings for your country or region, and follow the on page 78. ● If the HP Recovery media does not work, you wish to reclaim hard drive space, HP Recovery Manager offers the Remove Recovery Partition option. Before beginning recovery, back up , restoring, and recovering (select models only) For more information, see Creating HP Recovery media on -screen instructions. Using HP Recovery...
... need for recovery discs or a recovery USB flash drive. This type of the following recovery options: ● System Recovery-Reinstalls the original operating system, and then configures the settings for your country or region, and follow the on page 78. ● If the HP Recovery media does not work, you wish to reclaim hard drive space, HP Recovery Manager offers the Remove Recovery Partition option. Before beginning recovery, back up , restoring, and recovering (select models only) For more information, see Creating HP Recovery media on -screen instructions. Using HP Recovery...
HP 15 Notebook PC Maintenance and Service Guide
Page 91
... HP Recovery media you created, and then restart the computer. Select the optical drive or USB flash drive you will not be used if your system does not have an HP Recovery partition or if the hard drive is the order of devices listed in HP Recovery Manager, change the boot order: 1. IMPORTANT: For tablets, connect to the keyboard dock before you press the power button. 2. Press and hold f11 as you remove the Recovery partition, create HP Recovery media; Select Troubleshoot from the boot options menu. 3. Select Recovery Manager...
... HP Recovery media you created, and then restart the computer. Select the optical drive or USB flash drive you will not be used if your system does not have an HP Recovery partition or if the hard drive is the order of devices listed in HP Recovery Manager, change the boot order: 1. IMPORTANT: For tablets, connect to the keyboard dock before you press the power button. 2. Press and hold f11 as you remove the Recovery partition, create HP Recovery media; Select Troubleshoot from the boot options menu. 3. Select Recovery Manager...
HP 15 Notebook PC Maintenance and Service Guide
Page 95
...) jacks 5 Audio/USB port spare part numbers 19 B backups 78 base enclosure, spare part number 16 battery removal 27 spare part number 16, 19, 20, 27 battery cover, identifying 12 battery lock, locks and unlocks the battery 12 battery release latch 12 BIOS determining version 73 downloading an update 74 updating 73 boot order changing HP Recovery Manager 81 buttons left TouchPad 8 power 10 right TouchPad 8 C caps lock light, identifying 9 chipset, product description 1 components bottom 12 display 7 left side 6 right side 5 top 8 computer major components 14 computer specifications 76...
...) jacks 5 Audio/USB port spare part numbers 19 B backups 78 base enclosure, spare part number 16 battery removal 27 spare part number 16, 19, 20, 27 battery cover, identifying 12 battery lock, locks and unlocks the battery 12 battery release latch 12 BIOS determining version 73 downloading an update 74 updating 73 boot order changing HP Recovery Manager 81 buttons left TouchPad 8 power 10 right TouchPad 8 C caps lock light, identifying 9 chipset, product description 1 components bottom 12 display 7 left side 6 right side 5 top 8 computer major components 14 computer specifications 76...

HP 15 Notebook PC Maintenance and Service Guide
Page 96
... 81 starting 80 HP Recovery media creating 78 recovery 81 HP Recovery partition recovery 80 removing 81 I integrated numeric keypad, identifying 11 integrated webcam, identifying 7 internal microphones, identifying 7 J jacks audio-out (headphone) 5 network 6 RJ-45 (network) 6 K keyboard product description 2 removal 37 spare part numbers 14, 19, 37 keypad, integrated numeric 11 keys action 11 esc 11 fn 11 num lock 11 Windows 11 L labels serial number 13 latches 12 lights AC adapter 6 caps lock 9 eMMC 5 hard drive 5 mute 9 power 5 wireless 9 M memory card reader, identifying 6 memory module...
... 81 starting 80 HP Recovery media creating 78 recovery 81 HP Recovery partition recovery 80 removing 81 I integrated numeric keypad, identifying 11 integrated webcam, identifying 7 internal microphones, identifying 7 J jacks audio-out (headphone) 5 network 6 RJ-45 (network) 6 K keyboard product description 2 removal 37 spare part numbers 14, 19, 37 keypad, integrated numeric 11 keys action 11 esc 11 fn 11 num lock 11 Windows 11 L labels serial number 13 latches 12 lights AC adapter 6 caps lock 9 eMMC 5 hard drive 5 mute 9 power 5 wireless 9 M memory card reader, identifying 6 memory module...
HP 15 Notebook PC Maintenance and Service Guide
Page 97
...spare part number 28 serviceability, product description 3 slots memory card 6 security cable 6 speakers identifying 10 removal 66 spare part number 16, 19, 66 specifications computer 76 display 76 hard drive 77 supported discs recovery 78 system board removal 55 spare part numbers 15, 20, 55 system information locating 13 system recovery 80 system restore point creating 78 T top cover removal 40 spare part numbers 15, 20, 40 TouchPad buttons 8 TouchPad button board removal 50 spare part number 15, 19, 50 TouchPad zone, identifying 8 U USB 3.0 ports identifying 6 V vents, identifying 12 video...
...spare part number 28 serviceability, product description 3 slots memory card 6 security cable 6 speakers identifying 10 removal 66 spare part number 16, 19, 66 specifications computer 76 display 76 hard drive 77 supported discs recovery 78 system board removal 55 spare part numbers 15, 20, 55 system information locating 13 system recovery 80 system restore point creating 78 T top cover removal 40 spare part numbers 15, 20, 40 TouchPad buttons 8 TouchPad button board removal 50 spare part number 15, 19, 50 TouchPad zone, identifying 8 U USB 3.0 ports identifying 6 V vents, identifying 12 video...
User Guide
Page 7
...5 Locating hardware ...5 Locating software ...5 Right side ...6 Left side ...7 Display ...8 Top ...9 TouchPad ...9 Lights ...10 Buttons and speakers ...11 Keys ...12 Bottom ...13 Labels ...14 3 Connecting to a network ...16 Connecting to a wireless network ...16 Using the wireless controls 16 Using the wireless button 16 Using operating system controls 17 Sharing data and drives and accessing software 17 Using a WLAN ...17 Using an Internet service provider 18 Setting up a WLAN 18 Configuring a wireless router 18 Protecting your WLAN 18 Connecting to a WLAN 19 Using Bluetooth wireless...
...5 Locating hardware ...5 Locating software ...5 Right side ...6 Left side ...7 Display ...8 Top ...9 TouchPad ...9 Lights ...10 Buttons and speakers ...11 Keys ...12 Bottom ...13 Labels ...14 3 Connecting to a network ...16 Connecting to a wireless network ...16 Using the wireless controls 16 Using the wireless button 16 Using operating system controls 17 Sharing data and drives and accessing software 17 Using a WLAN ...17 Using an Internet service provider 18 Setting up a WLAN 18 Configuring a wireless router 18 Protecting your WLAN 18 Connecting to a WLAN 19 Using Bluetooth wireless...
User Guide
Page 9
... replacing memory modules 41 Updating programs and drivers ...45 Cleaning your computer ...45 Cleaning procedures ...46 Cleaning the display (All-in-Ones or Notebooks 46 Cleaning the sides or cover 46 Cleaning the TouchPad, keyboard, or mouse 46 Traveling with or shipping your computer 47 8 Securing your computer and information ...48 Using passwords ...48 Setting Windows passwords 49 Setting Setup Utility (BIOS) passwords 49 Using Internet security software ...49 Using antivirus software ...50 Using firewall software ...50 Installing software updates ...50 Installing...
... replacing memory modules 41 Updating programs and drivers ...45 Cleaning your computer ...45 Cleaning procedures ...46 Cleaning the display (All-in-Ones or Notebooks 46 Cleaning the sides or cover 46 Cleaning the TouchPad, keyboard, or mouse 46 Traveling with or shipping your computer 47 8 Securing your computer and information ...48 Using passwords ...48 Setting Windows passwords 49 Setting Setup Utility (BIOS) passwords 49 Using Internet security software ...49 Using antivirus software ...50 Using firewall software ...50 Installing software updates ...50 Installing...
User Guide
Page 27
... the Start screen, type control panel, and then select Control Panel. 2. Sharing data and drives and accessing software When your computer, you want to a wireless network 17 Select Change advanced sharing settings to set up a connection or network, connect to a network, and diagnose and repair network problems. To use the WLAN device in the notification area, at the top of the taskbar. 2. To use operating system controls: 1. From the Windows desktop, open File Explorer. 2. NOTE: When a disc like a DVD movie or...
... the Start screen, type control panel, and then select Control Panel. 2. Sharing data and drives and accessing software When your computer, you want to a wireless network 17 Select Change advanced sharing settings to set up a connection or network, connect to a network, and diagnose and repair network problems. To use the WLAN device in the notification area, at the top of the taskbar. 2. To use operating system controls: 1. From the Windows desktop, open File Explorer. 2. NOTE: When a disc like a DVD movie or...
User Guide
Page 30
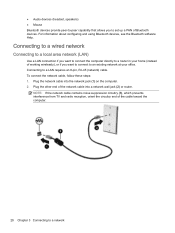
... the Bluetooth software Help. Plug the network cable into a network wall jack (2) or router. NOTE: If the network cable contains noise suppression circuitry (3), which prevents interference from TV and radio reception, orient the circuitry end of Bluetooth devices. Connecting to a network Connecting to a wired network Connecting to a local area network (LAN) Use a LAN connection if you want to connect to an existing network at your home (instead of working wirelessly), or if you to set...
... the Bluetooth software Help. Plug the network cable into a network wall jack (2) or router. NOTE: If the network cable contains noise suppression circuitry (3), which prevents interference from TV and radio reception, orient the circuitry end of Bluetooth devices. Connecting to a network Connecting to a wired network Connecting to a local area network (LAN) Use a LAN connection if you want to connect to an existing network at your home (instead of working wirelessly), or if you to set...
User Guide
Page 45
... must enter your Windows password before your Windows password before the computer will return to the screen. If you must enter your work will return to the screen. Manually initiating and exiting Sleep You can enable user-initiated Hibernation and change other power settings and timeouts using Power Options. 1. To exit Sleep: ● Briefly press the power button. ● If the display is closed, open the display. ● Press a key on wakeup, you need to create or change your work...
... must enter your Windows password before your Windows password before the computer will return to the screen. If you must enter your work will return to the screen. Manually initiating and exiting Sleep You can enable user-initiated Hibernation and change other power settings and timeouts using Power Options. 1. To exit Sleep: ● Briefly press the power button. ● If the display is closed, open the display. ● Press a key on wakeup, you need to create or change your work...
User Guide
Page 60
.... To download the latest versions, go to fully protect your computer. Antivirus software can disable programs, utilities, or the operating system, or cause them , and in order to http://www.hp.com/support. For more information, see Updating programs and drivers on the network. Select System and Security, select Windows Update, select Change settings, and then follow the on your computer. There are two types of...
.... To download the latest versions, go to fully protect your computer. Antivirus software can disable programs, utilities, or the operating system, or cause them , and in order to http://www.hp.com/support. For more information, see Updating programs and drivers on the network. Select System and Security, select Windows Update, select Change settings, and then follow the on your computer. There are two types of...
User Guide
Page 63
... battery power, docked in an optional docking device, or connected to an optional power source. From the Start screen, type support, and then select the HP Support Assistant app. 2. b. From the Start screen, type file, and then select File Explorer. 2. The BIOS installation begins. 5. Do not download or install a BIOS update while the computer is connected to reliable external power using the AC adapter. Click your selection to determine whether the computer hardware is functioning properly. The hard drive designation is downloaded...
... battery power, docked in an optional docking device, or connected to an optional power source. From the Start screen, type support, and then select the HP Support Assistant app. 2. b. From the Start screen, type file, and then select File Explorer. 2. The BIOS installation begins. 5. Do not download or install a BIOS update while the computer is connected to reliable external power using the AC adapter. Click your selection to determine whether the computer hardware is functioning properly. The hard drive designation is downloaded...
User Guide
Page 68
... in BIOS where the computer looks for an optical drive or a USB flash drive. From the Start screen, type recovery, and then select HP Recovery Manager. 2. Insert the HP Recovery media that you to remove the HP Recovery partition to remove everything and reinstall Windows. See Changing the computer boot order on -screen instructions. see Creating HP Recovery media on -screen instructions. Follow these steps (select models only). 1. Using HP Recovery media to recover You can change the computer boot order, which is not working properly. 1. You can use the Windows Refresh...
... in BIOS where the computer looks for an optical drive or a USB flash drive. From the Start screen, type recovery, and then select HP Recovery Manager. 2. Insert the HP Recovery media that you to remove the HP Recovery partition to remove everything and reinstall Windows. See Changing the computer boot order on -screen instructions. see Creating HP Recovery media on -screen instructions. Follow these steps (select models only). 1. Using HP Recovery media to recover You can change the computer boot order, which is not working properly. 1. You can use the Windows Refresh...
User Guide
Page 71
...to do 2 H hard drive light 6 hard drive, identifying 13 HDMI configuring audio 25 HDMI port connecting 24 identifying 7, 22 headphones and microphones, connecting 23 headphones, connecting 23 Hibernation exiting 35 initiated during critical battery level 37 initiating 35 high-definition devices, connecting 24 hot keys description 33 using 33 HP and third-party software updates, installing 50 HP PC Hardware Diagnostics (UEFI) downloading 54 using 53 HP Recovery Manager correcting boot problems 58 starting 58 HP Recovery media creating 55 recovery 58 HP Recovery partition recovery 57 removing 58...
...to do 2 H hard drive light 6 hard drive, identifying 13 HDMI configuring audio 25 HDMI port connecting 24 identifying 7, 22 headphones and microphones, connecting 23 headphones, connecting 23 Hibernation exiting 35 initiated during critical battery level 37 initiating 35 high-definition devices, connecting 24 hot keys description 33 using 33 HP and third-party software updates, installing 50 HP PC Hardware Diagnostics (UEFI) downloading 54 using 53 HP Recovery Manager correcting boot problems 58 starting 58 HP Recovery media creating 55 recovery 58 HP Recovery partition recovery 57 removing 58...
User Guide
Page 72
... 41 Disk Defragmenter 41 memory card reader, identifying 7, 22 memory module identifying 13 inserting 44 removing 43 replacing 41 memory module service door, removing 42 microphone, connecting 23 minimized image creating 57 minimized image recovery 57 mouse, external setting preferences 26 mute light, identifying 10 N network jack, identifying 7 num lock key, identifying 12, 33 O operating environment 59 optical drive, identifying 6, 21 original system recovery 57 P passwords Setup Utility (BIOS) 49 Windows 49 ports charging (powered) 7 HDMI 7, 22, 24 USB 2.0 22 USB 3.0 7, 22 power battery 36...
... 41 Disk Defragmenter 41 memory card reader, identifying 7, 22 memory module identifying 13 inserting 44 removing 43 replacing 41 memory module service door, removing 42 microphone, connecting 23 minimized image creating 57 minimized image recovery 57 mouse, external setting preferences 26 mute light, identifying 10 N network jack, identifying 7 num lock key, identifying 12, 33 O operating environment 59 optical drive, identifying 6, 21 original system recovery 57 P passwords Setup Utility (BIOS) 49 Windows 49 ports charging (powered) 7 HDMI 7, 22, 24 USB 2.0 22 USB 3.0 7, 22 power battery 36...


