Manual
Page 9
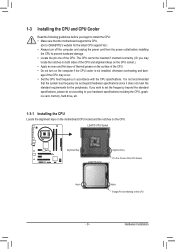
If you begin to install the CPU: • Make sure that the motherboard supports the CPU. (Go to GIGABYTE's website for the latest CPU support list.) • Always turn on the computer if the CPU cooler is not recommended that the system bus frequency... outlet before you wish to set beyond the standard specifications, please do so according to your hardware specifications including the CPU, graphics card, memory, hard drive, etc. 1-3-1 Installing the CPU Locate the alignment keys on the motherboard CPU socket and the notches on the CPU. Hardware Installation 1-3 Installing the CPU ...
If you begin to install the CPU: • Make sure that the motherboard supports the CPU. (Go to GIGABYTE's website for the latest CPU support list.) • Always turn on the computer if the CPU cooler is not recommended that the system bus frequency... outlet before you wish to set beyond the standard specifications, please do so according to your hardware specifications including the CPU, graphics card, memory, hard drive, etc. 1-3-1 Installing the CPU Locate the alignment keys on the motherboard CPU socket and the notches on the CPU. Hardware Installation 1-3 Installing the CPU ...
Manual
Page 11
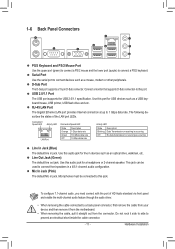
..., modem or other peripherals. D-Sub Port The D-Sub port supports a 15-pin D-Sub connector. Use this audio jack for USB devices such as an optical drive, walkman, etc. This jack can be connected to prevent an electrical short inside the cable connector. - 11 - Microphones must be used to a back panel connector... the port of the LAN port LEDs. Mic In Jack (Pink) The default Mic in devices such as a USB keyboard/mouse, USB printer, USB flash drive and etc.
..., modem or other peripherals. D-Sub Port The D-Sub port supports a 15-pin D-Sub connector. Use this audio jack for USB devices such as an optical drive, walkman, etc. This jack can be connected to prevent an electrical short inside the cable connector. - 11 - Microphones must be used to a back panel connector... the port of the LAN port LEDs. Mic In Jack (Pink) The default Mic in devices such as a USB keyboard/mouse, USB printer, USB flash drive and etc.
Manual
Page 14
... on the headers. For optimum heat dissipation, it is recommended that a system fan be sure to connect it in damage to prevent your SATA hard drive. 3/4) CPU_FAN/SYS_FAN (Fan Headers) The motherboard has a 4-pin CPU fan header (CPU_FAN) and a 3-pin (SYS_FAN) system fan header. The motherboard supports CPU fan speed control...
... on the headers. For optimum heat dissipation, it is recommended that a system fan be sure to connect it in damage to prevent your SATA hard drive. 3/4) CPU_FAN/SYS_FAN (Fan Headers) The motherboard has a 4-pin CPU fan header (CPU_FAN) and a 3-pin (SYS_FAN) system fan header. The motherboard supports CPU fan speed control...
Manual
Page 15
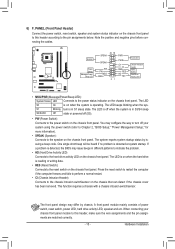
... system is operating. You may differ by issuing a beep code. A front panel module mainly consists of power switch, reset switch, power LED, hard drive activity LED, speaker and etc. One single short beep will be heard if no problem is reading or writing data. • RES (Reset Switch):...G.QBOFM 20 19 SPEAK- The LED S0 On is on when the system is in different patterns to indicate the problem. • HD (Hard Drive Activity LED) Connects to the power switch on the chassis front panel. This function requires a chassis with a chassis intrusion switch/sensor. The system ...
... system is operating. You may differ by issuing a beep code. A front panel module mainly consists of power switch, reset switch, power LED, hard drive activity LED, speaker and etc. One single short beep will be heard if no problem is reading or writing data. • RES (Reset Switch):...G.QBOFM 20 19 SPEAK- The LED S0 On is on when the system is in different patterns to indicate the problem. • HD (Hard Drive Activity LED) Connects to the power switch on the chassis front panel. This function requires a chassis with a chassis intrusion switch/sensor. The system ...
Manual
Page 23
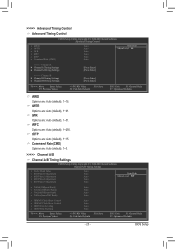
... x Command Rate (CMD) Auto Auto Auto Auto Auto Auto Item Help Menu Level >>>>> Channel A } Channel A Timing Settings } Channel A Driving Settings [Press Enter] [Press Enter] >>>>> Channel B } Channel B Timing Settings } Channel B Driving Settings [Press Enter] [Press Enter] Move Enter: Select F5: Previous Values +/-/PU/PD: Value F10: Save F6: Fail-Safe Defaults...
... x Command Rate (CMD) Auto Auto Auto Auto Auto Auto Item Help Menu Level >>>>> Channel A } Channel A Timing Settings } Channel A Driving Settings [Press Enter] [Press Enter] >>>>> Channel B } Channel B Timing Settings } Channel B Driving Settings [Press Enter] [Press Enter] Move Enter: Select F5: Previous Values +/-/PU/PD: Value F10: Save F6: Fail-Safe Defaults...
Manual
Page 25
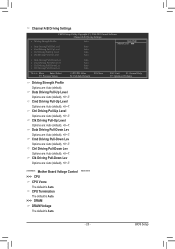
... CPU Vcore The default is Auto. ******** - 25 - Ctrl Driving Pull-Down Lev Options are : Auto (default), +8~-7. Channel A/B Driving Settings CMOS Setup Utility-Copyright (C) 1984-2010 Award Software Channel A/B Driving Settings x Driving Strength Profile x Data Driving Pull-Up Level x Cmd Driving Pull-Up Level x Ctrl Driving Pull-Up Level x Clk Driving Pull-Up Level Auto Auto Auto Auto Auto...
... CPU Vcore The default is Auto. ******** - 25 - Ctrl Driving Pull-Down Lev Options are : Auto (default), +8~-7. Channel A/B Driving Settings CMOS Setup Utility-Copyright (C) 1984-2010 Award Software Channel A/B Driving Settings x Driving Strength Profile x Data Driving Pull-Up Level x Cmd Driving Pull-Up Level x Ctrl Driving Pull-Up Level x Clk Driving Pull-Up Level Auto Auto Auto Auto Auto...
Manual
Page 26
...faster system startup. Landing Zone Landing zone. Memory These fields are read-only and are determined by using one of the hard drive when the hard drive access mode is set this item to manually enter the specifications of the three methods below: • Auto • None &#... time. Halt On Allows you wish to enter the parameters manually, refer to CHS. (For IDE Channel 0 Master/Slave only.) Sets the hard drive access mode. (Default: Auto) The following fields display your SATA devices by the BIOS POST. IDE Channel 0, 1 Master/Slave IDE Channel 0/1 ...
...faster system startup. Landing Zone Landing zone. Memory These fields are read-only and are determined by using one of the hard drive when the hard drive access mode is set this item to manually enter the specifications of the three methods below: • Auto • None &#... time. Halt On Allows you wish to enter the parameters manually, refer to CHS. (For IDE Channel 0 Master/Slave only.) Sets the hard drive access mode. (Default: Auto) The following fields display your SATA devices by the BIOS POST. IDE Channel 0, 1 Master/Slave IDE Channel 0/1 ...
Manual
Page 27
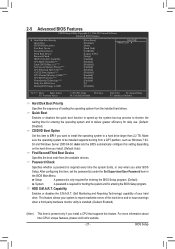
...Setup program. Password Check Specifies whether a password is present only if you install a CPU that supports this setting depending on the hard drive you want to install the operating system to be installed supports booting from the available devices. Quick Boot Enables or disables the quick ...Exit F1: General Help F7: Optimized Defaults Hard Disk Boot Priority Specifies the sequence of your system to report read/write errors of the hard drive and to issue warnings when a third party hardware monitor utility is installed. (Default: Enabled) (Note) This item is required every time ...
...Setup program. Password Check Specifies whether a password is present only if you install a CPU that supports this setting depending on the hard drive you want to install the operating system to be installed supports booting from the available devices. Quick Boot Enables or disables the quick ...Exit F1: General Help F7: Optimized Defaults Hard Disk Boot Priority Specifies the sequence of your system to report read/write errors of the hard drive and to issue warnings when a third party hardware monitor utility is installed. (Default: Enabled) (Note) This item is required every time ...
Manual
Page 28
... be recovered from 0 to 15 seconds. (Default: 0) Backup BIOS Image to HDD Allows the system to copy the BIOS image file to the hard drive. BIOS Setup - 28 - When enabled, the CPU core frequency and voltage will be reduced during system halt state to decrease power consumption. (Default: Enabled...operating systems and applications in system halt state. When enabled, the CPU core frequency and voltage will allow a platform to initialize the hard drive as Windows NT4.0. (Default: Disabled) No-Execute Memory Protect (Note) Enables or disables Intel Execute Disable Bit function.
... be recovered from 0 to 15 seconds. (Default: 0) Backup BIOS Image to HDD Allows the system to copy the BIOS image file to the hard drive. BIOS Setup - 28 - When enabled, the CPU core frequency and voltage will be reduced during system halt state to decrease power consumption. (Default: Enabled...operating systems and applications in system halt state. When enabled, the CPU core frequency and voltage will allow a platform to initialize the hard drive as Windows NT4.0. (Default: Disabled) No-Execute Memory Protect (Note) Enables or disables Intel Execute Disable Bit function.
Manual
Page 31
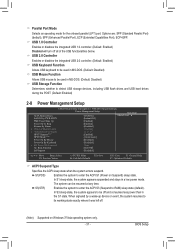
... off and consumes less power than in MS-DOS. (Default: Disabled) USB Storage Function Determines whether to detect USB storage devices, including USB flash drives and USB hard drives during the POST. (Default: Enabled) 2-8 Power Management Setup CMOS Setup Utility-Copyright (C) 1984-2010 Award Software Power Management Setup Item Help ACPI Suspend...
... off and consumes less power than in MS-DOS. (Default: Disabled) USB Storage Function Determines whether to detect USB storage devices, including USB flash drives and USB hard drives during the POST. (Default: Enabled) 2-8 Power Management Setup CMOS Setup Utility-Copyright (C) 1984-2010 Award Software Power Management Setup Item Help ACPI Suspend...

Manual
Page 37
... like that shown in the screen shot below. (If the driver Autorun screen does not appear automatically, go to My Computer, double-click the optical drive and execute the Run.exe program.) 3-1 Installing Chipset Drivers After inserting the driver disk, "Xpress Install" will install all the drivers that are recommended to... manually select the drivers you wish to install. BIOS Setup You can click the Install All button and "Xpress Install" will automatically scan your optical drive.
... like that shown in the screen shot below. (If the driver Autorun screen does not appear automatically, go to My Computer, double-click the optical drive and execute the Run.exe program.) 3-1 Installing Chipset Drivers After inserting the driver disk, "Xpress Install" will install all the drivers that are recommended to... manually select the drivers you wish to install. BIOS Setup You can click the Install All button and "Xpress Install" will automatically scan your optical drive.


