Manual
Page 3
...61550; In order to their respective owners. For example, "REV: 1.0" means the revision of the motherboard is the property of GIGABYTE. The trademarks mentioned in the use of this : "REV: X.X." All rights reserved. Changes to the specifications and features in ...User's Manual. For product-related information, check on our website at: http://www.gigabyte.com Identifying Your Motherboard Revision The revision number on your motherboard revision before updating motherboard BIOS, drivers, or when looking for technical information. Copyright © 2011 GIGA-BYTE TECHNOLOGY CO...
...61550; In order to their respective owners. For example, "REV: 1.0" means the revision of the motherboard is the property of GIGABYTE. The trademarks mentioned in the use of this : "REV: X.X." All rights reserved. Changes to the specifications and features in ...User's Manual. For product-related information, check on our website at: http://www.gigabyte.com Identifying Your Motherboard Revision The revision number on your motherboard revision before updating motherboard BIOS, drivers, or when looking for technical information. Copyright © 2011 GIGA-BYTE TECHNOLOGY CO...
Manual
Page 4
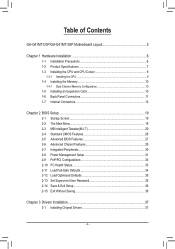
Table of Contents GA-G41MT-D3P/GA-G41MT-S2P Motherboard Layout 5 Chapter 1 Hardware Installation 6 1-1 Installation Precautions 6 1-2 Product Specifications 7 1-3 Installing the CPU and CPU Cooler 9 1-3-1 Installing the CPU...9 1-4 Installing the Memory 10 1-4-1 Dual Channel Memory Configuration 10 1-5 Installing an Expansion Card 10 1-6 Back Panel Connectors 11 1-7 Internal Connectors 12 Chapter 2 BIOS Setup 19 2-1 Startup Screen 19 2-2 The Main...
Table of Contents GA-G41MT-D3P/GA-G41MT-S2P Motherboard Layout 5 Chapter 1 Hardware Installation 6 1-1 Installation Precautions 6 1-2 Product Specifications 7 1-3 Installing the CPU and CPU Cooler 9 1-3-1 Installing the CPU...9 1-4 Installing the Memory 10 1-4-1 Dual Channel Memory Configuration 10 1-5 Installing an Expansion Card 10 1-6 Back Panel Connectors 11 1-7 Internal Connectors 12 Chapter 2 BIOS Setup 19 2-1 Startup Screen 19 2-2 The Main...
Manual
Page 8
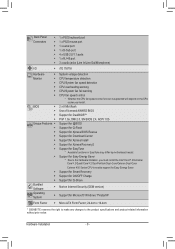
...the product specifications and product-related information without prior notice. BIOS ŠŠ 2 x 8 Mbit flash ŠŠ Use of licensed AWARD BIOS ŠŠ Support for DualBIOS™ ŠŠ PnP 1.0a, DMI 2.0, SM BIOS 2.4, ACPI 1.0b Unique Features ŠŠ Support for @BIOS ŠŠ Support for Q-Flash ŠŠ ...motherboard model. ŠŠ Support for Microsoft® Windows 7/Vista/XP Form Factor ŠŠ Micro ATX Form Factor; 24.4cm x 19.4cm * GIGABYTE reserves the right to make any changes to the hardware limitation, you install.
...the product specifications and product-related information without prior notice. BIOS ŠŠ 2 x 8 Mbit flash ŠŠ Use of licensed AWARD BIOS ŠŠ Support for DualBIOS™ ŠŠ PnP 1.0a, DMI 2.0, SM BIOS 2.4, ACPI 1.0b Unique Features ŠŠ Support for @BIOS ŠŠ Support for Q-Flash ŠŠ ...motherboard model. ŠŠ Support for Microsoft® Windows 7/Vista/XP Form Factor ŠŠ Micro ATX Form Factor; 24.4cm x 19.4cm * GIGABYTE reserves the right to make any changes to the hardware limitation, you install.
Manual
Page 10
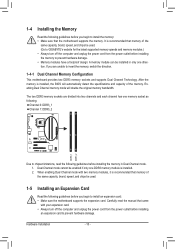
... your expansion card. • Always turn off the computer and unplug the power cord from the power outlet before you begin to GIGABYTE's website for the latest supported memory speeds and memory modules.) • Always turn off the computer and unplug the power cord from...Channel 0: DDR3_1 Channel 1: DDR3_2 DDR3_1 DDR3_2 Due to chipset limitations, read the manual that came with two memory modules, it is installed, the BIOS will double the original memory bandwidth. Hardware Installation - 10 - The two DDR3 memory sockets are unable to insert the memory, switch the direction....
... your expansion card. • Always turn off the computer and unplug the power cord from the power outlet before you begin to GIGABYTE's website for the latest supported memory speeds and memory modules.) • Always turn off the computer and unplug the power cord from...Channel 0: DDR3_1 Channel 1: DDR3_2 DDR3_1 DDR3_2 Due to chipset limitations, read the manual that came with two memory modules, it is installed, the BIOS will double the original memory bandwidth. Hardware Installation - 10 - The two DDR3 memory sockets are unable to insert the memory, switch the direction....
Manual
Page 15
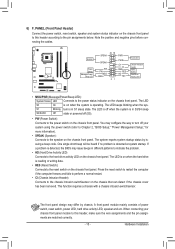
... PWPW+ MSGMSG+ 21 PWRPWR+ CI+ CIRES+ RESHD- The LED keeps blinking when the sys- S1 Blinking tem is detected, the BIOS may issue beeps in S1 sleep state. You may differ by issuing a beep code. DEBUG The front panel design may configure the ...chassis intrusion switch/sensor. Note the positive and negative pins before connecting the cables. When connecting your system using the power switch (refer to Chapter 2, "BIOS Setup," "Power Management Setup," for more information). • SPEAK (Speaker): Connects to the speaker on the chassis front panel. If a problem is in...
... PWPW+ MSGMSG+ 21 PWRPWR+ CI+ CIRES+ RESHD- The LED keeps blinking when the sys- S1 Blinking tem is detected, the BIOS may issue beeps in S1 sleep state. You may differ by issuing a beep code. DEBUG The front panel design may configure the ...chassis intrusion switch/sensor. Note the positive and negative pins before connecting the cables. When connecting your system using the power switch (refer to Chapter 2, "BIOS Setup," "Power Management Setup," for more information). • SPEAK (Speaker): Connects to the speaker on the chassis front panel. If a problem is in...
Manual
Page 17
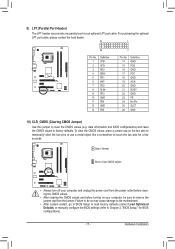
... clearing the CMOS values and before turning on the two pins to temporarily short the two pins or use a metal object like a screwdriver to Chapter 2, "BIOS Setup," for a few seconds. Failure to do so may cause damage to the motherboard. • After system restart, go to... BIOS Setup to load factory defaults (select Load Optimized Defaults) or manually configure the BIOS settings (refer to touch the two pins for BIOS configurations). - 17 - To clear the CMOS values, place a jumper cap on your computer ...
... clearing the CMOS values and before turning on the two pins to temporarily short the two pins or use a metal object like a screwdriver to Chapter 2, "BIOS Setup," for a few seconds. Failure to do so may cause damage to the motherboard. • After system restart, go to... BIOS Setup to load factory defaults (select Load Optimized Defaults) or manually configure the BIOS settings (refer to touch the two pins for BIOS configurations). - 17 - To clear the CMOS values, place a jumper cap on your computer ...
Manual
Page 18
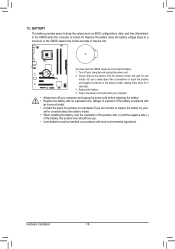
11) BATTERY The battery provides power to keep the values (such as BIOS configurations, date, and time information) in the CMOS when the computer is replaced with an incorrect model. • Contact the place of purchase or local ...
11) BATTERY The battery provides power to keep the values (such as BIOS configurations, date, and time information) in the CMOS when the computer is replaced with an incorrect model. • Contact the place of purchase or local ...

Manual
Page 19
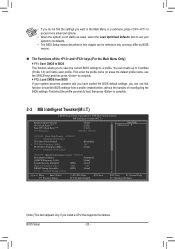
...press to accept or enter a sub-menu. (Sample BIOS Version:GA-G41MT-S2P F1d) CMOS Setup Utility-Copyright (C) 1984-2010 Award Software MB Intelligent Tweaker(M.I.T.) Standard CMOS Features Advanced BIOS Features Advanced Chipset Features Integrated ...upgrade the BIOS, use either the GIGABYTE Q-Flash or @BIOS utility. • Q-Flash allows the user to prevent system instability or other unexpected results. To flash the BIOS, do not encounter problems using the current version of the BIOS Setup program. G41MT-S2P F1d . . . . : BIOS Setup ...
...press to accept or enter a sub-menu. (Sample BIOS Version:GA-G41MT-S2P F1d) CMOS Setup Utility-Copyright (C) 1984-2010 Award Software MB Intelligent Tweaker(M.I.T.) Standard CMOS Features Advanced BIOS Features Advanced Chipset Features Integrated ...upgrade the BIOS, use either the GIGABYTE Q-Flash or @BIOS utility. • Q-Flash allows the user to prevent system instability or other unexpected results. To flash the BIOS, do not encounter problems using the current version of the BIOS Setup program. G41MT-S2P F1d . . . . : BIOS Setup ...
Manual
Page 20
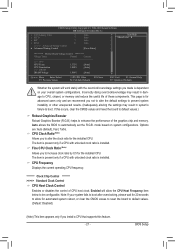
... F10: Save F6: Fail-Safe Defaults ESC: Exit F1: General Help F7: Optimized Defaults (Note) This item appears only if you to save the current BIOS settings to a profile. First enter the profile name (to erase the default profile name, use the SPACE key) and then press to complete. F12...: Load CMOS from BIOS If your system to its defaults. • The BIOS Setup menus described in this feature. BIOS Setup - 20 - • If you do not find the settings you want in the Main Menu or a ...
... F10: Save F6: Fail-Safe Defaults ESC: Exit F1: General Help F7: Optimized Defaults (Note) This item appears only if you to save the current BIOS settings to a profile. First enter the profile name (to erase the default profile name, use the SPACE key) and then press to complete. F12...: Load CMOS from BIOS If your system to its defaults. • The BIOS Setup menus described in this feature. BIOS Setup - 20 - • If you do not find the settings you want in the Main Menu or a ...
Manual
Page 21
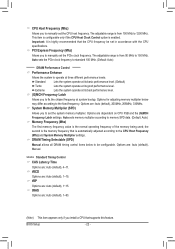
... current operating CPU frequency. ******** Clock Chip Control Standard Clock Control CPU Host Clock Control Enables or disables the control of the graphics chip and memory. BIOS Setup mode based on your system fails to boot after overclocking, please wait for 20 seconds to allow the CPU Host Frequency item below to...: Save F6: Fail-Safe Defaults ESC: Exit F1: General Help F7: Optimized Defaults Whether the system will allow for the installed CPU. Auto allows the BIOS to enhance the performance of CPU host clock.
... current operating CPU frequency. ******** Clock Chip Control Standard Clock Control CPU Host Clock Control Enables or disables the control of the graphics chip and memory. BIOS Setup mode based on your system fails to boot after overclocking, please wait for 20 seconds to allow the CPU Host Frequency item below to...: Save F6: Fail-Safe Defaults ESC: Exit F1: General Help F7: Optimized Defaults Whether the system will allow for the installed CPU. Auto allows the BIOS to enhance the performance of CPU host clock.
Manual
Page 22
... basic performance level. (Default) Turbo Lets the system operate at system bootup. Options for adjusting memory multiplier below to manually set the CPU host frequency. BIOS Setup - 22 - Options are : Auto (default), 1~63. (Note) This item appears only if you install a CPU that the CPU frequency be configurable. DRAM Timing Selectable...
... basic performance level. (Default) Turbo Lets the system operate at system bootup. Options for adjusting memory multiplier below to manually set the CPU host frequency. BIOS Setup - 22 - Options are : Auto (default), 1~63. (Note) This item appears only if you install a CPU that the CPU frequency be configurable. DRAM Timing Selectable...
Manual
Page 23
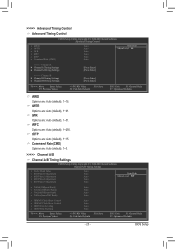
... Auto Move Enter: Select F5: Previous Values +/-/PU/PD: Value F10: Save F6: Fail-Safe Defaults ESC: Exit F1: General Help F7: Optimized Defaults - 23 - BIOS Setup Command Rate(CMD) Options are : Auto (default), 1~255.
... Auto Move Enter: Select F5: Previous Values +/-/PU/PD: Value F10: Save F6: Fail-Safe Defaults ESC: Exit F1: General Help F7: Optimized Defaults - 23 - BIOS Setup Command Rate(CMD) Options are : Auto (default), 1~255.
Manual
Page 24
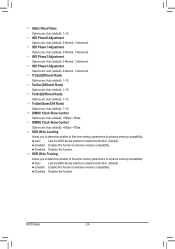
...800ps~-700ps. Trd2rd(Different Rank) Options are : Auto (default), 1~15. Trd2wr(Same/Diff Rank) Options are : Auto (default), 1~15. BIOS Setup - 24 - DIMM2 Clock Skew Control Options are : Auto (default), 0-Normal, 1-Advanced. DDR Write Leveling Allows you to determine whether ...Adjustment Options are : Auto (default), 1~15. Twr2wr(Different Rank) Options are : Auto (default), 0-Normal, 1-Advanced. Auto Lets the BIOS decide whether to enable this function. (Default) Enabled Enables this function to enhance memory compatibility. Static tRead Value Options are: Auto (default...
...800ps~-700ps. Trd2rd(Different Rank) Options are : Auto (default), 1~15. Trd2wr(Same/Diff Rank) Options are : Auto (default), 1~15. BIOS Setup - 24 - DIMM2 Clock Skew Control Options are : Auto (default), 0-Normal, 1-Advanced. DDR Write Leveling Allows you to determine whether ...Adjustment Options are : Auto (default), 1~15. Twr2wr(Different Rank) Options are : Auto (default), 0-Normal, 1-Advanced. Auto Lets the BIOS decide whether to enable this function. (Default) Enabled Enables this function to enhance memory compatibility. Static tRead Value Options are: Auto (default...
Manual
Page 25
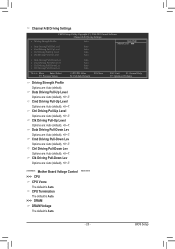
... Options are : Auto (default), +8~-7. Clk Driving Pull-Down Lev Options are: Auto (default), +8~-7. ******** Mother Board Voltage Control >>> CPU CPU Vcore The default is Auto. ******** - 25 - BIOS Setup Cmd Driving Pull-Up Level Options are : Auto (default), +8~-7. Data Driving Pull-Down Lev Options are : Auto (default), +8~-7. Cmd Driving Pull-Down Lev Options...
... Options are : Auto (default), +8~-7. Clk Driving Pull-Down Lev Options are: Auto (default), +8~-7. ******** Mother Board Voltage Control >>> CPU CPU Vcore The default is Auto. ******** - 25 - BIOS Setup Cmd Driving Pull-Up Level Options are : Auto (default), +8~-7. Data Driving Pull-Down Lev Options are : Auto (default), +8~-7. Cmd Driving Pull-Down Lev Options...
Manual
Page 26
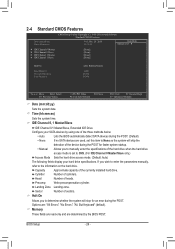
...to manually enter the specifications of the three methods below: • Auto • None • Manual Access Mode Lets the BIOS automatically detect SATA devices during the POST. Landing Zone Landing zone. Memory These fields are read-only and are determined by using ...one of the hard drive when the hard drive access mode is set to the information on the hard drive. BIOS Setup - 26 - Capacity Approximate capacity of heads. Head Number of the currently installed hard drive. 2-4 Standard CMOS Features CMOS ...
...to manually enter the specifications of the three methods below: • Auto • None • Manual Access Mode Lets the BIOS automatically detect SATA devices during the POST. Landing Zone Landing zone. Memory These fields are read-only and are determined by using ...one of the hard drive when the hard drive access mode is set to the information on the hard drive. BIOS Setup - 26 - Capacity Approximate capacity of heads. Head Number of the currently installed hard drive. 2-4 Standard CMOS Features CMOS ...
Manual
Page 27
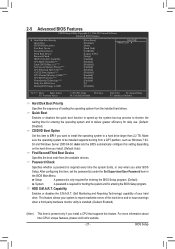
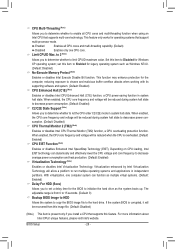
...C1E) (Note) C2/C2E State Support (Note) CPU Thermal Monitor 2(TM2) (Note) CPU EIST Function (Note) Virtualization Technology (Note) Delay For HDD (Secs) Backup BIOS Image to HDD [Press Enter] [Disabled] [Auto] [Hard Disk] [CDROM] [Legacy LAN] [Setup] [Enabled] [Enabled] [Disabled] [Enabled] [Enabled] [Disabled... Technology) capability of your system to a hard drive larger than 2.2 TB. Setup A password is only required for entering the BIOS Setup program. (Default) System A password is required for booting the system and for daily use. (Default: Disabled) CD/DVD...
...C1E) (Note) C2/C2E State Support (Note) CPU Thermal Monitor 2(TM2) (Note) CPU EIST Function (Note) Virtualization Technology (Note) Delay For HDD (Secs) Backup BIOS Image to HDD [Press Enter] [Disabled] [Auto] [Hard Disk] [CDROM] [Legacy LAN] [Setup] [Enabled] [Enabled] [Disabled] [Enabled] [Enabled] [Disabled... Technology) capability of your system to a hard drive larger than 2.2 TB. Setup A password is only required for entering the BIOS Setup program. (Default) System A password is required for booting the system and for daily use. (Default: Disabled) CD/DVD...
Manual
Page 28
...adjustable range is overheated. (Default: Enabled) CPU EIST Function (Note) Enables or disables Enhanced Intel SpeedStep Technology (EIST). If the system BIOS is corrupted, it will allow a platform to run multiple operating systems and applications in system halt state. For more information about Intel CPUs... Enabled) Delay For HDD (Secs) Allows you to set this item to Disabled for the computer, reducing exposure to limit CPUID maximum value. BIOS Setup - 28 - Enabled Enables all CPU cores and multi-threading function when using an Intel CPU that supports this image file. (Default: ...
...adjustable range is overheated. (Default: Enabled) CPU EIST Function (Note) Enables or disables Enhanced Intel SpeedStep Technology (EIST). If the system BIOS is corrupted, it will allow a platform to run multiple operating systems and applications in system halt state. For more information about Intel CPUs... Enabled) Delay For HDD (Secs) Allows you to set this item to Disabled for the computer, reducing exposure to limit CPUID maximum value. BIOS Setup - 28 - Enabled Enables all CPU cores and multi-threading function when using an Intel CPU that supports this image file. (Default: ...
Manual
Page 29
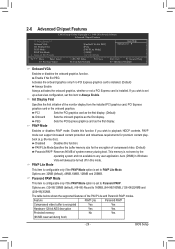
... Mode This item is configurable only if the PAVP Mode option is set to 160MB, (64+96)160MB, (128+96)224MB and (256+96)352MB. BIOS Setup Enable this item to Paranoid PAVP. PAVP Lite Mode Specifies the buffer memory size for premium content playback (e.g. Options are : 32MB (default), 48MB, 64MB...
... Mode This item is configurable only if the PAVP Mode option is set to 160MB, (64+96)160MB, (128+96)224MB and (256+96)352MB. BIOS Setup Enable this item to Paranoid PAVP. PAVP Lite Mode Specifies the buffer memory size for premium content playback (e.g. Options are : 32MB (default), 48MB, 64MB...
Manual
Page 30
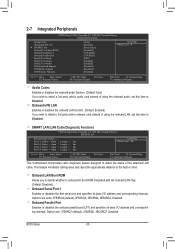
... function. (Default: Auto) If you wish to install a 3rd party add-in network card instead of using the onboard audio, set this item to Disabled. BIOS Setup - 30 - Onboard H/W LAN Enables or disables the onboard LAN function. (Default: Enabled) If you wish to install a 3rd party add-in audio card instead...
... function. (Default: Auto) If you wish to install a 3rd party add-in network card instead of using the onboard audio, set this item to Disabled. BIOS Setup - 30 - Onboard H/W LAN Enables or disables the onboard LAN function. (Default: Enabled) If you wish to install a 3rd party add-in audio card instead...
Manual
Page 31
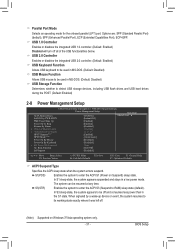
BIOS Setup In S3 sleep state, the system appears to be off and consumes less power than in a low power mode. S3(STR) Enables the system ...
BIOS Setup In S3 sleep state, the system appears to be off and consumes less power than in a low power mode. S3(STR) Enables the system ...


