Get support for Gigabyte MSH61DI

Gigabyte MSH61DI Support Question

Gigabyte MSH61DI Support Question

Find answers below for this question about Gigabyte MSH61DI.
Need a Gigabyte MSH61DI manual? We have 1 online manual for this item!
Question posted by dijenraj on August 20th, 2023

Doesn't Detect Msata Ssd Drive In Bios

Why Gigabyte MSH61DI doesn't detect Msata ssd drive in bios ?

Current Answers

Answer #1: Posted by SonuKumar on August 20th, 2023 11:12 AM
This answer was accepted by the poster of the original question.
SonuKumar

Member since:
May 9th, 2021

Points: 16,621,300
1,100
points
There are a few reasons why your Gigabyte MSH61DI motherboard might not be detecting your MSATA SSD drive in the BIOS. Here are some things to check:

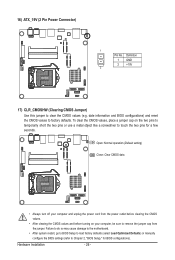
Make sure that the MSATA SSD drive is properly seated in the MSATA slot on the motherboard.

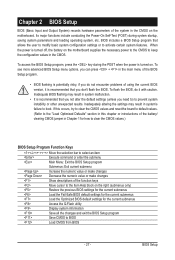
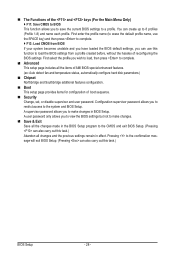
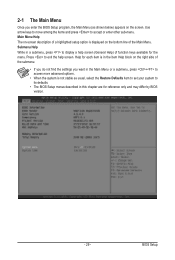
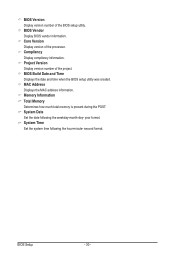
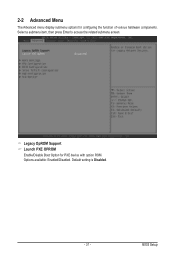
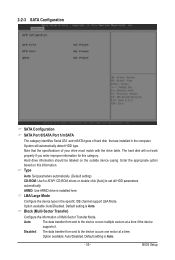
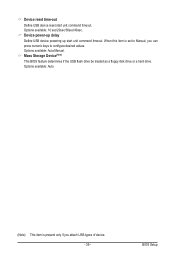
Make sure that the MSATA SSD drive is enabled in the BIOS. To do this, enter the BIOS and look for the SATA settings. There should be an option to enable or disable the MSATA controller.

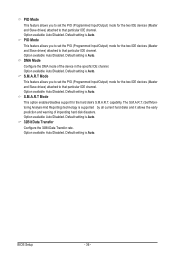
Make sure that the MSATA SSD drive is using the correct SATA mode. The MSH61DI motherboard supports both AHCI and IDE SATA modes. You can try changing the SATA mode in the BIOS and see if that makes a difference.

Make sure that the MSATA SSD drive is formatted and has a valid operating system installed. If the MSATA SSD drive is not formatted, the BIOS will not be able to detect it.

If you have checked all of these things and your MSATA SSD drive is still not being detected in the BIOS, you may need to contact Gigabyte customer support for further assistance.

Here are some additional things to keep in mind:

The MSH61DI motherboard does not support NVMe MSATA SSD drives.

If you are using an older version of the BIOS, you may need to update the BIOS to the latest version.

If you are using a SATA to MSATA adapter, make sure that the adapter is compatible with your motherboard and MSATA SSD drive.

I hope this helps! Let me know if you have any other questions.


Please respond to my effort to provide you with the best possible solution by using the "Acceptable Solution" and/or the "Helpful" buttons when the answer has proven to be helpful.

Regards,
Sonu
Your search handyman for all e-support needs!!

Related Gigabyte MSH61DI Manual Pages

Manual - Page 3

Table of Contents Box Contents...4 MSH61DI Motherboard Layout 5 Chapter 1 Hardware Installation 7 1-1 Installation Precautions 7 1-2 Product ... Channel Memory Configuration 13 1-4-2 Installing a Memory 14 1-5 Back Panel Connectors 15 1-6 Internal Connectors 17 Chapter 2 BIOS Setup 27 2-1 The Main Menu 29 2-2 Advanced Menu 31 2-2-1 ACPI Settings...32 2-2-2 CPU Configuration 33 2-2-3 SATA...
Manual - Page 6

... USB 3.0 ports USB 2.0 ports Battery connector HDMI port Clear CMOS jumper RJ45 LAN port DC In power connector 2 pin power connector Mini PCi Express connector MSATA connector Touch panel USB connector TV tuner USB connector Back Light switch Front panelconnector SATA cable connectors Hard disk power connector USB connector Audio cable...
Manual - Page 8

... Slots ŠŠ ŠŠ Onboard ŠŠ Graphics Storage Interface ŠŠ 1 x Mini PCI Express slot (Half size) 1 x Mini PCI Express slot (Full size/MSATA function/optional) Build in Intel® processor 2 x SATA 3Gb/s connectors USB Internal Connectors ŠŠ 2 x USB 3.0 ports (back panel) ŠŠ 2 x USB 2.0 ports (back panel...
Manual - Page 9

...;Š 1 x Audio Line In ŠŠ iTE IT8773 chip Hardware Monitor BIOS ŠŠ CPU/System temperature detection ŠŠ CPU fan speed detection ŠŠ 1 x 64 Mbit flash ŠŠ AMI BIOS Form Factor ŠŠ Mini ITX Form Factor; 170cm x 170cm * GIGABYTE reserves the right to make any changes to the product specifications...
Manual - Page 10

...drive, etc. 1-3-1 Installing the CPU A. If you wish to set the frequency beyond hardware specifications since it does not meet the standard requirements for the latest CPU support list.) • Always turn on the computer if the CPU cooler is not recommended that the motherboard supports the CPU. (Go to GIGABYTE.... Locate the alignment keys on the motherboard CPU socket and the notches on the...
Manual - Page 13

...the direction. 1-4-1 Dual Channel Memory Configuration This motherboard provides two DDR3 memory sockets and supports Dual Channel... to GIGABYTE's website for optimum performance. Hardware Installation - 13 - Enabling Dual Channel memory mode will automatically detect the specifications...have a foolproof design. It is installed, the BIOS will double the original memory bandwidth. If you...
Manual - Page 15

...port. Refer the figures below for details.), and enter BIOS Setup, then set Onboard VGA output connect to D-SUB/ HDMI under Advanced BIOS Features.. • Please note the HDMI audio output ...audio jack for USB devices such as a USB keyboard/mouse, USB printer, USB flash drive and etc. Hardware Installation The following describes the states of 1920x1080p but the actual resolutions supported...
Manual - Page 18

... sure the wire assignments and the pin assignments are matched correctly. - 18 - A front panel module mainly consists of power switch, reset switch, power LED, hard drive activity LED, speaker and etc. Hardware Installation Power LED Signal cathode(-) GND Ground Power Switch+ Power Button anode (+) RST Reset Button GND Ground LED_WLAN Wireless...
Manual - Page 21

...'97 Front Panel Audio: Pin No. Incorrect connection between the module connector and the motherboard header will be present on both of the front and back panel audio connections simultaneously....video controller in R 4 PCH_GPIO68 5 Line out R 1 9 6 MIC Jack detect 7 GND 8 No Pin 9 Line out L 10 Line out jack detect • The front panel audio header supports HD audio by default. • ...
Manual - Page 26

... the two pins or use a metal object like a screwdriver to touch the two pins for BIOS configurations). To clear the CMOS values, place a jumper cap on your computer, be sure to... so may cause damage to the motherboard. • After system restart, go to BIOS Setup to load factory defaults (select Load Optimized Defaults) or manually configure the BIOS settings (refer to factory defaults. ...
Manual - Page 27

.../ clearing CMOS jumper in the CMOS on the motherboard. Inadequate BIOS flashing may result in the main menu of the BIOS Setup program. • BIOS flashing is recommended that allows the user to modify basic system configuration settings or to activate certain system features. Chapter 2 BIOS Setup BIOS (Basic Input and Output System) records hardware parameters...
Manual - Page 28

...BIOS settings but not to make changes in the BIOS Setup program to the CMOS and exit BIOS Setup. (Pressing can also carry out this task.) Abandon all the items of AMI BIOS special enhanced features. (ex: Auto detect... only allows you to make changes.  Save & Exit Save all the changes made in BIOS Setup. You can create up to 8 profiles (Profile 1-8) and name each profile.  ...
Manual - Page 29

... the right side of the submenu. • If you do not find the settings you enter the BIOS Setup program, the Main Menu (as usual, select the Restore Defaults item to set your system to ... (General Help) of a highlighted setup option is displayed on the screen. Help for the menu. BIOS Setup Main Menu Help The on-screen description of function keys available for each item is not stable ...
Manual - Page 30

... Display version number of the processor. Project Version Display version number of the project. Compliency Display compliency information. BIOS Setup - 30 - BIOS Build Date and Time Displays the date and time when the BIOS setup utility was created. MAC Address Displays the MAC address information. Memory Information Total Memory Determines how much total...
Manual - Page 31

Options available: Enabled/Disabled. BIOS Setup Default setting is Disabled. - 31 - Legacy OpROM Support Launch PXE OPROM Enable/Disable Boot Option for configuring the function of various hardware components. 2-2 Advanced Menu The Advanced menu display submenu options for PXE device with option ROM. Select a submenu item, then press Enter to access the related submenu screen.
Manual - Page 35

...-Sector Transfer) Configure the information of your drive must match with the drive table. Option available: Auto/Disabled. Option available: Auto/Disabled. BIOS Setup The hard disk will automatically detect HDD type. 2-2-3 SATA Configuration SATA Configuration SATA Port 0/SATA Port 1/mSATA The category identifies Serial ATA and mSATA types of hard disk that the specifications of...
Manual - Page 36

...the PIO (Programmed Input/Output) mode for the two IDE devices (Master and Slave drives) attached to that particular IDE channel. Default setting is Auto. S.M.A.R.T Mode This option .../Output) mode for the two IDE devices (Master and Slave drives) attached to that particular IDE channel. Option available: Auto/Disabled. BIOS Setup - 36 - Option available: Auto/Disabled. Default setting ...
Manual - Page 39

... can press numeric keys to Manual, you attach USB types of device. - 39 - Mass Storage Device(Note) This BIOS feature determines if the USB flash drive be treated as a floppy disk drive or a hard drive. Options available: Auto. (Note) This item is set to configure desired values. Device reset time-out Define USB device...
Manual - Page 43

... Priorities Press Enter to configure the boot priority. Boot Configuration Bootup NumLock State Allows you to set the drive priority during system boot-up. Default setting is not bootable. BIOS Setup Boot Priority Order Boot Option Priorities Press Enter to configure the boot priority. - 43 - 2-4 Boot Menu The Boot menu allows you...
Manual - Page 46

... configure the device as User Defaults Press on this item and then press the key to restore user default settings. Restore as the boot-up drive. BIOS Setup - 46 - Launch EFI Shell from filesystem device. Options available: Yes/No. Restore as User Defaults Press on this item to Launch EFI Shell from...

Similar Questions

Msata
I have this board and it don't won't to work with mSATA hdd . It don't even see that drive :
(Posted by buszkiew13 7 months ago)
Flash Damp For Msh61di.
Required flash damp for MSH61DI. Flash MX25L3206EM2I.
(Posted by lubitel50 6 years ago)
Ssd,ahci,bios For Ga-945p-s3
In my Bios there is no possibility to pass in AHCI for use of SSD. Does this motherboard support SSD...
(Posted by michelbranger 9 years ago)
How To Add An Ssd Drive To Raid 0. It Has 2 Drives.
I have 2 128G SSD's in a Raid 0. I'd like to add another drive or would it be better to use it to ca...
(Posted by papavonschoen 10 years ago)
Ga 945pls3 Problem Sata Hard Not Detected
i have a mainboard gigabyte ga-945pl-s3 my mainboard not detect sata hard drive (maxtor 250) please ...
(Posted by wwwshahin1766 12 years ago)
Ask a New Question
Use the box below to post a new question about this Gigabyte product .
Points & Prizes
  • You can earn points for nearly everything you do on HelpOwl.com
  • You can trade in those points for gift cards at leading retailers such as Amazon.com and Walmart
  • It's that simple!
See How it Works
Create a Free Account

Gigabyte Manuals

Find free Gigabyte MSH61DI manuals and user guides available at ManualOwl.com. Try out our unique manual viewer allowing you to interact with manuals from directly within your browser!

Gigabyte Reviews

View thousands of Gigabyte user reviews and customer ratings available at ReviewOwl.com.

Contact Information

Complete Gigabyte customer service contact information including steps to reach representatives, hours of operation, customer support links and more from ContactHelp.com.

Scoreboard Ratings

See detailed Gigabyte customer service rankings, employee comments and much more from our sister site.