Get support for Gigabyte MSH61DI

Gigabyte MSH61DI Support Question

Gigabyte MSH61DI Support Question

Find answers below for this question about Gigabyte MSH61DI.
Need a Gigabyte MSH61DI manual? We have 1 online manual for this item!
Question posted by buszkiew13 on September 18th, 2023

Msata

I have this board and it don't won't to work with mSATA hdd . It don't even see that drive :

Current Answers

Answer #1: Posted by SonuKumar on September 18th, 2023 9:23 AM
This answer was accepted by the poster of the original question.
SonuKumar

Member since:
May 9th, 2021

Points: 16,621,300
1,100
points
I understand that your Gigabyte MSH61DI board will not detect your mSATA drive. There are a few things you can try to troubleshoot the issue:

Check the compatibility list for your motherboard. Make sure that your mSATA drive is listed as compatible.

Update your BIOS to the latest version. This may include a fix for the issue you are experiencing.

Try connecting the mSATA drive to a different port on the motherboard.

Try connecting a different mSATA drive to the motherboard. If the motherboard detects the other drive, then the issue is with your original drive.

If you have tried all of the above and the motherboard still does not detect the mSATA drive, then the issue may be with the motherboard itself. In this case, you will need to contact Gigabyte support for further assistance.

Here are some additional troubleshooting tips:

Make sure that the mSATA drive is properly seated in the port.

Try clearing the CMOS. This will reset the BIOS to its default settings.

Try booting the computer using a bootable USB drive. This will rule out any issues with the operating system.

If you have tried all of the above and the motherboard still does not detect the mSATA drive, then the issue is likely with the motherboard itself. In this case, you will need to contact Gigabyte support for further assistance.


Please respond to my effort to provide you with the best possible solution by using the "Acceptable Solution" and/or the "Helpful" buttons when the answer has proven to be helpful.

Regards,
Sonu
Your search handyman for all e-support needs!!

Related Gigabyte MSH61DI Manual Pages

Manual - Page 1

MSH61DI LGA1155 socket motherboard for Intel® Core™ i3 / Core™ i5 Core™ i7 processors/ Intel® Pentium® series processors User's Manual Rev. 1001
Manual - Page 3

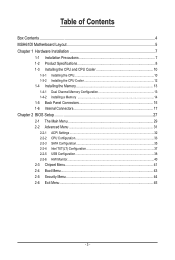
Table of Contents Box Contents...4 MSH61DI Motherboard Layout 5 Chapter 1 Hardware Installation 7 1-1 Installation Precautions 7 1-2 Product Specifications 8 1-3 Installing the CPU and CPU Cooler 10 1-3-1 Installing the CPU...10 1-3-2 Installing the CPU Cooler 12 1-4 Installing ...
Manual - Page 4

The box contents are for reference only. - 4 - Box Contents MSH61DI motherboard Driver CD Two SATA cables I/O Shield • The box contents above are subject to change without notice. • The motherboard image is for reference only and the actual items shall depend on the product package you obtain.
Manual - Page 5

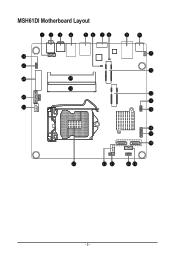
MSH61DI Motherboard Layout 123 4 5 6 78 9 10 11 28 27 12 26 29 30 13 25 14 24 15 16 17 18 23 22 21 20 19 - 5 -
Manual - Page 6

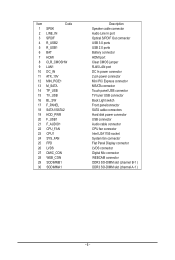
... USB 3.0 ports USB 2.0 ports Battery connector HDMI port Clear CMOS jumper RJ45 LAN port DC In power connector 2 pin power connector Mini PCi Express connector MSATA connector Touch panel USB connector TV tuner USB connector Back Light switch Front panelconnector SATA cable connectors Hard disk power connector USB connector Audio cable...
Manual - Page 7

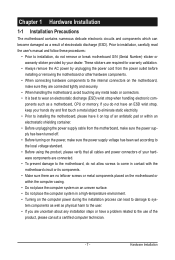
... and power connectors of the product, please consult a certified computer technician. - 7 - ponents such as a result of electrostatic discharge (ESD). Chapter 1 Hardware Installation 1-1 Installation Precautions The motherboard contains numerous delicate electronic circuits and components which can lead to damage to system components as well as physical harm to the user. • If...
Manual - Page 8

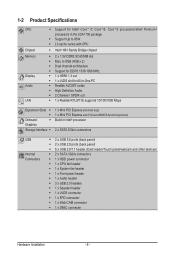
... Mini PCI Express slot (Half size) 1 x Mini PCI Express slot (Full size/MSATA function/optional) Build in the LGA1155 package ŠŠ Support Up to 8GB (4GB...2.0/1.1 header (Card reader/Touch panel/webcam and other devices) ŠŠ 2 x SATA 3Gb/s connectors ŠŠ 1 x HDD power connector ŠŠ 1 x CPU fan header ŠŠ 1 x System fan header ŠŠ 1 x Front panel...
Manual - Page 10

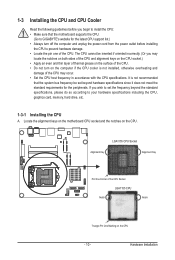
... Locate the alignment keys on the motherboard CPU socket and the notches on the computer if the CPU cooler is not recommended that the motherboard supports the CPU. (Go to GIGABYTE...before installing the CPU to your hardware specifications including the CPU, graphics card, memory, hard drive, etc. 1-3-1 Installing the CPU A. If you wish to set beyond the standard specifications...
Manual - Page 11

... rear grip of the load plate is not installed.) Step 3: Hold the CPU with the socket alignment keys) and gently insert the CPU into the motherboard CPU socket. B.
Manual - Page 12

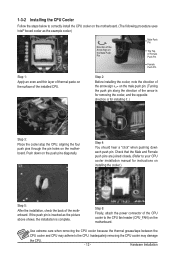
... the CPU cooler may adhere to the CPU fan header (CPU_FAN) on the motherboard. Hardware Installation Check that the Male and Female push pins are joined closely. (Refer to correctly... is for instructions on installing the cooler.) Step 5: After the installation, check the back of the motherboard. Push down each push pin. 1-3-2 Installing the CPU Cooler Follow the steps below to your CPU ...
Manual - Page 13

... chips be installed in Dual Channel mode. 1. A memory module can be used . (Go to insert the memory, switch the direction. 1-4-1 Dual Channel Memory Configuration This motherboard provides two DDR3 memory sockets and supports Dual Channel Technology. The two DDR3 memory sockets are unable to GIGABYTE's website for optimum performance. Enabling Dual...
Manual - Page 14

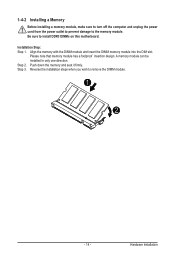
... 3. Push down the memory and seat it firmly. Installation Step: Step 1. Step 2. Reverse the installation steps when you wish to install DDR3 DIMMs on this motherboard. Hardware Installation A memory module can be installed In only one direction. 1-4-2 Installing a Memory Before installing a memory module, make sure to turn off the computer and...
Manual - Page 15

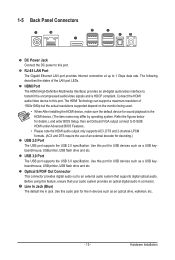
... decoder for line in jack. Line In Jack (Blue) The default line in devices such as an optical drive, walkman, etc. - 15 - Use this port. Hardware Installation HDMI Port The HDMI (High-Definition Multimedia ... for USB devices such as a USB keyboard/mouse, USB printer, USB flash drive and etc. Use this port. Before using this port for USB devices such as a USB keyboard/mouse,...
Manual - Page 16

... is occurring • When removing the cable connected to a back panel connector, first remove the cable from your device and then remove it from the motherboard. • When removing the cable, pull it side to side to prevent an electrical short inside the cable connector.
Manual - Page 17

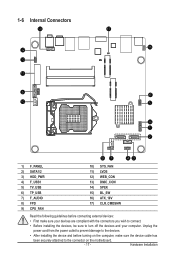
..., make sure your devices are compliant with the connectors you wish to connect. • Before installing the devices, be sure to the connector on the motherboard. - 17 - Hardware Installation Unplug the power cord from the power outlet to prevent damage to the devices. • After installing the device and before connecting...
Manual - Page 21

... Definition 1 MIC in L 2 GND 2 10 3 MIC in a laptop computer, computer monitor or LCD television set to work or even damage it. For information about connecting the front panel audio module that has separated connectors on both of the front... (HD) and AC'97 audio. Incorrect connection between the module connector and the motherboard header will be present on each wire instead of the...
Manual - Page 22

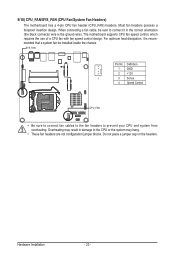
... headers are not configuration jumper blocks. Most fan headers possess a foolproof insertion design. The motherboard supports CPU fan speed control, which requires the use of a CPU fan with fan speed... wire). Hardware Installation - 22 - 9/10) CPU_FAN/SYS_FAN (CPU Fan/System Fan Headers) The motherboard has a 4-pin CPU fan header (CPU_FAN) headers. For optimum heat dissipation, it in damage ...
Manual - Page 26

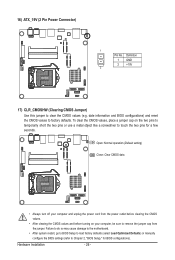
... - 26 - date information and BIOS configurations) and reset the CMOS values to clear the CMOS values (e.g. Failure to do so may cause damage to the motherboard. • After system restart, go to BIOS Setup to load factory defaults (select Load Optimized Defaults) or manually configure the BIOS settings (refer to Chapter...
Manual - Page 27

...and loading operating system, etc. If this occurs, try to clear the CMOS values and reset the board to default values. (Refer to the "Load Optimized Defaults" section in this chapter or introductions of the...Setup program. • BIOS flashing is turned off, the battery on the motherboard. Chapter 2 BIOS Setup BIOS (Basic Input and Output System) records hardware parameters of the system in ...
Manual - Page 35

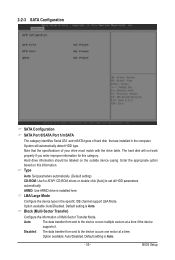
... data transfer from and to set all HDD parameters automatically. System will not work properly if you enter improper information for ATAPI CD-ROM drives or double click [Auto] to the ... The hard disk will automatically detect HDD type. 2-2-3 SATA Configuration SATA Configuration SATA Port 0/SATA Port 1/mSATA The category identifies Serial ATA and mSATA types of hard disk that the...

Similar Questions

Doesn't Detect Msata Ssd Drive In Bios
Why Gigabyte MSH61DI doesn't detect Msata ssd drive in bios ?
(Posted by dijenraj 8 months ago)
Flash Damp For Msh61di.
Required flash damp for MSH61DI. Flash MX25L3206EM2I.
(Posted by lubitel50 6 years ago)
Usb 3 On Ga-880ga-ud3h Problem
After I fixed a new USB3 card the on board USB3 does not function when I connect ex hard drive to it
(Posted by essmatz1 11 years ago)
Raid In Ga-945p-s3 Motherboards
How can we enable RAID in Gigabyte GA-945P-S3 motherboards?
(Posted by Amrsh 12 years ago)
Ask a New Question
Use the box below to post a new question about this Gigabyte product .
Points & Prizes
  • You can earn points for nearly everything you do on HelpOwl.com
  • You can trade in those points for gift cards at leading retailers such as Amazon.com and Walmart
  • It's that simple!
See How it Works
Create a Free Account

Gigabyte Manuals

Find free Gigabyte MSH61DI manuals and user guides available at ManualOwl.com. Try out our unique manual viewer allowing you to interact with manuals from directly within your browser!

Gigabyte Reviews

View thousands of Gigabyte user reviews and customer ratings available at ReviewOwl.com.

Contact Information

Complete Gigabyte customer service contact information including steps to reach representatives, hours of operation, customer support links and more from ContactHelp.com.

Scoreboard Ratings

See detailed Gigabyte customer service rankings, employee comments and much more from our sister site.