Manual
Page 10
GA-945GCM-S2L/S2C Motherboard - 10 - Only for GA-945GCM-S2L. 1-2 Product Specifications CPU Front Side Bus Chipset Memory Onboard Graphics Audio LAN Expansion Slots Storage Interface USB Š Support for an Intel® CoreTM 2 Extreme processor/ Intel® CoreTM 2 Duo processor/Intel® Pentium® D .../ Intel® Celeron® processor in the LGA 775 package (Go to GIGABYTE's website for the latest CPU support list.) Š Support for Intel® Hyper-Threading Technology Š L2 cache varies with CPU Š 1333 (Note 1)/1066/800/533 MHz FSB Š North Bridge:...
GA-945GCM-S2L/S2C Motherboard - 10 - Only for GA-945GCM-S2L. 1-2 Product Specifications CPU Front Side Bus Chipset Memory Onboard Graphics Audio LAN Expansion Slots Storage Interface USB Š Support for an Intel® CoreTM 2 Extreme processor/ Intel® CoreTM 2 Duo processor/Intel® Pentium® D .../ Intel® Celeron® processor in the LGA 775 package (Go to GIGABYTE's website for the latest CPU support list.) Š Support for Intel® Hyper-Threading Technology Š L2 cache varies with CPU Š 1333 (Note 1)/1066/800/533 MHz FSB Š North Bridge:...
Manual
Page 12
... the FSB 1333 MHz CoreTM 2 CPU with 1333 MHz FSB through overclocking. GA-945GCM-S2L/S2C Motherboard - 12 - Unique Features Bundled Software Operating System Form Factor Š Support for @BIOS Š Support for Download Center Š Support for Q-Flash Š Support for EasyTune (Note 4) Š Support for Xpress Install Š Support for Xpress Recovery2 Š Support for Virtual Dual BIOS Š...
... the FSB 1333 MHz CoreTM 2 CPU with 1333 MHz FSB through overclocking. GA-945GCM-S2L/S2C Motherboard - 12 - Unique Features Bundled Software Operating System Form Factor Š Support for @BIOS Š Support for Download Center Š Support for Q-Flash Š Support for EasyTune (Note 4) Š Support for Xpress Install Š Support for Xpress Recovery2 Š Support for Virtual Dual BIOS Š...
Manual
Page 13
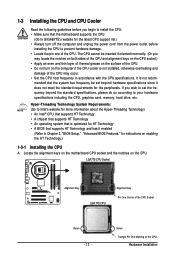
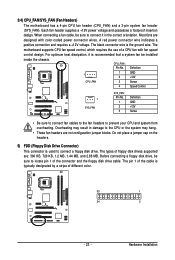
... from the power outlet before you begin to install the CPU: • Make sure that the motherboard supports the CPU. (Go to GIGABYTE's website for the latest CPU support list.) • Always turn on enabling the HT Technology.) 1-3-1 Installing the CPU A. Notch Triangle Pin One Marking on the CPU. It is not installed, otherwise overheating and damage of...
... from the power outlet before you begin to install the CPU: • Make sure that the motherboard supports the CPU. (Go to GIGABYTE's website for the latest CPU support list.) • Always turn on enabling the HT Technology.) 1-3-1 Installing the CPU A. Notch Triangle Pin One Marking on the CPU. It is not installed, otherwise overheating and damage of...
Manual
Page 23
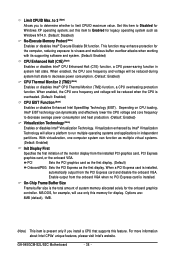
...Do not place a jumper cap on the headers. 5) FDD (Floppy Disk Drive Connector) This connector is the ground wire. The motherboard supports CPU fan speed control, which requires the use of the connector and the floppy disk drive cable. Overheating may hang. • These fan ...coded power connector wires. CPU_FAN : Pin No. For optimum heat dissipation, it in damage to prevent your CPU and system from overheating. 3/4) CPU_FAN/SYS_FAN (Fan Headers) The motherboard has a 4-pin CPU fan header (CPU_FAN) and a 3-pin system fan header (SYS_FAN). The types of different color. 33 ...
...Do not place a jumper cap on the headers. 5) FDD (Floppy Disk Drive Connector) This connector is the ground wire. The motherboard supports CPU fan speed control, which requires the use of the connector and the floppy disk drive cable. Overheating may hang. • These fan ...coded power connector wires. CPU_FAN : Pin No. For optimum heat dissipation, it in damage to prevent your CPU and system from overheating. 3/4) CPU_FAN/SYS_FAN (Fan Headers) The motherboard has a 4-pin CPU fan header (CPU_FAN) and a 3-pin system fan header (SYS_FAN). The types of different color. 33 ...

Manual
Page 37
...HDD S.M.A.R.T. BIOS Setup After configuring this feature. For more information about Intel CPUs' unique features, please visit Intel's website. - 37 - Capability CPU Hyper-Threading (Note) Limit CPUID Max. Use the up or down arrow key to select a hard drive, then press the plus key (... is required for booting the system and for operating systems that support multi-processors mode. (Default: Enabled) (Note) This item is required every time the system boots, or only when you install a CPU that supports this item, set the password(s) under the Set Supervisor/User ...
...HDD S.M.A.R.T. BIOS Setup After configuring this feature. For more information about Intel CPUs' unique features, please visit Intel's website. - 37 - Capability CPU Hyper-Threading (Note) Limit CPUID Max. Use the up or down arrow key to select a hard drive, then press the plus key (... is required for booting the system and for operating systems that support multi-processors mode. (Default: Enabled) (Note) This item is required every time the system boots, or only when you install a CPU that supports this item, set the password(s) under the Set Supervisor/User ...
Manual
Page 38
.... (Default: Enabled) CPU EIST Function (Note) Enables or disables Enhanced Intel SpeedStep Technology (EIST). Options are: 8MB (default), 1MB. (Note) This item is present only if you to determine whether to Enabled for Windows XP operating system; GA-945GCM-S2L/S2C Motherboard - 38 ...to viruses and malicious buffer overflow attacks when working with its supporting software and system. (Default: Enabled) CPU Enhanced Halt (C1E) (Note) Enables or disables Intel® CPU Enhanced Halt (C1E) function, a CPU power-saving function in independent partitions. set this memory for...
.... (Default: Enabled) CPU EIST Function (Note) Enables or disables Enhanced Intel SpeedStep Technology (EIST). Options are: 8MB (default), 1MB. (Note) This item is present only if you to determine whether to Enabled for Windows XP operating system; GA-945GCM-S2L/S2C Motherboard - 38 ...to viruses and malicious buffer overflow attacks when working with its supporting software and system. (Default: Enabled) CPU Enhanced Halt (C1E) (Note) Enables or disables Intel® CPU Enhanced Halt (C1E) function, a CPU power-saving function in independent partitions. set this memory for...
Manual
Page 48
... doing overclock/overvoltage may result in damage to CPU, chipset, or memory and reduce the useful life of a CoreTM 2 CPU with 1333 MHz FSB through overclocking. GA-945GCM-S2L/S2C Motherboard - 48 - Enabled will appear asking if you install a CPU that supports this feature. This page is present only if a CPU with DDR2 533 (or above) memory module...
... doing overclock/overvoltage may result in damage to CPU, chipset, or memory and reduce the useful life of a CoreTM 2 CPU with 1333 MHz FSB through overclocking. GA-945GCM-S2L/S2C Motherboard - 48 - Enabled will appear asking if you install a CPU that supports this feature. This page is present only if a CPU with DDR2 533 (or above) memory module...
Manual
Page 67
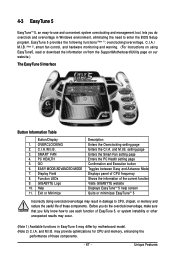
...smart fan control, and hardware monitoring and warning. (For instructions on using EasyTune5, read or download the information on/from the Support\Motherboard\Utility page on our website.) The EasyTune 5 Interface Button Information Table Button/Display 1. setting page Enters the Smart-Fan ...Health setting page Confirmation and Execution button Toggles between Easy and Advance Mode Displays panel of CPU frequency Shows the information of the current function Visits GIGABYTE website Displays EasyTuneTM 5 help screen Quits or minimizes EasyTuneTM 5 Incorrectly doing overclock/overvoltage may...
...smart fan control, and hardware monitoring and warning. (For instructions on using EasyTune5, read or download the information on/from the Support\Motherboard\Utility page on our website.) The EasyTune 5 Interface Button Information Table Button/Display 1. setting page Enters the Smart-Fan ...Health setting page Confirmation and Execution button Toggles between Easy and Advance Mode Displays panel of CPU frequency Shows the information of the current function Visits GIGABYTE website Displays EasyTuneTM 5 help screen Quits or minimizes EasyTuneTM 5 Incorrectly doing overclock/overvoltage may...
Manual
Page 79
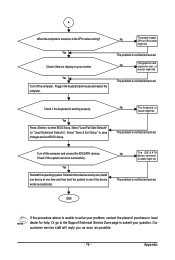
... other devices one by one (install one device at one time and then boot the system to enter BIOS Setup. Or go to the Support\Technical Service Zone page to save changes and exit BIOS Setup. Turn off the computer. A When the computer is turned on your monitor.... Yes Check if there is display on , is working properly. No The power supply, CPU or CPU socket might fail. Yes Press to see if the device works successfully). Select "Load Fail-Safe Defaults" (or "Load Optimized Defaults"). Select "Save ...
... other devices one by one (install one device at one time and then boot the system to enter BIOS Setup. Or go to the Support\Technical Service Zone page to save changes and exit BIOS Setup. Turn off the computer. A When the computer is turned on your monitor.... Yes Check if there is display on , is working properly. No The power supply, CPU or CPU socket might fail. Yes Press to see if the device works successfully). Select "Load Fail-Safe Defaults" (or "Load Optimized Defaults"). Select "Save ...


