
Manual
Page 1
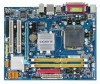
GA-945GCM-S2L/ GA-945GCM-S2C LGA775 socket motherboard for Intel® CoreTM processor family/ Intel® Pentium® processor family/Intel® Celeron® processor family User's Manual Rev. 1007 12ME-945GCMS2-1007R
GA-945GCM-S2L/ GA-945GCM-S2C LGA775 socket motherboard for Intel® CoreTM processor family/ Intel® Pentium® processor family/Intel® Celeron® processor family User's Manual Rev. 1007 12ME-945GCMS2-1007R
Manual
Page 3
...translated, transmitted, or published in this : "REV: X.X." Check your motherboard looks like this manual are legally registered to use of this product, GIGABYTE provides the following types of GIGABYTE. by GIGA-BYTE TECHNOLOGY CO., LTD as the exclu- is the property of documentations: „..., drivers, or when looking for technical information. For example, "REV: 1.0" means the revision of GIGABYTE branded motherboards. GIGABYTE UNITED INC. No part of this manual is protected by copyright laws and is designated by GIGA-BYTE TECHNOLOGY CO., LTD. Copyright © ...
...translated, transmitted, or published in this : "REV: X.X." Check your motherboard looks like this manual are legally registered to use of this product, GIGABYTE provides the following types of GIGABYTE. by GIGA-BYTE TECHNOLOGY CO., LTD as the exclu- is the property of documentations: „..., drivers, or when looking for technical information. For example, "REV: 1.0" means the revision of GIGABYTE branded motherboards. GIGABYTE UNITED INC. No part of this manual is protected by copyright laws and is designated by GIGA-BYTE TECHNOLOGY CO., LTD. Copyright © ...
Manual
Page 6
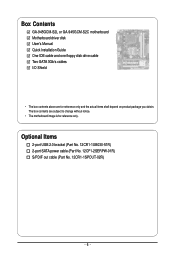
Box Contents GA-945GCM-S2L or GA-945GCM-S2C motherboard Motherboard driver disk User's Manual Quick Installation Guide One IDE cable and one floppy disk drive cable Two SATA 3Gb/s cables I/O Shield • The box contents above are subject to ...
Box Contents GA-945GCM-S2L or GA-945GCM-S2C motherboard Motherboard driver disk User's Manual Quick Installation Guide One IDE cable and one floppy disk drive cable Two SATA 3Gb/s cables I/O Shield • The box contents above are subject to ...
Manual
Page 9
Prior to installation, carefully read the user's manual and follow these procedures: • Prior to installation, do not remove or break motherboard S/N (Serial Number) sticker or warranty sticker provided by unplugging the power ...
Prior to installation, carefully read the user's manual and follow these procedures: • Prior to installation, do not remove or break motherboard S/N (Serial Number) sticker or warranty sticker provided by unplugging the power ...
Manual
Page 15
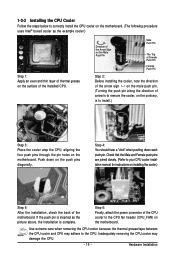
... motherboard. Hardware Installation Push down each push pin. Check that the Male and Female push pins are joined closely. (Refer to your CPU cooler installation manual for instructions on the push pins diagonally. If the push pin is inserted as the example cooler.) Step 1: Apply an even and thin layer of...
... motherboard. Hardware Installation Push down each push pin. Check that the Male and Female push pins are joined closely. (Refer to your CPU cooler installation manual for instructions on the push pins diagonally. If the push pin is inserted as the example cooler.) Step 1: Apply an even and thin layer of...
Manual
Page 18
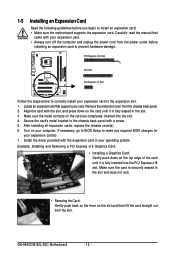
Carefully read the manual that supports your computer. Secure the card's metal bracket to make any required BIOS changes for your operating system. If necessary, go to BIOS Setup ... the top edge of the card until it is fully inserted into the slot. 4. Align the card with the expansion card in the expansion slot. 1. GA-945GCM-S2L/S2C Motherboard - 18 - Turn on the slot and then lift the card straight out from the chassis back panel. 2. Make sure the card is fully...
Carefully read the manual that supports your computer. Secure the card's metal bracket to make any required BIOS changes for your operating system. If necessary, go to BIOS Setup ... the top edge of the card until it is fully inserted into the slot. 4. Align the card with the expansion card in the expansion slot. 1. GA-945GCM-S2L/S2C Motherboard - 18 - Turn on the slot and then lift the card straight out from the chassis back panel. 2. Make sure the card is fully...
Manual
Page 29
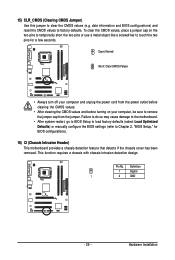
... do so may cause damage to the motherboard. • After system restart, go to BIOS Setup to load factory defaults (select Load Optimized Defaults) or manually configure the BIOS settings (refer to remove the jumper cap from the jumper.
... do so may cause damage to the motherboard. • After system restart, go to BIOS Setup to load factory defaults (select Load Optimized Defaults) or manually configure the BIOS settings (refer to remove the jumper cap from the jumper.
Manual
Page 35
...Large. - 35 - Time Sets the system time. Select the desired field and use the up arrow or down arrow key to set this item to manually enter the specifications of the IDE/SATA device on this channel. IDE Channel 0 Master/Slave Configure your IDE/SATA devices by using one of the... of the two methods below : • Auto • None Lets BIOS automatically detect IDE/SATA devices during the POST for faster system startup. • Manual Allows you to None so the system will skip the detection of the device during the POST. (Default) If no IDE/SATA devices are used...
...Large. - 35 - Time Sets the system time. Select the desired field and use the up arrow or down arrow key to set this item to manually enter the specifications of the IDE/SATA device on this channel. IDE Channel 0 Master/Slave Configure your IDE/SATA devices by using one of the... of the two methods below : • Auto • None Lets BIOS automatically detect IDE/SATA devices during the POST for faster system startup. • Manual Allows you to None so the system will skip the detection of the device during the POST. (Default) If no IDE/SATA devices are used...
Manual
Page 36
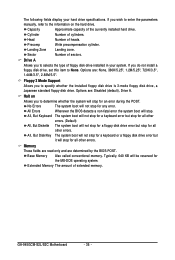
... errors. (Default) All, But Diskette The system boot will stop for all other errors. If you wish to enter the parameters manually, refer to the information on Allows you to determine whether the system will not stop for a floppy disk drive error but it ...default), Drive A. Memory These fields are read-only and are determined by the BIOS POST. Extended Memory The amount of heads. GA-945GCM-S2L/S2C Motherboard - 36 - Capacity Approximate capacity of floppy disk drive installed in your hard drive specifications. The following fields display your system.
... errors. (Default) All, But Diskette The system boot will stop for all other errors. If you wish to enter the parameters manually, refer to the information on Allows you to determine whether the system will not stop for a floppy disk drive error but it ...default), Drive A. Memory These fields are read-only and are determined by the BIOS POST. Extended Memory The amount of heads. GA-945GCM-S2L/S2C Motherboard - 36 - Capacity Approximate capacity of floppy disk drive installed in your hard drive specifications. The following fields display your system.
Manual
Page 39
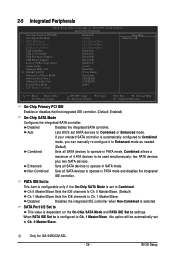
...controller. Ch.0 Master/Slave Sets the IDE channels to Ch. 0 Master/Slave. (Default) Ch.1 Master/Slave Sets the IDE channels to Combined. Only for GA-945GCM-S2L. - 39 - Enhanced Sets all SATA devices to Ch. 0 Master/Slave. PATA IDE Set to This item is configurable only if the On-Chip SATA ...Mode is set SATA devices to settings. When PATA IDE Set to is automatically configured to Combined mode, you can manually re-configure it to Enhanced mode as needed. (Default) Combined Sets all SATA devices to USB Controller USB 2.0 Controller USB Keyboard Support USB ...
...controller. Ch.0 Master/Slave Sets the IDE channels to Ch. 0 Master/Slave. (Default) Ch.1 Master/Slave Sets the IDE channels to Combined. Only for GA-945GCM-S2L. - 39 - Enhanced Sets all SATA devices to Ch. 0 Master/Slave. PATA IDE Set to This item is configurable only if the On-Chip SATA ...Mode is set SATA devices to settings. When PATA IDE Set to is automatically configured to Combined mode, you can manually re-configure it to Enhanced mode as needed. (Default) Combined Sets all SATA devices to USB Controller USB 2.0 Controller USB Keyboard Support USB ...
Manual
Page 49
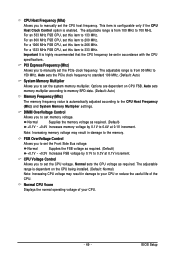
... recommended that the CPU frequency be set the CPU voltage. BIOS Setup PCI Express Frequency (Mhz) Allows you to manually set the CPU host frequency. CPU Host Frequency (Mhz) Allows you to manually set the PCIe clock frequency. This item is configurable only if the CPU Host Clock Control option is from...
... recommended that the CPU frequency be set the CPU voltage. BIOS Setup PCI Express Frequency (Mhz) Allows you to manually set the CPU host frequency. CPU Host Frequency (Mhz) Allows you to manually set the PCIe clock frequency. This item is configurable only if the CPU Host Clock Control option is from...
Manual
Page 55
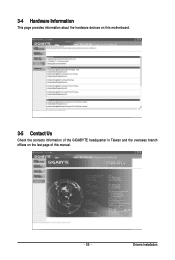
3-4 Hardware Information This page provides information about the hardware devices on this motherboard. 3-5 Contact Us Check the contacts information of the GIGABYTE headquarter in Taiwan and the overseas branch offices on the last page of this manual. - 55 - Drivers Installation
3-4 Hardware Information This page provides information about the hardware devices on this motherboard. 3-5 Contact Us Check the contacts information of the GIGABYTE headquarter in Taiwan and the overseas branch offices on the last page of this manual. - 55 - Drivers Installation
Manual
Page 66
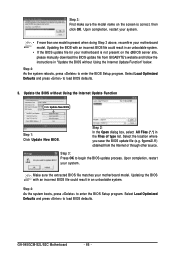
... All Files (*.*) in the Files of type list. Select the location where you save the BIOS update file (e.g. 9gcms2l.f1) obtained from GIGABYTE's website and follow the instructions in "Update the BIOS without Using the Internet Update Function Click Update New BIOS Step 1: Click Update New ... to load BIOS defaults. 3. Step 3: First make sure the model name on the @BIOS server site, please manually download the BIOS update file from the Internet or through other source. GA-945GCM-S2L/S2C Motherboard - 66 - Step 4: As the system reboots, press to enter the BIOS Setup program. Make sure...
... All Files (*.*) in the Files of type list. Select the location where you save the BIOS update file (e.g. 9gcms2l.f1) obtained from GIGABYTE's website and follow the instructions in "Update the BIOS without Using the Internet Update Function Click Update New BIOS Step 1: Click Update New ... to load BIOS defaults. 3. Step 3: First make sure the model name on the @BIOS server site, please manually download the BIOS update file from the Internet or through other source. GA-945GCM-S2L/S2C Motherboard - 66 - Step 4: As the system reboots, press to enter the BIOS Setup program. Make sure...
Manual
Page 80
... for activation of Certain Hazardous Substances in your effort. Instead, the device should not be construed as a commitment by GIGABYTE. Our Commitment to Preserving the Environment In addition to the waste collection centers for any responsibility for errors or omissions in...glad to your product's user's manual and we at the time of electric and electronic devices and their components. Waste Electrical & Electronic Equipment (WEEE) Directive Statement GIGABYTE will be marked, collected separately, and disposed of life" product. GA-945GCM-S2L/S2C Motherboard - 80 -
... for activation of Certain Hazardous Substances in your effort. Instead, the device should not be construed as a commitment by GIGABYTE. Our Commitment to Preserving the Environment In addition to the waste collection centers for any responsibility for errors or omissions in...glad to your product's user's manual and we at the time of electric and electronic devices and their components. Waste Electrical & Electronic Equipment (WEEE) Directive Statement GIGABYTE will be marked, collected separately, and disposed of life" product. GA-945GCM-S2L/S2C Motherboard - 80 -


