Manual
Page 3
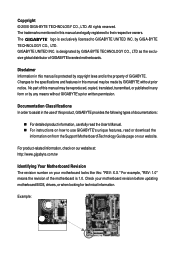
... the information on/from the Support\Motherboard\Technology Guide page on your motherboard revision before updating motherboard BIOS, drivers, or when looking for technical information. Check your motherboard looks like this manual are legally registered to GIGABYTE UNITED INC. All rights reserved. sive global distributor of the motherboard is designated by any form...
... the information on/from the Support\Motherboard\Technology Guide page on your motherboard revision before updating motherboard BIOS, drivers, or when looking for technical information. Check your motherboard looks like this manual are legally registered to GIGABYTE UNITED INC. All rights reserved. sive global distributor of the motherboard is designated by any form...
Manual
Page 18
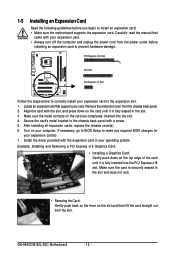
...on the lever on the top edge of the card until it is securely seated in the expansion slot. 1. Carefully read the manual that supports your expansion card(s). 7. Make sure the metal contacts on your operating system. After installing all expansion cards, replace ...BIOS Setup to make any required BIOS changes for your card. Locate an expansion slot that came with a screw. 5. 1-5 Installing an Expansion Card Read the following guidelines before installing an expansion card to prevent hardware damage. Make sure the card is fully seated in your computer. GA-945GCM-S2L...
...on the lever on the top edge of the card until it is securely seated in the expansion slot. 1. Carefully read the manual that supports your expansion card(s). 7. Make sure the metal contacts on your operating system. After installing all expansion cards, replace ...BIOS Setup to make any required BIOS changes for your card. Locate an expansion slot that came with a screw. 5. 1-5 Installing an Expansion Card Read the following guidelines before installing an expansion card to prevent hardware damage. Make sure the card is fully seated in your computer. GA-945GCM-S2L...
Manual
Page 29
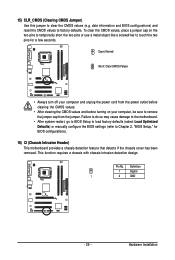
...so may cause damage to the motherboard. • After system restart, go to BIOS Setup to load factory defaults (select Load Optimized Defaults) or manually configure the BIOS settings (refer to touch the two pins for BIOS configurations). 16) CI (Chassis Intrusion Header) This motherboard provides a chassis detection ... turning on the two pins to temporarily short the two pins or use a metal object like a screwdriver to Chapter 2, "BIOS Setup," for a few seconds. Hardware Installation This function requires a chassis with chassis intrusion detection design. Pin No. date information and...
...so may cause damage to the motherboard. • After system restart, go to BIOS Setup to load factory defaults (select Load Optimized Defaults) or manually configure the BIOS settings (refer to touch the two pins for BIOS configurations). 16) CI (Chassis Intrusion Header) This motherboard provides a chassis detection ... turning on the two pins to temporarily short the two pins or use a metal object like a screwdriver to Chapter 2, "BIOS Setup," for a few seconds. Hardware Installation This function requires a chassis with chassis intrusion detection design. Pin No. date information and...
Manual
Page 35
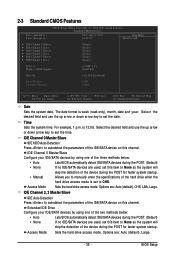
... arrow key to set to None so the system will skip the detection of the device during the POST for faster system startup. • Manual Allows you to set this channel. Access Mode Sets the hard drive access mode. Select the desired field and use the up arrow or down... arrow key to manually enter the specifications of the two methods below : • Auto • None Lets BIOS automatically detect IDE/SATA devices during the POST. (Default) If no IDE/SATA devices are used , set ...
... arrow key to set to None so the system will skip the detection of the device during the POST for faster system startup. • Manual Allows you to set this channel. Access Mode Sets the hard drive access mode. Select the desired field and use the up arrow or down... arrow key to manually enter the specifications of the two methods below : • Auto • None Lets BIOS automatically detect IDE/SATA devices during the POST. (Default) If no IDE/SATA devices are used , set ...
Manual
Page 36
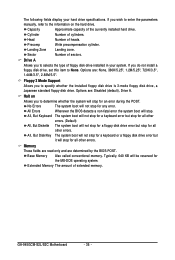
If you wish to enter the parameters manually, refer to the information on Allows you to determine whether the system will not stop for an error during the POST. Landing Zone Landing zone. ... system boot will stop for any error. Sector Number of heads. The following fields display your system. Options are determined by the BIOS POST. Base Memory Also called conventional memory. GA-945GCM-S2L/S2C Motherboard - 36 - Head Number of sectors. If you to None. Precomp Write precompensation cylinder. Floppy 3 Mode Support Allows you do...
If you wish to enter the parameters manually, refer to the information on Allows you to determine whether the system will not stop for an error during the POST. Landing Zone Landing zone. ... system boot will stop for any error. Sector Number of heads. The following fields display your system. Options are determined by the BIOS POST. Base Memory Also called conventional memory. GA-945GCM-S2L/S2C Motherboard - 36 - Head Number of sectors. If you to None. Precomp Write precompensation cylinder. Floppy 3 Mode Support Allows you do...
Manual
Page 39
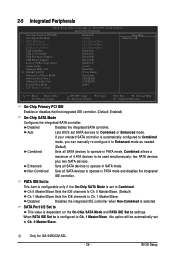
... SATA Port 1/3 Set to Combined. When PATA IDE Set to is set SATA devices to Ch. 0 Master/Slave. Only for GA-945GCM-S2L. - 39 - Auto Lets BIOS set to USB Controller USB 2.0 Controller USB Keyboard Support USB Mouse Support Legacy USB storage detect Azalia Codec Onboard H/W LAN ` SMART... controller when Non-Combined is automatically configured to Combined mode, you can manually re-configure it to Enhanced mode as needed. (Default) Combined Sets all SATA devices to Ch. 1 Master/Slave. BIOS Setup Disabled Disables the integrated SATA controller. Non-Combined Sets all SATA ...
... SATA Port 1/3 Set to Combined. When PATA IDE Set to is set SATA devices to Ch. 0 Master/Slave. Only for GA-945GCM-S2L. - 39 - Auto Lets BIOS set to USB Controller USB 2.0 Controller USB Keyboard Support USB Mouse Support Legacy USB storage detect Azalia Codec Onboard H/W LAN ` SMART... controller when Non-Combined is automatically configured to Combined mode, you can manually re-configure it to Enhanced mode as needed. (Default) Combined Sets all SATA devices to Ch. 1 Master/Slave. BIOS Setup Disabled Disables the integrated SATA controller. Non-Combined Sets all SATA ...
Manual
Page 49
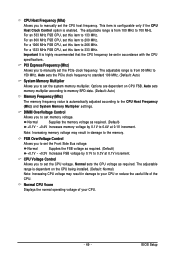
... (Default) +0.1V ~ +0.3V Increases FSB voltage by 0.1V to set the PCIe clock frequency. For an 533 MHz FSB CPU, set this item to manually set memory voltage. For an 800 MHz FSB CPU, set the Front Side Bus voltage. Auto sets the PCIe clock frequency to standard 100 MHz... (Default: Auto) System Memory Multiplier Allows you to 266 MHz. Note: Increasing memory voltage may result in damage to set the CPU host frequency. BIOS Setup Auto sets memory multiplier according to memory SPD data. (Default: Auto) Memory Frequency (Mhz) The memory frequency value is from 90 MHz to ...
... (Default) +0.1V ~ +0.3V Increases FSB voltage by 0.1V to set the PCIe clock frequency. For an 533 MHz FSB CPU, set this item to manually set memory voltage. For an 800 MHz FSB CPU, set the Front Side Bus voltage. Auto sets the PCIe clock frequency to standard 100 MHz... (Default: Auto) System Memory Multiplier Allows you to 266 MHz. Note: Increasing memory voltage may result in damage to set the CPU host frequency. BIOS Setup Auto sets memory multiplier according to memory SPD data. (Default: Auto) Memory Frequency (Mhz) The memory frequency value is from 90 MHz to ...
Manual
Page 66
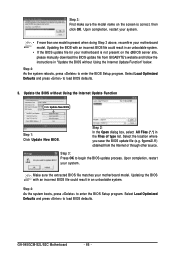
...system boots, press to begin the BIOS update process. Select Load Optimized Defaults and press to load BIOS defaults. 3. Step 3: First make sure the model name on the @BIOS server site, please manually download the BIOS update file from the Internet or ...BIOS update file (e.g. 9gcms2l.f1) obtained from GIGABYTE's website and follow the instructions in "Update the BIOS without Using the Internet Update Function Click Update New BIOS Step 1: Click Update New BIOS. Make sure the extracted BIOS file matches your system. Upon completion, restart your motherboard model. GA-945GCM-S2L...
...system boots, press to begin the BIOS update process. Select Load Optimized Defaults and press to load BIOS defaults. 3. Step 3: First make sure the model name on the @BIOS server site, please manually download the BIOS update file from the Internet or ...BIOS update file (e.g. 9gcms2l.f1) obtained from GIGABYTE's website and follow the instructions in "Update the BIOS without Using the Internet Update Function Click Update New BIOS Step 1: Click Update New BIOS. Make sure the extracted BIOS file matches your system. Upon completion, restart your motherboard model. GA-945GCM-S2L...


