Manual
Page 8
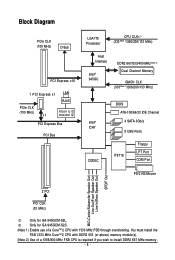
Only for GA-945GCM-S2L. Block Diagram PCIe CLK (100 MHz) D-Sub PCI Express x16 1 PCI Express x1 LAN RJ45 PCIe CLK (100 MHz) x1 RTL8111C RTL8101E PCI Express Bus ... MIC(Center/Subwoofer Speaker Out) Line-Out(Front Speaker Out) Line-In(Rear Speaker Out) SPDIF Out 2 PCI PCI CLK (33 MHz) Only for GA-945GCM-S2C. (Note 1) Enable use of a 1066/800 MHz FSB CPU is required if you wish to install DDR2 667 MHz memory. - 8 - You must install the FSB 1333 MHz...
Only for GA-945GCM-S2L. Block Diagram PCIe CLK (100 MHz) D-Sub PCI Express x16 1 PCI Express x1 LAN RJ45 PCIe CLK (100 MHz) x1 RTL8111C RTL8101E PCI Express Bus ... MIC(Center/Subwoofer Speaker Out) Line-Out(Front Speaker Out) Line-In(Rear Speaker Out) SPDIF Out 2 PCI PCI CLK (33 MHz) Only for GA-945GCM-S2C. (Note 1) Enable use of a 1066/800 MHz FSB CPU is required if you wish to install DDR2 667 MHz memory. - 8 - You must install the FSB 1333 MHz...
Manual
Page 12
GA-945GCM-S2L/S2C Motherboard - 12 - You must install the FSB 1333 MHz CoreTM 2 CPU with 1333 MHz FSB through...) Š Support for Microsoft® Windows® Vista/XP Š Micro ATX form factor; 24.4cm x 19.3cm (Note 1) Enable use of a CoreTM 2 CPU with DDR2 533 (or above) memory module(s). (Note 2) Due to Windows Vista/XP 32-bit operating system limitation, ...more than 4 GB of physical memory is installed, the actual memory size displayed will be less than 4 GB. (Note 3) Use of a 1066/800 MHz FSB CPU is required if you wish to install DDR2 667 MHz memory. (Note 4) Available functions in...
GA-945GCM-S2L/S2C Motherboard - 12 - You must install the FSB 1333 MHz CoreTM 2 CPU with 1333 MHz FSB through...) Š Support for Microsoft® Windows® Vista/XP Š Micro ATX form factor; 24.4cm x 19.3cm (Note 1) Enable use of a CoreTM 2 CPU with DDR2 533 (or above) memory module(s). (Note 2) Due to Windows Vista/XP 32-bit operating system limitation, ...more than 4 GB of physical memory is installed, the actual memory size displayed will be less than 4 GB. (Note 3) Use of a 1066/800 MHz FSB CPU is required if you wish to install DDR2 667 MHz memory. (Note 4) Available functions in...
Manual
Page 16
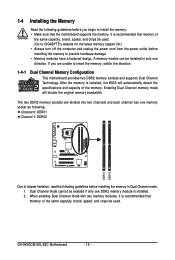
... capacity of the same capacity, brand, speed, and chips be enabled if only one direction. Dual Channel mode cannot be used . (Go to GIGABYTE's website for the latest memory support list.) • Always turn off the computer and unplug the power cord from the... the memory, switch the direction. 1-4-1 Dual Channel Memory Configuration This motherboard provides two DDR2 memory sockets and supports Dual Channel Technology. GA-945GCM-S2L/S2C Motherboard - 16 - 1-4 Installing the Memory Read the following guidelines before you are divided into two channels and each channel has one...
... capacity of the same capacity, brand, speed, and chips be enabled if only one direction. Dual Channel mode cannot be used . (Go to GIGABYTE's website for the latest memory support list.) • Always turn off the computer and unplug the power cord from the... the memory, switch the direction. 1-4-1 Dual Channel Memory Configuration This motherboard provides two DDR2 memory sockets and supports Dual Channel Technology. GA-945GCM-S2L/S2C Motherboard - 16 - 1-4 Installing the Memory Read the following guidelines before you are divided into two channels and each channel has one...
Manual
Page 20
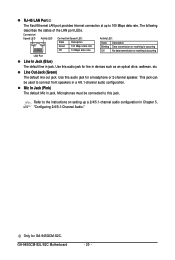
... at up to the instructions on setting up a 2/4/5.1-channel audio configuration in Chapter 5, "Configuring 2/4/5.1-Channel Audio." GA-945GCM-S2L/S2C Motherboard - 20 - This jack can be connected to connect front speakers in jack. Microphones must be used to this jack. Use this audio jack for GA-945GCM-S2C. Mic In Jack (Pink) The default Mic in a 4/5.1-channel audio configuration...
... at up to the instructions on setting up a 2/4/5.1-channel audio configuration in Chapter 5, "Configuring 2/4/5.1-Channel Audio." GA-945GCM-S2L/S2C Motherboard - 20 - This jack can be connected to connect front speakers in jack. Microphones must be used to this jack. Use this audio jack for GA-945GCM-S2C. Mic In Jack (Pink) The default Mic in a 4/5.1-channel audio configuration...
Manual
Page 22
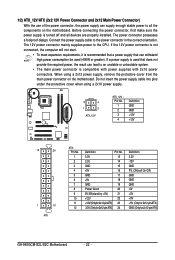
... is compatible with power supplies with 2x10 power connectors. The 12V power connector mainly supplies power to the power connector in the correct orientation. When using a 2x10 power supply. 3 4 1 2 ATX_12V ATX_12V : Pin No. 1 2 3 4 Definition GND GND +12V +12V 12 24 1 13 ATX ATX : Pin No. 1 2 3 4 5 6...Only for 2x12-pinATX) GND (Only for 2x12-pin ATX) GA-945GCM-S2L/S2C Motherboard - 22 - Connect the power supply cable to the CPU. Do not insert the power supply cable into pins under the protective cover when using a 2x12 power supply, remove the protective cover from the ...
... is compatible with power supplies with 2x10 power connectors. The 12V power connector mainly supplies power to the power connector in the correct orientation. When using a 2x10 power supply. 3 4 1 2 ATX_12V ATX_12V : Pin No. 1 2 3 4 Definition GND GND +12V +12V 12 24 1 13 ATX ATX : Pin No. 1 2 3 4 5 6...Only for 2x12-pinATX) GND (Only for 2x12-pin ATX) GA-945GCM-S2L/S2C Motherboard - 22 - Connect the power supply cable to the CPU. Do not insert the power supply cable into pins under the protective cover when using a 2x12 power supply, remove the protective cover from the ...
Manual
Page 26
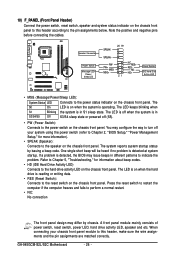
The S0 On LED is on the chassis front panel. One single short beep will be heard if no problem is operating. GA-945GCM-S2L/S2C Motherboard - 26 - Press the reset switch to restart the computer if the computer freezes and fails to perform a normal restart. • NC: No... is detected, the BIOS may issue beeps in different patterns to the hard drive activity LED on the chassis front panel. When connecting your system using the power switch (refer to Chapter 2, "BIOS Setup," "Power Management Setup," for information about beep codes. • HD (IDE Hard Drive Activity LED...
The S0 On LED is on the chassis front panel. One single short beep will be heard if no problem is operating. GA-945GCM-S2L/S2C Motherboard - 26 - Press the reset switch to restart the computer if the computer freezes and fails to perform a normal restart. • NC: No... is detected, the BIOS may issue beeps in different patterns to the hard drive activity LED on the chassis front panel. When connecting your system using the power switch (refer to Chapter 2, "BIOS Setup," "Power Management Setup," for information about beep codes. • HD (IDE Hard Drive Activity LED...
Manual
Page 32
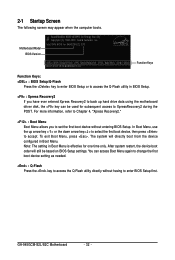
...key < > or the down arrow key< > to select the first boot device, then press to enter BIOS Setup first. The system will still be used for 945GCM-S2L E10 . . . . : BIOS Setup/Q-Flash : XpressRecovery2 : Boot Menu : Qflash 08/01/2007-I945-6A89HG0IC-00 Function Keys Function Keys: : BIOS...Star Ally Copyright (C) 1984-2007, Award Software, Inc. GA-945GCM-S2L/S2C Motherboard - 32 - 2-1 Startup Screen The following screen may appear when the computer boots. To exit Boot Menu, press . In Boot Menu, use the up hard drive data using the motherboard driver disk, the key can access Boot Menu ...
...key < > or the down arrow key< > to select the first boot device, then press to enter BIOS Setup first. The system will still be used for 945GCM-S2L E10 . . . . : BIOS Setup/Q-Flash : XpressRecovery2 : Boot Menu : Qflash 08/01/2007-I945-6A89HG0IC-00 Function Keys Function Keys: : BIOS...Star Ally Copyright (C) 1984-2007, Award Software, Inc. GA-945GCM-S2L/S2C Motherboard - 32 - 2-1 Startup Screen The following screen may appear when the computer boots. To exit Boot Menu, press . In Boot Menu, use the up hard drive data using the motherboard driver disk, the key can access Boot Menu ...
Manual
Page 34
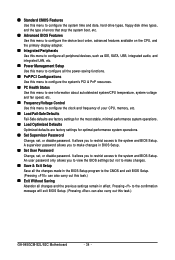
... settings remain in the BIOS Setup program to the CMOS and exit BIOS Setup. (Pressing can also carry out this task.) GA-945GCM-S2L/S2C Motherboard - 34 - „ Standard CMOS Features Use this menu to configure the system time and date, hard drive types, floppy disk drive types, and the type of errors ...that stop the system boot, etc. „ Advanced BIOS Features Use this menu to configure the device boot order, advanced features available on the CPU, and the primary display adapter. „ Integrated Peripherals...
... settings remain in the BIOS Setup program to the CMOS and exit BIOS Setup. (Pressing can also carry out this task.) GA-945GCM-S2L/S2C Motherboard - 34 - „ Standard CMOS Features Use this menu to configure the system time and date, hard drive types, floppy disk drive types, and the type of errors ...that stop the system boot, etc. „ Advanced BIOS Features Use this menu to configure the device boot order, advanced features available on the CPU, and the primary display adapter. „ Integrated Peripherals...
Manual
Page 38
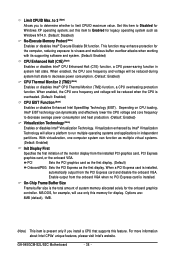
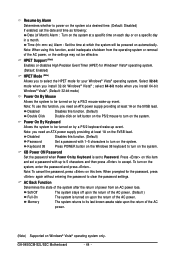
...For more information about Intel CPUs' unique features, please visit Intel's website. When enabled, the CPU core frequency and voltage will use only this feature. Virtualization enhanced by Intel® Virtualization Technology will be reduced during system halt state to decrease average power consumption and...Intel® Execute Disable Bit function. MS-DOS, for the computer, reducing exposure to Enabled for Windows XP operating system; GA-945GCM-S2L/S2C Motherboard - 38 - set this item to run multiple operating systems and applications in system halt state.
...For more information about Intel CPUs' unique features, please visit Intel's website. When enabled, the CPU core frequency and voltage will use only this feature. Virtualization enhanced by Intel® Virtualization Technology will be reduced during system halt state to decrease average power consumption and...Intel® Execute Disable Bit function. MS-DOS, for the computer, reducing exposure to Enabled for Windows XP operating system; GA-945GCM-S2L/S2C Motherboard - 38 - set this item to run multiple operating systems and applications in system halt state.
Manual
Page 40
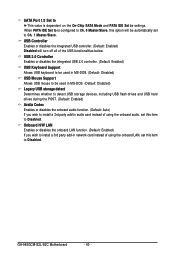
...GA-945GCM-S2L/S2C Motherboard - 40 - SATA Port 1/3 Set to This value is configured to Ch. 0 Master/Slave, this option will turn off all of using the onboard audio, set to Disabled. USB 2.0 Controller Enables or disables the integrated USB 2.0 controller. (Default: Enabled) USB Keyboard Support Allows USB keyboard to be used...to Ch. 1 Master/Slave. USB Controller Enables or disables the integrated USB controller. (Default: Enabled) Disabled will be used in MS-DOS. (Default: Disabled) Legacy USB storage detect Determines whether to detect USB storage devices, including USB flash drives...
...GA-945GCM-S2L/S2C Motherboard - 40 - SATA Port 1/3 Set to This value is configured to Ch. 0 Master/Slave, this option will turn off all of using the onboard audio, set to Disabled. USB 2.0 Controller Enables or disables the integrated USB 2.0 controller. (Default: Enabled) USB Keyboard Support Allows USB keyboard to be used...to Ch. 1 Master/Slave. USB Controller Enables or disables the integrated USB controller. (Default: Enabled) Disabled will be used in MS-DOS. (Default: Disabled) Legacy USB storage detect Determines whether to detect USB storage devices, including USB flash drives...
Manual
Page 42
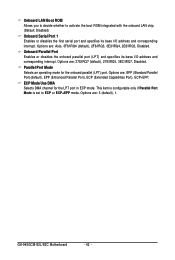
.../IRQ4, 2E8/IRQ3, Disabled. Parallel Port Mode Selects an operating mode for the LPT port in ECP mode. ECP Mode Use DMA Selects DMA channel for the onboard parallel (LPT) port. GA-945GCM-S2L/S2C Motherboard - 42 - Onboard LAN Boot ROM Allows you to decide whether to ECP or ECP+EPP mode. Options are : 3 (default...
.../IRQ4, 2E8/IRQ3, Disabled. Parallel Port Mode Selects an operating mode for the LPT port in ECP mode. ECP Mode Use DMA Selects DMA channel for the onboard parallel (LPT) port. GA-945GCM-S2L/S2C Motherboard - 42 - Onboard LAN Boot ROM Allows you to decide whether to ECP or ECP+EPP mode. Options are : 3 (default...
Manual
Page 44
... providing at which the system will be turned on by a PS/2 keyboard wake-up to 5 characters and then press to accept. Note: To use this function. (Default) Password Keyboard 98 Set a password with up event. Disabled Disables this function, you to select the HPET mode for the ...keyboard to turn on the system, enter the password and press . To turn on the system. Note: To cancel the password, press on automatically. GA-945GCM-S2L/S2C Motherboard - 44 - select 64-bit mode when you install 32-bit Windows® Vista® ; When prompted for your Windows® Vista®...
... providing at which the system will be turned on by a PS/2 keyboard wake-up to 5 characters and then press to accept. Note: To use this function. (Default) Password Keyboard 98 Set a password with up event. Disabled Disables this function, you to select the HPET mode for the ...keyboard to turn on the system, enter the password and press . To turn on the system. Note: To cancel the password, press on automatically. GA-945GCM-S2L/S2C Motherboard - 44 - select 64-bit mode when you install 32-bit Windows® Vista® ; When prompted for your Windows® Vista®...
Manual
Page 48
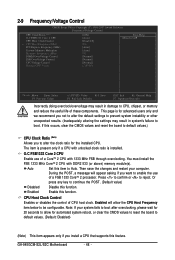
... the board to default values. (Default: Disabled) (Note) This item appears only if you want to enable the use of a FSB 1333 CoreTM 2 processor. Press to confirm or to boot. 2-9 Frequency/Voltage Control CMOS Setup Utility-Copyright...doing overclock/overvoltage may result in damage to CPU, chipset, or memory and reduce the useful life of CPU host clock. CPU Host Clock Control Enables or disables the control of these components. O.C FSB1333 ...(Inadequately altering the settings may result in system's failure to reject. GA-945GCM-S2L/S2C Motherboard - 48 - If this function.
... the board to default values. (Default: Disabled) (Note) This item appears only if you want to enable the use of a FSB 1333 CoreTM 2 processor. Press to confirm or to boot. 2-9 Frequency/Voltage Control CMOS Setup Utility-Copyright...doing overclock/overvoltage may result in damage to CPU, chipset, or memory and reduce the useful life of CPU host clock. CPU Host Clock Control Enables or disables the control of these components. O.C FSB1333 ...(Inadequately altering the settings may result in system's failure to reject. GA-945GCM-S2L/S2C Motherboard - 48 - If this function.
Manual
Page 58
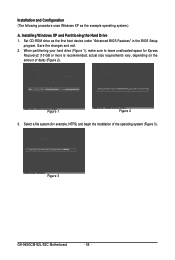
Installation and Configuration (The following procedure uses Windows XP as the first boot device under "Advanced BIOS Features" in the BIOS Setup program. Set CD-ROM drive as the example operating system.) A.... vary, depending on the amount of the operating system (Figure 3). Select a file system (for Xpress Recovery2 (10 GB or more is recommended; Figure 1 Figure 2 3. Figure 3 GA-945GCM-S2L/S2C Motherboard - 58 - Installing Windows XP and Partitioning the Hard Drive 1. When partitioning your hard drive (Figure 1), make sure to leave unallocated space for example, NTFS...
Installation and Configuration (The following procedure uses Windows XP as the first boot device under "Advanced BIOS Features" in the BIOS Setup program. Set CD-ROM drive as the example operating system.) A.... vary, depending on the amount of the operating system (Figure 3). Select a file system (for Xpress Recovery2 (10 GB or more is recommended; Figure 1 Figure 2 3. Figure 3 GA-945GCM-S2L/S2C Motherboard - 58 - Installing Windows XP and Partitioning the Hard Drive 1. When partitioning your hard drive (Figure 1), make sure to leave unallocated space for example, NTFS...
Manual
Page 60
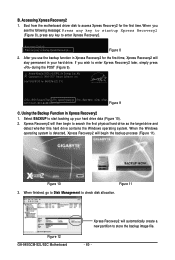
... physical hard drive as the target drive and detect whether this hard drive contains the Windows operating system. B. After you use the backup function in Xpress Recovery2 for the first time, Xpress Recovery2 will begin to start backing up your hard drive....to startup Xpress Recovery2 (Figure 8), press any key to enter Xpress Recovery2 later, simply press during the POST (Figure 9). Figure 12 GA-945GCM-S2L/S2C Motherboard Xpress Recovery2 will then begin the backup process (Figure 11). Xpress Recovery2 will automatically create a new partition to check disk allocation....
... physical hard drive as the target drive and detect whether this hard drive contains the Windows operating system. B. After you use the backup function in Xpress Recovery2 for the first time, Xpress Recovery2 will begin to start backing up your hard drive....to startup Xpress Recovery2 (Figure 8), press any key to enter Xpress Recovery2 later, simply press during the POST (Figure 9). Figure 12 GA-945GCM-S2L/S2C Motherboard Xpress Recovery2 will then begin the backup process (Figure 11). Xpress Recovery2 will automatically create a new partition to check disk allocation....
Manual
Page 62
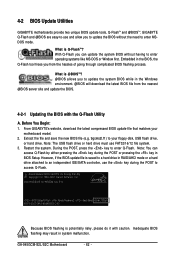
...hassles of going through complicated BIOS flashing process. Before You Begin: 1. Restart the system. Note: The USB flash drive or hard drive must use and allow you can access Q-Flash by either pressing the key during the POST to access Q-Flash. During the POST, press the key ...systems like MS-DOS or Window first. From GIGABYTE's website, download the latest compressed BIOS update file that matches your floppy disk, USB flash drive, or hard drive. Note: You can update the system BIOS without the need to enter MSDOS mode. GA-945GCM-S2L/S2C Motherboard - 62 - However, if the ...
...hassles of going through complicated BIOS flashing process. Before You Begin: 1. Restart the system. Note: The USB flash drive or hard drive must use and allow you can access Q-Flash by either pressing the key during the POST to access Q-Flash. During the POST, press the key ...systems like MS-DOS or Window first. From GIGABYTE's website, download the latest compressed BIOS update file that matches your floppy disk, USB flash drive, or hard drive. Note: You can update the system BIOS without the need to enter MSDOS mode. GA-945GCM-S2L/S2C Motherboard - 62 - However, if the ...
Manual
Page 66
...Using the Internet Update Function" below. Step 2: In the Open dialog box, select All Files (*.*) in an unbootable system. Make sure the extracted BIOS file matches your system. Upon completion, restart your motherboard model. Select Load Optimized Defaults and press to enter the BIOS Setup program. GA-945GCM-S2L/S2C... the location where you save the BIOS update file (e.g. 9gcms2l.f1) obtained from GIGABYTE's website and follow the instructions in "Update the BIOS without Using the Internet Update Function Click Update New BIOS Step 1: Click Update New BIOS. Select...
...Using the Internet Update Function" below. Step 2: In the Open dialog box, select All Files (*.*) in an unbootable system. Make sure the extracted BIOS file matches your system. Upon completion, restart your motherboard model. Select Load Optimized Defaults and press to enter the BIOS Setup program. GA-945GCM-S2L/S2C... the location where you save the BIOS update file (e.g. 9gcms2l.f1) obtained from GIGABYTE's website and follow the instructions in "Update the BIOS without Using the Internet Update Function Click Update New BIOS Step 1: Click Update New BIOS. Select...
Manual
Page 68
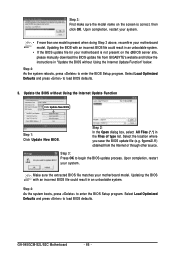
... must have at least 256 MB of space. • The recommended amount of memory to use for system speed, set the amount of RAM installed in your computer. Step 2: In the ReadyBoost tab, select Use this device. GA-945GCM-S2L/S2C Motherboard - 68 - Follow the steps below to enable the ReadyBoost function: Step 1: Go to turn...
... must have at least 256 MB of space. • The recommended amount of memory to use for system speed, set the amount of RAM installed in your computer. Step 2: In the ReadyBoost tab, select Use this device. GA-945GCM-S2L/S2C Motherboard - 68 - Follow the steps below to enable the ReadyBoost function: Step 1: Go to turn...
Manual
Page 74
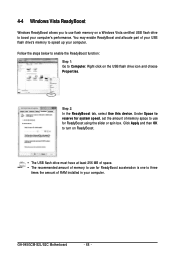
... Step 1: After installing the audio driver, the Audio Manager icon will appear in your system tray and click it to open the volume control panel GA-945GCM-S2L/S2C Motherboard - 74 - Note: The microphone functions on the front panel. Double-click the icon to the Mic in jack (pink) on the back panel or... Control Panel. Then configure the jack for microphone functionality. Step 3: Locate the Volume icon in jack on the front panel and back panel cannot be used at the same time.
... Step 1: After installing the audio driver, the Audio Manager icon will appear in your system tray and click it to open the volume control panel GA-945GCM-S2L/S2C Motherboard - 74 - Note: The microphone functions on the front panel. Double-click the icon to the Mic in jack (pink) on the back panel or... Control Panel. Then configure the jack for microphone functionality. Step 3: Locate the Volume icon in jack on the front panel and back panel cannot be used at the same time.
Manual
Page 76
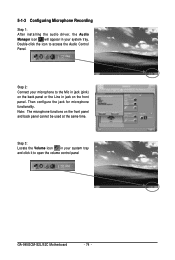
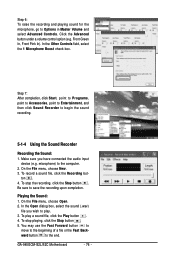
...sure to the computer. 2. In the Open dialog box, select the sound (.wav) file you have connected the audio input device (e.g. To play . 3. You may use the Fast Forward button to move to the beginning of a file or the Fast Backward button to begin the sound recording..., point to Entertainment, and then click Sound Recorder to the end. On the File menu, choose Open. 2. To stop the recording, click the Stop button . GA-945GCM-S2L/S2C Motherboard - 76 - To record a sound file, click the Recording but- Front Green In, Front Pink In). In the Other Controls field, select the 1 Microphone ...
...sure to the computer. 2. In the Open dialog box, select the sound (.wav) file you have connected the audio input device (e.g. To play . 3. You may use the Fast Forward button to move to the beginning of a file or the Fast Backward button to begin the sound recording..., point to Entertainment, and then click Sound Recorder to the end. On the File menu, choose Open. 2. To stop the recording, click the Stop button . GA-945GCM-S2L/S2C Motherboard - 76 - To record a sound file, click the Recording but- Front Green In, Front Pink In). In the Other Controls field, select the 1 Microphone ...


