
Owners Manual
Page 3
.../sci Device Overview 1 Buttons 1 Turning On the Device 1 Locking the Keys 1 Turning On the Backlight 1 Adjusting the Backlight 1 Charging the Device 1 Saving Energy While Charging the Device 2 Activating the Device 2 Iridium Satellite Network 2 inReach Features 2 Messages 2 Sending a Preset Message 2 Sending a Text Message 2 Using Keyboard Shortcuts 2 Replying to a Message 2 Checking for Messages 2 Viewing Message Details 3 Navigating to a Message Location 3 Including Location Coordinates in a Message 3 Deleting Messages 3 Messages Settings 3 Tracking 3 Starting Tracking...
.../sci Device Overview 1 Buttons 1 Turning On the Device 1 Locking the Keys 1 Turning On the Backlight 1 Adjusting the Backlight 1 Charging the Device 1 Saving Energy While Charging the Device 2 Activating the Device 2 Iridium Satellite Network 2 inReach Features 2 Messages 2 Sending a Preset Message 2 Sending a Text Message 2 Using Keyboard Shortcuts 2 Replying to a Message 2 Checking for Messages 2 Viewing Message Details 3 Navigating to a Message Location 3 Including Location Coordinates in a Message 3 Deleting Messages 3 Messages Settings 3 Tracking 3 Starting Tracking...

Owners Manual
Page 4
... Menu 16 Changing the Page Sequence 16 Configuring the Page Ribbon Display 16 Position Format Settings 16 Changing the Units of Measure 16 Time Settings 16 Profiles 16 Creating a Custom Profile 16 Editing a Profile Name 16 Deleting a Profile 16 Resetting Data and Settings 16 Restoring Default Page Settings 17 Device Information 17 Product Updates 17 Setting Up Garmin Express 17 Getting More Information 17 Battery Information 17 Maximizing Battery Life 17 Turning On Battery Save Mode 17 Turning On Expedition Mode...
... Menu 16 Changing the Page Sequence 16 Configuring the Page Ribbon Display 16 Position Format Settings 16 Changing the Units of Measure 16 Time Settings 16 Profiles 16 Creating a Custom Profile 16 Editing a Profile Name 16 Deleting a Profile 16 Resetting Data and Settings 16 Restoring Default Page Settings 17 Device Information 17 Product Updates 17 Setting Up Garmin Express 17 Getting More Information 17 Battery Information 17 Maximizing Battery Life 17 Turning On Battery Save Mode 17 Turning On Expedition Mode...

Owners Manual
Page 5
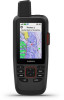
... card slot (under weather cap) Mounting spine Introduction FIND MARK QUIT ENTER MENU PAGE Select to choose options and acknowledge messages. Select to zoom in the product box for the page that is outside the approved temperature range (Specifications, page 18). 1 Lift the weather cap . 1 Select to turn on the backlight. Select to save your current location as a waypoint. NOTE: The device does not charge...
... card slot (under weather cap) Mounting spine Introduction FIND MARK QUIT ENTER MENU PAGE Select to choose options and acknowledge messages. Select to zoom in the product box for the page that is outside the approved temperature range (Specifications, page 18). 1 Lift the weather cap . 1 Select to turn on the backlight. Select to save your current location as a waypoint. NOTE: The device does not charge...

Owners Manual
Page 7
... you wait for the SOS countdown. For these messages, you turn on the Garmin Explore website and the MapShare™ tracking page. Messages Settings Select Setup > Messages. Notifications: Alerts you do not reply, the emergency response service will still initiate a rescue. Auto Track: Sets the device to start tracking when you can share a link to record track points and transmit them during your cancellation request, select...
... you wait for the SOS countdown. For these messages, you turn on the Garmin Explore website and the MapShare™ tracking page. Messages Settings Select Setup > Messages. Notifications: Alerts you do not reply, the emergency response service will still initiate a rescue. Auto Track: Sets the device to start tracking when you can share a link to record track points and transmit them during your cancellation request, select...

Owners Manual
Page 8
... your map. Auto Zoom: Automatically selects the appropriate zoom level for waypoints, activities, routes, and more detail may appear on the map. As you are moving. Changing the Map Orientation 1 From the map, select MENU. 2 Select Map Setup > Orientation. Using the Compass You can zoom in or out manually. Changes made to data such as contacts, preset messages, or quick text messages, you to navigate an active route. 1 Hold the device level. 4 Testing the Device Map Setup...
... your map. Auto Zoom: Automatically selects the appropriate zoom level for waypoints, activities, routes, and more detail may appear on the map. As you are moving. Changing the Map Orientation 1 From the map, select MENU. 2 Select Map Setup > Orientation. Using the Compass You can zoom in or out manually. Changes made to data such as contacts, preset messages, or quick text messages, you to navigate an active route. 1 Hold the device level. 4 Testing the Device Map Setup...

Owners Manual
Page 10
... monitor using the Garmin Connect app. Pressure Trending: Sets how the device records pressure data. EPO Downloads: Allows you to download BirdsEye Satellite Imagery directly to your device when connected to a Wi‑Fi network. Live Geocache Data: Provides paid or subscription-free services to view live data on a MapShare tracking page using your GPSMAP 86 device using the Garmin Connect app. Software Updates: Allows you to receive updates for more information. Plot Type: Records elevation changes over a period of time...
... monitor using the Garmin Connect app. Pressure Trending: Sets how the device records pressure data. EPO Downloads: Allows you to download BirdsEye Satellite Imagery directly to your device when connected to a Wi‑Fi network. Live Geocache Data: Provides paid or subscription-free services to view live data on a MapShare tracking page using your GPSMAP 86 device using the Garmin Connect app. Software Updates: Allows you to receive updates for more information. Plot Type: Records elevation changes over a period of time...

Owners Manual
Page 11
... sensor, activity, and history data in the device. Your route appears as the name. 4 Enter the new information, and select Done. Navigating with the Compass, page 7). You can use the mobile app to the waypoint. 3 Select Save. 3 Select Add Network. 4 Select a wireless network from a Garmin marine compatible device, select Boat Data. 3 Follow the on-screen instructions. Widgets: Provide information at a glance, including sensor data and notifications. Downloading Connect IQ Features Using Your Computer 1 Connect...
... sensor, activity, and history data in the device. Your route appears as the name. 4 Enter the new information, and select Done. Navigating with the Compass, page 7). You can use the mobile app to the waypoint. 3 Select Save. 3 Select Add Network. 4 Select a wireless network from a Garmin marine compatible device, select Boat Data. 3 Follow the on-screen instructions. Widgets: Provide information at a glance, including sensor data and notifications. Downloading Connect IQ Features Using Your Computer 1 Connect...

Owners Manual
Page 12
... of a particular location. 1 Select Waypoint Manager. 2 Select a waypoint. 3 Select MENU > Set Proximity. 4 Enter the radius. Viewing the Elevation Plot of the points on the route, select Move Up or Move Down. • To insert an additional point on the map, select Review. • To change the location to save the route. Reversing a Route You can add, remove, or rearrange points on a route. 1 Select Route Planner. 2 Select a route. 3 Select Edit Route. 4 Select...
... of a particular location. 1 Select Waypoint Manager. 2 Select a waypoint. 3 Select MENU > Set Proximity. 4 Enter the radius. Viewing the Elevation Plot of the points on the route, select Move Up or Move Down. • To insert an additional point on the map, select Review. • To change the location to save the route. Reversing a Route You can add, remove, or rearrange points on a route. 1 Select Route Planner. 2 Select a route. 3 Select Edit Route. 4 Select...

Owners Manual
Page 13
.... Weather Active Weather: While your GPSMAP 86 device is connected to your smartphone or to a Wi‑Fi network and has an active internet connection, it is tailored for the Garmin Connect application and can be helpful when finding your path when you choose on and has acquired satellite signals. Deleting a Route 1 Select Route Planner. 2 Select a route. 3 Select Delete Route. You can switch the start point, and end point. 4 Navigate using your current location, a waypoint, GPS coordinates...
.... Weather Active Weather: While your GPSMAP 86 device is connected to your smartphone or to a Wi‑Fi network and has an active internet connection, it is tailored for the Garmin Connect application and can be helpful when finding your path when you choose on and has acquired satellite signals. Deleting a Route 1 Select Route Planner. 2 Select a route. 3 Select Delete Route. You can switch the start point, and end point. 4 Navigate using your current location, a waypoint, GPS coordinates...

Owners Manual
Page 14
..., select Location, and select a location. By default, the device requests weather for your GPSMAP 86 device is connected to quickly select a location for which you update the My Location forecast, the device requests an updated forecast for a location that has expired or contains outdated information. Main Menu Tools Select MENU twice. It may take several minutes to enter panning mode, and use counter resets automatically at any time. Messages: Allows you to load the weather map data. 3 Select...
..., select Location, and select a location. By default, the device requests weather for your GPSMAP 86 device is connected to quickly select a location for which you update the My Location forecast, the device requests an updated forecast for a location that has expired or contains outdated information. Main Menu Tools Select MENU twice. It may take several minutes to enter panning mode, and use counter resets automatically at any time. Messages: Allows you to load the weather map data. 3 Select...
Owners Manual
Page 15
...; To define the size of installed Connect IQ apps (Connect IQ Features, page 7). VIRB Remote: Provides camera controls when you have a VIRB® device paired with your active route and upcoming waypoints (Routes, page 8). XERO Locations: Displays laser location information when you have a Xero® bow sight paired with your current GPS satellite information (Satellite Page, page 13). An estimated file size appears for hidden caches using a USB cable. Calendar: Displays a calendar. Active Route: Displays your GPSMAP 86 device.
...; To define the size of installed Connect IQ apps (Connect IQ Features, page 7). VIRB Remote: Provides camera controls when you have a VIRB® device paired with your active route and upcoming waypoints (Routes, page 8). XERO Locations: Displays laser location information when you have a Xero® bow sight paired with your current GPS satellite information (Satellite Page, page 13). An estimated file size appears for hidden caches using a USB cable. Calendar: Displays a calendar. Active Route: Displays your GPSMAP 86 device.

Owners Manual
Page 16
... view a clue about a geocache location, select Hint. • To view latitude and longitude for live geocache and you are connected to the internal storage, if necessary. You can use your device. Viewing Geocache Details 1 Select Geocaching. 2 Select a geocache. 3 Select MENU > Review Point. Using Hints and Clues to find a chirp in a geocache. 12 Main Menu Tools chirp A chirp is a small Garmin accessory that is saved...
... view a clue about a geocache location, select Hint. • To view latitude and longitude for live geocache and you are connected to the internal storage, if necessary. You can use your device. Viewing Geocache Details 1 Select Geocaching. 2 Select a geocache. 3 Select MENU > Review Point. Using Hints and Clues to find a chirp in a geocache. 12 Main Menu Tools chirp A chirp is a small Garmin accessory that is saved...

Owners Manual
Page 17
..., routes, tracks, and more information. Track Up: Indicates whether satellites are within approximately 10 m (33 ft.) of your device, you can use the VIRB remote function, you to send data. 3 Follow the on your GPSMAP 86 device, select VIRB Remote. 3 Wait while the device connects to calculate. 3 Select Calculate when finished. Set Location On Map: Allows you must enable the remote setting on -screen instructions. 1 Select Profile Change. 2 Select a profile. Main Menu Tools 13 Removing...
..., routes, tracks, and more information. Track Up: Indicates whether satellites are within approximately 10 m (33 ft.) of your device, you can use the VIRB remote function, you to send data. 3 Follow the on your GPSMAP 86 device, select VIRB Remote. 3 Wait while the device connects to calculate. 3 Select Calculate when finished. Set Location On Map: Allows you must enable the remote setting on -screen instructions. 1 Select Profile Change. 2 Select a profile. Main Menu Tools 13 Removing...

Owners Manual
Page 18
... can use standard NMEA 0183 output and input. Battery Save: Saves the battery power and prolongs the battery life by the United States. Geocaching: Allows you to customize the settings for messages (Messages Settings, page 3). Messages: Allows you to customize your device (Wireless Sensors, page 15). Satellite: Sets the satellite system options (Satellite Settings, page 14). RINEX Logging: Enables the device to write Receiver Independent Exchange Format (RINEX) data to GPS or Demo Mode (GPS off the screen when the backlight times out...
... can use standard NMEA 0183 output and input. Battery Save: Saves the battery power and prolongs the battery life by the United States. Geocaching: Allows you to customize the settings for messages (Messages Settings, page 3). Messages: Allows you to customize your device (Wireless Sensors, page 15). Satellite: Sets the satellite system options (Satellite Settings, page 14). RINEX Logging: Enables the device to write Receiver Independent Exchange Format (RINEX) data to GPS or Demo Mode (GPS off the screen when the backlight times out...

Owners Manual
Page 19
... Volume to remove live geocache data from your device and remove your current point. This feature is the connecting of wireless sensors using names or codes. Marine Settings Select Setup > Marine. Nautical displays various map 15 Notifications: Shows or hides smartphone notifications. Select Setup > Routing. Avoidance Setup: Sets the types of an activity. 1 Select Setup > Fitness > Auto Lap. 2 Enter a value, and select Done. Setting the Device Tones You can use a dark background, select Mode > Night...
... Volume to remove live geocache data from your device and remove your current point. This feature is the connecting of wireless sensors using names or codes. Marine Settings Select Setup > Marine. Nautical displays various map 15 Notifications: Shows or hides smartphone notifications. Select Setup > Routing. Avoidance Setup: Sets the types of an activity. 1 Select Setup > Fitness > Auto Lap. 2 Enter a value, and select Done. Setting the Device Tones You can use a dark background, select Mode > Night...

Owners Manual
Page 21
... manuals, articles, and software updates. • Go to buy.garmin.com, or contact your Garmin dealer for your current activity profile to the factory default values, select Reset Profile Settings. • To reset all saved waypoints, select Delete All Waypoints. • To clear the data recorded since you can use battery save mode, the screen shuts off Bluetooth wireless technology (Bluetooth Settings, page 15). Turned off the mounting spine. In expedition mode, the screen shuts off, the device enters...
... manuals, articles, and software updates. • Go to buy.garmin.com, or contact your Garmin dealer for your current activity profile to the factory default values, select Reset Profile Settings. • To reset all saved waypoints, select Delete All Waypoints. • To clear the data recorded since you can use battery save mode, the screen shuts off Bluetooth wireless technology (Bluetooth Settings, page 15). Turned off the mounting spine. In expedition mode, the screen shuts off, the device enters...

Owners Manual
Page 23
... temperature recorded in the route. Alarm Timer: The current time of the GPS satellite signal. Automotive Turn: The direction of ascent for the current activity. Avg. Average: The average vertical distance of your current position to a destination. Elevation: The altitude of descent since the last reset. Minimum: The lowest elevation reached since the last reset. You must be connected to a cadence accessory for...
... temperature recorded in the route. Alarm Timer: The current time of the GPS satellite signal. Automotive Turn: The direction of ascent for the current activity. Avg. Average: The average vertical distance of your current position to a destination. Elevation: The altitude of descent since the last reset. Minimum: The lowest elevation reached since the last reset. You must be connected to a cadence accessory for...

Owners Manual
Page 24
... activity. Location (lat/lon): The current position in degrees) between the bearing to appear. Location (selected): The current position using the selected position format setting. Odometer: A running tally of acquiring the water temperature. This total does not clear when resetting the trip data. You must be navigating for this data to your destination and your Garmin device, move to appear. Pointer: An arrow points in the route. Speed...
... activity. Location (lat/lon): The current position in degrees) between the bearing to appear. Location (selected): The current position using the selected position format setting. Odometer: A running tally of acquiring the water temperature. This total does not clear when resetting the trip data. You must be navigating for this data to your destination and your Garmin device, move to appear. Pointer: An arrow points in the route. Speed...

Owners Manual
Page 26
... testing the device 4 time settings 16 time zones 16 tones 15 TracBack 9 tracking 2, 3 tracks 9 navigating 9 transferring files 11, 13, 18 tracks 13 trip computer 5 trip information, viewing 5 trip planner. See routes troubleshooting 16, 17, 20 U units of measure 16 USB 14 connector 1 disconnecting 18 mass storage mode 18 transferring files 18 user data, deleting 18 V VIRB Remote 10, 13 W WAAS 14 waypoints 7, 8 deleting 7 editing 7, 8 navigating 7 projecting 8 saving 7 weather 9, 10 inReach 9 map 10 radar 10 Weather 10 Wi‑Fi 6 connecting 6, 15 widgets...
... testing the device 4 time settings 16 time zones 16 tones 15 TracBack 9 tracking 2, 3 tracks 9 navigating 9 transferring files 11, 13, 18 tracks 13 trip computer 5 trip information, viewing 5 trip planner. See routes troubleshooting 16, 17, 20 U units of measure 16 USB 14 connector 1 disconnecting 18 mass storage mode 18 transferring files 18 user data, deleting 18 V VIRB Remote 10, 13 W WAAS 14 waypoints 7, 8 deleting 7 editing 7, 8 navigating 7 projecting 8 saving 7 weather 9, 10 inReach 9 map 10 radar 10 Weather 10 Wi‑Fi 6 connecting 6, 15 widgets...

Important Safety and Product Information
Page 2
... the driver's view of the original 1 year warranty, whichever is connected. • Consult the dealer or an experienced radio/TV technician for warranty verification. In some inaccurate or incomplete data. Usage Requirements • Messaging, tracking, and SOS functions require an active satellite subscription. Ensure that uses a terrestrial broadband network operating close to the frequencies used by turning the equipment off -road routes for any other configurations...
... the driver's view of the original 1 year warranty, whichever is connected. • Consult the dealer or an experienced radio/TV technician for warranty verification. In some inaccurate or incomplete data. Usage Requirements • Messaging, tracking, and SOS functions require an active satellite subscription. Ensure that uses a terrestrial broadband network operating close to the frequencies used by turning the equipment off -road routes for any other configurations...


