

Installation Instructions
Page 1
... USA, go to use the GPSMAP 6000/7000 chartplotter. If any questions while installing your convenience: • Connecting the chartplotter to other Garmin Marine Network compatible devices, such as a sounder or a radar (page 9). • Connecting the chartplotter to a GPS 17 or GPS 17 HVS antenna (page 15). • Connecting the chartplotter to other important information. Caution Always wear safety goggles, ear protection, and a dust mask when drilling, cutting, or sanding. In...
... USA, go to use the GPSMAP 6000/7000 chartplotter. If any questions while installing your convenience: • Connecting the chartplotter to other Garmin Marine Network compatible devices, such as a sounder or a radar (page 9). • Connecting the chartplotter to a GPS 17 or GPS 17 HVS antenna (page 15). • Connecting the chartplotter to other important information. Caution Always wear safety goggles, ear protection, and a dust mask when drilling, cutting, or sanding. In...

Installation Instructions
Page 2
... a clear, glare-free view of the display and easy operation of two methods. Because of the larger size of clearance behind the 6000/7000 series chartplotter for your specific mounting surface. Using the bail mount as a template, mark the location of the four mounting holes. Using an appropriately-sized drill bit, drill the pilot holes for the wiring. Secure the bail mount to bail mount the chartplotter, or you can mount the GPSMAP...
... a clear, glare-free view of the display and easy operation of two methods. Because of the larger size of clearance behind the 6000/7000 series chartplotter for your specific mounting surface. Using the bail mount as a template, mark the location of the four mounting holes. Using an appropriately-sized drill bit, drill the pilot holes for the wiring. Secure the bail mount to bail mount the chartplotter, or you can mount the GPSMAP...

Installation Instructions
Page 5
...; Set the surface-mount bracket aside. OD pipe-threaded-pole marine mount (14 threads per inch-not included). Secure the antenna to the adapter with the included M3 set screw ➌. 8. (Optional) With the GPS 17x installed on the surface. • Use a pencil to your NMEA 2000 network (page 8). Route the cable away from sources of electronic interference, and connect it to mark the three screw locations...
...; Set the surface-mount bracket aside. OD pipe-threaded-pole marine mount (14 threads per inch-not included). Secure the antenna to the adapter with the included M3 set screw ➌. 8. (Optional) With the GPS 17x installed on the surface. • Use a pencil to your NMEA 2000 network (page 8). Route the cable away from sources of electronic interference, and connect it to mark the three screw locations...

Installation Instructions
Page 8
... needed , add an extension to the top of the Technical Reference for Garmin NMEA 2000 Products on the included CD or click on the "Manuals" hyperlink on the NMEA 2000 guidelines. Route an included drop cable from the backbone nearest to the location where you want to connect the GPSMAP 6000/7000 series chartplotter and the GPS 17x to your boat already has a NMEA 2000 network installed, use the included T-connectors...
... needed , add an extension to the top of the Technical Reference for Garmin NMEA 2000 Products on the included CD or click on the "Manuals" hyperlink on the NMEA 2000 guidelines. Route an included drop cable from the backbone nearest to the location where you want to connect the GPSMAP 6000/7000 series chartplotter and the GPS 17x to your boat already has a NMEA 2000 network installed, use the included T-connectors...
Installation Instructions
Page 9
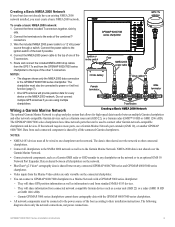
... port extender (GMS 10), or another GPSMAP 6000/7000. GPSMAP 6000/7000 series chartplotter Ignition or in-line switch Fuse + - 12 Vdc battery NMEA 2000 power cable Drop cables Female terminator T-connectors Male terminator Wiring a Garmin Marine Network Creating a Basic NMEA 2000 Network The optional Garmin Marine Network is not shared over the network to other connected chartplotters. • Connect all chartplotters on the network or to the GPSMAP 6000/7000 series chartplotter. Data from connected network compatible Garmin devices such as a Garmin sonar unit (GSD...
... port extender (GMS 10), or another GPSMAP 6000/7000. GPSMAP 6000/7000 series chartplotter Ignition or in-line switch Fuse + - 12 Vdc battery NMEA 2000 power cable Drop cables Female terminator T-connectors Male terminator Wiring a Garmin Marine Network Creating a Basic NMEA 2000 Network The optional Garmin Marine Network is not shared over the network to other connected chartplotters. • Connect all chartplotters on the network or to the GPSMAP 6000/7000 series chartplotter. Data from connected network compatible Garmin devices such as a Garmin sonar unit (GSD...

Installation Instructions
Page 12
... all connections and seal them with the GPSMAP 6000/7000 series chartplotter supports the NMEA 0183 standard, which is used to NMEA 0183-compliant devices such as VHF radios, NMEA instruments, autopilots, or a computer. For more-complete information on the NMEA 0183 capabilities of your GPSMAP 6000/7000 series chartplotter to wire various NMEA 0183-compliant devices, such as an AIS or DSC device. Garmin GPSMAP 6000/7000 series chartplotter Power cable NMEA 0183 Cable wire color + - BATTERY 10-35 Vdc Wire Fuse...
... all connections and seal them with the GPSMAP 6000/7000 series chartplotter supports the NMEA 0183 standard, which is used to NMEA 0183-compliant devices such as VHF radios, NMEA instruments, autopilots, or a computer. For more-complete information on the NMEA 0183 capabilities of your GPSMAP 6000/7000 series chartplotter to wire various NMEA 0183-compliant devices, such as an AIS or DSC device. Garmin GPSMAP 6000/7000 series chartplotter Power cable NMEA 0183 Cable wire color + - BATTERY 10-35 Vdc Wire Fuse...

Installation Instructions
Page 13
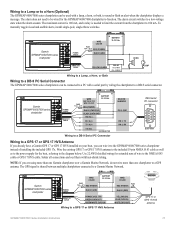
... Series NMEA 0183 Data Cable GPSMAP 6000/7000 Series Installation Instructions 13 See the GPSMAP 6000/7000 Series Owner's Manual for your NMEA 0183-compliant device to the A (+) and B (-) wires of your NMEA 0183-compliant device. Each RX and TX port has 2 wires, labeled A (+) and B (-) according to NMEA 0183 devices. Connect the corresponding A (+) and B (-) wires of each TX port to send NMEA 0183 data (TX ports). Advanced NMEA 0183 Wiring The GPSMAP 6000/7000 series chartplotter has four ports to receive NMEA...
... Series NMEA 0183 Data Cable GPSMAP 6000/7000 Series Installation Instructions 13 See the GPSMAP 6000/7000 Series Owner's Manual for your NMEA 0183-compliant device to the A (+) and B (-) wires of your NMEA 0183-compliant device. Each RX and TX port has 2 wires, labeled A (+) and B (-) according to NMEA 0183 devices. Connect the corresponding A (+) and B (-) wires of each TX port to send NMEA 0183 data (TX ports). Advanced NMEA 0183 Wiring The GPSMAP 6000/7000 series chartplotter has four ports to receive NMEA...
Installation Instructions
Page 15
... chartplotter displays a message. Wire the existing GPS 17 or GPS 17 HVS antenna to the included 19-pin NMEA 0183 cable as well as to the power supply for the boat, referring to a low-voltage state when the alarm sounds. The alarm circuit switches to the diagram below. The maximum current is 100 mA, and a relay is shared between multiple chartplotters connected to a Garmin Marine Network. Garmin GPSMAP 6000/7000 series chartplotter Power cable Wire Color Fuse 7.5 A - 42 V Red (power) Black (gnd) + Battery...
... chartplotter displays a message. Wire the existing GPS 17 or GPS 17 HVS antenna to the included 19-pin NMEA 0183 cable as well as to the power supply for the boat, referring to a low-voltage state when the alarm sounds. The alarm circuit switches to the diagram below. The maximum current is 100 mA, and a relay is shared between multiple chartplotters connected to a Garmin Marine Network. Garmin GPSMAP 6000/7000 series chartplotter Power cable Wire Color Fuse 7.5 A - 42 V Red (power) Black (gnd) + Battery...
Owner's Manual
Page 4
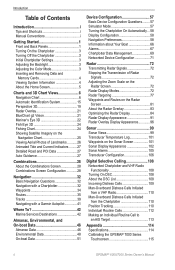
... a Chartplotter 32 Waypoints 34 Routes 35 Tracks 39 Navigating with a Garmin Autopilot 41 Where To 42 Marine Services Destinations 42 Almanac, Environmental, and On-boat Data 46 Almanac Data 46 Environmental Data 48 On-boat Data 51 Device Configuration 57 Basic Device Configuration Questions.........57 Simulator Mode 57 Turning the Chartplotter On Automatically....58 Display Configuration 58 Navigation Preferences 58 Information about Your Boat 66 Alarms 67 Chartplotter Data Management 69 Networked Device Configuration 71 Radar 72 Transmitting Radar Signals...
... a Chartplotter 32 Waypoints 34 Routes 35 Tracks 39 Navigating with a Garmin Autopilot 41 Where To 42 Marine Services Destinations 42 Almanac, Environmental, and On-boat Data 46 Almanac Data 46 Environmental Data 48 On-boat Data 51 Device Configuration 57 Basic Device Configuration Questions.........57 Simulator Mode 57 Turning the Chartplotter On Automatically....58 Display Configuration 58 Navigation Preferences 58 Information about Your Boat 66 Alarms 67 Chartplotter Data Management 69 Networked Device Configuration 71 Radar 72 Transmitting Radar Signals...

Owner's Manual
Page 29
... land as seen from the water. From the Home screen, select Charts > Mariner's Eye 3D > Menu > Chart Appearance > Safe Depth. 2. GPSMAP® 6000/7000 Series Owner's Manual 23 It does not effect the safe water depth Auto Guidance setting (page 59) or the sonar shallow water alarm setting (page 105). 1. Using Waypoints and Tracks See "Waypoints" (page 34) or "Tracks" (page 39). Mariner's Eye 3D, Hazard Colors Off Mariner's Eye 3D, Hazard Colors On Showing Range Rings See "Showing Range Rings" (page 20). Select...
... land as seen from the water. From the Home screen, select Charts > Mariner's Eye 3D > Menu > Chart Appearance > Safe Depth. 2. GPSMAP® 6000/7000 Series Owner's Manual 23 It does not effect the safe water depth Auto Guidance setting (page 59) or the sonar shallow water alarm setting (page 105). 1. Using Waypoints and Tracks See "Waypoints" (page 34) or "Tracks" (page 39). Mariner's Eye 3D, Hazard Colors Off Mariner's Eye 3D, Hazard Colors On Showing Range Rings See "Showing Range Rings" (page 20). Select...

Owner's Manual
Page 40
... Use Chart to change the depth. An international MOB symbol marks the active MOB point and the chartplotter sets a course back to select a new location on -screen keyboard. Select Review > Edit. 4. Complete an action: • Select Name. Waypoints You can designate it as a Waypoint From the Home screen, select Mark. From the Home screen, select Information > User Data > Waypoints. 2. For the GPSMAP 6000 series, use the Rocker to the marked location using coordinates. Creating a Waypoint at a Different Location 1. Indicate the location of the Auto Guidance line. Select a new...
... Use Chart to change the depth. An international MOB symbol marks the active MOB point and the chartplotter sets a course back to select a new location on -screen keyboard. Select Review > Edit. 4. Complete an action: • Select Name. Waypoints You can designate it as a Waypoint From the Home screen, select Mark. From the Home screen, select Information > User Data > Waypoints. 2. For the GPSMAP 6000 series, use the Rocker to the marked location using coordinates. Creating a Waypoint at a Different Location 1. Indicate the location of the Auto Guidance line. Select a new...

Owner's Manual
Page 63
... GPSMAP 7000 series, touch the navigation chart. How do I erase all waypoints, route, and tracks? See "Showing the Compass Tape Data Bar" (page 65). How do I check the software version and the map version on the map? Simulator mode turns the GPS receiver off for use the Rocker to set the heading automatically, or select User Track to enter the date. Turning Simulator Mode On From the Home screen, select Configure > System > Simulator > On. From the Home screen, select Configure > System > Simulator > Setup. 2. How do I delete...
... GPSMAP 7000 series, touch the navigation chart. How do I erase all waypoints, route, and tracks? See "Showing the Compass Tape Data Bar" (page 65). How do I check the software version and the map version on the map? Simulator mode turns the GPS receiver off for use the Rocker to set the heading automatically, or select User Track to enter the date. Turning Simulator Mode On From the Home screen, select Configure > System > Simulator > On. From the Home screen, select Configure > System > Simulator > Setup. 2. How do I delete...

Owner's Manual
Page 65
.... GPSMAP® 6000/7000 Series Owner's Manual 59 Auto Guidance Line Configurations You can specify the source of a bridge that is available with a preprogrammed BlueChart g2 Vision data card. From the Home screen, select Configure > Preferences > Navigation > Auto Guidance. 2. On the chart, the course through those areas, a message appears. Select Safe Depth to set the minimum height (chart height datum) of the speed data that your GPS position. 1. Select Safe Height to set the data the chartplotter uses when...
.... GPSMAP® 6000/7000 Series Owner's Manual 59 Auto Guidance Line Configurations You can specify the source of a bridge that is available with a preprogrammed BlueChart g2 Vision data card. From the Home screen, select Configure > Preferences > Navigation > Auto Guidance. 2. On the chart, the course through those areas, a message appears. Select Safe Depth to set the minimum height (chart height datum) of the speed data that your GPS position. 1. Select Safe Height to set the data the chartplotter uses when...

Owner's Manual
Page 67
... chartplotter may not reposition the Auto Guidance line, unless the destination selected in step 3 requires navigation through a narrow waterway. 10.Repeat steps 1-9 at least once more, using a map or chart that specifies a different position format. 1. Setting the Heading Reference You can set the position format in open water, even if you set a time-keeping standard. The default coordinate system is structured. Complete an action: • Select Time Format to set the Shoreline Distance setting to...
... chartplotter may not reposition the Auto Guidance line, unless the destination selected in step 3 requires navigation through a narrow waterway. 10.Repeat steps 1-9 at least once more, using a map or chart that specifies a different position format. 1. Setting the Heading Reference You can set the position format in open water, even if you set a time-keeping standard. The default coordinate system is structured. Complete an action: • Select Time Format to set the Shoreline Distance setting to...

Owner's Manual
Page 70
... Home screen, select Charts. 2. Complete an action: • Select Route Leg. You can appear at a time. 1. Select Menu > Data Bars > Navigation > Data Bar Setup. 4. Fishing, Fuel, and Sailing Data Bars Data Bar Fishing Fuel Sailing Data Shown Depth, water temperature, and water speed Fuel rate, remaining fuel, range, and fuel economy Water speed, wind speed, wind angle, and wind velocity made good (VMG) when navigating a route or an Auto Guidance line (page 65). • Select Next Turn > Distance to show next turn data based on distance. • Select Next Turn > Time to show...
... Home screen, select Charts. 2. Complete an action: • Select Route Leg. You can appear at a time. 1. Select Menu > Data Bars > Navigation > Data Bar Setup. 4. Fishing, Fuel, and Sailing Data Bars Data Bar Fishing Fuel Sailing Data Shown Depth, water temperature, and water speed Fuel rate, remaining fuel, range, and fuel economy Water speed, wind speed, wind angle, and wind velocity made good (VMG) when navigating a route or an Auto Guidance line (page 65). • Select Next Turn > Distance to show next turn data based on distance. • Select Next Turn > Time to show...

Owner's Manual
Page 129
... Auto Guidance 59 auto power up 58 backlight 3 beeper 58 calibrate water speed 66 chart borders 13, 98 chart type 84 clock 68 collision alarm 18, 79 color mode 3 color scheme 93, 104 compass tape 93 compass tape data bar 65 crosstalk 91 cruising data bar 63, 91 data bars 62 daylight saving time 61 deep water 105 depth line 102 depth units 62 detail 11, 97 details 17, 79, 97 display range 17, 79, 97 distance uniits 62 DSC...
... Auto Guidance 59 auto power up 58 backlight 3 beeper 58 calibrate water speed 66 chart borders 13, 98 chart type 84 clock 68 collision alarm 18, 79 color mode 3 color scheme 93, 104 compass tape 93 compass tape data bar 65 crosstalk 91 cruising data bar 63, 91 data bars 62 daylight saving time 61 deep water 105 depth line 102 depth units 62 detail 11, 97 details 17, 79, 97 display range 17, 79, 97 distance uniits 62 DSC...
Quick Reference Guide
Page 2
... arrange screen 2 the screens in Taiwan to adjust the backlight manually. Carefully compare the course to enter the coordinates of Garmin. © 2009 Garmin Ltd. Select Navigate To. 5. Turning the Chartplotter On or Off WARNING See the Important Safety and Product Information guide in your chartplotter. Marking a Waypoint or an MOB Location Marking Your Present Location as 1. Indicate the location of the BlueChart g2 Vision data card is based on the chart. For the GPSMAP 6000 series, use the...
... arrange screen 2 the screens in Taiwan to adjust the backlight manually. Carefully compare the course to enter the coordinates of Garmin. © 2009 Garmin Ltd. Select Navigate To. 5. Turning the Chartplotter On or Off WARNING See the Important Safety and Product Information guide in your chartplotter. Marking a Waypoint or an MOB Location Marking Your Present Location as 1. Indicate the location of the BlueChart g2 Vision data card is based on the chart. For the GPSMAP 6000 series, use the...
Supplement
Page 15
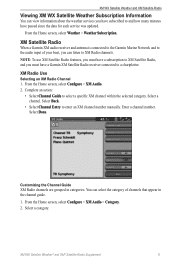
... to XM Satellite Radio, and you have subscribed to and how many minutes have a Garmin XM Satellite Radio receiver connected to a chartplotter. Note: To use XM Satellite Radio features, you must have passed since the data for each service was updated. From the Home screen, select Configure > XM Audio. 2. Complete an action: • Select Channel Guide to enter an XM channel number manually. XM WX Satellite Weather® and XM® Satellite Radio Supplement...
... to XM Satellite Radio, and you have subscribed to and how many minutes have a Garmin XM Satellite Radio receiver connected to a chartplotter. Note: To use XM Satellite Radio features, you must have passed since the data for each service was updated. From the Home screen, select Configure > XM Audio. 2. Complete an action: • Select Channel Guide to enter an XM channel number manually. XM WX Satellite Weather® and XM® Satellite Radio Supplement...
Technical Reference for Garmin NMEA 2000 Products
Page 12
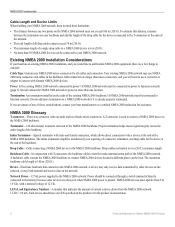
... connectors, which allows direct connection to connect with one location. Network Power-12 Vdc power supplied to power? LEN (Load Equivalency Number)-A number that connects to the NMEA 2000 backbone. Power: Is the existing NMEA 2000 network connected to the NMEA 2000 network. A NMEA 2000 network must operate from the NMEA 2000 network. 1 LEN = 50 mA. Do not add more terminators to the NMEA 2000 backbone. If you will need to 16 Vdc, with T-connectors, the backbone cables create...
... connectors, which allows direct connection to connect with one location. Network Power-12 Vdc power supplied to power? LEN (Load Equivalency Number)-A number that connects to the NMEA 2000 backbone. Power: Is the existing NMEA 2000 network connected to the NMEA 2000 network. A NMEA 2000 network must operate from the NMEA 2000 network. 1 LEN = 50 mA. Do not add more terminators to the NMEA 2000 backbone. If you will need to 16 Vdc, with T-connectors, the backbone cables create...
Technical Reference for Garmin NMEA 2000 Products
Page 13
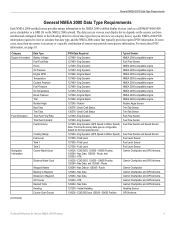
... - Route 129284 - Small Craft Status 127489 - Eng Dynamic (GPS Speed or Water Speed) 127505 - Nav Data, and 129285 - Category Engine Information Fuel Information Data Type Battery Voltage Fuel Flow Rate Hours Oil Pressure Engine RPM Temperature Coolant Pressure Fuel Pressure Oil Temperature Boost Pressure Trim Rudder Angle Bow Tabs Trim Tabs Total Fuel Flow Rate Total Fuel Onboard Fuel Economy Navigation Information (Continued) Cruising Range Fuel Level Tank 1 Tank 2 Course Made Good Distance Made Good Waypoint Name Bearing to Waypoint Distance to Waypoint...
... - Route 129284 - Small Craft Status 127489 - Eng Dynamic (GPS Speed or Water Speed) 127505 - Nav Data, and 129285 - Category Engine Information Fuel Information Data Type Battery Voltage Fuel Flow Rate Hours Oil Pressure Engine RPM Temperature Coolant Pressure Fuel Pressure Oil Temperature Boost Pressure Trim Rudder Angle Bow Tabs Trim Tabs Total Fuel Flow Rate Total Fuel Onboard Fuel Economy Navigation Information (Continued) Cruising Range Fuel Level Tank 1 Tank 2 Course Made Good Distance Made Good Waypoint Name Bearing to Waypoint Distance to Waypoint...


