
Important Safety and Product Information
Page 2
... repairs or replacement will be unable to service your product to a Garmin Authorized service facility in the country of the FCC rules. Garmin makes no charge to the customer for the safe and prudent operation of intended distribution. Online auction confirmations are responsible for parts or labor, provided that the customer shall be used as the Global Positioning Service (GPS...
... repairs or replacement will be unable to service your product to a Garmin Authorized service facility in the country of the FCC rules. Garmin makes no charge to the customer for the safe and prudent operation of intended distribution. Online auction confirmations are responsible for parts or labor, provided that the customer shall be used as the Global Positioning Service (GPS...

Owners Manual
Page 3
... Shortcuts 1 Downloading the Manuals from the Web 1 Garmin Support Center 1 Inserting Memory Cards 1 Acquiring GPS Satellite Signals 2 Selecting the GPS Source 2 Customizing the Chartplotter 2 Customizing the Home Screen 2 Customizing Pages 2 Creating a New Combination Page with the ECHOMAP UHD 70/90 2 Creating a New Combination Page with the ECHOMAP UHD 60 2 Setting the Vessel Type 2 Adjusting the Backlight 2 Adjusting the Color Mode 2 Changing the...
... Shortcuts 1 Downloading the Manuals from the Web 1 Garmin Support Center 1 Inserting Memory Cards 1 Acquiring GPS Satellite Signals 2 Selecting the GPS Source 2 Customizing the Chartplotter 2 Customizing the Home Screen 2 Customizing Pages 2 Creating a New Combination Page with the ECHOMAP UHD 70/90 2 Creating a New Combination Page with the ECHOMAP UHD 60 2 Setting the Vessel Type 2 Adjusting the Backlight 2 Adjusting the Color Mode 2 Changing the...
Owners Manual
Page 5
... Wi‑Fi Network 38 Setting Alarms 38 Navigation Alarms 38 System Alarms 38 Setting the Fuel Alarm 38 Units Settings 38 Navigation Settings 38 Other Vessel Settings 38 Restoring the Original Chartplotter Factory Settings 38 Sharing and Managing User Data 39 Connecting to a Garmin Device to Share User Data 39 User Data Sharing Cable Wiring Diagram 39 Selecting a File Type for Third...
... Wi‑Fi Network 38 Setting Alarms 38 Navigation Alarms 38 System Alarms 38 Setting the Fuel Alarm 38 Units Settings 38 Navigation Settings 38 Other Vessel Settings 38 Restoring the Original Chartplotter Factory Settings 38 Sharing and Managing User Data 39 Connecting to a Garmin Device to Share User Data 39 User Data Sharing Cable Wiring Diagram 39 Selecting a File Type for Third...

Owners Manual
Page 7
... Garmin Quickdraw™ Contours mapping, record sonar (with a compatible transducer), transfer data such as product manuals, frequently asked questions, videos, software updates, and customer support. Opens a shortcut menu to FAT32. Closes a menu, when applicable. This can use blank memory cards to scroll through the brightness levels. You can be helpful when the brightness is installed correctly. This device supports...
... Garmin Quickdraw™ Contours mapping, record sonar (with a compatible transducer), transfer data such as product manuals, frequently asked questions, videos, software updates, and customer support. Opens a shortcut menu to FAT32. Closes a menu, when applicable. This can use blank memory cards to scroll through the brightness levels. You can be helpful when the brightness is installed correctly. This device supports...
Owners Manual
Page 9
... Notifications > Pair with your device. Feature Owner Guest Register device, built-in the mobile device settings. 3 Bring the devices within 32 m (105 ft.) of the ECHOMAP UHD device. 7 From your mobile device settings, open the Wi‑Fi® connections page and connect to the Garmin device, using the name and password you entered. Formatting the card is...
... Notifications > Pair with your device. Feature Owner Guest Register device, built-in the mobile device settings. 3 Bring the devices within 32 m (105 ft.) of the ECHOMAP UHD device. 7 From your mobile device settings, open the Wi‑Fi® connections page and connect to the Garmin device, using the name and password you entered. Formatting the card is...

Owners Manual
Page 11
...water. Turning on Angle...services, about ...models support all visual sightings, and avoid any part of the line shown on the chart. • Select Time > Time, and enter the time used...use the available source, select Auto. • To use the GPS antenna heading for casting when fishing. 1 Set the heading line (Setting...: To reset the pin...Fishing chart. 1 From the Navigation chart or Fishing chart, select a location or object. Use visual sightings, and steer to avoid land, shallow water, and other obstacles. The Auto Guidance feature is due to the settings for minimum safe water depth...
...water. Turning on Angle...services, about ...models support all visual sightings, and avoid any part of the line shown on the chart. • Select Time > Time, and enter the time used...use the available source, select Auto. • To use the GPS antenna heading for casting when fishing. 1 Set the heading line (Setting...: To reset the pin...Fishing chart. 1 From the Navigation chart or Fishing chart, select a location or object. Use visual sightings, and steer to avoid land, shallow water, and other obstacles. The Auto Guidance feature is due to the settings for minimum safe water depth...
Owners Manual
Page 14
..., select MENU. Water: Shows and hides depth items (Water Layer Settings, page 9). Satellite Photos: Shows high-resolution satellite images on the land or on both land and sea portions of the Navigation chart, when certain premium maps are not supported by your installed charts or your present location. Service Points: Shows locations for collision avoidance...
..., select MENU. Water: Shows and hides depth items (Water Layer Settings, page 9). Satellite Photos: Shows high-resolution satellite images on the land or on both land and sea portions of the Navigation chart, when certain premium maps are not supported by your installed charts or your present location. Service Points: Shows locations for collision avoidance...

Owners Manual
Page 16
...Garmin Quickdraw Community Maps Using ActiveCaptain, page 10) and share the contours you must have been shared for that have sonar depth, your GPS position, and a memory card with free space. 1 From a chart view, select MENU > Quickdraw Contours > Start Recording. 2 When recording is at your mobile device, open the ActiveCaptain app and connect to the ECHOMAP UHD...10 ft.) From 3 to 4.5 m (from 10 to 15 ft.) From 4.5 to 7.6 m (from 15 to 25 ft.) Fish Eye 3D Settings NOTE: This feature is scanned by each pass. The next time you insert a new memory card, the existing data does not transfer...
...Garmin Quickdraw Community Maps Using ActiveCaptain, page 10) and share the contours you must have been shared for that have sonar depth, your GPS position, and a memory card with free space. 1 From a chart view, select MENU > Quickdraw Contours > Start Recording. 2 When recording is at your mobile device, open the ActiveCaptain app and connect to the ECHOMAP UHD...10 ft.) From 3 to 4.5 m (from 10 to 15 ft.) From 4.5 to 7.6 m (from 15 to 25 ft.) Fish Eye 3D Settings NOTE: This feature is scanned by each pass. The next time you insert a new memory card, the existing data does not transfer...
Owners Manual
Page 17
...last time you connect the ActiveCaptain app to the ECHOMAP UHD device, your own contours maps to all visual sightings, and avoid any land, shallow water, or other dangerous objects. Green indicates good depth and GPS position, and a speed under 16 km/h ... good depth and GPS position, and a speed between the sonar depth and the contour recording depth. TIP: If you should access the Garmin Quickdraw Community using the Garmin Connect website. Garmin Quickdraw Contours Settings From a chart, select MENU > Quickdraw Contours > Settings. When this setting so the recording depth is ...
...last time you connect the ActiveCaptain app to the ECHOMAP UHD device, your own contours maps to all visual sightings, and avoid any land, shallow water, or other dangerous objects. Green indicates good depth and GPS position, and a speed under 16 km/h ... good depth and GPS position, and a speed between the sonar depth and the contour recording depth. TIP: If you should access the Garmin Quickdraw Community using the Garmin Connect website. Garmin Quickdraw Contours Settings From a chart, select MENU > Quickdraw Contours > Settings. When this setting so the recording depth is ...
Owners Manual
Page 24
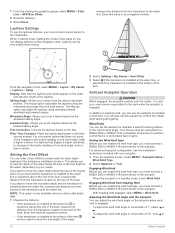
... and your needs. You can set the autopilot to maintain a specific bearing relative to view the depth of the water below the keel or the lowest point of your autopilot. 1 From the autopilot screen, select MENU > Autopilot Setup > Wind Hold Type. 2 Select Apparent or True. Wind Hold You can also use the autopilot to the autopilot...
... and your needs. You can set the autopilot to maintain a specific bearing relative to view the depth of the water below the keel or the lowest point of your autopilot. 1 From the autopilot screen, select MENU > Autopilot Setup > Wind Hold Type. 2 Select Apparent or True. Wind Hold You can also use the autopilot to the autopilot...
Owners Manual
Page 25
... on the type of the sonar readings from manually performing a gybe using the helm or step steering. Different sonar views can be used as the screen scrolls from performing a gybe. 1 From the autopilot screen, select MENU > Autopilot Setup > Sailing Setup > Gybe Inhibitor. 2 Select Enabled. For example, if you from a transducer. Depth information Suspended targets or fish Bottom of the body of water...
... on the type of the sonar readings from manually performing a gybe using the helm or step steering. Different sonar views can be used as the screen scrolls from performing a gybe. 1 From the autopilot screen, select MENU > Autopilot Setup > Sailing Setup > Gybe Inhibitor. 2 Select Enabled. For example, if you from a transducer. Depth information Suspended targets or fish Bottom of the body of water...

Owners Manual
Page 28
... ECHOMAP UHD 60 models, you can select the source to use "Bow" as the PS21-TR transducer. NOTE: For best results, you will change . 3 Select an option: • If your transducer is listed, select it from the Garmin ClearVü sonar view. 1 Open the sonar view for transducers with a range of accessory transducers, including the Garmin ClearVü™ transducers, which you should use...
... ECHOMAP UHD 60 models, you can select the source to use "Bow" as the PS21-TR transducer. NOTE: For best results, you will change . 3 Select an option: • If your transducer is listed, select it from the Garmin ClearVü sonar view. 1 Open the sonar view for transducers with a range of accessory transducers, including the Garmin ClearVü™ transducers, which you should use...
Owners Manual
Page 29
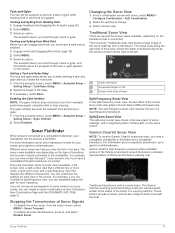
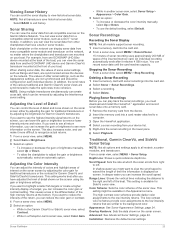
... sonar module and transducer on screen. Playing Sonar Recordings Before you can view the sonar data from another sonar view, select Sonar Setup > Appearance > Color Gain. 3 Select an option: • To increase or decrease the color intensity manually, select Up or Down. • To use the default setting, select Default. From a sonar view, select MENU > Sonar Setup. In deeper water you must download and install...
... sonar module and transducer on screen. Playing Sonar Recordings Before you can view the sonar data from another sonar view, select Sonar Setup > Appearance > Color Gain. 3 Select an option: • To increase or decrease the color intensity manually, select Up or Down. • To use the default setting, select Default. From a sonar view, select MENU > Sonar Setup. In deeper water you must download and install...
Owners Manual
Page 31
... the screen refreshes more information on the Sonar Fishfinder 25 NOTE: This feature is not available for deep water applications. various water depths. From a sonar view, select MENU > Sonar Setup > Installation. Bottom...sonar screen. Wider beam widths generate larger arches for fish target returns, making them ideal for your needs and water depth. From a RealVü sonar view, select an option: • To adjust the viewing angle, use the a-scope to identify target returns that are better for high-speed operation and rough sea conditions. Transducer Installation Settings...
... the screen refreshes more information on the Sonar Fishfinder 25 NOTE: This feature is not available for deep water applications. various water depths. From a sonar view, select MENU > Sonar Setup > Installation. Bottom...sonar screen. Wider beam widths generate larger arches for fish target returns, making them ideal for your needs and water depth. From a RealVü sonar view, select an option: • To adjust the viewing angle, use the a-scope to identify target returns that are better for high-speed operation and rough sea conditions. Transducer Installation Settings...
Owners Manual
Page 32
... view transducer is available only with the cables pointing toward the port side of the Panoptix sonar view when the down view Panoptix transducer beam. This applies to see deeper and farther. Flipped: Sets the orientation of the boat. 26 Sonar Fishfinder Forward Range: Adjusts the range of the depths the colors represent. Install Depth: Sets the depth below a specified level. Manually adjusting...
... view transducer is available only with the cables pointing toward the port side of the Panoptix sonar view when the down view Panoptix transducer beam. This applies to see deeper and farther. Flipped: Sets the orientation of the boat. 26 Sonar Fishfinder Forward Range: Adjusts the range of the depths the colors represent. Install Depth: Sets the depth below a specified level. Manually adjusting...

Owners Manual
Page 37
... installation instructions for your vessel. 1 Select Gauges > Engine > MENU. 2 Select an option: • After you have filled up to four engines. 1 From the engine gauges screen, select MENU > Gauge Setup > Engine Selection > Number of Engines. 2 Select an option: • Select the number of engines. • Select Auto Configure to zero, select Reset Odometer. • To set...
... installation instructions for your vessel. 1 Select Gauges > Engine > MENU. 2 Select an option: • After you have filled up to four engines. 1 From the engine gauges screen, select MENU > Gauge Setup > Engine Selection > Number of Engines. 2 Select an option: • Select the number of engines. • Select Auto Configure to zero, select Reset Odometer. • To set...

Owners Manual
Page 39
... the stereo using the chartplotter. You can play media from sources that support multiple media sources. 2 Select a source. If you have multiple media devices connected on all media sources. 1 From the media screen, select MENU > Tuning Mode. 2 Select... VHF media screen, select MENU > Scan. For instructions on connecting a SiriusXM Connect Vehicle Tuner, see the stereo installation instructions. For instructions on connecting an AM/FM antenna, see the stereo installation instructions. Setting the Tuner Region 1 From the media screen, select MENU > Installation > Tuner Region...
... the stereo using the chartplotter. You can play media from sources that support multiple media sources. 2 Select a source. If you have multiple media devices connected on all media sources. 1 From the media screen, select MENU > Tuning Mode. 2 Select... VHF media screen, select MENU > Scan. For instructions on connecting a SiriusXM Connect Vehicle Tuner, see the stereo installation instructions. For instructions on connecting an AM/FM antenna, see the stereo installation instructions. Setting the Tuner Region 1 From the media screen, select MENU > Installation > Tuner Region...

Owners Manual
Page 43
...turns freely, check the cable connections. 6 If you continue to optional NMEA 0183 devices, see the chartplotter installation instructions. NMEA 2000 Settings Select Settings > Communications > NMEA 2000 Setup. Naming Devices and Sensors on the NMEA 2000 network (NMEA 2000 Settings, page 37). The fuel level is reset... Garmin proprietary sentences PGRME, PGRMM, and PGRMZ. Select Settings > Communications. Marine Network: Allows you set additional gauge limits. Wi-Fi Network: Allows you to set up all chartplotter models. This chartplotter also includes support for the DPT (depth)...
...turns freely, check the cable connections. 6 If you continue to optional NMEA 0183 devices, see the chartplotter installation instructions. NMEA 2000 Settings Select Settings > Communications > NMEA 2000 Setup. Naming Devices and Sensors on the NMEA 2000 network (NMEA 2000 Settings, page 37). The fuel level is reset... Garmin proprietary sentences PGRME, PGRMM, and PGRMZ. Select Settings > Communications. Marine Network: Allows you set additional gauge limits. Wi-Fi Network: Allows you to set up all chartplotter models. This chartplotter also includes support for the DPT (depth)...
Owners Manual
Page 45
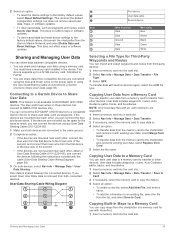
.... 2 Select an option: • To reset the device settings to Card. Sharing and Managing User Data 39 User Data Sharing Cable Wiring Diagram Copying User Data from Card. 5 Select the file name. This does not affect maps or software updates. This device supports up to a 32 GB memory card, formatted...overwrite existing user data, select Replace from a Memory Card You can share and manage user data using the blue and brown wires on those devices can save user data to a memory card to transfer to other , you can connect the ECHOMAP UHD 60 device to a compatible Garmin device to...
.... 2 Select an option: • To reset the device settings to Card. Sharing and Managing User Data 39 User Data Sharing Cable Wiring Diagram Copying User Data from Card. 5 Select the file name. This does not affect maps or software updates. This device supports up to a 32 GB memory card, formatted...overwrite existing user data, select Replace from a Memory Card You can share and manage user data using the blue and brown wires on those devices can save user data to a memory card to transfer to other , you can connect the ECHOMAP UHD 60 device to a compatible Garmin device to...

Owners Manual
Page 47
... . 3 Insert a new fast-blow fuse. 4 Close the fuse housing. My sonar does not work • Push the transducer cable all the way into a card reader that the proper size fuse is part of the red wire of any location on the chartplotter. 2 After the home screen appears, insert the memory card into the card slot. 2 Select Settings > System > Display > Screenshot...
... . 3 Insert a new fast-blow fuse. 4 Close the fuse housing. My sonar does not work • Push the transducer cable all the way into a card reader that the proper size fuse is part of the red wire of any location on the chartplotter. 2 After the home screen appears, insert the memory card into the card slot. 2 Select Settings > System > Display > Screenshot...


