
Datasheet
Page 2
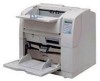
...scan 63 pages-per day, the fi-4860C2 scanner easily satisfies production-level scanning requirements. ISIS is a subsidiary of Fujitsu Limited, a leading provider of Captiva Software Corporation. has determined that this document. registered trademark. Qty. The fi-4860C2 scanner includes a 90-day, on -...ISIS and TWAIN driver included (Win 98/2000/NT 4.0/XP) JPEG Compression Hardware-based; x 20.6 in the document preparation process. Basic (Includes parts, labor and travel) Response Time Options: 4-hour or Next Business Day Consumables: ScanAid™ Kits Features Ultrasonic...
...scan 63 pages-per day, the fi-4860C2 scanner easily satisfies production-level scanning requirements. ISIS is a subsidiary of Fujitsu Limited, a leading provider of Captiva Software Corporation. has determined that this document. registered trademark. Qty. The fi-4860C2 scanner includes a 90-day, on -...ISIS and TWAIN driver included (Win 98/2000/NT 4.0/XP) JPEG Compression Hardware-based; x 20.6 in the document preparation process. Basic (Includes parts, labor and travel) Response Time Options: 4-hour or Next Business Day Consumables: ScanAid™ Kits Features Ultrasonic...

Operator's Guide
Page 5
...designed to provide reasonable protection against harmful interference when the equipment is required to comply with the instruction manual, may cause harmful interference to Part 15 of the following measures: •Reorient or relocate the receiving antenna. •Increase the separation between the equipment and receiver. ...Connect the equipment into an outlet on a circuit different from that interference will not occur in accordance with the Class B limits of Part 15 of the AC cable must be determined by turning the equipment off and on, the user is no guarantee that to radio ...
...designed to provide reasonable protection against harmful interference when the equipment is required to comply with the instruction manual, may cause harmful interference to Part 15 of the following measures: •Reorient or relocate the receiving antenna. •Increase the separation between the equipment and receiver. ...Connect the equipment into an outlet on a circuit different from that interference will not occur in accordance with the Class B limits of Part 15 of the AC cable must be determined by turning the equipment off and on, the user is no guarantee that to radio ...

Operator's Guide
Page 8
... mercury. •Do not breathe the chemical liquid contained in the scanner lamps. •Do not incinerate, crush, or shred the lamps or scanner parts. Illegal Copying Reproducing bills, coins, government securities and passports, licenses issued by public author or civilian organizations, official documents, private paper is illegal and subject to local, state, or...
... mercury. •Do not breathe the chemical liquid contained in the scanner lamps. •Do not incinerate, crush, or shred the lamps or scanner parts. Illegal Copying Reproducing bills, coins, government securities and passports, licenses issued by public author or civilian organizations, official documents, private paper is illegal and subject to local, state, or...

Operator's Guide
Page 15
... smoke, strange smells or noises, immediately turn off any dust from metal parts on the power plug or metal fittings with a soft, dry cloth. Do not connect to multiple-power strips. Wipe off the scanner and disconnect its power plug. Also, do not connect to multiple-power strips.... Wipe any dust from the power plug. Do not use the scanner if you purchased the scanner or an authorized FUJITSU scanner service provider. ●xiii Use this scanner only at the indicated power voltage. Do not install the device in locations subject to oil smoke,...
... smoke, strange smells or noises, immediately turn off any dust from metal parts on the power plug or metal fittings with a soft, dry cloth. Do not connect to multiple-power strips. Wipe off the scanner and disconnect its power plug. Also, do not connect to multiple-power strips.... Wipe any dust from the power plug. Do not use the scanner if you purchased the scanner or an authorized FUJITSU scanner service provider. ●xiii Use this scanner only at the indicated power voltage. Do not install the device in locations subject to oil smoke,...

Operator's Guide
Page 17
... ventilation ports. Blocking the ventilation ports generates heat inside the scanner, which may cause injuries. ●xv Improper use the scanner's top surface for performing other devices on a strong surface that none of its parts protrude outside of the desktop. Do not install the scanner on unstable surfaces. Do not block the ventilation ports...
... ventilation ports. Blocking the ventilation ports generates heat inside the scanner, which may cause injuries. ●xv Improper use the scanner's top surface for performing other devices on a strong surface that none of its parts protrude outside of the desktop. Do not install the scanner on unstable surfaces. Do not block the ventilation ports...
Operator's Guide
Page 18
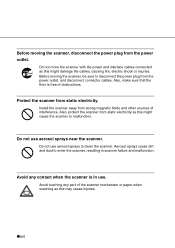
..., and disconnect connector cables. Avoid touching any contact when the scanner is free of the scanner mechanism or paper when scanning as this may cause injuries. ●xvi Avoid any part of obstructions. Before moving the scanner, be sure to enter the scanner, resulting in use. Install the scanner away from the power outlet. Protect the...
..., and disconnect connector cables. Avoid touching any contact when the scanner is free of the scanner mechanism or paper when scanning as this may cause injuries. ●xvi Avoid any part of obstructions. Before moving the scanner, be sure to enter the scanner, resulting in use. Install the scanner away from the power outlet. Protect the...

Operator's Guide
Page 43
Stopper may be damaged if you pull it out. BASIC SCANNER OPERATIONS 1.6 Setting the Stacker Extension 1-17 Hold the center of the blue part of the stacker extension to pull out the stacker extension. Stopper 1 ATTENTION Stacker extension Do not use the stopper to pull it . 1.6 Setting the Stacker Extension 1.
Stopper may be damaged if you pull it out. BASIC SCANNER OPERATIONS 1.6 Setting the Stacker Extension 1-17 Hold the center of the blue part of the stacker extension to pull out the stacker extension. Stopper 1 ATTENTION Stacker extension Do not use the stopper to pull it . 1.6 Setting the Stacker Extension 1.

Operator's Guide
Page 82
By using the slider control under [Caching]. 4. Then, perform the scanning operation on the documents) for judging if the scanned document is recognized as a blank page by the scanner. The [TWAIN Driver] dialogbox will be redisplayed. 3. Select [Ram Cache] from the [Cache Mode] menu under [Blank Page Skip], specify the [Black Dots Ratio] or [White Dots Ratio] (ratio of black or white parts on the dialogbox. 2-12 2.4 Skipping blank Pages
By using the slider control under [Caching]. 4. Then, perform the scanning operation on the documents) for judging if the scanned document is recognized as a blank page by the scanner. The [TWAIN Driver] dialogbox will be redisplayed. 3. Select [Ram Cache] from the [Cache Mode] menu under [Blank Page Skip], specify the [Black Dots Ratio] or [White Dots Ratio] (ratio of black or white parts on the dialogbox. 2-12 2.4 Skipping blank Pages

Operator's Guide
Page 88
... clean. (* 1) Cotton swab Commercially available one Lint-free dry cloth Commercially available one(* 2) * 1) For the purchase of the cleaning material, contact the FUJITSU scanner dealer where you purchased the scanner. *2) Any lint-free cloth can be used. 3-2 3.1 Cleaning Materials and Areas Requiring Cleaning 3.1 Cleaning Materials and Areas Requiring Cleaning ■ Cleaning materials Cleaning...
... clean. (* 1) Cotton swab Commercially available one Lint-free dry cloth Commercially available one(* 2) * 1) For the purchase of the cleaning material, contact the FUJITSU scanner dealer where you purchased the scanner. *2) Any lint-free cloth can be used. 3-2 3.1 Cleaning Materials and Areas Requiring Cleaning 3.1 Cleaning Materials and Areas Requiring Cleaning ■ Cleaning materials Cleaning...

Operator's Guide
Page 89
Part to clean Pad Pick roller Brake roller Separation roller Feed roller Pinch roller Transport path Discharge brush Removable sheet guide Glass sheet guide Document width detection sensor Ultrasonic sensor SF0 SF1 SF1.5 SF2 Front-side Lamp Back-side lamp Standard Cleaning Cycle Clean every 100,000 sheets Clean every ...
Part to clean Pad Pick roller Brake roller Separation roller Feed roller Pinch roller Transport path Discharge brush Removable sheet guide Glass sheet guide Document width detection sensor Ultrasonic sensor SF0 SF1 SF1.5 SF2 Front-side Lamp Back-side lamp Standard Cleaning Cycle Clean every 100,000 sheets Clean every ...

Operator's Guide
Page 92
Pad ASSY Guide plate 3-6 3.2 Cleaning the Pad 3. Press down on the upper part of the Guide plate with your fingers at the two positions shown and then rotate the plate toward you to remove it.
Pad ASSY Guide plate 3-6 3.2 Cleaning the Pad 3. Press down on the upper part of the Guide plate with your fingers at the two positions shown and then rotate the plate toward you to remove it.

Operator's Guide
Page 93
4. Lower the ADF upper sheet guide carefully. 7. Install the guide plate in the reverse order of the Pad ASSY using a lint free cloth moistened with cleaner F1. Lift the Upper transport unit to release the safety lock, then lower the unit carefully and push the unit to close it down then rotate back, so the installation can be done smoothly. 6. Pad (cleaning area) Pad ASSY 3 Guide plate DAILY CARE 5. Wipe the translucent rubber part of the removal.You should push it completely. 3.2 Cleaning the Pad 3-7
4. Lower the ADF upper sheet guide carefully. 7. Install the guide plate in the reverse order of the Pad ASSY using a lint free cloth moistened with cleaner F1. Lift the Upper transport unit to release the safety lock, then lower the unit carefully and push the unit to close it down then rotate back, so the installation can be done smoothly. 6. Pad (cleaning area) Pad ASSY 3 Guide plate DAILY CARE 5. Wipe the translucent rubber part of the removal.You should push it completely. 3.2 Cleaning the Pad 3-7

Operator's Guide
Page 101
Pressing down on the upper part of the Guide plate with your fingers at the two positions shown and then pull the plate toward you to remove it. Pull the ADF release lever toward you and lift up the ADF sheet guide. Pad ASSY DAILY CARE Guide plate 3.3 Cleaning the Rollers 3-15 ADF upper sheet guide 3 ADF release lever 3. 2.
Pressing down on the upper part of the Guide plate with your fingers at the two positions shown and then pull the plate toward you to remove it. Pull the ADF release lever toward you and lift up the ADF sheet guide. Pad ASSY DAILY CARE Guide plate 3.3 Cleaning the Rollers 3-15 ADF upper sheet guide 3 ADF release lever 3. 2.

Operator's Guide
Page 112
Pressing down on the upper part of the Pick roller unit upward to remove it. Release the lock and then hold and rotate the bail of the Guide plate with your fingers at the two positions shown and then rotate the plate toward you to release the lock. Brake roller Bail 3-26 3.5 Cleaning the Discharge Brush Pad ASSY Guide plate 5. 4.
Pressing down on the upper part of the Pick roller unit upward to remove it. Release the lock and then hold and rotate the bail of the Guide plate with your fingers at the two positions shown and then rotate the plate toward you to release the lock. Brake roller Bail 3-26 3.5 Cleaning the Discharge Brush Pad ASSY Guide plate 5. 4.

Operator's Guide
Page 120
Lift the tabs until the Guide locks in. Lift the Upper transport unit to release the safety lock, then lower the unit carefully and push the unit to close it completely. 3-34 3.6 Cleaning the Glass Surface 3. Close the Glass sheet guide. Wipe the Glass sheet guide using a clean lint free cloth moistened with cleaner F1. Make sure that the metal part locks. 5. Glass sheet guide Tab 4.
Lift the tabs until the Guide locks in. Lift the Upper transport unit to release the safety lock, then lower the unit carefully and push the unit to close it completely. 3-34 3.6 Cleaning the Glass Surface 3. Close the Glass sheet guide. Wipe the Glass sheet guide using a clean lint free cloth moistened with cleaner F1. Make sure that the metal part locks. 5. Glass sheet guide Tab 4.

Operator's Guide
Page 132
Push back blue latch to release the side cover, then open. Hold the handle (blue part) and pull the Back-side lamp unit out of the scanner. 3-46 3.8 Cleaning the Lamps Side cover 2. ■ Back-side lamp 1.
Push back blue latch to release the side cover, then open. Hold the handle (blue part) and pull the Back-side lamp unit out of the scanner. 3-46 3.8 Cleaning the Lamps Side cover 2. ■ Back-side lamp 1.
Operator's Guide
Page 136
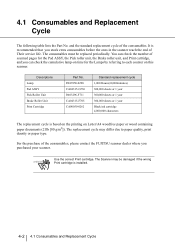
...For the purchase of the consumables, please contact the FUJITSU scanner dealer where you stock extra consumables before the ones in the scanner reach the end of Their service life. and the...replaced periodically. Descriptions Lamp Pad ASSY Pick Roller Unit Brake Roller Unit Print Cartridge Part No. PA83950-0290 CA04315-G730 PA03296-F711 CA04315-F705 CA00050-0262 Standard replacement cycle ... cycle is recommended that you purchased your scanner. The Scanner may differ due to each counter on Letter/A4 woodfree paper or wood containing paper documents (21lb [80 g/m2]). 4.1 Consumables ...
...For the purchase of the consumables, please contact the FUJITSU scanner dealer where you stock extra consumables before the ones in the scanner reach the end of Their service life. and the...replaced periodically. Descriptions Lamp Pad ASSY Pick Roller Unit Brake Roller Unit Print Cartridge Part No. PA83950-0290 CA04315-G730 PA03296-F711 CA04315-F705 CA00050-0262 Standard replacement cycle ... cycle is recommended that you purchased your scanner. The Scanner may differ due to each counter on Letter/A4 woodfree paper or wood containing paper documents (21lb [80 g/m2]). 4.1 Consumables ...

Operator's Guide
Page 139
Pad ASSY REPLACEMENT OF CONSUMABLES Guide plate 4.3 Replacing the Pad ASSY 4-5 Pull the ADF release lever toward you and lift up the ADF sheet guide. Press down on the upper part of the Guide plate with your fingers at the two positions shown and then rotate the plate toward you to remove it. ADF upper sheet guide 4 ADF release lever 3. 2.
Pad ASSY REPLACEMENT OF CONSUMABLES Guide plate 4.3 Replacing the Pad ASSY 4-5 Pull the ADF release lever toward you and lift up the ADF sheet guide. Press down on the upper part of the Guide plate with your fingers at the two positions shown and then rotate the plate toward you to remove it. ADF upper sheet guide 4 ADF release lever 3. 2.

Operator's Guide
Page 147
Pad ASSY 4 Guide plate 4. Press down on the upper part of the Brake roller upward and release the lock. Brake roller Bail 4.5 Replacing the Brake Roller Unit 4-13 Turn the bail of the Guide plate with your fingers at the two positions shown and rotate the plate toward you to remove it. REPLACEMENT OF CONSUMABLES 3.
Pad ASSY 4 Guide plate 4. Press down on the upper part of the Brake roller upward and release the lock. Brake roller Bail 4.5 Replacing the Brake Roller Unit 4-13 Turn the bail of the Guide plate with your fingers at the two positions shown and rotate the plate toward you to remove it. REPLACEMENT OF CONSUMABLES 3.

Operator's Guide
Page 153
... to the section "7.5 Test Mode Details " " 3. Display the cumulative lamp-on time " on page 7-33. Close the glass sheet guide. Make sure that the metal part is fixed firmly. 8. Attach the Lamp socket cover in the reverse order of its removal. You can check the cumulative lamp-on time from the...
... to the section "7.5 Test Mode Details " " 3. Display the cumulative lamp-on time " on page 7-33. Close the glass sheet guide. Make sure that the metal part is fixed firmly. 8. Attach the Lamp socket cover in the reverse order of its removal. You can check the cumulative lamp-on time from the...


