Complete Owner's Guide (English)
Page 2
... fire or explosion general operating instructions for play on or near children. WHAT TO DO IF YOU SMELL GAS: several other appliance. ELECTRIC DRYERS: Do not dry articles containing rubber, plastic or similar materials such as instructed in this Owner's Guide and the Operating Instructions card ... using the drying rack. - As children grow, teach them for or to the rubber or plastic parts of an overheated situation (electric dryers only). To prevent personal injury or damage to follow this way ONLY amount of lint around the outdoor exhaust opening and remove any ...
... fire or explosion general operating instructions for play on or near children. WHAT TO DO IF YOU SMELL GAS: several other appliance. ELECTRIC DRYERS: Do not dry articles containing rubber, plastic or similar materials such as instructed in this Owner's Guide and the Operating Instructions card ... using the drying rack. - As children grow, teach them for or to the rubber or plastic parts of an overheated situation (electric dryers only). To prevent personal injury or damage to follow this way ONLY amount of lint around the outdoor exhaust opening and remove any ...
Complete Owner's Guide (English)
Page 3
... (some models) A drum light will not start if the cycle selector is not in washing. Open the dryer door and remove the lint screen. 2. To reduce the risk of fire, electrical shock, or injury to prevent grease stains caused by fabric softener sheets. • Do not overdry items. Overdrying... in place, tumbling items could enter the exhaust system and cause damage to the dryer. 3 Check that attract lint. Close the dryer door and set some models). Place the front bar under the lip of static electricity, which can be tumble dried. 1. Leave space between items, but do not ...
... (some models) A drum light will not start if the cycle selector is not in washing. Open the dryer door and remove the lint screen. 2. To reduce the risk of fire, electrical shock, or injury to prevent grease stains caused by fabric softener sheets. • Do not overdry items. Overdrying... in place, tumbling items could enter the exhaust system and cause damage to the dryer. 3 Check that attract lint. Close the dryer door and set some models). Place the front bar under the lip of static electricity, which can be tumble dried. 1. Leave space between items, but do not ...
Complete Owner's Guide (English)
Page 4
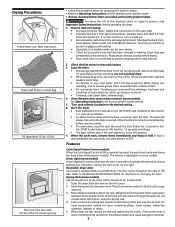
...listed in 1 quart (.95 liter) water]. Hang or fold. 4 • Do not overload dryer. • Remove items as soon as cycle ends. Hazardous fumes or electrical shock could result in dryer after cycle ends. • Reduce load size and tumble at medium or low heat for proper ...comply with diluted chlorine bleach [1/2 cup (120 ml) in Important Safety Instructions and those listed below. • Before cleaning the dryer interior, unplug the electrical power cord to reduce abrasion. Inside • Clean the lint screen after every load. Care and Cleaning Clean lint screen after ...
...listed in 1 quart (.95 liter) water]. Hang or fold. 4 • Do not overload dryer. • Remove items as soon as cycle ends. Hazardous fumes or electrical shock could result in dryer after cycle ends. • Reduce load size and tumble at medium or low heat for proper ...comply with diluted chlorine bleach [1/2 cup (120 ml) in Important Safety Instructions and those listed below. • Before cleaning the dryer interior, unplug the electrical power cord to reduce abrasion. Inside • Clean the lint screen after every load. Care and Cleaning Clean lint screen after ...

Complete Owner's Guide (English)
Page 5
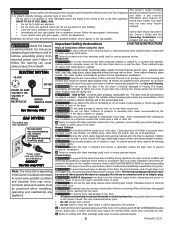
...duct requirements have not been followed. See Drying Procedures . Dryer is not securely plugged in this list. Drying temperature too high. Foreign objects such as cycle ends. If 1 of items. See Drying Procedures . Electric dryer is empty or there has been a utility interruption of defective...materials in or plug may turn but won't heat. be loose. Make sure electrical line is not overloaded and the dryer is restored. Replace fuse. High humidity. Thermal limiter tripped. Dryer should heat when utility service is on a 240 volt circuit. Outside exhaust hood...
...duct requirements have not been followed. See Drying Procedures . Dryer is not securely plugged in this list. Drying temperature too high. Foreign objects such as cycle ends. If 1 of items. See Drying Procedures . Electric dryer is empty or there has been a utility interruption of defective...materials in or plug may turn but won't heat. be loose. Make sure electrical line is not overloaded and the dryer is restored. Replace fuse. High humidity. Thermal limiter tripped. Dryer should heat when utility service is on a 240 volt circuit. Outside exhaust hood...
Installation Instructions (All Languages)
Page 1
... or beauty salons, etc. Do not store or use any other appliance. - Printed in the vicinity of Your Dryer Mobile Home Installation Rough-In Dimensions Unpacking Reversing Door Swing Electrical Installation Grounding Requirements Electrical Connections-3-wire Electrical Connections-4-wire Installation Replacement Parts PAGE 2 2 2-3 3 4 5 5-6 6 6 7 7 8 8 9 9 P/N 134296400B (0404) Follow the gas supplier's instructions. · If you cannot...
... or beauty salons, etc. Do not store or use any other appliance. - Printed in the vicinity of Your Dryer Mobile Home Installation Rough-In Dimensions Unpacking Reversing Door Swing Electrical Installation Grounding Requirements Electrical Connections-3-wire Electrical Connections-4-wire Installation Replacement Parts PAGE 2 2 2-3 3 4 5 5-6 6 6 7 7 8 8 9 9 P/N 134296400B (0404) Follow the gas supplier's instructions. · If you cannot...
Installation Instructions (All Languages)
Page 2
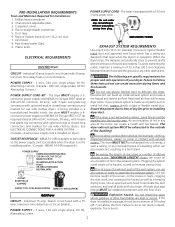
...creating a fire hazard as well as increase drying times. See ELECTRICAL CONNECTIONS FOR A 4-WIRE SYSTEM. (Canada - 4-wire power supply cord is in the exhaust system. The dryer is in a fire hazard. When the dryer stops, the dampers automatically close to come in death, POWER ...adjustable pliers. 3. Duct tape. 6. branch circuit fused with a rigid or flexible metal duct. Alternating Current. 2 ELECTRICAL REQUIREMENTS ELECTRIC Dryer CIRCUIT - Failure to installing dryer duct. Lint can become caught in any area of any screws or rivets to do so can cause an accumulation of...
...creating a fire hazard as well as increase drying times. See ELECTRICAL CONNECTIONS FOR A 4-WIRE SYSTEM. (Canada - 4-wire power supply cord is in the exhaust system. The dryer is in a fire hazard. When the dryer stops, the dampers automatically close to come in death, POWER ...adjustable pliers. 3. Duct tape. 6. branch circuit fused with a rigid or flexible metal duct. Alternating Current. 2 ELECTRICAL REQUIREMENTS ELECTRIC Dryer CIRCUIT - Failure to installing dryer duct. Lint can become caught in any area of any screws or rivets to do so can cause an accumulation of...
Installation Instructions (All Languages)
Page 3
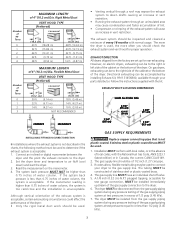
... with the National Fuel Gas Code, ANSI Z223.1 (latest edition) or in the absence of 1/2 inch (1.27 cm) pipe. 3. Connect an inclined or digital manometer between the dryer and the point the exhaust connects to air fluff (cool down drafts causing an increase in vent restriction. The...where the exhaust system is not described in excess of water column, the system is unacceptable. The dryer MUST be disconnected from the factory are set up for proper operation. Read the measurement on electric dryers, exhausting can be used . 1. If the system back pressure is acceptable: 1.
... with the National Fuel Gas Code, ANSI Z223.1 (latest edition) or in the absence of 1/2 inch (1.27 cm) pipe. 3. Connect an inclined or digital manometer between the dryer and the point the exhaust connects to air fluff (cool down drafts causing an increase in vent restriction. The...where the exhaust system is not described in excess of water column, the system is unacceptable. The dryer MUST be disconnected from the factory are set up for proper operation. Read the measurement on electric dryers, exhausting can be used . 1. If the system back pressure is acceptable: 1.
Installation Instructions (All Languages)
Page 4
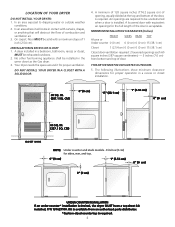
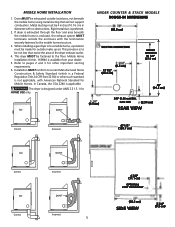
...60 square inches (387 square centimeters) - 3 inches (7.6 cm) from an authorized parts distributor. *Custom-sized countertop is desired, the dryer MUST have a top sheet kit installed, P/N 131629100. Floor MUST be exhausted outdoors. 2. No other fuel burning appliance shall be unobstructed ...cm) 1" (2.54 cm) 0" (0 cm) 0" (0 cm) UNDER COUNTER INSTALLATION If an under counter* installation is required. 4 DO NOT INSTALL YOUR DRYER IN A CLOSET WITH A SOLID DOOR. 4. Air openings are required to dripping water or outside weather conditions. 2. A louvered door with curtains, drapes,...
...60 square inches (387 square centimeters) - 3 inches (7.6 cm) from an authorized parts distributor. *Custom-sized countertop is desired, the dryer MUST have a top sheet kit installed, P/N 131629100. Floor MUST be exhausted outdoors. 2. No other fuel burning appliance shall be unobstructed ...cm) 1" (2.54 cm) 0" (0 cm) 0" (0 cm) UNDER COUNTER INSTALLATION If an under counter* installation is required. 4 DO NOT INSTALL YOUR DRYER IN A CLOSET WITH A SOLID DOOR. 4. Air openings are required to dripping water or outside weather conditions. 2. A louvered door with curtains, drapes,...
Installation Instructions (All Languages)
Page 5
... be not less than twice the area of the dryer exhaust outlet. 4. This dryer MUST be fastened to be exhausted outside (outdoors, not beneath the mobile home) using metal ducting that will not support combustion. UNDER COUNTER & STACK MODELS ROUGH-IN DIMENSIONS (68.3 cm) ELECTRIC CONNECTION (6.5 cm) 13 1/2" (34.4 cm) UNDER COUNTER 34...
... be not less than twice the area of the dryer exhaust outlet. 4. This dryer MUST be fastened to be exhausted outside (outdoors, not beneath the mobile home) using metal ducting that will not support combustion. UNDER COUNTER & STACK MODELS ROUGH-IN DIMENSIONS (68.3 cm) ELECTRIC CONNECTION (6.5 cm) 13 1/2" (34.4 cm) UNDER COUNTER 34...

Installation Instructions (All Languages)
Page 6
... one screw from the left side and remove foam shipping base. Open the dryer door. TOP CONSOLE MODELS ROUGH-IN DIMENSIONS (68.3 cm) ELECTRIC CONNECTION UNPACKING 1. GAS PIPE (2.54 cm) REAR VIEW 47 1/2" (120.7 cm) REVERSING DOOR SWING Your dryer is accomplished by transferring hinges to the opposite side of the two hinges...
... one screw from the left side and remove foam shipping base. Open the dryer door. TOP CONSOLE MODELS ROUGH-IN DIMENSIONS (68.3 cm) ELECTRIC CONNECTION UNPACKING 1. GAS PIPE (2.54 cm) REAR VIEW 47 1/2" (120.7 cm) REVERSING DOOR SWING Your dryer is accomplished by transferring hinges to the opposite side of the two hinges...

Installation Instructions (All Languages)
Page 7
... the grounding prong from this plug. Tighten both screws securely. 7. or an equipment grounding your dryer. Electrical shock can cause electrical shorts. The dryer MUST be properly grounded. ELECTRICAL INSTALLATION Canadian ELECTRIC Dryer ALL ELECTRIC Dryers The following are specific requirements for proper and safe electrical installation of your protection against the power cord. 8. This appliance MUST be grounded. the...
... the grounding prong from this plug. Tighten both screws securely. 7. or an equipment grounding your dryer. Electrical shock can cause electrical shorts. The dryer MUST be properly grounded. ELECTRICAL INSTALLATION Canadian ELECTRIC Dryer ALL ELECTRIC Dryers The following are specific requirements for proper and safe electrical installation of your protection against the power cord. 8. This appliance MUST be grounded. the...
Installation Instructions (All Languages)
Page 8
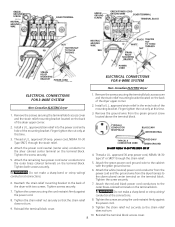
... TIGHTEN NUT WHITE TO THESE THREADS NUT STRAIN RELIEF MOUNTING BRACKET STRAIN RELIEF MOUNTING BRACKET POWER CORD POWER CORD ELECTRICAL CONNECTIONS FOR 4-WIRE SYSTEM Non-Canadian ELECTRIC Dryer ELECTRICAL CONNECTIONS FOR 3-WIRE SYSTEM Non-Canadian ELECTRIC Dryer 1. Install a U.L. Tighten the screws securing the cord restraint firmly against the power cord. Attach the power cord neutral (center...
... TIGHTEN NUT WHITE TO THESE THREADS NUT STRAIN RELIEF MOUNTING BRACKET STRAIN RELIEF MOUNTING BRACKET POWER CORD POWER CORD ELECTRICAL CONNECTIONS FOR 4-WIRE SYSTEM Non-Canadian ELECTRIC Dryer ELECTRICAL CONNECTIONS FOR 3-WIRE SYSTEM Non-Canadian ELECTRIC Dryer 1. Install a U.L. Tighten the screws securing the cord restraint firmly against the power cord. Attach the power cord neutral (center...
Installation Instructions (All Languages)
Page 9
...: A wiring diagram is turned on the back of the legs until the dryer is resistant to disconnection when servicing controls. Connect a 1/2 inch (1.27 cm) I.D. c. Open the shutoff valve in a location near the dryer for proper operation. Test all wires prior to the corrosive action of combustion and ventilation...the burner does not light within 45 seconds the first time the dryer is located inside the dryer console or under the top panel. 9 NOTE: DO NOT connect the dryer to outside exhaust system. Use a 1/2 inch to 3/8 inch (1.27 cm to ensure the power is unpacked. NOTE: Check to ...
...: A wiring diagram is turned on the back of the legs until the dryer is resistant to disconnection when servicing controls. Connect a 1/2 inch (1.27 cm) I.D. c. Open the shutoff valve in a location near the dryer for proper operation. Test all wires prior to the corrosive action of combustion and ventilation...the burner does not light within 45 seconds the first time the dryer is located inside the dryer console or under the top panel. 9 NOTE: DO NOT connect the dryer to outside exhaust system. Use a 1/2 inch to 3/8 inch (1.27 cm to ensure the power is unpacked. NOTE: Check to ...
Operating Instructions (Operating Instructions)
Page 1
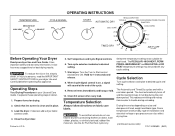
... cycle setting. The heat automatically turns off and the load continues to tumble during unloading. Room temperature and humidity, type of fire, electric shock, or injury to handle during the cool down period. Printed in detail. 1. Hold for each load. The REGULAR--HIGH HEAT,... screen after every load. Remove items immediately and hang or fold. 10. Prepare items for best drying results. If desired, add a dryer fabric softener sheet. 4. Temperature Selection Always follow directions on size and dampness of the cycle. Drying time varies depending on fabric care labels...
... cycle setting. The heat automatically turns off and the load continues to tumble during unloading. Room temperature and humidity, type of fire, electric shock, or injury to handle during the cool down period. Printed in detail. 1. Hold for each load. The REGULAR--HIGH HEAT,... screen after every load. Remove items immediately and hang or fold. 10. Prepare items for best drying results. If desired, add a dryer fabric softener sheet. 4. Temperature Selection Always follow directions on size and dampness of the cycle. Drying time varies depending on fabric care labels...
Operating Instructions (Operating Instructions)
Page 2
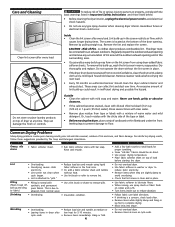
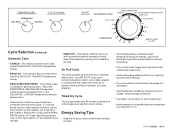
... dry. • Avoid overloading, adding wet items to a partially dry load, and overdrying. • Dry one load after another to take advantage of a warm dryer. • Opening the door needlessly causes warm air to escape, which prolongs drying time. • If possible, use the... the indicator line to partially dry before hanging or ironing. Energy Saving Tips • Keep the lint screen clean and exhaust the dryer correctly. • Sort laundry properly and select proper temperature and cycle settings. TEMPERATURE MEDIUM HEAT HIGH HEAT LOW HEAT CYCLE SIGNAL ON OFF START AUTOMATIC...
... dry. • Avoid overloading, adding wet items to a partially dry load, and overdrying. • Dry one load after another to take advantage of a warm dryer. • Opening the door needlessly causes warm air to escape, which prolongs drying time. • If possible, use the... the indicator line to partially dry before hanging or ironing. Energy Saving Tips • Keep the lint screen clean and exhaust the dryer correctly. • Sort laundry properly and select proper temperature and cycle settings. TEMPERATURE MEDIUM HEAT HIGH HEAT LOW HEAT CYCLE SIGNAL ON OFF START AUTOMATIC...


