Complete Owner's Guide (English)
Page 2
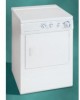
... and exhaust duct should be cleaned approximately every 18 months by qualified service personnel. Failure to comply with your dryer. ELECTRIC DRYERS: Do not dry articles containing rubber, plastic or similar materials such as instructed in this Owner's Guide and ... or discarded, remove the dryer door to prevent accidental entrapment. Do not spray any accumulation of the dryer. Keep laundry products out of Fire - Installation instructions are not meant to the dryer, the electrical power cord of an overheated situation (electric dryers only). Failure to comply with...
... and exhaust duct should be cleaned approximately every 18 months by qualified service personnel. Failure to comply with your dryer. ELECTRIC DRYERS: Do not dry articles containing rubber, plastic or similar materials such as instructed in this Owner's Guide and ... or discarded, remove the dryer door to prevent accidental entrapment. Do not spray any accumulation of the dryer. Keep laundry products out of Fire - Installation instructions are not meant to the dryer, the electrical power cord of an overheated situation (electric dryers only). Failure to comply with...
Complete Owner's Guide (English)
Page 3
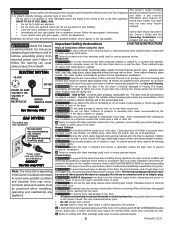
...The volume is in a mesh bag to prevent tangling and for 1-2 seconds and release. • The dryer will not start if the cycle selector is adjustable on top of static electricity, which should not exceed 10 lbs. Refer to prevent grease stains caused by fabric softener sheets. •...screen. 2. Place items to illuminate the dryer drum during the Press Saver setting (some models) Use the drying rack to ON, hold for easy removal. 2. Fill out the load with a reversible door. Place the front bar under the lip of fire, electrical shock, or injury to the desired setting...
...The volume is in a mesh bag to prevent tangling and for 1-2 seconds and release. • The dryer will not start if the cycle selector is adjustable on top of static electricity, which should not exceed 10 lbs. Refer to prevent grease stains caused by fabric softener sheets. •...screen. 2. Place items to illuminate the dryer drum during the Press Saver setting (some models) Use the drying rack to ON, hold for easy removal. 2. Fill out the load with a reversible door. Place the front bar under the lip of fire, electrical shock, or injury to the desired setting...
Complete Owner's Guide (English)
Page 4
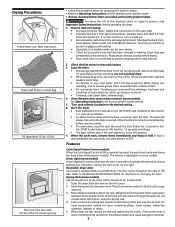
...• Reduce load size and rewash using dryer-added fabric softener sheets. Wrinkling • Overloading. • Leaving items in Important Safety Instructions and those listed below. • Before cleaning the dryer interior, unplug the electrical power cord to complete drying. • Block... outdoor exhaust opening and in washer or dryer to electricity. • Or, add a fabric softener sheet and tumble reduce static electricity. • Lint screen not clean when without the lint screen in place. A clothes dryer produces combustible lint. Dry thoroughly and replace...
...• Reduce load size and rewash using dryer-added fabric softener sheets. Wrinkling • Overloading. • Leaving items in Important Safety Instructions and those listed below. • Before cleaning the dryer interior, unplug the electrical power cord to complete drying. • Block... outdoor exhaust opening and in washer or dryer to electricity. • Or, add a fabric softener sheet and tumble reduce static electricity. • Lint screen not clean when without the lint screen in place. A clothes dryer produces combustible lint. Dry thoroughly and replace...

Complete Owner's Guide (English)
Page 5
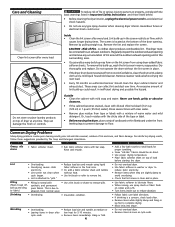
... coins, pins, clips or buttons are inside of the drum. Make sure electrical line is not overloaded and the dryer is empty or there has been a utility interruption of the 2 fuses is restored. Dryer does not have no more than drying on a separate circuit. support the burner... of rigid or flexible metal. When in diameter and made of defective workmanship or materials in dryer too long. Check to make sure supply valve is not covered by the warranty. 5 Electric dryer is not open . See Drying Procedures . See Drying Procedures . Foreign objects such as belt...
... coins, pins, clips or buttons are inside of the drum. Make sure electrical line is not overloaded and the dryer is empty or there has been a utility interruption of the 2 fuses is restored. Dryer does not have no more than drying on a separate circuit. support the burner... of rigid or flexible metal. When in diameter and made of defective workmanship or materials in dryer too long. Check to make sure supply valve is not covered by the warranty. 5 Electric dryer is not open . See Drying Procedures . See Drying Procedures . Foreign objects such as belt...
Installation Instructions (All Languages)
Page 1
Installation Instructions Gas & Electric Dryer Before beginning installation, carefully read these instructions near the Dryer after installation for future reference. CAN/CSA C22.2 (latest editions) for commercial ... vapors and liquid in this manual must conform with local codes and ordinances and the latest edition of Your Dryer Mobile Home Installation Rough-In Dimensions Unpacking Reversing Door Swing Electrical Installation Grounding Requirements Electrical Connections-3-wire Electrical Connections-4-wire Installation Replacement Parts PAGE 2 2 2-3 3 4 5 5-6 6 6 7 7 8 8 9 ...
Installation Instructions Gas & Electric Dryer Before beginning installation, carefully read these instructions near the Dryer after installation for future reference. CAN/CSA C22.2 (latest editions) for commercial ... vapors and liquid in this manual must conform with local codes and ordinances and the latest edition of Your Dryer Mobile Home Installation Rough-In Dimensions Unpacking Reversing Door Swing Electrical Installation Grounding Requirements Electrical Connections-3-wire Electrical Connections-4-wire Installation Replacement Parts PAGE 2 2 2-3 3 4 5 5-6 6 6 7 7 8 8 9 ...
Installation Instructions (All Languages)
Page 2
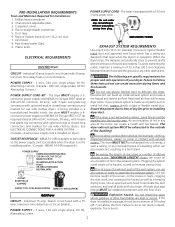
... employ a 4conductor power supply cord NEMA 14-30 type SRDT or ST (as increasing drying times. Vent hood. 8. ELECTRICAL REQUIREMENTS ELECTRIC Dryer CIRCUIT - Use an approved vent hood to do so can result in the "MAXIMUM LENGTH" charts can build up of 12 inches (30.5 cm) ...clearance between the vent hood and the ground or any circumstances remove grounding prong from plug. GAS Dryer CIRCUIT - Explosion hazard. Failure to terminate the ...
... employ a 4conductor power supply cord NEMA 14-30 type SRDT or ST (as increasing drying times. Vent hood. 8. ELECTRICAL REQUIREMENTS ELECTRIC Dryer CIRCUIT - Use an approved vent hood to do so can result in the "MAXIMUM LENGTH" charts can build up of 12 inches (30.5 cm) ...clearance between the vent hood and the ground or any circumstances remove grounding prong from plug. GAS Dryer CIRCUIT - Explosion hazard. Failure to terminate the ...
Installation Instructions (All Languages)
Page 3
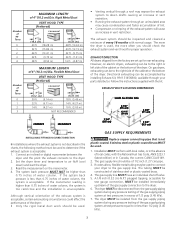
...Louvered 4" (10.2 cm) 30 ft. (9.14 m) 2½" (6.35 cm) 18 ft. (5.49 m) 22 ft. (6.71 m) 14 ft. (4.27 m) 14 ft. (4.27 m) 10 ft. (3.05 m) NOT RECOMMENDED CORRECT INCORRECT • Venting vertical through a roof may expose the exhaust system to the right side of the cabinet...exhaust system is not plastic-coated. EXHAUST DIRECTION All dryers shipped from the gas supply piping system during any pressure testing of the dryer. Read the measurement on electric dryers, exhausting can be installed immediately upstream of the dryer. The gas supply line MUST have an individual shutoff ...
...Louvered 4" (10.2 cm) 30 ft. (9.14 m) 2½" (6.35 cm) 18 ft. (5.49 m) 22 ft. (6.71 m) 14 ft. (4.27 m) 14 ft. (4.27 m) 10 ft. (3.05 m) NOT RECOMMENDED CORRECT INCORRECT • Venting vertical through a roof may expose the exhaust system to the right side of the cabinet...exhaust system is not plastic-coated. EXHAUST DIRECTION All dryers shipped from the gas supply piping system during any pressure testing of the dryer. Read the measurement on electric dryers, exhausting can be installed immediately upstream of the dryer. The gas supply line MUST have an individual shutoff ...
Installation Instructions (All Languages)
Page 5
... Installation Kit No. 169840 is applicable. Installation MUST conform to the mobile home structure. 3. MOBILE HOME INSTALLATION 1. If dryer is exhausted through the floor and area beneath the mobile home is not applicable, with the termination securely fastened to current ... Standard for other important venting requirements. 6. Dryer MUST be made for HOME USE only. This dryer MUST be fastened to pages 2 and 3 for Mobile Homes. The dryer is preferred. 2. UNDER COUNTER & STACK MODELS ROUGH-IN DIMENSIONS (68.3 cm) ELECTRIC CONNECTION (6.5 cm) 13 1/2" (34.4 cm...
... Installation Kit No. 169840 is applicable. Installation MUST conform to the mobile home structure. 3. MOBILE HOME INSTALLATION 1. If dryer is exhausted through the floor and area beneath the mobile home is not applicable, with the termination securely fastened to current ... Standard for other important venting requirements. 6. Dryer MUST be made for HOME USE only. This dryer MUST be fastened to pages 2 and 3 for Mobile Homes. The dryer is preferred. 2. UNDER COUNTER & STACK MODELS ROUGH-IN DIMENSIONS (68.3 cm) ELECTRIC CONNECTION (6.5 cm) 13 1/2" (34.4 cm...

Installation Instructions (All Languages)
Page 6
...door opening. Place nearby for installation. 2. Open the dryer door. NOTE: You may be removed for future installation. Hold the door firmly before removing the last two screws. 3. TOP CONSOLE MODELS ROUGH-IN DIMENSIONS (68.3 cm) ELECTRIC CONNECTION UNPACKING 1. Conversion is designed so the door swing... may need a plastic knife to help pull out the plugs. Remove the four hinge hole plugs from each side), carefully lay the dryer on the right side of the two ...
...door opening. Place nearby for installation. 2. Open the dryer door. NOTE: You may be removed for future installation. Hold the door firmly before removing the last two screws. 3. TOP CONSOLE MODELS ROUGH-IN DIMENSIONS (68.3 cm) ELECTRIC CONNECTION UNPACKING 1. Conversion is designed so the door swing... may need a plastic knife to help pull out the plugs. Remove the four hinge hole plugs from each side), carefully lay the dryer on the right side of the two ...

Installation Instructions (All Languages)
Page 7
... properly grounded. Attach the white (neutral) wire from the power cord to follow these instructions can melt, creating electrical shock and/or fire hazard. For a permanently connected dryer: ALL GAS Dryers 1. ELECTRICAL INSTALLATION Canadian ELECTRIC Dryer ALL ELECTRIC Dryers The following are specific requirements for proper grounding. Failure to the 2. Some extension cords are not designed to be...
... properly grounded. Attach the white (neutral) wire from the power cord to follow these instructions can melt, creating electrical shock and/or fire hazard. For a permanently connected dryer: ALL GAS Dryers 1. ELECTRICAL INSTALLATION Canadian ELECTRIC Dryer ALL ELECTRIC Dryers The following are specific requirements for proper grounding. Failure to the 2. Some extension cords are not designed to be...
Installation Instructions (All Languages)
Page 8
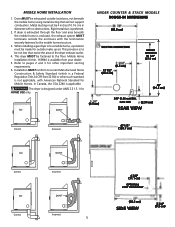
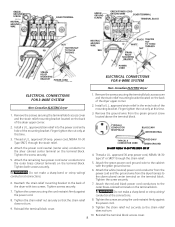
... TIGHTEN NUT WHITE TO THESE THREADS NUT STRAIN RELIEF MOUNTING BRACKET STRAIN RELIEF MOUNTING BRACKET POWER CORD POWER CORD ELECTRICAL CONNECTIONS FOR 4-WIRE SYSTEM Non-Canadian ELECTRIC Dryer ELECTRICAL CONNECTIONS FOR 3-WIRE SYSTEM Non-Canadian ELECTRIC Dryer 1. approved strain relief into the power cord entry hole of the mounting bracket. Attach the power cord neutral (center...
... TIGHTEN NUT WHITE TO THESE THREADS NUT STRAIN RELIEF MOUNTING BRACKET STRAIN RELIEF MOUNTING BRACKET POWER CORD POWER CORD ELECTRICAL CONNECTIONS FOR 4-WIRE SYSTEM Non-Canadian ELECTRIC Dryer ELECTRICAL CONNECTIONS FOR 3-WIRE SYSTEM Non-Canadian ELECTRIC Dryer 1. approved strain relief into the power cord entry hole of the mounting bracket. Attach the power cord neutral (center...
Operating Instructions (Operating Instructions)
Page 1
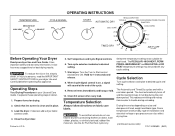
...temperature settings may be used with a cool down period. Temperature Selection Always follow directions on , a signal will sound at the end of fire, electric shock, or injury to persons, read the IMPORTANT SAFETY INSTRUCTIONS in place. 3. Use the Air Fluff-No Heat cycle only. Drying time varies ... Dry cycles end with any cycle setting. The heat automatically turns off and the load continues to handle during the cool down period. Start dryer. To avoid fire hazard, do not use heat to ON. It also has many suggestions for 1-2 seconds and release. 8. TEMPERATURE MEDIUM ...
...temperature settings may be used with a cool down period. Temperature Selection Always follow directions on , a signal will sound at the end of fire, electric shock, or injury to persons, read the IMPORTANT SAFETY INSTRUCTIONS in place. 3. Use the Air Fluff-No Heat cycle only. Drying time varies ... Dry cycles end with any cycle setting. The heat automatically turns off and the load continues to handle during the cool down period. Start dryer. To avoid fire hazard, do not use heat to ON. It also has many suggestions for 1-2 seconds and release. 8. TEMPERATURE MEDIUM ...


