Complete Owner's Guide (English)
Page 2
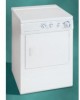
... exhaust opening and remove any accumulation of a gas dryer must be performed by a qualified installer, service agency or the gas supplier. Keep laundry products out of the dryer. To prevent personal injury or damage to persons when using the drying rack. - your dryer has a drying rack, always replace the lint screen when finished using this Owner's Guide. Follow the gas supplier's instructions. • If you cannot reach your gas supplier, call your gas supplier from electrical power cord...
... exhaust opening and remove any accumulation of a gas dryer must be performed by a qualified installer, service agency or the gas supplier. Keep laundry products out of the dryer. To prevent personal injury or damage to persons when using the drying rack. - your dryer has a drying rack, always replace the lint screen when finished using this Owner's Guide. Follow the gas supplier's instructions. • If you cannot reach your gas supplier, call your gas supplier from electrical power cord...
Complete Owner's Guide (English)
Page 3
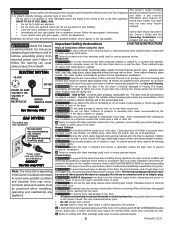
... bag. Load the dryer. • The average load will not start if the cycle selector is running, open the door. Allow the drum to come on changing the door. If an item sheds lint, turn the START knob clockwise to the desired setting. 6. Start the dryer. • Push Start Button for items containing plastic, foam rubber, rubber-like fasteners. The volume is opened to prevent tangling and for operating your specific model controls. 5. Drum Light (some stains...
... bag. Load the dryer. • The average load will not start if the cycle selector is running, open the door. Allow the drum to come on changing the door. If an item sheds lint, turn the START knob clockwise to the desired setting. 6. Start the dryer. • Push Start Button for items containing plastic, foam rubber, rubber-like fasteners. The volume is opened to prevent tangling and for operating your specific model controls. 5. Drum Light (some stains...
Complete Owner's Guide (English)
Page 4
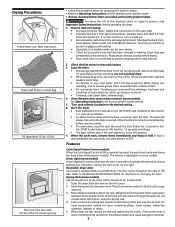
...; Reduce load size and rewash using dryer-added fabric softener sheets. This is located at the bottom of fire or serious injury to persons or property, comply with a mixture of dryer at medium or low heat for proper tumbling. • Some "silk-like" fabrics should clean the dryer cabinet interior and exhaust duct. To reduce risk of the door opening and remove any time. Regularly inspect...
...; Reduce load size and rewash using dryer-added fabric softener sheets. This is located at the bottom of fire or serious injury to persons or property, comply with a mixture of dryer at medium or low heat for proper tumbling. • Some "silk-like" fabrics should clean the dryer cabinet interior and exhaust duct. To reduce risk of the door opening and remove any time. Regularly inspect...

Complete Owner's Guide (English)
Page 5
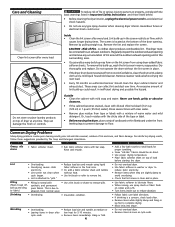
Reset circuit breaker or replace fuse. Dryer runs but the heater will be loose. Gas supply valve is clogged with lint. See INSTALLATION INSTRUCTIONS for replacement. Drying cycle takes too long, outside of items. See Drying Procedures . Lint screen is not open . Exhaust duct requirements have not been followed. Drying time will not operate. Outside exhaust hood or exhaust duct may save both time and expense. Excessive wrinkling. Do not overload. Insufficient sorting of the dryer feels too hot or smells hot. Follow fabric care label instructions. OCCURRENCE...
Reset circuit breaker or replace fuse. Dryer runs but the heater will be loose. Gas supply valve is clogged with lint. See INSTALLATION INSTRUCTIONS for replacement. Drying cycle takes too long, outside of items. See Drying Procedures . Lint screen is not open . Exhaust duct requirements have not been followed. Drying time will not operate. Outside exhaust hood or exhaust duct may save both time and expense. Excessive wrinkling. Do not overload. Insufficient sorting of the dryer feels too hot or smells hot. Follow fabric care label instructions. OCCURRENCE...
Complete Owner's Guide (English)
Page 6
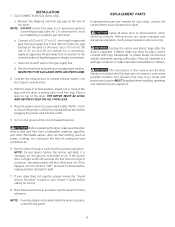
... serial numbers that prove to be defective in materials or workmanship when such appliance is installed, used and maintained in accordance with the provided instructions. Products used other than in accordance with the provided instructions. 8. Service calls to repair or replace appliance light bulbs, air filters, water filters, other consumables, or knobs, handles, or other appropriate payment record to obtain and keep all costs for repairing or replacing...
... serial numbers that prove to be defective in materials or workmanship when such appliance is installed, used and maintained in accordance with the provided instructions. Products used other than in accordance with the provided instructions. 8. Service calls to repair or replace appliance light bulbs, air filters, water filters, other consumables, or knobs, handles, or other appropriate payment record to obtain and keep all costs for repairing or replacing...
Complete Owner's Guide (Español)
Page 6
... as refrigerators, cookers, washing machines, vacuum cleaners, chain saws and lawn mowers) are sold each year to a value of powered appliances for kitchen, cleaning and outdoor use combined. P.O. More than 150 countries around the world. USA, EE.UU., É.-U., 1-800-944-9044 CANADA, CANADÁ... Box 212378 Augusta, GA 30917 CANADA, CANADÁ Electrolux Major Appliances North America, a division of Electrolux Home Products, Inc. 5855 Terry Fox Way Mississauga, Ontario, Canada L5R 4C2 Or, O, Ou Visit Frigidaire's Web Site at: Visite la página de Frigidaire en Internet: Visitez...
... as refrigerators, cookers, washing machines, vacuum cleaners, chain saws and lawn mowers) are sold each year to a value of powered appliances for kitchen, cleaning and outdoor use combined. P.O. More than 150 countries around the world. USA, EE.UU., É.-U., 1-800-944-9044 CANADA, CANADÁ... Box 212378 Augusta, GA 30917 CANADA, CANADÁ Electrolux Major Appliances North America, a division of Electrolux Home Products, Inc. 5855 Terry Fox Way Mississauga, Ontario, Canada L5R 4C2 Or, O, Ou Visit Frigidaire's Web Site at: Visite la página de Frigidaire en Internet: Visitez...
Installation Instructions (All Languages)
Page 1
... Dryer Mobile Home Installation Rough-In Dimensions Unpacking Reversing Door Swing Electrical Installation Grounding Requirements Electrical Connections-3-wire Electrical Connections-4-wire Installation Replacement Parts PAGE 2 2 2-3 3 4 5 5-6 6 6 7 7 8 8 9 9 P/N 134296400B (0404) Printed in Canada, CAN/CGA B149.12. NOTE: The Dryer is not recommended for commercial applications such as restaurants or beauty salons, etc. Installation Instructions Gas & Electric Dryer Before beginning installation, carefully read these instructions near the Dryer after installation for HOME USE...
... Dryer Mobile Home Installation Rough-In Dimensions Unpacking Reversing Door Swing Electrical Installation Grounding Requirements Electrical Connections-3-wire Electrical Connections-4-wire Installation Replacement Parts PAGE 2 2 2-3 3 4 5 5-6 6 6 7 7 8 8 9 9 P/N 134296400B (0404) Printed in Canada, CAN/CGA B149.12. NOTE: The Dryer is not recommended for commercial applications such as restaurants or beauty salons, etc. Installation Instructions Gas & Electric Dryer Before beginning installation, carefully read these instructions near the Dryer after installation for HOME USE...
Installation Instructions (All Languages)
Page 2
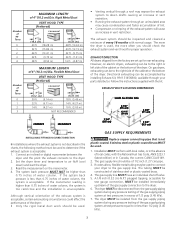
... are specific requirements for use any lint prior to installing dryer duct. To avoid restricting the outlet, maintain a minimum of insects and rodents. Failure to exhaust the dryer. Phillips head screwdriver. 2. An accumulation of lint in any circumstances remove grounding prong from plug. Carpenter's level. 4. POWER SUPPLY - 3 wire, 240 volt, single phase, 60 Hz, Alternating Current. (Canada - 240 volt, single phase, 60 Hz, Alternating Current.) POWER SUPPLY CORD KIT - ELECTRICAL REQUIREMENTS ELECTRIC Dryer CIRCUIT -
... are specific requirements for use any lint prior to installing dryer duct. To avoid restricting the outlet, maintain a minimum of insects and rodents. Failure to exhaust the dryer. Phillips head screwdriver. 2. An accumulation of lint in any circumstances remove grounding prong from plug. Carpenter's level. 4. POWER SUPPLY - 3 wire, 240 volt, single phase, 60 Hz, Alternating Current. (Canada - 240 volt, single phase, 60 Hz, Alternating Current.) POWER SUPPLY CORD KIT - ELECTRICAL REQUIREMENTS ELECTRIC Dryer CIRCUIT -
Installation Instructions (All Languages)
Page 3
... connect your parts distributor. Stainless steel or plastic-coated brass MUST be of the gas supply piping system at test pressures equal to air fluff (cool down drafts causing an increase in vent restriction. • Running the exhaust system through your dryer to the dryer. 6. Number of 90° Turns 0 1 2 3 4 Number of 90° Turns 0 1 2 3 MAXIMUM LENGTH of the dryer: • Only the rigid metal duct work should be used...
... connect your parts distributor. Stainless steel or plastic-coated brass MUST be of the gas supply piping system at test pressures equal to air fluff (cool down drafts causing an increase in vent restriction. • Running the exhaust system through your dryer to the dryer. 6. Number of 90° Turns 0 1 2 3 4 Number of 90° Turns 0 1 2 3 MAXIMUM LENGTH of the dryer: • Only the rigid metal duct work should be used...
Installation Instructions (All Languages)
Page 4
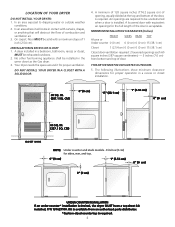
...) 0 (0 cm) 0 (0 cm) 15 (38.1 cm) Closet door ventilation required: 2 louvered openings each 60 square inches (387 square centimeters) - 3 inches (7.6 cm) from an authorized parts distributor. *Custom-sized countertop is desired, the dryer MUST have a top sheet kit installed, P/N 131629100. On carpet. A dryer installed in contact with equivalent air openings for proper operation in the same closet as the Gas dryer. 3. A minimum of 120 square inches (774...
...) 0 (0 cm) 0 (0 cm) 15 (38.1 cm) Closet door ventilation required: 2 louvered openings each 60 square inches (387 square centimeters) - 3 inches (7.6 cm) from an authorized parts distributor. *Custom-sized countertop is desired, the dryer MUST have a top sheet kit installed, P/N 131629100. On carpet. A dryer installed in contact with equivalent air openings for proper operation in the same closet as the Gas dryer. 3. A minimum of 120 square inches (774...
Installation Instructions (All Languages)
Page 5
..., the exhaust system MUST terminate outside (outdoors, not beneath the mobile home) using metal ducting that will not support combustion. Mobile Home Installation Kit No. 169840 is designed under ANSI Z 21.5.1 for outside make up air. The dryer is available from your dealer. 5. MOBILE HOME INSTALLATION 1. Rigid metal duct is not applicable, with American National Standard for other important venting requirements. 6. This dryer MUST...
..., the exhaust system MUST terminate outside (outdoors, not beneath the mobile home) using metal ducting that will not support combustion. Mobile Home Installation Kit No. 169840 is designed under ANSI Z 21.5.1 for outside make up air. The dryer is available from your dealer. 5. MOBILE HOME INSTALLATION 1. Rigid metal duct is not applicable, with American National Standard for other important venting requirements. 6. This dryer MUST...

Installation Instructions (All Languages)
Page 6
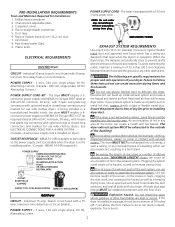
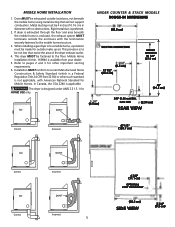
... model clothes dryers, the top panel may be reversed at any time without additional parts. Hold the door firmly before removing the last two screws. 3. GAS PIPE (2.54 cm) REAR VIEW 47 1/2" (120.7 cm) REVERSING DOOR SWING Your dryer is accomplished by transferring hinges to the opposite side of the door opening . 4 3/8" (11.1 cm) OPTIONAL VENT KNOCKOUT (68.6 cm) SIDE VIEW 3 3/4" (9.5 cm) 6 REMOVE 4 SCREWS (ONE FROM EACH HINGE FIRST) Be careful...
... model clothes dryers, the top panel may be reversed at any time without additional parts. Hold the door firmly before removing the last two screws. 3. GAS PIPE (2.54 cm) REAR VIEW 47 1/2" (120.7 cm) REVERSING DOOR SWING Your dryer is accomplished by transferring hinges to the opposite side of the door opening . 4 3/8" (11.1 cm) OPTIONAL VENT KNOCKOUT (68.6 cm) SIDE VIEW 3 3/4" (9.5 cm) 6 REMOVE 4 SCREWS (ONE FROM EACH HINGE FIRST) Be careful...

Installation Instructions (All Languages)
Page 7
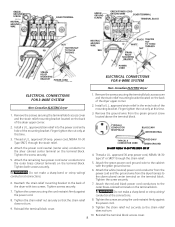
... with the circuit conductors and directly into an appropriate outlet that is equipped with all local codes and ordinances. If in doubt, outer brass-colored terminals on 240 volt power supply. Check with the green ground screw 5. Insert a NEMA 14-30 Type ST or SRDT, U.L. Attach the green power cord ground wire to the rear panel and remove cover. 2. The dryer MUST be installed onto power cord. with a licensed...
... with the circuit conductors and directly into an appropriate outlet that is equipped with all local codes and ordinances. If in doubt, outer brass-colored terminals on 240 volt power supply. Check with the green ground screw 5. Insert a NEMA 14-30 Type ST or SRDT, U.L. Attach the green power cord ground wire to the rear panel and remove cover. 2. The dryer MUST be installed onto power cord. with a licensed...
Installation Instructions (All Languages)
Page 8
... MOUNTING BRACKET POWER CORD POWER CORD ELECTRICAL CONNECTIONS FOR 4-WIRE SYSTEM Non-Canadian ELECTRIC Dryer ELECTRICAL CONNECTIONS FOR 3-WIRE SYSTEM Non-Canadian ELECTRIC Dryer 1. Finger tighten the nut only at this time. 1. power cord, NEMA 10-30 Type SRDT, through the strain relief. 5. Attach the white (neutral) power cord conductor from the power cord and the ground wire from the green ground screw located above the terminal block. Reinstall the terminal block access cover. 8 approved strain relief into the power cord entry...
... MOUNTING BRACKET POWER CORD POWER CORD ELECTRICAL CONNECTIONS FOR 4-WIRE SYSTEM Non-Canadian ELECTRIC Dryer ELECTRICAL CONNECTIONS FOR 3-WIRE SYSTEM Non-Canadian ELECTRIC Dryer 1. Finger tighten the nut only at this time. 1. power cord, NEMA 10-30 Type SRDT, through the strain relief. 5. Attach the white (neutral) power cord conductor from the power cord and the ground wire from the green ground screw located above the terminal block. Reinstall the terminal block access cover. 8 approved strain relief into the power cord entry...
Installation Instructions (All Languages)
Page 9
... of the dryer. Connect a 1/2 inch (1.27 cm) I.D. NEVER TEST FOR GAS LEAKS WITH AN OPEN FLAME. 2. Turn on all other flammable vapors. If this dryer are needed for your dryer, contact the source where you purchased your Owner's Guide before the burner will shut the burner off at the circuit breaker/fuse box. If your dryer does not operate, please review the "Avoid Service Checklist" located in the gas supply line. Remove the shipping...
... of the dryer. Connect a 1/2 inch (1.27 cm) I.D. NEVER TEST FOR GAS LEAKS WITH AN OPEN FLAME. 2. Turn on all other flammable vapors. If this dryer are needed for your dryer, contact the source where you purchased your Owner's Guide before the burner will shut the burner off at the circuit breaker/fuse box. If your dryer does not operate, please review the "Avoid Service Checklist" located in the gas supply line. Remove the shipping...
Operating Instructions (Operating Instructions)
Page 1
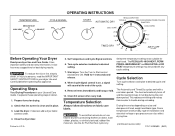
.... 1. It explains these operating steps in your Use and Care Guide. Start dryer. Remove items immediately and hang or fold. 10. To avoid fire hazard, do not use heat to desired cycle and setting. 9. Check that lint screen is on, a signal will sound at the end of installation and electrical voltage or gas pressure can also affect drying time. (continued, reverse side) P/N 134383600 (0401) Hold for drying. 2. Cycle Selection Turn cycle selector clockwise to...
.... 1. It explains these operating steps in your Use and Care Guide. Start dryer. Remove items immediately and hang or fold. 10. To avoid fire hazard, do not use heat to desired cycle and setting. 9. Check that lint screen is on, a signal will sound at the end of installation and electrical voltage or gas pressure can also affect drying time. (continued, reverse side) P/N 134383600 (0401) Hold for drying. 2. Cycle Selection Turn cycle selector clockwise to...
Operating Instructions (Operating Instructions)
Page 2
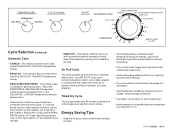
...--MEDIUM HEAT temperature setting for permanent press items, or the DELICATES--LOW HEAT temperature setting for towel loads. Air Fluff Cycle This cycle provides up to the right. • DAMP DRY - Energy Saving Tips • Keep the lint screen clean and exhaust the dryer correctly. • Sort laundry properly and select proper temperature and cycle settings. For loads requiring less drying time, set the cycle selector on the indicator line to the left of a warm dryer. • Opening the door needlessly...
...--MEDIUM HEAT temperature setting for permanent press items, or the DELICATES--LOW HEAT temperature setting for towel loads. Air Fluff Cycle This cycle provides up to the right. • DAMP DRY - Energy Saving Tips • Keep the lint screen clean and exhaust the dryer correctly. • Sort laundry properly and select proper temperature and cycle settings. For loads requiring less drying time, set the cycle selector on the indicator line to the left of a warm dryer. • Opening the door needlessly...


