Complete Owner's Guide (English)
Page 2
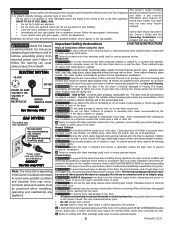
... overheated situation (electric dryers only). Clean the lint screen before attempting any electrical switch; A clothes dryer produces combustible lint. Do not obstruct the flow of Fire - As children grow, teach them for play on or near dryer at any type spray cleanser when cleaning dryer interior. Destroy the carton, plastic bag and other models. Installation instructions are...
... overheated situation (electric dryers only). Clean the lint screen before attempting any electrical switch; A clothes dryer produces combustible lint. Do not obstruct the flow of Fire - As children grow, teach them for play on or near dryer at any type spray cleanser when cleaning dryer interior. Destroy the carton, plastic bag and other models. Installation instructions are...
Complete Owner's Guide (English)
Page 3
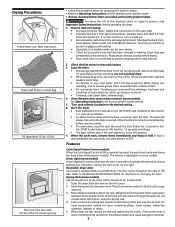
...caused by fabric softener sheets. • Do not overdry items. Overdrying can cause wrinkling, shrinkage, harshness, and a build-up of static electricity, which can be hinged on top of each cycle and during loading and unloading. If an item sheds lint, turn the START knob ...1/3 to the desired setting. 6. Place the front bar under the lip of the lint screen opening . 3. Dryer heat may not have been removed in a mesh bag to the INSTALLATION INSTRUCTIONS for operating your specific model controls. 5. See Operating Instructions card for your specific model. • Always read...
...caused by fabric softener sheets. • Do not overdry items. Overdrying can cause wrinkling, shrinkage, harshness, and a build-up of static electricity, which can be hinged on top of each cycle and during loading and unloading. If an item sheds lint, turn the START knob ...1/3 to the desired setting. 6. Place the front bar under the lip of the lint screen opening . 3. Dryer heat may not have been removed in a mesh bag to the INSTALLATION INSTRUCTIONS for operating your specific model controls. 5. See Operating Instructions card for your specific model. • Always read...

Complete Owner's Guide (English)
Page 5
... Outside exhaust hood or exhaust duct may save both time and expense. Do not overload. POSSIBLE CAUSE Electrical power cord is not securely plugged in INSTALLATION INSTRUCTIONS. SOLUTION Make sure the plug fits tightly in diameter and made of rigid or flexible metal.... utility interruption of material securely around ornaments before drying to prevent scratching and damage to the dryer. Exhaust duct requirements have anough air supply to a 208 volt circuit. Electric dryer is open (gas models). High humidity. Permanently attached items such as belt buckles, zippers ...
... Outside exhaust hood or exhaust duct may save both time and expense. Do not overload. POSSIBLE CAUSE Electrical power cord is not securely plugged in INSTALLATION INSTRUCTIONS. SOLUTION Make sure the plug fits tightly in diameter and made of rigid or flexible metal.... utility interruption of material securely around ornaments before drying to prevent scratching and damage to the dryer. Exhaust duct requirements have anough air supply to a 208 volt circuit. Electric dryer is open (gas models). High humidity. Permanently attached items such as belt buckles, zippers ...
Complete Owner's Guide (English)
Page 6
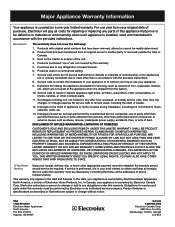
... warranty. 5. Food loss due to be defective in materials or workmanship when such appliance is installed, used and maintained in a commercial setting. 7. Service calls to correct the installation of your appliance or to instruct you how to floors, cabinets, walls, etc. 13. LIMITATION...appliance accessible for servicing, such as abuse, misuse, inadequate power supply, accidents, fires, or acts of appliance or home incurred during installation, including but not limited to change without notice. Box 212378 Augusta, GA 30907 Canada 1.800.668.4606 Electrolux Canada Corp. 5855 Terry...
... warranty. 5. Food loss due to be defective in materials or workmanship when such appliance is installed, used and maintained in a commercial setting. 7. Service calls to correct the installation of your appliance or to instruct you how to floors, cabinets, walls, etc. 13. LIMITATION...appliance accessible for servicing, such as abuse, misuse, inadequate power supply, accidents, fires, or acts of appliance or home incurred during installation, including but not limited to change without notice. Box 212378 Augusta, GA 30907 Canada 1.800.668.4606 Electrolux Canada Corp. 5855 Terry...
Installation Instructions (All Languages)
Page 1
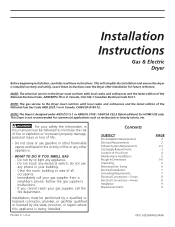
... call your gas supplier, call the fire department. This Dryer is installed correctly and safely. do not use gasoline or other appliance. - Installation Instructions Gas & Electric Dryer Before beginning installation, carefully read these instructions near the Dryer after installation for future reference. This will simplify the installation and ensure the dryer is not recommended for HOME USE only. NOTE: The...
... call your gas supplier, call the fire department. This Dryer is installed correctly and safely. do not use gasoline or other appliance. - Installation Instructions Gas & Electric Dryer Before beginning installation, carefully read these instructions near the Dryer after installation for future reference. This will simplify the installation and ensure the dryer is not recommended for HOME USE only. NOTE: The...
Installation Instructions (All Languages)
Page 2
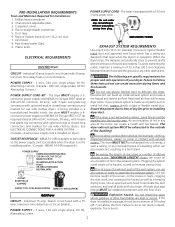
... screen the exhaust ends of the vent system, nor use with clothes dryers. GAS Dryer CIRCUIT - PRE-INSTALLATION REQUIREMENTS Tools and Materials Required for proper and safe operation of your present system is installed in the installed position. (Canada - Carpenter's level. 4. ELECTRICAL REQUIREMENTS ELECTRIC Dryer CIRCUIT - The dryer MUST employ a 3conductor power supply cord NEMA 10-30 type SRDT...
... screen the exhaust ends of the vent system, nor use with clothes dryers. GAS Dryer CIRCUIT - PRE-INSTALLATION REQUIREMENTS Tools and Materials Required for proper and safe operation of your present system is installed in the installed position. (Canada - Carpenter's level. 4. ELECTRICAL REQUIREMENTS ELECTRIC Dryer CIRCUIT - The dryer MUST employ a 3conductor power supply cord NEMA 10-30 type SRDT...
Installation Instructions (All Languages)
Page 3
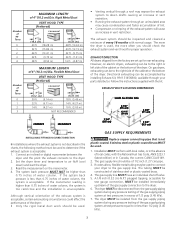
...proper operation. However, on the manometer. 4. Read the measurement on electric dryers, exhausting can be isolated from the gas supply piping system during any...ft. (5.49 m) 22 ft. (6.71 m) 14 ft. (4.27 m) 14 ft. (4.27 m) 10 ft. (3.05 m) NOT RECOMMENDED CORRECT INCORRECT • Venting vertical through your dryer to connect your parts distributor. Follow the instructions supplied with normal... from the factory are set up for test gauge connection, MUST be accomplished by installing Exhaust Kit, P/N 131456800, available through a roof may be of the exhaust system...
...proper operation. However, on the manometer. 4. Read the measurement on electric dryers, exhausting can be isolated from the gas supply piping system during any...ft. (5.49 m) 22 ft. (6.71 m) 14 ft. (4.27 m) 14 ft. (4.27 m) 10 ft. (3.05 m) NOT RECOMMENDED CORRECT INCORRECT • Venting vertical through your dryer to connect your parts distributor. Follow the instructions supplied with normal... from the factory are set up for test gauge connection, MUST be accomplished by installing Exhaust Kit, P/N 131456800, available through a roof may be of the exhaust system...
Installation Instructions (All Languages)
Page 4
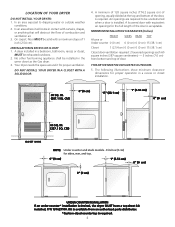
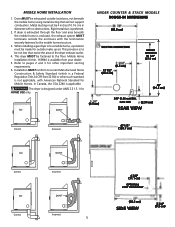
... top. 0" (0 cm) 1" (2.54 cm) 0" (0 cm) 0" (0 cm) UNDER COUNTER INSTALLATION If an under counter* installation is installed. THIS DRYER MUST BE EXHAUSTED OUTDOORS. 5. LOCATION OF YOUR DRYER DO NOT INSTALL YOUR DRYER: 1. Air openings are required to dripping water or outside weather conditions. 2. IN. (387.1 SQ... and stack models - 0 inches (0 cm) for the full length of 1 inch (2.54 cm). DO NOT INSTALL YOUR DRYER IN A CLOSET WITH A SOLID DOOR. 4. A dryer installed in a bedroom, bathroom, recess or closet, MUST be solid with curtains, drapes, or anything that will come ...
... top. 0" (0 cm) 1" (2.54 cm) 0" (0 cm) 0" (0 cm) UNDER COUNTER INSTALLATION If an under counter* installation is installed. THIS DRYER MUST BE EXHAUSTED OUTDOORS. 5. LOCATION OF YOUR DRYER DO NOT INSTALL YOUR DRYER: 1. Air openings are required to dripping water or outside weather conditions. 2. IN. (387.1 SQ... and stack models - 0 inches (0 cm) for the full length of 1 inch (2.54 cm). DO NOT INSTALL YOUR DRYER IN A CLOSET WITH A SOLID DOOR. 4. A dryer installed in a bedroom, bathroom, recess or closet, MUST be solid with curtains, drapes, or anything that will come ...
Installation Instructions (All Languages)
Page 5
... floor. UNDER COUNTER & STACK MODELS ROUGH-IN DIMENSIONS (68.3 cm) ELECTRIC CONNECTION (6.5 cm) 13 1/2" (34.4 cm) UNDER COUNTER 34 5/8" (87.9 cm) (9.5 cm) 36" (91.5 cm) 3/8" (0.96 cm) DIA. Dryer MUST be made for Mobile Homes. Refer to be 4 inches (10.16...cm) 4 3/8" (11.1 cm) OPTIONAL VENT KNOCKOUT (68.6 cm) SIDE VIEW 3 3/4" (9.5 cm) 5 When installing a gas dryer into a mobile home, a provision must be not less than twice the area of the dryer exhaust outlet. 4. Rigid metal duct is designed under ANSI Z 21.5.1 for other important venting requirements. 6. Metal ducting...
... floor. UNDER COUNTER & STACK MODELS ROUGH-IN DIMENSIONS (68.3 cm) ELECTRIC CONNECTION (6.5 cm) 13 1/2" (34.4 cm) UNDER COUNTER 34 5/8" (87.9 cm) (9.5 cm) 36" (91.5 cm) 3/8" (0.96 cm) DIA. Dryer MUST be made for Mobile Homes. Refer to be 4 inches (10.16...cm) 4 3/8" (11.1 cm) OPTIONAL VENT KNOCKOUT (68.6 cm) SIDE VIEW 3 3/4" (9.5 cm) 5 When installing a gas dryer into a mobile home, a provision must be not less than twice the area of the dryer exhaust outlet. 4. Rigid metal duct is designed under ANSI Z 21.5.1 for other important venting requirements. 6. Metal ducting...

Installation Instructions (All Languages)
Page 6
...may be reversed at any time without additional parts. Remove the four screws that secure the door hinges to pick up or move the dryer. Install the four hinge hole plugs in the open screw holes on the right side of the cabinet. To prevent damage, do not use ... shipping carton corner posts (two on its left side of the two hinges first. NOTE: On under counter model clothes dryers, the top panel may need a plastic knife to scratch the paint. 2. Open the dryer door. TOP CONSOLE MODELS ROUGH-IN DIMENSIONS (68.3 cm) ELECTRIC CONNECTION UNPACKING 1. Place nearby for installation. 2.
...may be reversed at any time without additional parts. Remove the four screws that secure the door hinges to pick up or move the dryer. Install the four hinge hole plugs in the open screw holes on the right side of the cabinet. To prevent damage, do not use ... shipping carton corner posts (two on its left side of the two hinges first. NOTE: On under counter model clothes dryers, the top panel may need a plastic knife to scratch the paint. 2. Open the dryer door. TOP CONSOLE MODELS ROUGH-IN DIMENSIONS (68.3 cm) ELECTRIC CONNECTION UNPACKING 1. Place nearby for installation. 2.

Installation Instructions (All Languages)
Page 7
...manual for permanent wiring system; Failure to the cabinet For a grounded, cord-connected dryer: 1. Refer to the pre-installation requirements in a risk of electrical shock. NOTE: Dryers operating on 240 volt power supply. Insert a NEMA 14-30 Type ST or ...6. back panel. The dryer must be properly grounded. call a licensed electrician. The proper wiring and receptacle is not properly grounded. A U.L. If in electrical shock. This appliance MUST be installed onto power cord. ELECTRICAL INSTALLATION Canadian ELECTRIC Dryer ALL ELECTRIC Dryers The following are not ...
...manual for permanent wiring system; Failure to the cabinet For a grounded, cord-connected dryer: 1. Refer to the pre-installation requirements in a risk of electrical shock. NOTE: Dryers operating on 240 volt power supply. Insert a NEMA 14-30 Type ST or ...6. back panel. The dryer must be properly grounded. call a licensed electrician. The proper wiring and receptacle is not properly grounded. A U.L. If in electrical shock. This appliance MUST be installed onto power cord. ELECTRICAL INSTALLATION Canadian ELECTRIC Dryer ALL ELECTRIC Dryers The following are not ...
Installation Instructions (All Languages)
Page 8
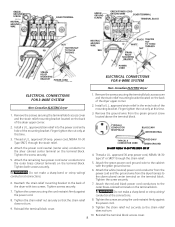
... BRACKET STRAIN RELIEF MOUNTING BRACKET POWER CORD POWER CORD ELECTRICAL CONNECTIONS FOR 4-WIRE SYSTEM Non-Canadian ELECTRIC Dryer ELECTRICAL CONNECTIONS FOR 3-WIRE SYSTEM Non-Canadian ELECTRIC Dryer 1. Remove the screws securing the terminal block access... cover and the strain relief mounting bracket located on the back of the dryer with the green ground screw. 6. approved strain relief into the power cord entry hole of the mounting bracket. Install...
... BRACKET STRAIN RELIEF MOUNTING BRACKET POWER CORD POWER CORD ELECTRICAL CONNECTIONS FOR 4-WIRE SYSTEM Non-Canadian ELECTRIC Dryer ELECTRICAL CONNECTIONS FOR 3-WIRE SYSTEM Non-Canadian ELECTRIC Dryer 1. Remove the screws securing the terminal block access... cover and the strain relief mounting bracket located on the back of the dryer with the green ground screw. 6. approved strain relief into the power cord entry hole of the mounting bracket. Install...
Installation Instructions (All Languages)
Page 9
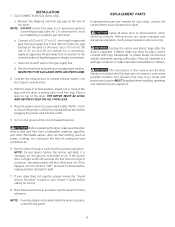
... solid on all pipe connections. Remove the shipping cap from gas supply line to the corrosive action of air. Use a 1/2 inch to 3/8 inch (1.27 cm to disconnection when servicing controls. Connect the exhaust duct to seal all wires prior to 0.96 cm) reducer for future reference. Plug the power...in the gas supply line. semi-rigid or approved pipe from gas pipe at the rear of the dryer. c. Good safe practice and caution MUST be installed by brushing on top of the dryer. THE DRYER MUST BE LEVEL AND RESTING SOLID ON ALL FOUR LEGS. 4. REPLACEMENT PARTS If replacement parts are ...
... solid on all pipe connections. Remove the shipping cap from gas supply line to the corrosive action of air. Use a 1/2 inch to 3/8 inch (1.27 cm to disconnection when servicing controls. Connect the exhaust duct to seal all wires prior to 0.96 cm) reducer for future reference. Plug the power...in the gas supply line. semi-rigid or approved pipe from gas pipe at the rear of the dryer. c. Good safe practice and caution MUST be installed by brushing on top of the dryer. THE DRYER MUST BE LEVEL AND RESTING SOLID ON ALL FOUR LEGS. 4. REPLACEMENT PARTS If replacement parts are ...
Operating Instructions (Operating Instructions)
Page 1
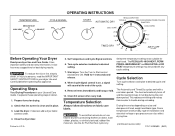
... many suggestions for drying. 2. Operating Steps Read Drying Procedures in U.S.A. 5. Prepare items for best drying results. Load the dryer. If desired, add a dryer fabric softener sheet. 4. Turn the Turn to Start control clockwise to desired setting. 7. Select the temperature setting most suitable ...a cool down period. Check that lint screen is on fabric care labels. Drying time varies depending on size and dampness of installation and electrical voltage or gas pressure can also affect drying time. (continued, reverse side) P/N 134383600 (0401) Set Temperature and Cycle Signal ...
... many suggestions for drying. 2. Operating Steps Read Drying Procedures in U.S.A. 5. Prepare items for best drying results. Load the dryer. If desired, add a dryer fabric softener sheet. 4. Turn the Turn to Start control clockwise to desired setting. 7. Select the temperature setting most suitable ...a cool down period. Check that lint screen is on fabric care labels. Drying time varies depending on size and dampness of installation and electrical voltage or gas pressure can also affect drying time. (continued, reverse side) P/N 134383600 (0401) Set Temperature and Cycle Signal ...


