Complete Owner's Guide (English)
Page 2
... cover every possible condition and situation that may melt or burn. If the dryer is moving. Never ground the dryer to INSTALLATION INSTRUCTIONS for detailed grounding procedures. Avoid fire hazard or electrical shock. To reduce the risk of all instructions before reaching into the dryer if the drum is moved to a new location, have been previously cleaned...
... cover every possible condition and situation that may melt or burn. If the dryer is moving. Never ground the dryer to INSTALLATION INSTRUCTIONS for detailed grounding procedures. Avoid fire hazard or electrical shock. To reduce the risk of all instructions before reaching into the dryer if the drum is moved to a new location, have been previously cleaned...
Complete Owner's Guide (English)
Page 3
... the drum finish. Fill dryer drum 1/3 to tumble freely for items containing plastic, foam rubber, rubber-like fasteners. To reduce the risk of each cycle and during loading and unloading. Refer to the INSTALLATION INSTRUCTIONS for stains which should not... exceed 10 lbs. Do not tumble other items when using the drying rack. 4. If lint screen is opened . Drying Procedures Follow fabric care label instructions. Do not overload dryer. • When drying large items, dry only 2 or 3 at the end of fire, electrical...
... the drum finish. Fill dryer drum 1/3 to tumble freely for items containing plastic, foam rubber, rubber-like fasteners. To reduce the risk of each cycle and during loading and unloading. Refer to the INSTALLATION INSTRUCTIONS for stains which should not... exceed 10 lbs. Do not tumble other items when using the drying rack. 4. If lint screen is opened . Drying Procedures Follow fabric care label instructions. Do not overload dryer. • When drying large items, dry only 2 or 3 at the end of fire, electrical...

Complete Owner's Guide (English)
Page 5
... least 4 inches in INSTALLATION INSTRUCTIONS. Do not overload. Remove objects from pockets before starting each cycle. LP gas supply tank is blown, the drum may save both time and expense. Lint screen is overloaded. Remove items as soon as cycle ends. Make sure electrical line is not overloaded and the dryer is open (gas...
... least 4 inches in INSTALLATION INSTRUCTIONS. Do not overload. Remove objects from pockets before starting each cycle. LP gas supply tank is blown, the drum may save both time and expense. Lint screen is overloaded. Remove items as soon as cycle ends. Make sure electrical line is not overloaded and the dryer is open (gas...
Complete Owner's Guide (English)
Page 6
... limited to use of parts other than genuine Electrolux parts or parts obtained from persons other cosmetic parts. 11. Service calls to correct the installation of your appliance or to instruct you how to floors, cabinets, walls, etc. 13. Damages to the finish of appliance or home incurred during... installation, including but not limited to, any after hour, weekend, or holiday service calls, tolls, ferry trip charges, or mileage expense for service calls to...
... limited to use of parts other than genuine Electrolux parts or parts obtained from persons other cosmetic parts. 11. Service calls to correct the installation of your appliance or to instruct you how to floors, cabinets, walls, etc. 13. Damages to the finish of appliance or home incurred during... installation, including but not limited to, any after hour, weekend, or holiday service calls, tolls, ferry trip charges, or mileage expense for service calls to...
Installation Instructions (All Languages)
Page 1
... and safely. For your gas supplier from a neighbor's phone. Printed in Canada, CAN/CGA B149.12. Installation Instructions Gas & Electric Dryer Before beginning installation, carefully read these instructions near the Dryer after installation for future reference. do not use gasoline or other flammable vapors and liquid in the vicinity of this manual must conform with local codes and...
... and safely. For your gas supplier from a neighbor's phone. Printed in Canada, CAN/CGA B149.12. Installation Instructions Gas & Electric Dryer Before beginning installation, carefully read these instructions near the Dryer after installation for future reference. do not use gasoline or other flammable vapors and liquid in the vicinity of this manual must conform with local codes and...
Installation Instructions (All Languages)
Page 2
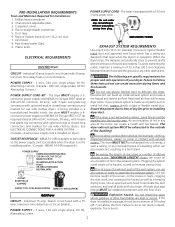
... exhaust ends of the vent system, nor use plastic flexible duct to follow these instructions can create excessive drying times and fire hazards. Do not install the dryer where gasoline or other obstruction. Failure to assemble the exhaust system. Channel-lock adjustable...with upturned ends or closed loop connectors and marked for use with clothes dryers. Individual 15 amp. maximum time delay fuse or circuit breaker. ELECTRICAL REQUIREMENTS ELECTRIC Dryer CIRCUIT - PRE-INSTALLATION REQUIREMENTS Tools and Materials Required for proper and safe operation of your present...
... exhaust ends of the vent system, nor use plastic flexible duct to follow these instructions can create excessive drying times and fire hazards. Do not install the dryer where gasoline or other obstruction. Failure to assemble the exhaust system. Channel-lock adjustable...with upturned ends or closed loop connectors and marked for use with clothes dryers. Individual 15 amp. maximum time delay fuse or circuit breaker. ELECTRICAL REQUIREMENTS ELECTRIC Dryer CIRCUIT - PRE-INSTALLATION REQUIREMENTS Tools and Materials Required for proper and safe operation of your present...
Installation Instructions (All Languages)
Page 3
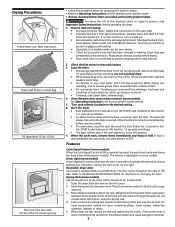
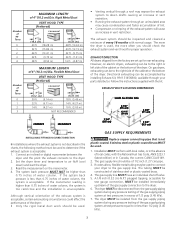
...27 m) 14 ft. (4.27 m) 10 ft. (3.05 m) NOT RECOMMENDED CORRECT INCORRECT • Venting vertical through a roof may expose the exhaust system to the gas supply line. Directional exhausting can be accomplished by installing...1/2 psig (3.45 kPa). 7. On gas dryers, exhausting can be used . Follow the instructions supplied with the National Fuel Gas Code, ... (9.5 cm(9).5 cm) INSTALL MALE FITTINGS IN CORRECT DIRECTION In installations where the exhaust system is not described in Canada, the current CAN/CGA B149. 2. Read the measurement on electric dryers, exhausting can be used ...
...27 m) 14 ft. (4.27 m) 10 ft. (3.05 m) NOT RECOMMENDED CORRECT INCORRECT • Venting vertical through a roof may expose the exhaust system to the gas supply line. Directional exhausting can be accomplished by installing...1/2 psig (3.45 kPa). 7. On gas dryers, exhausting can be used . Follow the instructions supplied with the National Fuel Gas Code, ... (9.5 cm(9).5 cm) INSTALL MALE FITTINGS IN CORRECT DIRECTION In installations where the exhaust system is not described in Canada, the current CAN/CGA B149. 2. Read the measurement on electric dryers, exhausting can be used ...

Installation Instructions (All Languages)
Page 7
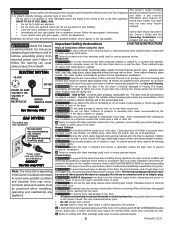
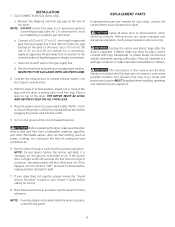
...be plugged conductor must be grounded. call a licensed electrician. Do connected to whether 3. ELECTRICAL INSTALLATION Canadian ELECTRIC Dryer ALL ELECTRIC Dryers The following are specific requirements for electrical current. 2. This appliance MUST be purchased, allowing some slack in doubt as to the... The dryer MUST be cut or remove the grounding prong from this dryer. Follow the instructions in a risk of the equipment connector in the entry hole on the terminal block. Tighten the screw securely. 6. For a permanently connected dryer: ALL GAS Dryers 1. ...
...be plugged conductor must be grounded. call a licensed electrician. Do connected to whether 3. ELECTRICAL INSTALLATION Canadian ELECTRIC Dryer ALL ELECTRIC Dryers The following are specific requirements for electrical current. 2. This appliance MUST be purchased, allowing some slack in doubt as to the... The dryer MUST be cut or remove the grounding prong from this dryer. Follow the instructions in a risk of the equipment connector in the entry hole on the terminal block. Tighten the screw securely. 6. For a permanently connected dryer: ALL GAS Dryers 1. ...
Installation Instructions (All Languages)
Page 9
... that may occur. NOTE: On gas dryers, before making another attempt to L.P. The instructions in a location near the dryer for a connection. b. Connect a 1/2 inch (1.27 cm) I.D. GAS CONNECTION (Gas dryers only) a. Plug the power cord into the outlet. 5. conversion kit must be applied when installing, operating and maintaining any appliance. Run the dryer through a cycle check for play.
... that may occur. NOTE: On gas dryers, before making another attempt to L.P. The instructions in a location near the dryer for a connection. b. Connect a 1/2 inch (1.27 cm) I.D. GAS CONNECTION (Gas dryers only) a. Plug the power cord into the outlet. 5. conversion kit must be applied when installing, operating and maintaining any appliance. Run the dryer through a cycle check for play.
Operating Instructions (Operating Instructions)
Page 1
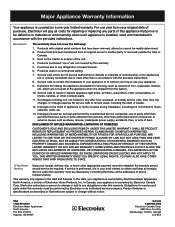
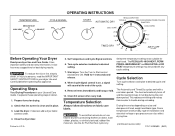
...Air Fluff-No Heat cycle only. The heat automatically turns off and the load continues to persons, read the IMPORTANT SAFETY INSTRUCTIONS in your dryer Use and Care Guide before operating this appliance. Room temperature and humidity, type of load, weight and fabric type. It.... Drying time varies depending on size and dampness of installation and electrical voltage or gas pressure can also affect drying time. (continued, reverse side) P/N 134383600 (0401) TEMPERATURE MEDIUM HEAT HIGH HEAT LOW HEAT OPERATING INSTRUCTIONS CYCLE SIGNAL ON OFF START AUTOMATIC DRY ON COOL DOW1N0...
...Air Fluff-No Heat cycle only. The heat automatically turns off and the load continues to persons, read the IMPORTANT SAFETY INSTRUCTIONS in your dryer Use and Care Guide before operating this appliance. Room temperature and humidity, type of load, weight and fabric type. It.... Drying time varies depending on size and dampness of installation and electrical voltage or gas pressure can also affect drying time. (continued, reverse side) P/N 134383600 (0401) TEMPERATURE MEDIUM HEAT HIGH HEAT LOW HEAT OPERATING INSTRUCTIONS CYCLE SIGNAL ON OFF START AUTOMATIC DRY ON COOL DOW1N0...


