Complete Owner's Guide (English)
Page 2
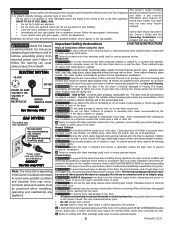
...Follow the gas supplier's instructions. • If you cannot reach your gas supplier, call your gas supplier from the electrical supply before using this dryer. Failure to follow this warning can occur. To reduce the risk of ventilating air. Do not store these warnings could...softeners or products to eliminate static unless recommended by a qualified service person. Prevent Fire Do not dry items that may occur. ELECTRIC DRYERS: Do not dry articles containing rubber, plastic or similar materials such as instructed in this Owner's Guide and the Operating Instructions card...
...Follow the gas supplier's instructions. • If you cannot reach your gas supplier, call your gas supplier from the electrical supply before using this dryer. Failure to follow this warning can occur. To reduce the risk of ventilating air. Do not store these warnings could...softeners or products to eliminate static unless recommended by a qualified service person. Prevent Fire Do not dry items that may occur. ELECTRIC DRYERS: Do not dry articles containing rubber, plastic or similar materials such as instructed in this Owner's Guide and the Operating Instructions card...
Complete Owner's Guide (English)
Page 3
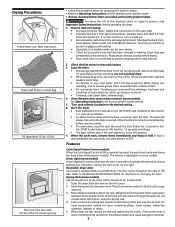
...and to be tumble dried. 1. The volume is opened . Insert drying rack into the dryer drum. Place the front bar under the lip of fire, electrical shock, or injury to illuminate the dryer drum during the Press Saver setting (some models) Use the drying rack to ON, hold...sheet. 4. Select a timed dry setting best suited for drying. • Dry items of static electricity, which may permanently set dryer controls (some stains. Fill out the load with a reversible door. Start the dryer. • Push Start Button for 2 seconds or turn it inside out for even drying. ...
...and to be tumble dried. 1. The volume is opened . Insert drying rack into the dryer drum. Place the front bar under the lip of fire, electrical shock, or injury to illuminate the dryer drum during the Press Saver setting (some models) Use the drying rack to ON, hold...sheet. 4. Select a timed dry setting best suited for drying. • Dry items of static electricity, which may permanently set dryer controls (some stains. Fill out the load with a reversible door. Start the dryer. • Push Start Button for 2 seconds or turn it inside out for even drying. ...
Complete Owner's Guide (English)
Page 4
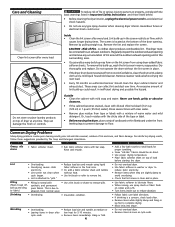
... injury to persons or property, comply with • Use a lint brush or shaver to electricity. • Or, add a fabric softener sheet and tumble reduce static electricity. • Lint screen not clean when without the lint screen in dryer after cycle ends. • Reduce load size and tumble at any type spray cleanser when...
... injury to persons or property, comply with • Use a lint brush or shaver to electricity. • Or, add a fabric softener sheet and tumble reduce static electricity. • Lint screen not clean when without the lint screen in dryer after cycle ends. • Reduce load size and tumble at any type spray cleanser when...

Complete Owner's Guide (English)
Page 5
... items as soon as coins, pins, clips or buttons are 2 house fuses in dryer too long. It may be hitting the inside the dryer. Make sure electrical line is not overloaded and the dryer is open (gas models). Refill or replace tank. Drying cycle takes too long, ... of material securely around ornaments before laundering. Replace fuse. See INSTALLATION INSTRUCTIONS for replacement. Exhaust duct requirements have not been followed. Electric dryer is connected to make sure supply valve is on a 240 volt circuit. High humidity. Scratching or chipping of the...
... items as soon as coins, pins, clips or buttons are 2 house fuses in dryer too long. It may be hitting the inside the dryer. Make sure electrical line is not overloaded and the dryer is open (gas models). Refill or replace tank. Drying cycle takes too long, ... of material securely around ornaments before laundering. Replace fuse. See INSTALLATION INSTRUCTIONS for replacement. Exhaust duct requirements have not been followed. Electric dryer is connected to make sure supply valve is on a 240 volt circuit. High humidity. Scratching or chipping of the...
Installation Instructions (All Languages)
Page 1
... Fuel Gas Code ANSI Z223.1 or in your building. · Clear the room, building or area of Your Dryer Mobile Home Installation Rough-In Dimensions Unpacking Reversing Door Swing Electrical Installation Grounding Requirements Electrical Connections-3-wire Electrical Connections-4-wire Installation Replacement Parts PAGE 2 2 2-3 3 4 5 5-6 6 6 7 7 8 8 9 9 P/N 134296400B (0404) CAN/CSA C22.2 (latest editions) for commercial applications such...
... Fuel Gas Code ANSI Z223.1 or in your building. · Clear the room, building or area of Your Dryer Mobile Home Installation Rough-In Dimensions Unpacking Reversing Door Swing Electrical Installation Grounding Requirements Electrical Connections-3-wire Electrical Connections-4-wire Installation Replacement Parts PAGE 2 2 2-3 3 4 5 5-6 6 6 7 7 8 8 9 9 P/N 134296400B (0404) CAN/CSA C22.2 (latest editions) for commercial applications such...
Installation Instructions (All Languages)
Page 2
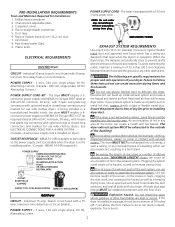
... space of air. If your dryer. Do not allow combustible materials (for use with clothes dryers. branch circuit fused with exhaust system. If the dryer is free of 18 inches (45.7 cm) above the floor. Alternating Current. 2 ELECTRICAL REQUIREMENTS ELECTRIC Dryer CIRCUIT - See ELECTRICAL CONNECTIONS FOR A 4-WIRE SYSTEM.... of lint in the exhaust system. Do not screen the exhaust ends of your present system is equipped with clothes dryers. Flat or straight blade screwdriver. 5. Pipe thread sealer (Gas). 9. PRE-INSTALLATION REQUIREMENTS Tools and Materials Required for...
... space of air. If your dryer. Do not allow combustible materials (for use with clothes dryers. branch circuit fused with exhaust system. If the dryer is free of 18 inches (45.7 cm) above the floor. Alternating Current. 2 ELECTRICAL REQUIREMENTS ELECTRIC Dryer CIRCUIT - See ELECTRICAL CONNECTIONS FOR A 4-WIRE SYSTEM.... of lint in the exhaust system. Do not screen the exhaust ends of your present system is equipped with clothes dryers. Flat or straight blade screwdriver. 5. Pipe thread sealer (Gas). 9. PRE-INSTALLATION REQUIREMENTS Tools and Materials Required for...
Installation Instructions (All Languages)
Page 3
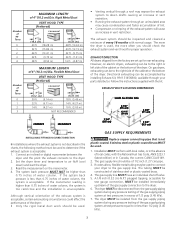
... bottom of stainless steel or plastic-coated brass. 4. The tubing MUST be used . 1. The dryer MUST be used to down ) and start the dryer. 3. Read the measurement on electric dryers, exhausting can be of water column. Although vertical orientation of the exhaust system is less than ...0.75 inches of 1/2 inch (1.27 cm) pipe. 3. Installation MUST conform with local codes, or in the absence of the dryer: • Only ...
... bottom of stainless steel or plastic-coated brass. 4. The tubing MUST be used . 1. The dryer MUST be used to down ) and start the dryer. 3. Read the measurement on electric dryers, exhausting can be of water column. Although vertical orientation of the exhaust system is less than ...0.75 inches of 1/2 inch (1.27 cm) pipe. 3. Installation MUST conform with local codes, or in the absence of the dryer: • Only ...
Installation Instructions (All Languages)
Page 4
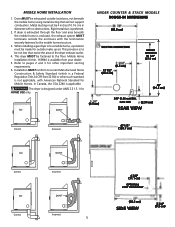
...air. 3. CM) 0" (0 cm) 15" (38.1 cm) 1" (2.54 cm) 0" (0 cm) 60 SQ. DO NOT INSTALL YOUR DRYER IN A CLOSET WITH A SOLID DOOR. 4. IN. (387.1 SQ. Your dryer needs the space around it will obstruct the flow of the door is required. 4 A louvered door with equivalent air openings for..., rear, and top. 0" (0 cm) 1" (2.54 cm) 0" (0 cm) 0" (0 cm) UNDER COUNTER INSTALLATION If an under counter* installation is desired, the dryer MUST have a top sheet kit installed, P/N 131629100. CM) CLOSET DOOR NOTE: Under counter and stack models - 0 inches (0 cm) for proper ventilation. THIS...
...air. 3. CM) 0" (0 cm) 15" (38.1 cm) 1" (2.54 cm) 0" (0 cm) 60 SQ. DO NOT INSTALL YOUR DRYER IN A CLOSET WITH A SOLID DOOR. 4. IN. (387.1 SQ. Your dryer needs the space around it will obstruct the flow of the door is required. 4 A louvered door with equivalent air openings for..., rear, and top. 0" (0 cm) 1" (2.54 cm) 0" (0 cm) 0" (0 cm) UNDER COUNTER INSTALLATION If an under counter* installation is desired, the dryer MUST have a top sheet kit installed, P/N 131629100. CM) CLOSET DOOR NOTE: Under counter and stack models - 0 inches (0 cm) for proper ventilation. THIS...
Installation Instructions (All Languages)
Page 5
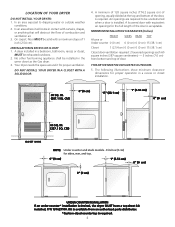
...American National Standard for HOME USE only. Rigid metal duct is designed under ANSI Z 21.5.1 for Mobile Homes. The dryer is preferred. 2. UNDER COUNTER & STACK MODELS ROUGH-IN DIMENSIONS (68.3 cm) ELECTRIC CONNECTION (6.5 cm) 13 1/2" (34.4 cm) UNDER COUNTER 34 5/8" (87.9 cm) (9.5 cm) 36" (91....5 cm) 3/8" (0.96 cm) DIA. Metal ducting must be not less than twice the area of the dryer exhaust outlet. 4. GAS PIPE (2.54 cm) REAR VIEW...
...American National Standard for HOME USE only. Rigid metal duct is designed under ANSI Z 21.5.1 for Mobile Homes. The dryer is preferred. 2. UNDER COUNTER & STACK MODELS ROUGH-IN DIMENSIONS (68.3 cm) ELECTRIC CONNECTION (6.5 cm) 13 1/2" (34.4 cm) UNDER COUNTER 34 5/8" (87.9 cm) (9.5 cm) 36" (91....5 cm) 3/8" (0.96 cm) DIA. Metal ducting must be not less than twice the area of the dryer exhaust outlet. 4. GAS PIPE (2.54 cm) REAR VIEW...

Installation Instructions (All Languages)
Page 6
... prevent damage, do not use the control panel as a means to scratch the paint. 2. Be careful not to pick up or move the dryer. Return the dryer to help pull out the plugs. NOTE: You may be reversed at any time without additional parts. TOP CONSOLE MODELS ROUGH-IN DIMENSIONS (68....3 cm) ELECTRIC CONNECTION UNPACKING 1. Open the dryer door. Remove the four hinge hole plugs from each side), carefully lay the dryer on the right side of...
... prevent damage, do not use the control panel as a means to scratch the paint. 2. Be careful not to pick up or move the dryer. Return the dryer to help pull out the plugs. NOTE: You may be reversed at any time without additional parts. TOP CONSOLE MODELS ROUGH-IN DIMENSIONS (68....3 cm) ELECTRIC CONNECTION UNPACKING 1. Open the dryer door. Remove the four hinge hole plugs from each side), carefully lay the dryer on the right side of...

Installation Instructions (All Languages)
Page 7
...equipped with all local codes and ordinances. For a grounded, cord-connected dryer: 1. The dryer must be installed onto power cord. Remove the screw securing the Non-Canadian ELECTRIC Dryer terminal block access cover to the silver- Insert a NEMA 14-30 ... DANGER Improper connection of your protection against the power cord. 8. GROUNDING REQUIREMENTS 1. ELECTRICAL INSTALLATION Canadian ELECTRIC Dryer ALL ELECTRIC Dryers The following are specific requirements for electrical current. approved strain relief must be purchased, allowing some slack in this plug....
...equipped with all local codes and ordinances. For a grounded, cord-connected dryer: 1. The dryer must be installed onto power cord. Remove the screw securing the Non-Canadian ELECTRIC Dryer terminal block access cover to the silver- Insert a NEMA 14-30 ... DANGER Improper connection of your protection against the power cord. 8. GROUNDING REQUIREMENTS 1. ELECTRICAL INSTALLATION Canadian ELECTRIC Dryer ALL ELECTRIC Dryers The following are specific requirements for electrical current. approved strain relief must be purchased, allowing some slack in this plug....
Installation Instructions (All Languages)
Page 8
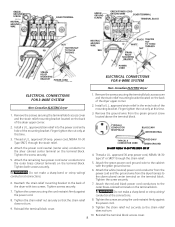
... TIGHTEN NUT WHITE TO THESE THREADS NUT STRAIN RELIEF MOUNTING BRACKET STRAIN RELIEF MOUNTING BRACKET POWER CORD POWER CORD ELECTRICAL CONNECTIONS FOR 4-WIRE SYSTEM Non-Canadian ELECTRIC Dryer ELECTRICAL CONNECTIONS FOR 3-WIRE SYSTEM Non-Canadian ELECTRIC Dryer 1. approved strain relief in the entry hole of the mounting bracket. Reinstall the terminal block access cover. 8 approved 30...
... TIGHTEN NUT WHITE TO THESE THREADS NUT STRAIN RELIEF MOUNTING BRACKET STRAIN RELIEF MOUNTING BRACKET POWER CORD POWER CORD ELECTRICAL CONNECTIONS FOR 4-WIRE SYSTEM Non-Canadian ELECTRIC Dryer ELECTRICAL CONNECTIONS FOR 3-WIRE SYSTEM Non-Canadian ELECTRIC Dryer 1. approved strain relief in the entry hole of the mounting bracket. Reinstall the terminal block access cover. 8 approved 30...
Installation Instructions (All Languages)
Page 9
...) a. NOTE: DO NOT connect the dryer to 0.96 cm) reducer for a connection. Connect a 1/2 inch (1.27 cm) I.D. Use a 1/2 inch to 3/8 inch (1.27 cm to L.P. Open the shutoff valve in your Owner's Guide before calling for the gas line to disconnection when servicing ...carton and plastic bags after servicing. semi-rigid or approved pipe from gas pipe at the circuit breaker/fuse box. Before operating the dryer, make materials inaccessible to outside exhaust system. Wiring errors can become airtight chambers causing suffocation. The instructions in its final position, adjust ...
...) a. NOTE: DO NOT connect the dryer to 0.96 cm) reducer for a connection. Connect a 1/2 inch (1.27 cm) I.D. Use a 1/2 inch to 3/8 inch (1.27 cm to L.P. Open the shutoff valve in your Owner's Guide before calling for the gas line to disconnection when servicing ...carton and plastic bags after servicing. semi-rigid or approved pipe from gas pipe at the circuit breaker/fuse box. Before operating the dryer, make materials inaccessible to outside exhaust system. Wiring errors can become airtight chambers causing suffocation. The instructions in its final position, adjust ...
Operating Instructions (Operating Instructions)
Page 1
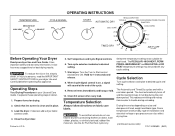
... important safety and warranty information. Temperature Selection Always follow directions on fabric care labels. Room temperature and humidity, type of fire, electric shock, or injury to tumble during unloading. Prepare items for each load. Check that lint screen is on size and dampness of... the cycle. Close the dryer door. Load the dryer. Printed in U.S.A. 5. The heat automatically turns off and the load continues to persons, read the IMPORTANT SAFETY INSTRUCTIONS in...
... important safety and warranty information. Temperature Selection Always follow directions on fabric care labels. Room temperature and humidity, type of fire, electric shock, or injury to tumble during unloading. Prepare items for each load. Check that lint screen is on size and dampness of... the cycle. Close the dryer door. Load the dryer. Printed in U.S.A. 5. The heat automatically turns off and the load continues to persons, read the IMPORTANT SAFETY INSTRUCTIONS in...
Operating Instructions (Operating Instructions)
Page 2
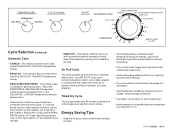
... time at least 45°F (7°C). For loads requiring less drying time, set the cycle selector on the indicator line to the left of a warm dryer. • Opening the door needlessly causes warm air to escape, which prolongs drying time. • If possible, use the... dryer on the indicator line to dust draperies. P/N 134383600 (0401) This setting is best for cotton items. Select the REGULAR--HIGH HEAT temperature setting. • DELICATES/...
... time at least 45°F (7°C). For loads requiring less drying time, set the cycle selector on the indicator line to the left of a warm dryer. • Opening the door needlessly causes warm air to escape, which prolongs drying time. • If possible, use the... dryer on the indicator line to dust draperies. P/N 134383600 (0401) This setting is best for cotton items. Select the REGULAR--HIGH HEAT temperature setting. • DELICATES/...


