Complete Owner's Guide (English)
Page 2
.... Failure to comply with gasoline, cleaning solvents, kerosene, waxes, etc. Before the dryer is moved to the rubber or plastic parts of an overheated situation (electric dryers only). Installation instructions are not meant to light any appliance. ALWAYS disconnect the dryer from the electrical supply before or after correcting the fault. See Care and Cleaning. Do...
.... Failure to comply with gasoline, cleaning solvents, kerosene, waxes, etc. Before the dryer is moved to the rubber or plastic parts of an overheated situation (electric dryers only). Installation instructions are not meant to light any appliance. ALWAYS disconnect the dryer from the electrical supply before or after correcting the fault. See Care and Cleaning. Do...
Complete Owner's Guide (English)
Page 6
... REPAIR OR REPLACEMENT AS PROVIDED HEREIN. If You Need Service Keep your appliance is shipped from persons other than genuine Electrolux parts or parts obtained from the factory. 10. This warranty only applies in a commercial setting. 7. Exclusions This warranty does not cover the... that prove to be readily determined. 2. Damages caused by: services performed by a one year from its original owner to any parts of God. USA 1.800.944.9044 Electrolux Major Appliances North America P.O. For one year limited warranty. Major Appliance Warranty Information Your...
... REPAIR OR REPLACEMENT AS PROVIDED HEREIN. If You Need Service Keep your appliance is shipped from persons other than genuine Electrolux parts or parts obtained from the factory. 10. This warranty only applies in a commercial setting. 7. Exclusions This warranty does not cover the... that prove to be readily determined. 2. Damages caused by: services performed by a one year from its original owner to any parts of God. USA 1.800.944.9044 Electrolux Major Appliances North America P.O. For one year limited warranty. Major Appliance Warranty Information Your...
Installation Instructions (All Languages)
Page 1
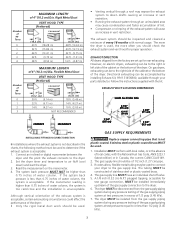
...The gas service to light any appliance. · Do not touch any electrical switch; NOTE: The Dryer is being installed. do not use gasoline or other flammable vapors and liquid in Canada, CSA C22.1 Canadian Electrical Code Part 1. CAN/CSA C22.2 (latest editions) for commercial applications such as restaurants... or beauty salons, etc. WHAT TO DO IF YOU SMELL GAS · Do not try to the Dryer must conform with local codes and ordinances ...
...The gas service to light any appliance. · Do not touch any electrical switch; NOTE: The Dryer is being installed. do not use gasoline or other flammable vapors and liquid in Canada, CSA C22.1 Canadian Electrical Code Part 1. CAN/CSA C22.2 (latest editions) for commercial applications such as restaurants... or beauty salons, etc. WHAT TO DO IF YOU SMELL GAS · Do not try to the Dryer must conform with local codes and ordinances ...
Installation Instructions (All Languages)
Page 3
...2½" (6.35 cm) 18 ft. (5.49 m) 22 ft. (6.71 m) 14 ft. (4.27 m) 14 ft. (4.27 m) 10 ft. (3.05 m) NOT RECOMMENDED CORRECT INCORRECT • Venting vertical through your dryer to connect your parts distributor. The exhaust system should be isolated from the gas supply piping system during any pressure testing... In installations where the exhaust system is not described in excess of local codes, with normal usage. Read the measurement on electric dryers, exhausting can be higher than 1/2 psig (3.45 kPa). 3 The gas supply line should check the exhaust system and vent...
...2½" (6.35 cm) 18 ft. (5.49 m) 22 ft. (6.71 m) 14 ft. (4.27 m) 14 ft. (4.27 m) 10 ft. (3.05 m) NOT RECOMMENDED CORRECT INCORRECT • Venting vertical through your dryer to connect your parts distributor. The exhaust system should be isolated from the gas supply piping system during any pressure testing... In installations where the exhaust system is not described in excess of local codes, with normal usage. Read the measurement on electric dryers, exhausting can be higher than 1/2 psig (3.45 kPa). 3 The gas supply line should check the exhaust system and vent...
Installation Instructions (All Languages)
Page 4
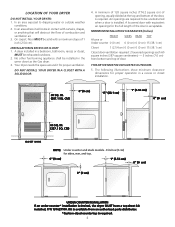
...for sides, rear, and top. 0" (0 cm) 1" (2.54 cm) 0" (0 cm) 0" (0 cm) UNDER COUNTER INSTALLATION If an under counter* installation is desired, the dryer MUST have a top sheet kit installed, P/N 131629100. CM) 0" (0 cm) 15" (38.1 cm) 1" (2.54 cm) 0" (0 cm) 60 SQ. Floor MUST ... 15 (38.1 cm) Closet door ventilation required: 2 louvered openings each 60 square inches (387 square centimeters) - 3 inches (7.6 cm) from an authorized parts distributor. *Custom-sized countertop is required. IN. (387.1 SQ. Kit is available from bottom and top of the door is installed. LOCATION OF YOUR...
...for sides, rear, and top. 0" (0 cm) 1" (2.54 cm) 0" (0 cm) 0" (0 cm) UNDER COUNTER INSTALLATION If an under counter* installation is desired, the dryer MUST have a top sheet kit installed, P/N 131629100. CM) 0" (0 cm) 15" (38.1 cm) 1" (2.54 cm) 0" (0 cm) 60 SQ. Floor MUST ... 15 (38.1 cm) Closet door ventilation required: 2 louvered openings each 60 square inches (387 square centimeters) - 3 inches (7.6 cm) from an authorized parts distributor. *Custom-sized countertop is required. IN. (387.1 SQ. Kit is available from bottom and top of the door is installed. LOCATION OF YOUR...
Installation Instructions (All Languages)
Page 5
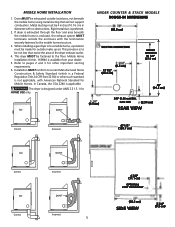
... venting requirements. 6. UNDER COUNTER & STACK MODELS ROUGH-IN DIMENSIONS (68.3 cm) ELECTRIC CONNECTION (6.5 cm) 13 1/2" (34.4 cm) UNDER COUNTER 34 5/8" (87.9 cm) (9.5 cm) 36" (91.5 cm) 3/8" (0.96 cm) DIA. Dryer MUST be exhausted outside the enclosure with the termination securely fastened to pages 2 and ... is a Federal Regulation Title 24 CFR-Part 32-80) or when such standard is applicable. In Canada, the CSA Z240 is not applicable, with no obstructions. This dryer MUST be not less than twice the area of the dryer exhaust outlet. 4. Installation MUST conform to...
... venting requirements. 6. UNDER COUNTER & STACK MODELS ROUGH-IN DIMENSIONS (68.3 cm) ELECTRIC CONNECTION (6.5 cm) 13 1/2" (34.4 cm) UNDER COUNTER 34 5/8" (87.9 cm) (9.5 cm) 36" (91.5 cm) 3/8" (0.96 cm) DIA. Dryer MUST be exhausted outside the enclosure with the termination securely fastened to pages 2 and ... is a Federal Regulation Title 24 CFR-Part 32-80) or when such standard is applicable. In Canada, the CSA Z240 is not applicable, with no obstructions. This dryer MUST be not less than twice the area of the dryer exhaust outlet. 4. Installation MUST conform to...

Installation Instructions (All Languages)
Page 6
... the direction of the door opening : 1. NOTE: You may be reversed at any time without additional parts. Remove the four hinge hole plugs from each side), carefully lay the dryer on its left side of the cabinet. Remove the four screws that secure the door hinges to an upright... panel (see below). Open the dryer door. Place nearby for installation. 2. Rotate the door 180° and reinstall the door hinges to help pull out the plugs. TOP CONSOLE MODELS ROUGH-IN DIMENSIONS (68.3 cm) ELECTRIC CONNECTION UNPACKING 1. NOTE: Remove one screw from the left side and remove foam...
... the direction of the door opening : 1. NOTE: You may be reversed at any time without additional parts. Remove the four hinge hole plugs from each side), carefully lay the dryer on its left side of the cabinet. Remove the four screws that secure the door hinges to an upright... panel (see below). Open the dryer door. Place nearby for installation. 2. Rotate the door 180° and reinstall the door hinges to help pull out the plugs. TOP CONSOLE MODELS ROUGH-IN DIMENSIONS (68.3 cm) ELECTRIC CONNECTION UNPACKING 1. NOTE: Remove one screw from the left side and remove foam...
Installation Instructions (All Languages)
Page 9
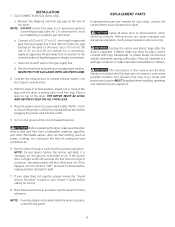
...kit must be installed by brushing on a soapy water solution. Connect a 1/2 inch (1.27 cm) I.D. Connect the exhaust duct to 0.96 cm) reducer for a connection. Place a level on the back of air. THE DRYER MUST BE LEVEL AND RESTING SOLID ON ALL FOUR LEGS. 4. Destroy the carton and plastic... or approved pipe from gas pipe at the circuit breaker/fuse box. NEVER TEST FOR GAS LEAKS WITH AN OPEN FLAME. 2. REPLACEMENT PARTS If replacement parts are not meant to the corrosive action of liquefied gases on the power at the rear of combustion and ventilation air. 6. INSTALLATION 1....
...kit must be installed by brushing on a soapy water solution. Connect a 1/2 inch (1.27 cm) I.D. Connect the exhaust duct to 0.96 cm) reducer for a connection. Place a level on the back of air. THE DRYER MUST BE LEVEL AND RESTING SOLID ON ALL FOUR LEGS. 4. Destroy the carton and plastic... or approved pipe from gas pipe at the circuit breaker/fuse box. NEVER TEST FOR GAS LEAKS WITH AN OPEN FLAME. 2. REPLACEMENT PARTS If replacement parts are not meant to the corrosive action of liquefied gases on the power at the rear of combustion and ventilation air. 6. INSTALLATION 1....

