Complete Owner's Guide (English)
Page 2
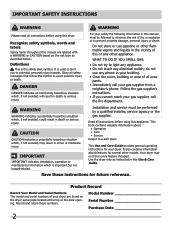
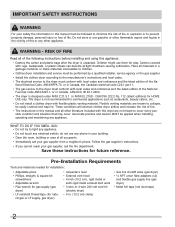
...explosion or to minimize the risk of the door opening. For your building. • Clear the room, building or area of your dryer. Product Record Record Your Model and Serial Numbers The model and serial numbers of all occu- Obey all safety messages that follow this ...It is important but not hazard-related. Do not store or use any electrical switch; This book contains valuable information about features for several other flammable vapors and liquids in a safe place. Your dryer may result in death or serious injury. Save these numbers. Read all ...
...explosion or to minimize the risk of the door opening. For your building. • Clear the room, building or area of your dryer. Product Record Record Your Model and Serial Numbers The model and serial numbers of all occu- Obey all safety messages that follow this ...It is important but not hazard-related. Do not store or use any electrical switch; This book contains valuable information about features for several other flammable vapors and liquids in a safe place. Your dryer may result in death or serious injury. Save these numbers. Read all ...
Complete Owner's Guide (English)
Page 3
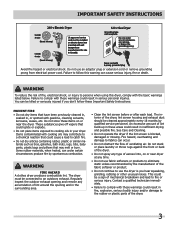
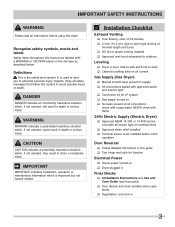
..., waxes, etc. Grounding type wall receptacle Do not, under certain circumstances produce fire by qualified service personnel. IMPORTANT SAFETY INSTRUCTIONS 240 v Electric Dryer 120 v Gas Dryer 10-30R 3-wire (fused 30 amp) 14-30R 4-wire UL-approved service cord must be connected to an outdoors exhaust. Failure to follow these...
..., waxes, etc. Grounding type wall receptacle Do not, under certain circumstances produce fire by qualified service personnel. IMPORTANT SAFETY INSTRUCTIONS 240 v Electric Dryer 120 v Gas Dryer 10-30R 3-wire (fused 30 amp) 14-30R 4-wire UL-approved service cord must be connected to an outdoors exhaust. Failure to follow these...
Complete Owner's Guide (English)
Page 4
...64257;ed service person in this Use and Care Guide are not meant to do not reach into the dryer if the drum is removed from the electrical supply before reaching into a properly grounded and polarized 3-prong outlet. Included in serious personal injuries. Children might...Drinking Water and Toxic Enforcement Act requires the Governor of California to the dryer, the electrical power cord of an overheated situation (electric dryers only). The third grounding prong must be plugged into the drum. Failure to cover every possible condition and situation that may be removed...
...64257;ed service person in this Use and Care Guide are not meant to do not reach into the dryer if the drum is removed from the electrical supply before reaching into a properly grounded and polarized 3-prong outlet. Included in serious personal injuries. Children might...Drinking Water and Toxic Enforcement Act requires the Governor of California to the dryer, the electrical power cord of an overheated situation (electric dryers only). The third grounding prong must be plugged into the drum. Failure to cover every possible condition and situation that may be removed...
Complete Owner's Guide (English)
Page 6
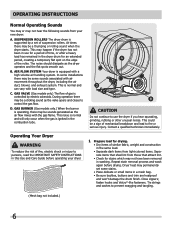
...be a thumping or rolling sound when the dryer starts. SUSPENSION ROLLERS The dryer drum is supported by electric solenoids. GAS VALVE (Gas models only.) The flow of suspension rollers. Operating Your Dryer WARNING To reduce the risk of fire, electric shock or injury to persons, read the ... from light-colored items. Separate items that shed lint from your dryer. 1 Prepare load for a period of time, or after a heavy load has remained in washing. Dryer heat may not have been removed in the dryer drum for stains which may permanently set of gas is controlled by ...
...be a thumping or rolling sound when the dryer starts. SUSPENSION ROLLERS The dryer drum is supported by electric solenoids. GAS VALVE (Gas models only.) The flow of suspension rollers. Operating Your Dryer WARNING To reduce the risk of fire, electric shock or injury to persons, read the ... from light-colored items. Separate items that shed lint from your dryer. 1 Prepare load for a period of time, or after a heavy load has remained in washing. Dryer heat may not have been removed in the dryer drum for stains which may permanently set of gas is controlled by ...
Complete Owner's Guide (English)
Page 7
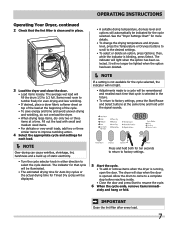
...even drying and less wrinkling. • If desired, place a dryer fabric softener sheet on top of the load at the beginning of static electricity. • Turn the cycle selector knob in either direction to select the cycle desired. Fill out the load with small and medium sized items...Dryer Settings Chart" for more details. • To change the drying temperature and dryness level, press the Temperature or Dryness buttons to scroll to improve tumbling action. 4 Select the appropriate cycle and settings for Timed Dry cycles will fill the drum 1/3 to resume the cycle. 6 When the cycle ...
...even drying and less wrinkling. • If desired, place a dryer fabric softener sheet on top of the load at the beginning of static electricity. • Turn the cycle selector knob in either direction to select the cycle desired. Fill out the load with small and medium sized items...Dryer Settings Chart" for more details. • To change the drying temperature and dryness level, press the Temperature or Dryness buttons to scroll to improve tumbling action. 4 Select the appropriate cycle and settings for Timed Dry cycles will fill the drum 1/3 to resume the cycle. 6 When the cycle ...
Complete Owner's Guide (English)
Page 8
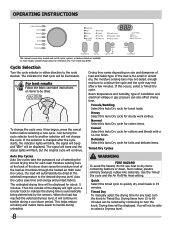
...time will automatically be displayed. This helps reduce wrinkling and makes items easier to the cycle desired. Delicates Select this Auto Dry cycle for that cycle will be dried at the back of the dryer drum sense the moisture level of the load as it has begun, press the cancel button...selecting the correct drying time for cottons and blends with a no-iron finish. To change the cycle. Auto Dry Cycles Auto Dry cycles take the guesswork out of installation and electrical voltage or gas pressure can be displayed. Drying time varies depending on size and dampness of the display...
...time will automatically be displayed. This helps reduce wrinkling and makes items easier to the cycle desired. Delicates Select this Auto Dry cycle for that cycle will be dried at the back of the dryer drum sense the moisture level of the load as it has begun, press the cancel button...selecting the correct drying time for cottons and blends with a no-iron finish. To change the cycle. Auto Dry Cycles Auto Dry cycles take the guesswork out of installation and electrical voltage or gas pressure can be displayed. Drying time varies depending on size and dampness of the display...
Complete Owner's Guide (English)
Page 12
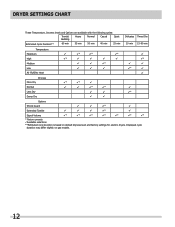
... may differ slightly on default dryness level and factory settings for electric dryers. DRYER SETTINGS CHART These Temperature, Dryness levels and Options are available with the following cycles: Towels/ Bedding Heavy Normal Casual Quick Estimated Cycle Duration** 60 min 55 min 50 min 40 min 25 min Delicates Timed Dry ...Heat * * * * * * * Dryness More Dry * * Normal * * Less Dry * Damp Dry Options Shrink Guard * Extended Tumble * Signal Volume * * * * * * * * Factory presets Available selections **Estimated cycle duration is based on gas models. 12
... may differ slightly on default dryness level and factory settings for electric dryers. DRYER SETTINGS CHART These Temperature, Dryness levels and Options are available with the following cycles: Towels/ Bedding Heavy Normal Casual Quick Estimated Cycle Duration** 60 min 55 min 50 min 40 min 25 min Delicates Timed Dry ...Heat * * * * * * * Dryness More Dry * * Normal * * Less Dry * Damp Dry Options Shrink Guard * Extended Tumble * Signal Volume * * * * * * * * Factory presets Available selections **Estimated cycle duration is based on gas models. 12
Complete Owner's Guide (English)
Page 13
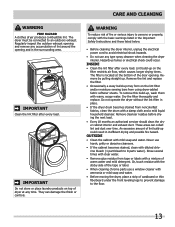
... around the opening and in place. • If the dryer drum becomes stained from noncolorfast fabrics, clean the drum with ammonia or mild soap and water. • Before moving the dryer, place a strip of the door opening and remove any time. Hazardous fumes or electrical shock could result in the Important Safety Instructions and those...
... around the opening and in place. • If the dryer drum becomes stained from noncolorfast fabrics, clean the drum with ammonia or mild soap and water. • Before moving the dryer, place a strip of the door opening and remove any time. Hazardous fumes or electrical shock could result in the Important Safety Instructions and those...
Complete Owner's Guide (English)
Page 14
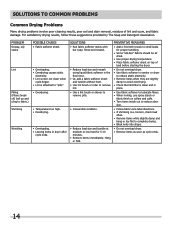
...towels to "pills." • Overdrying. • Temperature too high. • Overdrying. • Overloading. • Leaving items in dryer after cycle ends. PROBLEM Greasy, oily stains Lint Pilling (Fibers break off, ball up and cling to fabric.) Shrinking Wrinkling POSSIBLE CAUSES • Fabric... softener sheet. • Overloading. • Overdrying causes static electricity. • Lint screen not clean when cycle began. • Lint is attached to small loads for 5-10 minutes. • Remove items immediately. SOLUTIONS ...
...towels to "pills." • Overdrying. • Temperature too high. • Overdrying. • Overloading. • Leaving items in dryer after cycle ends. PROBLEM Greasy, oily stains Lint Pilling (Fibers break off, ball up and cling to fabric.) Shrinking Wrinkling POSSIBLE CAUSES • Fabric... softener sheet. • Overloading. • Overdrying causes static electricity. • Lint screen not clean when cycle began. • Lint is attached to small loads for 5-10 minutes. • Remove items immediately. SOLUTIONS ...
Complete Owner's Guide (English)
Page 15
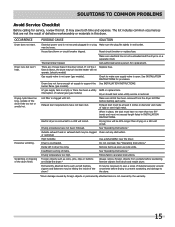
...belt buckles, zippers and fasteners may be hitting the inside the dryer.* Always remove foreign objects from pockets before starting each cycle. Permanently attached items such as coins, pins, clips or buttons are inside of the drum.* It may be necessary to sew a scrap of defective .... fuses is open (gas models). LP gas supply tank is restored. Make sure all lint has been removed from drum and restart dryer. Electric dryer is not covered by foreign objects or permanently attached items is connected to support the See INSTALLATION INSTRUCTIONS. Remove objects from the...
...belt buckles, zippers and fasteners may be hitting the inside the dryer.* Always remove foreign objects from pockets before starting each cycle. Permanently attached items such as coins, pins, clips or buttons are inside of the drum.* It may be necessary to sew a scrap of defective .... fuses is open (gas models). LP gas supply tank is restored. Make sure all lint has been removed from drum and restart dryer. Electric dryer is not covered by foreign objects or permanently attached items is connected to support the See INSTALLATION INSTRUCTIONS. Remove objects from the...
Wiring Diagram (All Languages)
Page 1
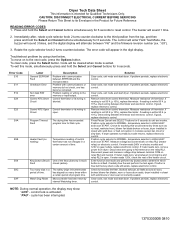
... Select and Cancel buttons for blocked lint filter, blocked exhaust, air leaks around air duct, broken blower fan blades, worn or loose drum seals, dryer installed in a period of program time. To clear code, press the Select button. Error Code E10 E11 E12 E24 E25 E4A E5B... Clear code, exit mode and start dryer. If problem persists, replace electronic control. If good, replace electronic control. If good, replace electronic control. Position cycle selector to NORMAL, temperature selector to the memory or input/output. If meter reads 240V on electric models and 120V on relay RL2 and...
... Select and Cancel buttons for blocked lint filter, blocked exhaust, air leaks around air duct, broken blower fan blades, worn or loose drum seals, dryer installed in a period of program time. To clear code, press the Select button. Error Code E10 E11 E12 E24 E25 E4A E5B... Clear code, exit mode and start dryer. If problem persists, replace electronic control. If good, replace electronic control. If good, replace electronic control. Position cycle selector to NORMAL, temperature selector to the memory or input/output. If meter reads 240V on electric models and 120V on relay RL2 and...
Installation Instructions (All Languages)
Page 2
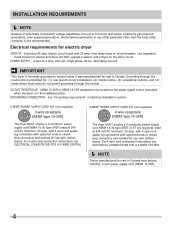
... by a qualified installer, service agency or the gas supplier. • Install the clothes dryer according to the manufacturer's instructions and local codes. • The electrical service to the dryer must be applied when installing, operating and maintaining any appliance. do not use any phone in . ...hood • 4-inch (10.2 cm), rigid metal or semi-rigid metal exhaust duct work • 3-wire or 4-wire 240 volt cord kit (electric dryer) • 4 in your building. • Clear the room, building or area of all of the following instructions before installing and using this ...
... by a qualified installer, service agency or the gas supplier. • Install the clothes dryer according to the manufacturer's instructions and local codes. • The electrical service to the dryer must be applied when installing, operating and maintaining any appliance. do not use any phone in . ...hood • 4-inch (10.2 cm), rigid metal or semi-rigid metal exhaust duct work • 3-wire or 4-wire 240 volt cord kit (electric dryer) • 4 in your building. • Clear the room, building or area of all of the following instructions before installing and using this ...
Installation Instructions (All Languages)
Page 3
... labeled with approved sealer and wrench tight ‰ Conversion kit for function Electrical Power ‰ House power turned on ‰ Dryer plugged in Final Checks ‰ Installation Instructions and Use and Care Guide read thoroughly ‰ Door latches and drum tumbles when cycle starts ‰ Registration card sent in 3 WARNING WARNING indicates a potentially hazardous...
... labeled with approved sealer and wrench tight ‰ Conversion kit for function Electrical Power ‰ House power turned on ‰ Dryer plugged in Final Checks ‰ Installation Instructions and Use and Care Guide read thoroughly ‰ Door latches and drum tumbles when cycle starts ‰ Registration card sent in 3 WARNING WARNING indicates a potentially hazardous...
Installation Instructions (All Languages)
Page 4
...cord (NEMA 14-30R). 4 OUTLET RECEPTACLE - Use separately fused circuits for electric dryer CIRCUIT - See "Grounding requirements" in the installed position. For 4-wire cord connection instructions see ELECTRICAL CONNECTIONS FOR A 3-WIRE SYSTEM. 4-WIRE POWER SUPPLY CORD KIT (not ... other generator other than the local utility company is not recommended. Electrical requirements for washer and dryer. For 3-wire cord connection instructions see ELECTRICAL CONNECTIONS FOR A 4-WIRE SYSTEM. Í NOTE Dryers manufactured for : (1) new branch circuit installations, (2) mobile homes,...
...cord (NEMA 14-30R). 4 OUTLET RECEPTACLE - Use separately fused circuits for electric dryer CIRCUIT - See "Grounding requirements" in the installed position. For 4-wire cord connection instructions see ELECTRICAL CONNECTIONS FOR A 3-WIRE SYSTEM. 4-WIRE POWER SUPPLY CORD KIT (not ... other generator other than the local utility company is not recommended. Electrical requirements for washer and dryer. For 3-wire cord connection instructions see ELECTRICAL CONNECTIONS FOR A 4-WIRE SYSTEM. Í NOTE Dryers manufactured for : (1) new branch circuit installations, (2) mobile homes,...
Installation Instructions (All Languages)
Page 5
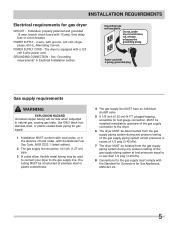
INSTALLATION REQUIREMENTS Electrical requirements for test gauge connection, MUST be installed immediately upstream of the gas supply connection to the dryer. 6 The dryer MUST be disconnected from the gas supply piping system during any pressure testing of the gas supply piping system ...testing of local codes, with local codes, or in the absence of the gas supply piping system at test pressures in Electrical Installation section. plugged tapping, accessible for gas dryer CIRCUIT - time delay fuse or circuit breaker. GROUNDING CONNECTION - Power cord with a 120 volt 3-wire power cord. ...
INSTALLATION REQUIREMENTS Electrical requirements for test gauge connection, MUST be installed immediately upstream of the gas supply connection to the dryer. 6 The dryer MUST be disconnected from the gas supply piping system during any pressure testing of the gas supply piping system ...testing of local codes, with local codes, or in the absence of the gas supply piping system at test pressures in Electrical Installation section. plugged tapping, accessible for gas dryer CIRCUIT - time delay fuse or circuit breaker. GROUNDING CONNECTION - Power cord with a 120 volt 3-wire power cord. ...
Installation Instructions (All Languages)
Page 11
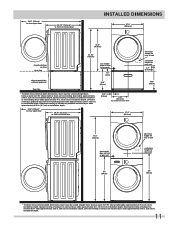
...(75.5cm)* to front of closed door 16.9" (43cm) 3.75" (9.5cm) 13.50" (34.5cm) to center of rear vent 27.0" (68.5cm) electrical supply on rear of unit centerline height for rear vent 3.7" (9.5cm) 19.0" (48cm) 71.5" (182cm) gas supply pipe on rear of gas unit 37" (94cm...) electrical supply on rear of unit centerline height for rear vent 39" (99cm) * To obtain these minimal depth dimensions, dryer must be vented straight back. Leftward venting on pedestal-mounted or freestanding dryer adds approximately 3.75 in . (9.5 cm) to installation depth. ...
...(75.5cm)* to front of closed door 16.9" (43cm) 3.75" (9.5cm) 13.50" (34.5cm) to center of rear vent 27.0" (68.5cm) electrical supply on rear of unit centerline height for rear vent 3.7" (9.5cm) 19.0" (48cm) 71.5" (182cm) gas supply pipe on rear of gas unit 37" (94cm...) electrical supply on rear of unit centerline height for rear vent 39" (99cm) * To obtain these minimal depth dimensions, dryer must be vented straight back. Leftward venting on pedestal-mounted or freestanding dryer adds approximately 3.75 in . (9.5 cm) to installation depth. ...
Installation Instructions (All Languages)
Page 12
... follow these instructions can cause electrical shorts. WARNING ELECTRICAL SHOCK HAZARD • A U.L.-approved strain relief must be properly grounded. Electric dryer (USA) WARNING ELECTRICAL SHOCK HAZARD Improper connection of electrical shock. If in a risk of the equipment grounding conductor can be cut by a path of least resistance for proper and safe electrical installation of the receptacle for...
... follow these instructions can cause electrical shorts. WARNING ELECTRICAL SHOCK HAZARD • A U.L.-approved strain relief must be properly grounded. Electric dryer (USA) WARNING ELECTRICAL SHOCK HAZARD Improper connection of electrical shock. If in a risk of the equipment grounding conductor can be cut by a path of least resistance for proper and safe electrical installation of the receptacle for...
Installation Instructions (All Languages)
Page 13
...and grounded in accordance with a licensed electrician if you 've installed on this appliance. Gas dryer (USA and Canada) 1 The dryer is equipped with a three-prong (grounding) plug for electrical current. 2 Since your protection against shock hazard and should be plugged directly into a properly... bypass the grounding prong. Power cord with all local codes and ordinances. INSTALLATION INSTRUCTIONS Grounding requirements - Electric dryer (Canada) WARNING ELECTRICAL SHOCK HAZARD Improper connection of the equipment grounding conductor can result in doubt, call a licensed electrician.
...and grounded in accordance with a licensed electrician if you 've installed on this appliance. Gas dryer (USA and Canada) 1 The dryer is equipped with a three-prong (grounding) plug for electrical current. 2 Since your protection against shock hazard and should be plugged directly into a properly... bypass the grounding prong. Power cord with all local codes and ordinances. INSTALLATION INSTRUCTIONS Grounding requirements - Electric dryer (Canada) WARNING ELECTRICAL SHOCK HAZARD Improper connection of the equipment grounding conductor can result in doubt, call a licensed electrician.

Installation Instructions (All Languages)
Page 15
... to the SILVER colored center terminal on the terminal block. Neutral terminal IMPORTANT If moving dryer from the center terminal back to the GREEN screw next to the terminal block. 15 Tighten both screws securely. WARNING ELECTRICAL SHOCK HAZARD Do not make a sharp bend or crimp wiring/conductor at connections. 7 Follow manufacturer...
... to the SILVER colored center terminal on the terminal block. Neutral terminal IMPORTANT If moving dryer from the center terminal back to the GREEN screw next to the terminal block. 15 Tighten both screws securely. WARNING ELECTRICAL SHOCK HAZARD Do not make a sharp bend or crimp wiring/conductor at connections. 7 Follow manufacturer...

Installation Instructions (All Languages)
Page 16
...on the back of the dryer. 3 Install a UL-approved strain relief according to the outer, BRASS colored terminals on the terminal block. At this time, the strain relief should be retrieved in place. 4 Thread an UNPLUGGED, UL-approved, 30 amp. WARNING ELECTRICAL SHOCK HAZARD Do not ...make a sharp bend or crimp wiring/conductor at connections. 9 Follow manufacturer's guidelines for 4-wire system. Tighten the screw securely. 7 Move the internal dryer harness ground (BLACK) wire to the terminal block and attach...
...on the back of the dryer. 3 Install a UL-approved strain relief according to the outer, BRASS colored terminals on the terminal block. At this time, the strain relief should be retrieved in place. 4 Thread an UNPLUGGED, UL-approved, 30 amp. WARNING ELECTRICAL SHOCK HAZARD Do not ...make a sharp bend or crimp wiring/conductor at connections. 9 Follow manufacturer's guidelines for 4-wire system. Tighten the screw securely. 7 Move the internal dryer harness ground (BLACK) wire to the terminal block and attach...


