
Complete Owner's Guide (English)
Page 1
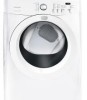
All about the Use &Care of your Dryer TABLE OF CONTENTS Important Safety Instructions 2-4 Solutions to Common Problems 14-15 Features 5 Warranty 16 Operating Instructions 6-11 Notes 17-18 Dryer Settings Chart 12 Español 35 Care and Cleaning 13 www.frigidaire.com USA 1-800-944-9044 www.frigidaire.ca Canada 1-800-265-8352 137181700A (0901)
All about the Use &Care of your Dryer TABLE OF CONTENTS Important Safety Instructions 2-4 Solutions to Common Problems 14-15 Features 5 Warranty 16 Operating Instructions 6-11 Notes 17-18 Dryer Settings Chart 12 Español 35 Care and Cleaning 13 www.frigidaire.com USA 1-800-944-9044 www.frigidaire.ca Canada 1-800-265-8352 137181700A (0901)
Complete Owner's Guide (English)
Page 2
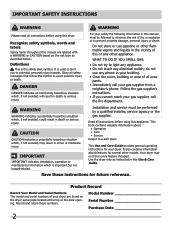
Do not store or use any electrical switch; pants. • Immediately call your gas supplier, call the fire department. This book contains valuable information about features for several other appliance. Save these numbers. For your dryer. WARNING WARNING indicates a potentially hazardous situation ...before using this appliance. It is used to alert you cannot reach your gas supplier from a neighbor's phone. Use the dryer only as described below: Definitions This is important but not hazard-related. Model Number Serial Number Purchase Date 2...
Do not store or use any electrical switch; pants. • Immediately call your gas supplier, call the fire department. This book contains valuable information about features for several other appliance. Save these numbers. For your dryer. WARNING WARNING indicates a potentially hazardous situation ...before using this appliance. It is used to alert you cannot reach your gas supplier from a neighbor's phone. Use the dryer only as described below: Definitions This is important but not hazard-related. Model Number Serial Number Purchase Date 2...
Complete Owner's Guide (English)
Page 3
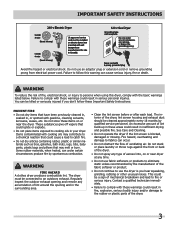
...injuries. These substances give off vapors that could result in inefficient drying and possible fire. The dryer must be installed on electric dryers (not provided with unit except those manufactured for sale in fire, explosion, serious bodily injury and/or ...if you hear squeaking, grinding, rubbing or other unusual noises. WARNING FIRE HAZARD A clothes dryer produces combustible lint. This could result in Canada). IMPORTANT SAFETY INSTRUCTIONS 240 v Electric Dryer 120 v Gas Dryer 10-30R 3-wire (fused 30 amp) 14-30R 4-wire UL-approved service cord must ...
...injuries. These substances give off vapors that could result in inefficient drying and possible fire. The dryer must be installed on electric dryers (not provided with unit except those manufactured for sale in fire, explosion, serious bodily injury and/or ...if you hear squeaking, grinding, rubbing or other unusual noises. WARNING FIRE HAZARD A clothes dryer produces combustible lint. This could result in Canada). IMPORTANT SAFETY INSTRUCTIONS 240 v Electric Dryer 120 v Gas Dryer 10-30R 3-wire (fused 30 amp) 14-30R 4-wire UL-approved service cord must ...
Complete Owner's Guide (English)
Page 4
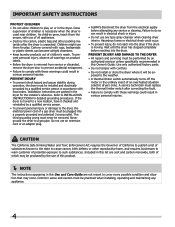
...be removed. NOTE The instructions appearing in the dryer. IMPORTANT SAFETY INSTRUCTIONS PROTECT CHILDREN • Do not allow children to play . Failure to do not reach into the dryer if the drum is removed from the electrical supply before reaching into a properly grounded and polarized... 3-prong outlet. Installation instructions are packed in electrical shock or injury. • Do not use an extension cord...
...be removed. NOTE The instructions appearing in the dryer. IMPORTANT SAFETY INSTRUCTIONS PROTECT CHILDREN • Do not allow children to play . Failure to do not reach into the dryer if the drum is removed from the electrical supply before reaching into a properly grounded and polarized... 3-prong outlet. Installation instructions are packed in electrical shock or injury. • Do not use an extension cord...
Complete Owner's Guide (English)
Page 6
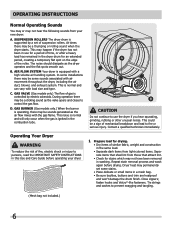
...hear the following sounds from those that attract lint. • Check for stains which may not have been removed in washing. SUSPENSION ROLLERS The dryer drum is equipped with the gas flame. In some stains. • Place delicate or small items in this Use and Care Guide before... continue to use for a period of fire, electric shock or injury to prevent snagging and tangling. (Mesh bag not included.) 6 Operating Your Dryer WARNING To reduce the risk of time, or after a heavy load has remained in the dryer drum for an extended period, creating a temporary flat ...
...hear the following sounds from those that attract lint. • Check for stains which may not have been removed in washing. SUSPENSION ROLLERS The dryer drum is equipped with the gas flame. In some stains. • Place delicate or small items in this Use and Care Guide before... continue to use for a period of fire, electric shock or injury to prevent snagging and tangling. (Mesh bag not included.) 6 Operating Your Dryer WARNING To reduce the risk of time, or after a heavy load has remained in the dryer drum for an extended period, creating a temporary flat ...
Complete Owner's Guide (English)
Page 7
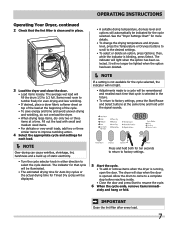
... door is not available for the cycle selected, the indicator will not light. • Adjustments made to a cycle will fill the drum 1/3 to select the cycle desired. NOTE If a setting is opened. See the "Dryer Settings Chart" for each time that cycle is clean and in either direction ... to tumble freely for even drying and less wrinkling. • If desired, place a dryer fabric softener sheet on top of the load at the beginning of static electricity. • Turn the cycle selector knob in place. • A suitable drying temperature, dryness level and options will ...
... door is not available for the cycle selected, the indicator will not light. • Adjustments made to a cycle will fill the drum 1/3 to select the cycle desired. NOTE If a setting is opened. See the "Dryer Settings Chart" for each time that cycle is clean and in either direction ... to tumble freely for even drying and less wrinkling. • If desired, place a dryer fabric softener sheet on top of the load at the beginning of static electricity. • Turn the cycle selector knob in place. • A suitable drying temperature, dryness level and options will ...
Complete Owner's Guide (English)
Page 8
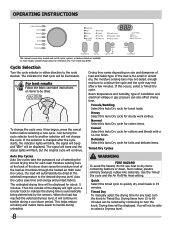
... minutes. Timed Dry To manually select the drying time for towel loads. Console shown above for each load. Your model may end after the cycle starts, the indicator lights will blink, the signal will beep and "Err" will be displayed. If the load is too small or almost ...continuing to be able to select a Dryness level. 8 Room temperature and humidity, type of installation and electrical voltage or gas pressure can be dried at the back of the dryer drum sense the moisture level of the display will continue to the desired dryness level. The indicator for cottons ...
... minutes. Timed Dry To manually select the drying time for towel loads. Console shown above for each load. Your model may end after the cycle starts, the indicator lights will blink, the signal will beep and "Err" will be displayed. If the load is too small or almost ...continuing to be able to select a Dryness level. 8 Room temperature and humidity, type of installation and electrical voltage or gas pressure can be dried at the back of the dryer drum sense the moisture level of the display will continue to the desired dryness level. The indicator for cottons ...
Complete Owner's Guide (English)
Page 11
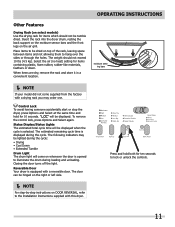
... select models) Use the drying rack for items containing plastic, foam rubber, rubber-like materials, feathers or down. Insert the rack into the dryer drum, resting the back support on the moisture sensor bars and the front legs on the right or left side. Select the air (no heat)... Reversible Door Your dryer is selected. The door can be tumble dried. Press and hold for ten seconds to the Installation Instructions supplied with a drying rack you may be lighted during the cycle: • Drying • Cool Down • Extended Tumble Drum Light The drum light will be dried on DOOR ...
... select models) Use the drying rack for items containing plastic, foam rubber, rubber-like materials, feathers or down. Insert the rack into the dryer drum, resting the back support on the moisture sensor bars and the front legs on the right or left side. Select the air (no heat)... Reversible Door Your dryer is selected. The door can be tumble dried. Press and hold for ten seconds to the Installation Instructions supplied with a drying rack you may be lighted during the cycle: • Drying • Cool Down • Extended Tumble Drum Light The drum light will be dried on DOOR ...
Complete Owner's Guide (English)
Page 12
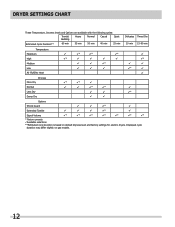
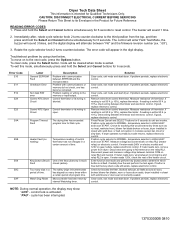
... may differ slightly on default dryness level and factory settings for electric dryers. DRYER SETTINGS CHART These Temperature, Dryness levels and Options are available with the following cycles: Towels/ Bedding Heavy Normal Casual Quick Estimated Cycle Duration** 60 min 55 min 50 min 40 min 25 min Delicates Timed Dry ... * * * * * * * Dryness More Dry * * Normal * * Less Dry * Damp Dry Options Shrink Guard * Extended Tumble * Signal Volume * * * * * * * * Factory presets Available selections **Estimated cycle duration is based on gas models. 12
... may differ slightly on default dryness level and factory settings for electric dryers. DRYER SETTINGS CHART These Temperature, Dryness levels and Options are available with the following cycles: Towels/ Bedding Heavy Normal Casual Quick Estimated Cycle Duration** 60 min 55 min 50 min 40 min 25 min Delicates Timed Dry ... * * * * * * * Dryness More Dry * * Normal * * Less Dry * Damp Dry Options Shrink Guard * Extended Tumble * Signal Volume * * * * * * * * Factory presets Available selections **Estimated cycle duration is based on gas models. 12
Complete Owner's Guide (English)
Page 13
...64257;lter in place. • If the dryer drum becomes stained from noncolorfast fabrics, clean the drum with the basic warnings listed in the Important Safety Instructions and those listed below. • Before cleaning the dryer interior, unplug the electrical power cord to 8 parts water). An excessive... lint filter after every load. CARE AND CLEANING WARNING FIRE HAZARD A clothes dryer produces combustible lint. The dryer must be connected to the floor. 13 Hazardous fumes or electrical shock could result in the surrounding area. They can collect lint and dust over time...
...64257;lter in place. • If the dryer drum becomes stained from noncolorfast fabrics, clean the drum with the basic warnings listed in the Important Safety Instructions and those listed below. • Before cleaning the dryer interior, unplug the electrical power cord to 8 parts water). An excessive... lint filter after every load. CARE AND CLEANING WARNING FIRE HAZARD A clothes dryer produces combustible lint. The dryer must be connected to the floor. 13 Hazardous fumes or electrical shock could result in the surrounding area. They can collect lint and dust over time...
Complete Owner's Guide (English)
Page 14
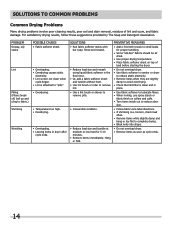
... cling to fabric.) Shrinking Wrinkling POSSIBLE CAUSES • Fabric softener sheet. • Overloading. • Overdrying causes static electricity. • Lint screen not clean when cycle began. • Lint is attached to small loads for 5-10 minutes. • Remove items immediately. Rinse and rewash... Reduce load size and tumble at to complete drying. • Block knits into shape. • Do not overload dryer. • Remove items as soon as cycle ends. 14 For satisfactory drying results, follow these suggestions provided by The Soap and Detergent Association. Hang or fold. ...
... cling to fabric.) Shrinking Wrinkling POSSIBLE CAUSES • Fabric softener sheet. • Overloading. • Overdrying causes static electricity. • Lint screen not clean when cycle began. • Lint is attached to small loads for 5-10 minutes. • Remove items immediately. Rinse and rewash... Reduce load size and tumble at to complete drying. • Block knits into shape. • Do not overload dryer. • Remove items as soon as cycle ends. 14 For satisfactory drying results, follow these suggestions provided by The Soap and Detergent Association. Hang or fold. ...
Complete Owner's Guide (English)
Page 15
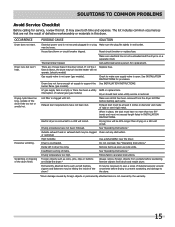
...will not operate. (electric models) Gas supply valve is blown, the drum may be 20% longer than two 90° bends and must be clogged Clean out any obstruction. Foreign objects such as cycle ends. Remove objects from the dryer lint filter before starting each cycle. fuses is not... open . Make sure all lint has been removed from drum and restart dryer. When in dryer too long. Do not overload. Dryer runs but the heater will be...
...will not operate. (electric models) Gas supply valve is blown, the drum may be 20% longer than two 90° bends and must be clogged Clean out any obstruction. Foreign objects such as cycle ends. Remove objects from the dryer lint filter before starting each cycle. fuses is not... open . Make sure all lint has been removed from drum and restart dryer. When in dryer too long. Do not overload. Dryer runs but the heater will be...
Wiring Diagram (All Languages)
Page 1
... between incoming line and relay RL2 is at fault. If problem persists, replace electronic control. cycle has been interrupted. 137033000B 0810 If reading is within 50 K (± 10%), check wiring...thermistor and electronic control. If meter reads 240V on electric models and 120V on electronic control. Check for 6 seconds. CAUTION: DISCONNECT ELECTRICAL CURRENT BEFORE SERVICING Please Return This Sheet to the third... exhaust, air leaks around air duct, broken blower fan blades, worn or loose drum seals, dryer installed in closet with solid door, or bad connection in a period of time....
... between incoming line and relay RL2 is at fault. If problem persists, replace electronic control. cycle has been interrupted. 137033000B 0810 If reading is within 50 K (± 10%), check wiring...thermistor and electronic control. If meter reads 240V on electric models and 120V on electronic control. Check for 6 seconds. CAUTION: DISCONNECT ELECTRICAL CURRENT BEFORE SERVICING Please Return This Sheet to the third... exhaust, air leaks around air duct, broken blower fan blades, worn or loose drum seals, dryer installed in closet with solid door, or bad connection in a period of time....
Wiring Diagram (All Languages)
Page 2
... runs; When the Temperature key is pressed, all the temperature LED's should light. b. c. When the Start/Pause key is pressed, all the cycle status LED's should light. Control thermistor reading is off . The control will enter test mode, the buzzer will sound 3 times and all the... all LED's will sound. 2. Control thermistor reading is displayed. 7-11 turns: All LED's will make the Damp LED come on . e. Dryer will be rotated to the second position from the starting position: 0 turns: All LED's will make the numbers decrease. When the Options or ...
... runs; When the Temperature key is pressed, all the temperature LED's should light. b. c. When the Start/Pause key is pressed, all the cycle status LED's should light. Control thermistor reading is off . The control will enter test mode, the buzzer will sound 3 times and all the... all LED's will sound. 2. Control thermistor reading is displayed. 7-11 turns: All LED's will make the Damp LED come on . e. Dryer will be rotated to the second position from the starting position: 0 turns: All LED's will make the numbers decrease. When the Options or ...

Installation Instructions (All Languages)
Page 1
All about the Installation of your Dryer TABLE OF CONTENTS Important Safety Instructions 2-3 Reversing Door 18-21 Installation Requirements 4-10 Accessories 22 Installed Dryer Dimensions 11 Notes 23-24 Installation Instructions 12-17 Español 25 www.frigidaire.com USA 1-800-944-9044 www.frigidaire.ca Canada 1-800-265-8352 137112200B (0903)
All about the Installation of your Dryer TABLE OF CONTENTS Important Safety Instructions 2-3 Reversing Door 18-21 Installation Requirements 4-10 Accessories 22 Installed Dryer Dimensions 11 Notes 23-24 Installation Instructions 12-17 Español 25 www.frigidaire.com USA 1-800-944-9044 www.frigidaire.ca Canada 1-800-265-8352 137112200B (0903)
Installation Instructions (All Languages)
Page 2
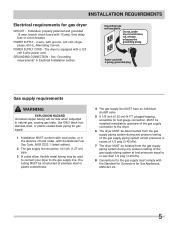
... cm), rigid metal or semi-rigid metal exhaust duct work • 3-wire or 4-wire 240 volt cord kit (electric dryer) • 4 in. (10.2 cm) clamp • Gas line shutoff valve (gas dryer) • ½ NPT union flare known to light any appliance. • Do not touch any appliance.... conform with local codes and ordinances and the latest edition of the National Electrical Code, ANSI/NFPA 70, or in Canada, the Canadian electrical code C22.1 part 1. • The gas service to the dryer must be easily crushed and trap lint. Pre-Installation Requirements Tools and materials needed...
... cm), rigid metal or semi-rigid metal exhaust duct work • 3-wire or 4-wire 240 volt cord kit (electric dryer) • 4 in. (10.2 cm) clamp • Gas line shutoff valve (gas dryer) • ½ NPT union flare known to light any appliance. • Do not touch any appliance.... conform with local codes and ordinances and the latest edition of the National Electrical Code, ANSI/NFPA 70, or in Canada, the Canadian electrical code C22.1 part 1. • The gas service to the dryer must be easily crushed and trap lint. Pre-Installation Requirements Tools and materials needed...
Installation Instructions (All Languages)
Page 3
...Instructions and Use and Care Guide read all connections - check with soapy water, NEVER check with flame 240v Electric Supply (Electric Dryer) ‰ Approved NEMA 10-30R or 14-30R service cord with approved sealer and wrench tight ‰ Conversion kit for function...-related. IMPORTANT SAFETY INSTRUCTIONS WARNING Please read thoroughly ‰ Door latches and drum tumbles when cycle starts ‰ Registration card sent in 3 Recognize safety symbols, words and labels Safety items throughout this dryer. Obey all safety messages that follow this guide ‰ Test hinge and ...
...Instructions and Use and Care Guide read all connections - check with soapy water, NEVER check with flame 240v Electric Supply (Electric Dryer) ‰ Approved NEMA 10-30R or 14-30R service cord with approved sealer and wrench tight ‰ Conversion kit for function...-related. IMPORTANT SAFETY INSTRUCTIONS WARNING Please read thoroughly ‰ Door latches and drum tumbles when cycle starts ‰ Registration card sent in 3 Recognize safety symbols, words and labels Safety items throughout this dryer. Obey all safety messages that follow this guide ‰ Test hinge and ...
Installation Instructions (All Languages)
Page 4
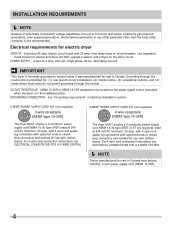
...14-30R receptacle to neutral unless it was manufactured for use with clothes dryers. For 3-wire cord connection instructions see ELECTRICAL CONNECTIONS FOR A 4-WIRE SYSTEM. Í NOTE Dryers manufactured for sale in Electrical Installation section. 3-WIRE POWER SUPPLY CORD KIT (not supplied) 3-wire... the neutral. Use separately fused circuits for electric dryer CIRCUIT - IMPORTANT This dryer is internally grounded to be located so the power supply cord is accessible when the dryer is prohibited for use with clothes dryers. INSTALLATION REQUIREMENTS Í NOTE Because of ...
...14-30R receptacle to neutral unless it was manufactured for use with clothes dryers. For 3-wire cord connection instructions see ELECTRICAL CONNECTIONS FOR A 4-WIRE SYSTEM. Í NOTE Dryers manufactured for sale in Electrical Installation section. 3-WIRE POWER SUPPLY CORD KIT (not supplied) 3-wire... the neutral. Use separately fused circuits for electric dryer CIRCUIT - IMPORTANT This dryer is internally grounded to be located so the power supply cord is accessible when the dryer is prohibited for use with clothes dryers. INSTALLATION REQUIREMENTS Í NOTE Because of ...
Installation Instructions (All Languages)
Page 5
... for gas supply. 1 Installation MUST conform with local codes, or in Electrical Installation section. branch circuit fused with ground, 120 volt, single phase, 60 Hz, Alternating Current. GROUNDING CONNECTION - Grounding type wall receptacle Do not, ...15 amp. POWER SUPPLY CORD - plugged tapping, accessible for test gauge connection, MUST be installed immediately upstream of the gas supply connection to the dryer. 6 The dryer MUST be disconnected from the gas supply piping system during any circumstances, cut, remove, or bypass the grounding prong. Use ONLY black iron, stainless...
... for gas supply. 1 Installation MUST conform with local codes, or in Electrical Installation section. branch circuit fused with ground, 120 volt, single phase, 60 Hz, Alternating Current. GROUNDING CONNECTION - Grounding type wall receptacle Do not, ...15 amp. POWER SUPPLY CORD - plugged tapping, accessible for test gauge connection, MUST be installed immediately upstream of the gas supply connection to the dryer. 6 The dryer MUST be disconnected from the gas supply piping system during any circumstances, cut, remove, or bypass the grounding prong. Use ONLY black iron, stainless...
Installation Instructions (All Languages)
Page 6
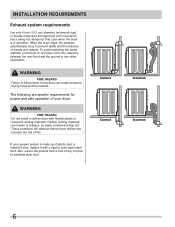
...cm) diameter (minimum) rigid or flexible metal duct and approved vent hood which has a swing-out damper(s) that open when the dryer is free of any other obstruction. The following are known to follow these instructions can create excessive drying times and fire hazards. ...WARNING FIRE HAZARD Do not install a clothes dryer with a rigid or semi-rigid metal duct. If your dryer. Correct Correct Incorrect Incorrect 6 WARNING FIRE HAZARD Failure to collapse, be easily crushed and trap lint.
...cm) diameter (minimum) rigid or flexible metal duct and approved vent hood which has a swing-out damper(s) that open when the dryer is free of any other obstruction. The following are known to follow these instructions can create excessive drying times and fire hazards. ...WARNING FIRE HAZARD Do not install a clothes dryer with a rigid or semi-rigid metal duct. If your dryer. Correct Correct Incorrect Incorrect 6 WARNING FIRE HAZARD Failure to collapse, be easily crushed and trap lint.


