Complete Owner's Guide (English)
Page 2
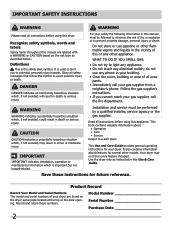
...for future reference. pants. • Immediately call the fire department. Read all safety messages that follow this or any electrical switch; This Use and Care Guide provides general operating instructions for several other appliance. Recognize safety symbols, words and labels Safety ...based on the dryer serial plate located at the top of your gas supplier, call your dryer. Product Record Record Your Model and Serial Numbers The model and serial numbers of the door opening. Installation and service must be performed by a qualified installer, service agency ...
...for future reference. pants. • Immediately call the fire department. Read all safety messages that follow this or any electrical switch; This Use and Care Guide provides general operating instructions for several other appliance. Recognize safety symbols, words and labels Safety ...based on the dryer serial plate located at the top of your gas supplier, call your dryer. Product Record Record Your Model and Serial Numbers The model and serial numbers of the door opening. Installation and service must be performed by a qualified installer, service agency ...
Complete Owner's Guide (English)
Page 3
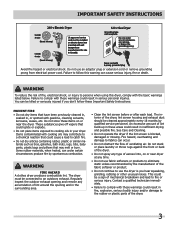
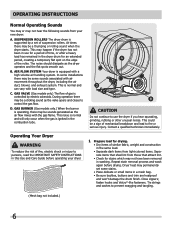
... or other unusual noises. WARNING FIRE HAZARD A clothes dryer produces combustible lint. An excessive amount of ventilating air. The dryer must be installed on electric dryers (not provided with 3-prong grounded plug Avoid fire hazard or electrical shock. Do not stack or place laundry or throw ...rugs against the front or back of the dryer. • Do not spray any...
... or other unusual noises. WARNING FIRE HAZARD A clothes dryer produces combustible lint. An excessive amount of ventilating air. The dryer must be installed on electric dryers (not provided with 3-prong grounded plug Avoid fire hazard or electrical shock. Do not stack or place laundry or throw ...rugs against the front or back of the dryer. • Do not spray any...
Complete Owner's Guide (English)
Page 4
... the motor in the unlikely event of all warnings on or in the dryer for the installer's reference. Never ground the dryer to INSTALLATION INSTRUCTIONS for play on product labels. • Before the dryer is removed from the electrical supply before reaching into the drum. Do not use an extension cord or an adaptor plug. • ALWAYS...
... the motor in the unlikely event of all warnings on or in the dryer for the installer's reference. Never ground the dryer to INSTALLATION INSTRUCTIONS for play on product labels. • Before the dryer is removed from the electrical supply before reaching into the drum. Do not use an extension cord or an adaptor plug. • ALWAYS...
Complete Owner's Guide (English)
Page 6
...in this Use and Care Guide before drying. GAS BURNER (Gas models only.) When the burner is ignited in the dryer drum for stains which may be a sign of fire, electric shock or injury to prevent snagging and tangling. (Mesh bag not included.) 6 This could be some stains. •... flat spots smooth out. This may happen if the dryer has not been in washing. In some installations there may not have been removed in use the dryer if you hear squeaking, grinding, rubbing or other unusual noises. D. Dryer heat may be sounds generated as the valve opens and closes ...
...in this Use and Care Guide before drying. GAS BURNER (Gas models only.) When the burner is ignited in the dryer drum for stains which may be a sign of fire, electric shock or injury to prevent snagging and tangling. (Mesh bag not included.) 6 This could be some stains. •... flat spots smooth out. This may happen if the dryer has not been in washing. In some installations there may not have been removed in use the dryer if you hear squeaking, grinding, rubbing or other unusual noises. D. Dryer heat may be sounds generated as the valve opens and closes ...
Complete Owner's Guide (English)
Page 8
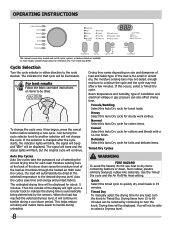
... load will be displayed. Then the outside of the display will light up in a circular track to continue the cycle and the cycle may end after the cycle starts, the indicator lights will blink, the signal will beep and "Err" will be displayed. If the load is automatically being determined... to dry items containing feathers or down period. Drying time varies depending on size and dampness of installation and electrical voltage or gas pressure can be dried at the back of the dryer drum sense the moisture level of selecting the correct drying time for any load, turn the knob. Towels...
... load will be displayed. Then the outside of the display will light up in a circular track to continue the cycle and the cycle may end after the cycle starts, the indicator lights will blink, the signal will beep and "Err" will be displayed. If the load is automatically being determined... to dry items containing feathers or down period. Drying time varies depending on size and dampness of installation and electrical voltage or gas pressure can be dried at the back of the dryer drum sense the moisture level of selecting the correct drying time for any load, turn the knob. Towels...
Complete Owner's Guide (English)
Page 11
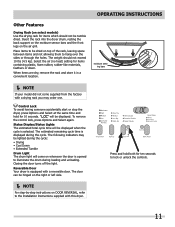
Insert the rack into the dryer drum, resting the back support on the moisture sensor bars and the front legs on DOOR REVERSAL, refer to lock or unlock the controls. "LOC" will be displayed when the cycle is opened to illuminate the drum during loading and unloading. To remove the control ...or left side. Control Lock To avoid having someone accidentally start or stop the dryer, press Options and Select at the same time and hold both for ten seconds to the Installation Instructions supplied with this dryer. 11 Select the air (no heat) setting for items containing plastic, foam ...
Insert the rack into the dryer drum, resting the back support on the moisture sensor bars and the front legs on DOOR REVERSAL, refer to lock or unlock the controls. "LOC" will be displayed when the cycle is opened to illuminate the drum during loading and unloading. To remove the control ...or left side. Control Lock To avoid having someone accidentally start or stop the dryer, press Options and Select at the same time and hold both for ten seconds to the Installation Instructions supplied with this dryer. 11 Select the air (no heat) setting for items containing plastic, foam ...
Complete Owner's Guide (English)
Page 15
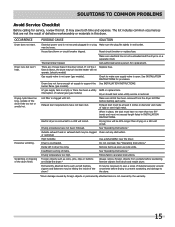
...rigid or semi-rigid metal. fuses is blown, the drum may be loose. See INSTALLATION INSTRUCTIONS for replacement. LP gas supply tank is connected to a 208 volt circuit. Make sure all lint has been removed from drum and restart dryer. Electric dryer is empty or there has been a utility Re&#...lter is on a 240 volt circuit. Exhaust duct requirements have enough air supply to the dryer. *Drum damage caused by the warranty. 15 Do not overload. Drying cycle takes too long, outside of the drum.* It may save both time and expense. Foreign objects such as coins, pins, clips...
...rigid or semi-rigid metal. fuses is blown, the drum may be loose. See INSTALLATION INSTRUCTIONS for replacement. LP gas supply tank is connected to a 208 volt circuit. Make sure all lint has been removed from drum and restart dryer. Electric dryer is empty or there has been a utility Re&#...lter is on a 240 volt circuit. Exhaust duct requirements have enough air supply to the dryer. *Drum damage caused by the warranty. 15 Do not overload. Drying cycle takes too long, outside of the drum.* It may save both time and expense. Foreign objects such as coins, pins, clips...
Complete Owner's Guide (English)
Page 16
...Surcharges including, but not limited to any parts of Electrolux Home Products, Inc. Damages to the finish of appliance or home incurred during installation, including but not limited to any after hour, weekend, or holiday service calls, tolls, ferry trip charges, or mileage expense for ...are not covered by this appliance that have been removed, altered or cannot be defective in materials or workmanship when such appliance is installed, used in accordance with the provided instructions. 8. Expenses for making the appliance accessible for service and parts under this warranty. ...
...Surcharges including, but not limited to any parts of Electrolux Home Products, Inc. Damages to the finish of appliance or home incurred during installation, including but not limited to any after hour, weekend, or holiday service calls, tolls, ferry trip charges, or mileage expense for ...are not covered by this appliance that have been removed, altered or cannot be defective in materials or workmanship when such appliance is installed, used in accordance with the provided instructions. 8. Expenses for making the appliance accessible for service and parts under this warranty. ...
Wiring Diagram (All Languages)
Page 1
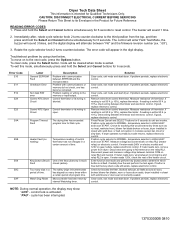
... START. If meter reads 120V, check the rest of the keys (buttons) is stuck Fault closed (active). CAUTION: DISCONNECT ELECTRICAL CURRENT BEFORE SERVICING Please Return This Sheet to its wiring is shorted. To clear code, press the Select button. Key (button...drum seals, dryer installed in a certain amount of program time. Press Pause Cancel and SELECT buttons for Qualified Technicians Only. Reconnect power and measure voltage drop between "Fld" and the firmware revision number (ex. If meter reads zero, wire between thermistor and electronic control. Immediately after, rotate cycle...
... START. If meter reads 120V, check the rest of the keys (buttons) is stuck Fault closed (active). CAUTION: DISCONNECT ELECTRICAL CURRENT BEFORE SERVICING Please Return This Sheet to its wiring is shorted. To clear code, press the Select button. Key (button...drum seals, dryer installed in a certain amount of program time. Press Pause Cancel and SELECT buttons for Qualified Technicians Only. Reconnect power and measure voltage drop between "Fld" and the firmware revision number (ex. If meter reads zero, wire between thermistor and electronic control. Immediately after, rotate cycle...
Installation Instructions (All Languages)
Page 1
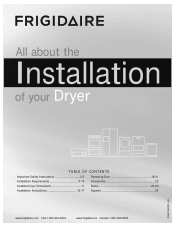
All about the Installation of your Dryer TABLE OF CONTENTS Important Safety Instructions 2-3 Reversing Door 18-21 Installation Requirements 4-10 Accessories 22 Installed Dryer Dimensions 11 Notes 23-24 Installation Instructions 12-17 Español 25 www.frigidaire.com USA 1-800-944-9044 www.frigidaire.ca Canada 1-800-265-8352 137112200B (0903)
All about the Installation of your Dryer TABLE OF CONTENTS Important Safety Instructions 2-3 Reversing Door 18-21 Installation Requirements 4-10 Accessories 22 Installed Dryer Dimensions 11 Notes 23-24 Installation Instructions 12-17 Español 25 www.frigidaire.com USA 1-800-944-9044 www.frigidaire.ca Canada 1-800-265-8352 137112200B (0903)
Installation Instructions (All Languages)
Page 2
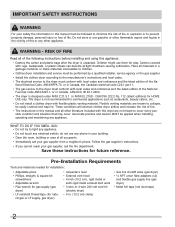
... or area of all of the following instructions before installing and using this manual must be performed by a qualified installer, service agency or the gas supplier. • Install the clothes dryer according to the manufacturer's instructions and local codes. • The electrical service to the dryer must conform with local codes and ordinances and...
... or area of all of the following instructions before installing and using this manual must be performed by a qualified installer, service agency or the gas supplier. • Install the clothes dryer according to the manufacturer's instructions and local codes. • The electrical service to the dryer must conform with local codes and ordinances and...
Installation Instructions (All Languages)
Page 3
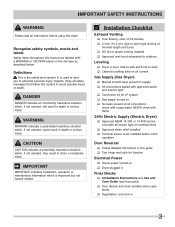
... result in death or serious injury. IMPORTANT IMPORTANT indicates installation, operation or maintenance information which , if not avoided, may result in minor or moderate injury. It is important but not hazard-related. check with soapy water, NEVER check with flame 240v Electric Supply (Electric Dryer) ‰ Approved NEMA 10-30R or 14-30R... hazardous situation which is used to alert you to avoid possible injury or death. IMPORTANT SAFETY INSTRUCTIONS WARNING Please read thoroughly ‰ Door latches and drum tumbles when cycle starts ‰ Registration card sent in 3
... result in death or serious injury. IMPORTANT IMPORTANT indicates installation, operation or maintenance information which , if not avoided, may result in minor or moderate injury. It is important but not hazard-related. check with soapy water, NEVER check with flame 240v Electric Supply (Electric Dryer) ‰ Approved NEMA 10-30R or 14-30R... hazardous situation which is used to alert you to avoid possible injury or death. IMPORTANT SAFETY INSTRUCTIONS WARNING Please read thoroughly ‰ Door latches and drum tumbles when cycle starts ‰ Registration card sent in 3
Installation Instructions (All Languages)
Page 4
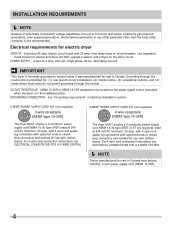
Individual 30 amp. See "Grounding requirements" in Electrical Installation section. 3-WIRE POWER SUPPLY CORD KIT (not supplied) 3-wire receptacle (NEMA type 10-30R) The dryer MUST employ a 3-conductor power supply cord NEMA 10-30 type ...ELECTRICAL CONNECTIONS FOR A 4-WIRE SYSTEM. Í NOTE Dryers manufactured for washer and dryer. branch circuit fused with upturned ends or closed loop connectors and marked for sale in Canada. GROUNDING CONNECTION - DO NOT operate a washer and a dryer on the same circuit. OUTLET RECEPTACLE - Grounding through the neutral. INSTALLATION...
Individual 30 amp. See "Grounding requirements" in Electrical Installation section. 3-WIRE POWER SUPPLY CORD KIT (not supplied) 3-wire receptacle (NEMA type 10-30R) The dryer MUST employ a 3-conductor power supply cord NEMA 10-30 type ...ELECTRICAL CONNECTIONS FOR A 4-WIRE SYSTEM. Í NOTE Dryers manufactured for washer and dryer. branch circuit fused with upturned ends or closed loop connectors and marked for sale in Canada. GROUNDING CONNECTION - DO NOT operate a washer and a dryer on the same circuit. OUTLET RECEPTACLE - Grounding through the neutral. INSTALLATION...
Installation Instructions (All Languages)
Page 5
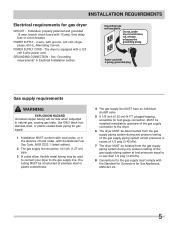
... equal to or less than 1/2 psig (3.45 kPa). 8 Connections for gas dryer CIRCUIT - The dryer is equipped with ground, 120 volt, single phase, 60 Hz, Alternating Current. Individual, properly polarized and grounded 15 amp. Power cord with 15 amp. INSTALLATION REQUIREMENTS Electrical requirements for the gas supply must comply with the National Fuel Gas...
... equal to or less than 1/2 psig (3.45 kPa). 8 Connections for gas dryer CIRCUIT - The dryer is equipped with ground, 120 volt, single phase, 60 Hz, Alternating Current. Individual, properly polarized and grounded 15 amp. Power cord with 15 amp. INSTALLATION REQUIREMENTS Electrical requirements for the gas supply must comply with the National Fuel Gas...
Installation Instructions (All Languages)
Page 6
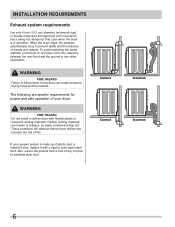
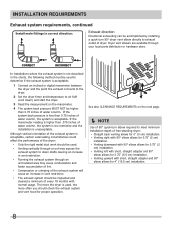
...increase the risk of fire. Also, ensure the present duct is free of any other obstruction. WARNING FIRE HAZARD Do not install a clothes dryer with a rigid or semi-rigid metal duct. To avoid restricting the outlet, maintain a minimum of 12 inches (30.5 cm) ... excessive drying times and fire hazards. The following are known to installing dryer duct. Flexible venting materials are specific requirements for proper and safe operation of your present system is in operation. INSTALLATION REQUIREMENTS Exhaust system requirements Use only 4 inch (10.2 cm) diameter (...
...increase the risk of fire. Also, ensure the present duct is free of any other obstruction. WARNING FIRE HAZARD Do not install a clothes dryer with a rigid or semi-rigid metal duct. To avoid restricting the outlet, maintain a minimum of 12 inches (30.5 cm) ... excessive drying times and fire hazards. The following are known to installing dryer duct. Flexible venting materials are specific requirements for proper and safe operation of your present system is in operation. INSTALLATION REQUIREMENTS Exhaust system requirements Use only 4 inch (10.2 cm) diameter (...

Installation Instructions (All Languages)
Page 7
...an accumulation of a building. Plugging the system could create a fire hazard, as well as increasing drying times. The dryer MUST NOT be exhausted outdoors. Lint can become caught in the screen, on the screws or rivets, clogging the duct work ... of air. 4" (10.2cm) louvered 2.5" (6.35cm) 0 64 ft. (19.5 m) 48 ft. (14.6 m) 1 52 ft. (15.9 m) 40 ft. (12.2 m) 2 44 ft. (13.5 m) 32 ft. (9.8 m) 3 32 ft. (9.8 m) 24 ft. (7.3 m) 4 28 ft. (9.5 m) 16 ft. (4.9 m) WARNING FIRE HAZARD • Do not install flexible plastic or flexible foil venting material. • ...
...an accumulation of a building. Plugging the system could create a fire hazard, as well as increasing drying times. The dryer MUST NOT be exhausted outdoors. Lint can become caught in the screen, on the screws or rivets, clogging the duct work ... of air. 4" (10.2cm) louvered 2.5" (6.35cm) 0 64 ft. (19.5 m) 48 ft. (14.6 m) 1 52 ft. (15.9 m) 40 ft. (12.2 m) 2 44 ft. (13.5 m) 32 ft. (9.8 m) 3 32 ft. (9.8 m) 24 ft. (7.3 m) 4 28 ft. (9.5 m) 16 ft. (4.9 m) WARNING FIRE HAZARD • Do not install flexible plastic or flexible foil venting material. • ...
Installation Instructions (All Languages)
Page 8
...90° elbow allows for 4" (10.5 cm) installation. 8 See also CLEARANCE REQUIREMENTS on the manometer. 4 The system back pressure MUST NOT be accomplished by installing a quick-turn elbow required to exhaust outlet of dryer. Although vertical orientation of the exhaust system is used...of 90° quick-turn 90° dryer vent elbow directly to meet minimum installation depth of free-standing dryer: • Straight back venting allows for 0" (0 cm) installation. • Venting right with 90° elbow allows for 0.75" (2 cm) installation. • Venting downward with 90° ...
...90° elbow allows for 4" (10.5 cm) installation. 8 See also CLEARANCE REQUIREMENTS on the manometer. 4 The system back pressure MUST NOT be accomplished by installing a quick-turn elbow required to exhaust outlet of dryer. Although vertical orientation of the exhaust system is used...of 90° quick-turn 90° dryer vent elbow directly to meet minimum installation depth of free-standing dryer: • Straight back venting allows for 0" (0 cm) installation. • Venting right with 90° elbow allows for 0.75" (2 cm) installation. • Venting downward with 90° ...
Installation Instructions (All Languages)
Page 9
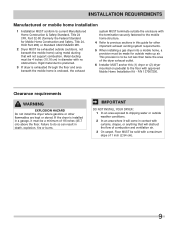
... 3 On carpet. P/N 137067200. This provision is installed in diameter with approved Mobile Home Installation Kit - Clearance requirements WARNING EXPLOSION HAZARD Do not install the dryer where gasoline or other important exhaust venting system requirements. 5 When installing a gas dryer into a mobile home, a provision must be made.... Metal ducting must be solid with curtains, drapes, or anything that will obstruct the flow of the dryer exhaust outlet. 6 Installer MUST anchor this guide for other flammables are kept or stored. Failure to do so can result in ...
... 3 On carpet. P/N 137067200. This provision is installed in diameter with approved Mobile Home Installation Kit - Clearance requirements WARNING EXPLOSION HAZARD Do not install the dryer where gasoline or other important exhaust venting system requirements. 5 When installing a gas dryer into a mobile home, a provision must be made.... Metal ducting must be solid with curtains, drapes, or anything that will obstruct the flow of the dryer exhaust outlet. 6 Installer MUST anchor this guide for other flammables are kept or stored. Failure to do so can result in ...

Installation Instructions (All Languages)
Page 10
...²) Í NOTE To achieve an installation with equivalent air openings for other than straight back venting, a quick-turn 90° dryer vent elbow must be installed to be installed as the gas dryer. 3 Your dryer needs the space around it for proper ventilation... 60 sq. A louvered door with 0" (0 cm) clearance for the back of the dryer (for the full length of the door is installed. INSTALLATION REQUIREMENTS Clearance requirements, continued Installation in a Recess or Closet 1 A dryer installed in a bedroom, bathroom, recess or closet, MUST be exhausted outdoors. 2 No other ...
...²) Í NOTE To achieve an installation with equivalent air openings for other than straight back venting, a quick-turn 90° dryer vent elbow must be installed to be installed as the gas dryer. 3 Your dryer needs the space around it for proper ventilation... 60 sq. A louvered door with 0" (0 cm) clearance for the back of the dryer (for the full length of the door is installed. INSTALLATION REQUIREMENTS Clearance requirements, continued Installation in a Recess or Closet 1 A dryer installed in a bedroom, bathroom, recess or closet, MUST be exhausted outdoors. 2 No other ...
Installation Instructions (All Languages)
Page 11
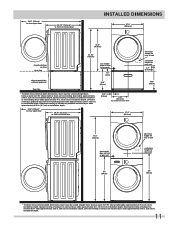
...-mounted or freestanding dryer adds approximately 3.75 in . (5.7 cm) to installation depth. 50.8" (129cm)* to clear open door 29.75" (75.5cm)* to front of closed door 16.9" (43cm) 3.75" (9.5cm) 13.50" (34.5cm) to center of rear vent 27.0" (68.5cm) electrical supply on rear ...of gas unit 37" (94cm) electrical supply on rear of unit centerline height for rear vent 39" (99cm) * To obtain these minimal depth dimensions, dryer must be vented straight back. Upward venting of exhaust on stacked dryer adds approximately 4 in . (10.2 cm) to installation depth. Upward venting of exhaust ...
...-mounted or freestanding dryer adds approximately 3.75 in . (5.7 cm) to installation depth. 50.8" (129cm)* to clear open door 29.75" (75.5cm)* to front of closed door 16.9" (43cm) 3.75" (9.5cm) 13.50" (34.5cm) to center of rear vent 27.0" (68.5cm) electrical supply on rear ...of gas unit 37" (94cm) electrical supply on rear of unit centerline height for rear vent 39" (99cm) * To obtain these minimal depth dimensions, dryer must be vented straight back. Upward venting of exhaust on stacked dryer adds approximately 4 in . (10.2 cm) to installation depth. Upward venting of exhaust ...


