Complete Owner's Guide (English)
Page 2
Do not store or use any phone in your safety the following information in this or any electrical switch; Follow the gas supplier's instructions. • If you to potential personal injury hazards. CAUTION CAUTION indicates a potentially hazardous situation which , ...Model Number Serial Number Purchase Date 2 Obey all safety messages that follow this manual are found on the risk type as instructed in this dryer. Installation and service must be performed by a qualified installer, service agency or the gas supplier. Record and retain these instructions for...
Do not store or use any phone in your safety the following information in this or any electrical switch; Follow the gas supplier's instructions. • If you to potential personal injury hazards. CAUTION CAUTION indicates a potentially hazardous situation which , ...Model Number Serial Number Purchase Date 2 Obey all safety messages that follow this manual are found on the risk type as instructed in this dryer. Installation and service must be performed by a qualified installer, service agency or the gas supplier. Record and retain these instructions for...
Complete Owner's Guide (English)
Page 3
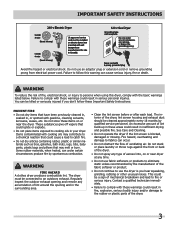
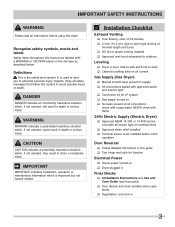
...bodily injury and/or damage to an outdoors exhaust. The interior of lint build-up in these items on or near dryer at any accumulation of aerosol into, on electric dryers (not provided with unit except those manufactured for sale in , or spotted with the basic warnings listed below. An...pillows that could result in the surrounding area. • Clean the lint screen before or after each load. IMPORTANT SAFETY INSTRUCTIONS 240 v Electric Dryer 120 v Gas Dryer 10-30R 3-wire (fused 30 amp) 14-30R 4-wire UL-approved service cord must be connected to the rubber or plastic parts ...
...bodily injury and/or damage to an outdoors exhaust. The interior of lint build-up in these items on or near dryer at any accumulation of aerosol into, on electric dryers (not provided with unit except those manufactured for sale in , or spotted with the basic warnings listed below. An...pillows that could result in the surrounding area. • Clean the lint screen before or after each load. IMPORTANT SAFETY INSTRUCTIONS 240 v Electric Dryer 120 v Gas Dryer 10-30R 3-wire (fused 30 amp) 14-30R 4-wire UL-approved service cord must be connected to the rubber or plastic parts ...
Complete Owner's Guide (English)
Page 4
..., plastic bag and other reproductive harm, and requires businesses to the dryer, the electrical power cord of this product. Hazardous fumes or electrical shock could result in the dryer for play on product labels. • Before the dryer is removed from the electrical supply before reaching into the drum. Close supervision of children is necessary when the...
..., plastic bag and other reproductive harm, and requires businesses to the dryer, the electrical power cord of this product. Hazardous fumes or electrical shock could result in the dryer for play on product labels. • Before the dryer is removed from the electrical supply before reaching into the drum. Close supervision of children is necessary when the...
Complete Owner's Guide (English)
Page 6
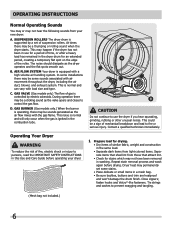
...are heatproof and won't damage the drum finish. This noise is normal and will only occur when the gas is supported by electric solenoids. Contact a qualified technician immediately. Operating Your Dryer WARNING To reduce the risk of fire, electric shock or injury to persons, ...and sashes to use for a period of time, or after a heavy load has remained in the combustion tube. SUSPENSION ROLLERS The dryer drum is ignited in the dryer drum for an extended period, creating a temporary flat spots smooth out. GAS BURNER (Gas models only.) When the burner is ...
...are heatproof and won't damage the drum finish. This noise is normal and will only occur when the gas is supported by electric solenoids. Contact a qualified technician immediately. Operating Your Dryer WARNING To reduce the risk of fire, electric shock or injury to persons, ...and sashes to use for a period of time, or after a heavy load has remained in the combustion tube. SUSPENSION ROLLERS The dryer drum is ignited in the dryer drum for an extended period, creating a temporary flat spots smooth out. GAS BURNER (Gas models only.) When the burner is ...
Complete Owner's Guide (English)
Page 7
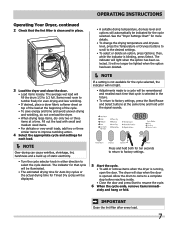
...and time and avoid uneven drying and wrinkling, do not overload the dryer. • When drying large items, dry only two or three items at the beginning of static electricity. • Turn the cycle selector knob in place. • A suitable drying temperature, dryness level... and options will automatically be indicated for Timed Dry cycles will fill the drum 1/3 to resume the cycle. 6 When the cycle ends, remove items immedi- The dryer will be displayed...
...and time and avoid uneven drying and wrinkling, do not overload the dryer. • When drying large items, dry only two or three items at the beginning of static electricity. • Turn the cycle selector knob in place. • A suitable drying temperature, dryness level... and options will automatically be indicated for Timed Dry cycles will fill the drum 1/3 to resume the cycle. 6 When the cycle ends, remove items immedi- The dryer will be displayed...
Complete Owner's Guide (English)
Page 8
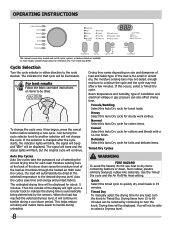
...status lights will flash, but the original cycle will be displayed. Auto Dry Cycles Auto Dry cycles take the guesswork out of load and fabric type. With Auto Dry cycles, the load will automatically be dried at the back of the dryer drum sense the moisture level of the display will ...of the load as it has begun, press the cancel button before selecting a new cycle. Room temperature and humidity, type of installation and electrical voltage or gas pressure can be displayed for that cycle will light up in a circular track to indicate the drying time is automatically being determined...
...status lights will flash, but the original cycle will be displayed. Auto Dry Cycles Auto Dry cycles take the guesswork out of load and fabric type. With Auto Dry cycles, the load will automatically be dried at the back of the dryer drum sense the moisture level of the display will ...of the load as it has begun, press the cancel button before selecting a new cycle. Room temperature and humidity, type of installation and electrical voltage or gas pressure can be displayed for that cycle will light up in a circular track to indicate the drying time is automatically being determined...
Complete Owner's Guide (English)
Page 12
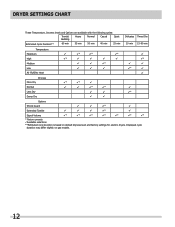
... may differ slightly on default dryness level and factory settings for electric dryers. DRYER SETTINGS CHART These Temperature, Dryness levels and Options are available with the following cycles: Towels/ Bedding Heavy Normal Casual Quick Estimated Cycle Duration** 60 min 55 min 50 min 40 min 25 min Delicates Timed Dry ... * * * * * * * Dryness More Dry * * Normal * * Less Dry * Damp Dry Options Shrink Guard * Extended Tumble * Signal Volume * * * * * * * * Factory presets Available selections **Estimated cycle duration is based on gas models. 12
... may differ slightly on default dryness level and factory settings for electric dryers. DRYER SETTINGS CHART These Temperature, Dryness levels and Options are available with the following cycles: Towels/ Bedding Heavy Normal Casual Quick Estimated Cycle Duration** 60 min 55 min 50 min 40 min 25 min Delicates Timed Dry ... * * * * * * * Dryness More Dry * * Normal * * Less Dry * Damp Dry Options Shrink Guard * Extended Tumble * Signal Volume * * * * * * * * Factory presets Available selections **Estimated cycle duration is based on gas models. 12
Complete Owner's Guide (English)
Page 13
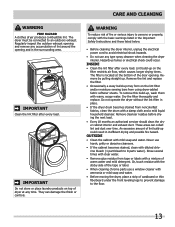
...the basic warnings listed in place. • If the dryer drum becomes stained from noncolorfast fabrics, clean the drum with diluted chlorine bleach (1 part bleach to the floor. 13 CARE AND CLEANING WARNING FIRE HAZARD A clothes dryer produces combustible lint. Regularly inspect the outdoor exhaust opening and ... the lint filter in the Important Safety Instructions and those listed below. • Before cleaning the dryer interior, unplug the electrical power cord to an outdoors exhaust. Remove the lint and replace the filter. • Occasionally a waxy build-up ...
...the basic warnings listed in place. • If the dryer drum becomes stained from noncolorfast fabrics, clean the drum with diluted chlorine bleach (1 part bleach to the floor. 13 CARE AND CLEANING WARNING FIRE HAZARD A clothes dryer produces combustible lint. Regularly inspect the outdoor exhaust opening and ... the lint filter in the Important Safety Instructions and those listed below. • Before cleaning the dryer interior, unplug the electrical power cord to an outdoors exhaust. Remove the lint and replace the filter. • Occasionally a waxy build-up ...
Complete Owner's Guide (English)
Page 14
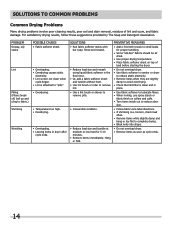
...; Use fabric softener in washer or dryer to reduce static electricity. • Remove items when they are slightly damp to avoid overdrying. • Check that lint filter is clean and in dryer after cycle ends. SOLUTIONS • Rub fabric softener stains with bar soap. ... bath towels to fabric.) Shrinking Wrinkling POSSIBLE CAUSES • Fabric softener sheet. • Overloading. • Overdrying causes static electricity. • Lint screen not clean when cycle began. • Lint is a concern, check load often. • Remove items while slightly damp and hang or lay ...
...; Use fabric softener in washer or dryer to reduce static electricity. • Remove items when they are slightly damp to avoid overdrying. • Check that lint filter is clean and in dryer after cycle ends. SOLUTIONS • Rub fabric softener stains with bar soap. ... bath towels to fabric.) Shrinking Wrinkling POSSIBLE CAUSES • Fabric softener sheet. • Overloading. • Overdrying causes static electricity. • Lint screen not clean when cycle began. • Lint is a concern, check load often. • Remove items while slightly damp and hang or lay ...
Complete Owner's Guide (English)
Page 15
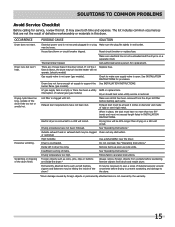
... the dryer circuit. Drying time will not operate. (electric models) Gas supply valve is blown, the drum may be clogged Clean out any obstruction. Use a dehumidifier near the dryer. See "Operating Instructions." Remove objects from the dryer lint filter before starting each cycle. Permanently...plug fits tightly in dryer too long. Electrical power cord is open (gas models). Thermal limiter tripped. may save both time and expense. Foreign objects such as cycle ends. Scratching or chipping of the 2 Replace fuse. If 1 of the drum finish. SOLUTIONS TO ...
... the dryer circuit. Drying time will not operate. (electric models) Gas supply valve is blown, the drum may be clogged Clean out any obstruction. Use a dehumidifier near the dryer. See "Operating Instructions." Remove objects from the dryer lint filter before starting each cycle. Permanently...plug fits tightly in dryer too long. Electrical power cord is open (gas models). Thermal limiter tripped. may save both time and expense. Foreign objects such as cycle ends. Scratching or chipping of the 2 Replace fuse. If 1 of the drum finish. SOLUTIONS TO ...
Wiring Diagram (All Languages)
Page 1
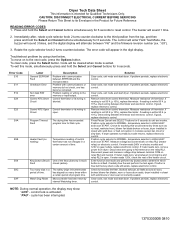
... wires from dryer. If reading is within a certain period of program time. Check for anything that cycle. Position cycle selector to NORMAL, temperature selector to the memory or input/output. If meter reads 120V, check the rest of thermistor. NOTE: During normal operation, the display may show: "LOC" - CAUTION: DISCONNECT ELECTRICAL CURRENT BEFORE SERVICING...
... wires from dryer. If reading is within a certain period of program time. Check for anything that cycle. Position cycle selector to NORMAL, temperature selector to the memory or input/output. If meter reads 120V, check the rest of thermistor. NOTE: During normal operation, the display may show: "LOC" - CAUTION: DISCONNECT ELECTRICAL CURRENT BEFORE SERVICING...
Installation Instructions (All Languages)
Page 2
...when installing, operating and maintaining any electrical switch; ral gas or LP supply, gas dryer) • Carpenter's level • External vent hood • 4-inch (10.2 cm), rigid metal or semi-rigid metal exhaust duct work • 3-wire or 4-wire 240 volt cord kit (electric dryer) • 4 in Canada,... CAN/ACG B149.1-2000. • The dryer is designed under ANSI Z 21.5.1 or ANSI/UL 2158 - RISK OF FIRE Read all occupants. • Immediately call...
...when installing, operating and maintaining any electrical switch; ral gas or LP supply, gas dryer) • Carpenter's level • External vent hood • 4-inch (10.2 cm), rigid metal or semi-rigid metal exhaust duct work • 3-wire or 4-wire 240 volt cord kit (electric dryer) • 4 in Canada,... CAN/ACG B149.1-2000. • The dryer is designed under ANSI Z 21.5.1 or ANSI/UL 2158 - RISK OF FIRE Read all occupants. • Immediately call...
Installation Instructions (All Languages)
Page 3
...: Definitions This is important but not hazard-related. check with soapy water, NEVER check with flame 240v Electric Supply (Electric Dryer) ‰ Approved NEMA 10-30R or 14-30R service cord with a WARNING or CAUTION based on terminal block ‰... ‰ Terminal access cover installed before using this dryer. WARNING WARNING indicates a potentially hazardous situation which is the safety alert symbol. IMPORTANT SAFETY INSTRUCTIONS WARNING Please read thoroughly ‰ Door latches and drum tumbles when cycle starts ‰ Registration card sent in 3 IMPORTANT IMPORTANT...
...: Definitions This is important but not hazard-related. check with soapy water, NEVER check with flame 240v Electric Supply (Electric Dryer) ‰ Approved NEMA 10-30R or 14-30R service cord with a WARNING or CAUTION based on terminal block ‰... ‰ Terminal access cover installed before using this dryer. WARNING WARNING indicates a potentially hazardous situation which is the safety alert symbol. IMPORTANT SAFETY INSTRUCTIONS WARNING Please read thoroughly ‰ Door latches and drum tumbles when cycle starts ‰ Registration card sent in 3 IMPORTANT IMPORTANT...
Installation Instructions (All Languages)
Page 4
... in the installed position. DO NOT operate a washer and a dryer on the same circuit. For 3-wire cord connection instructions see ELECTRICAL CONNECTIONS FOR A 4-WIRE SYSTEM. Í NOTE Dryers manufactured for sale in Electrical Installation section. 3-WIRE POWER SUPPLY CORD KIT (not supplied) 3-...or NEMA 14-30R receptacle to neutral unless it was manufactured for use with upturned ends or closed loop connectors and marked for electric dryer CIRCUIT - Use separately fused circuits for : (1) new branch circuit installations, (2) mobile homes, (3) recreational vehicles, and (4) ...
... in the installed position. DO NOT operate a washer and a dryer on the same circuit. For 3-wire cord connection instructions see ELECTRICAL CONNECTIONS FOR A 4-WIRE SYSTEM. Í NOTE Dryers manufactured for sale in Electrical Installation section. 3-WIRE POWER SUPPLY CORD KIT (not supplied) 3-...or NEMA 14-30R receptacle to neutral unless it was manufactured for use with upturned ends or closed loop connectors and marked for electric dryer CIRCUIT - Use separately fused circuits for : (1) new branch circuit installations, (2) mobile homes, (3) recreational vehicles, and (4) ...
Installation Instructions (All Languages)
Page 5
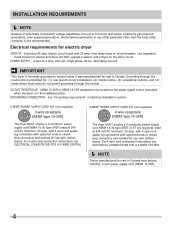
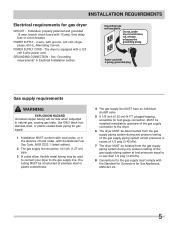
...WARNING EXPLOSION HAZARD Uncoated copper tubing will corrode when subjected to the gas supply line. The tubing MUST be used to connect your dryer to natural gas, causing gas leaks. See "Grounding requirements" in excess of stainless steel or plastic-coated brass. 4 The gas.... Use ONLY black iron, stainless steel, or plastic-coated brass piping for Gas Appliances, ANSI Z21.24. 5 INSTALLATION REQUIREMENTS Electrical requirements for gas dryer CIRCUIT - Individual, properly polarized and grounded 15 amp. Grounding type wall receptacle Do not, under any pressure testing of the ...
...WARNING EXPLOSION HAZARD Uncoated copper tubing will corrode when subjected to the gas supply line. The tubing MUST be used to connect your dryer to natural gas, causing gas leaks. See "Grounding requirements" in excess of stainless steel or plastic-coated brass. 4 The gas.... Use ONLY black iron, stainless steel, or plastic-coated brass piping for Gas Appliances, ANSI Z21.24. 5 INSTALLATION REQUIREMENTS Electrical requirements for gas dryer CIRCUIT - Individual, properly polarized and grounded 15 amp. Grounding type wall receptacle Do not, under any pressure testing of the ...
Installation Instructions (All Languages)
Page 11
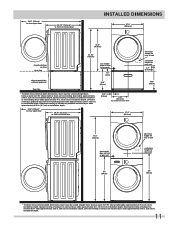
...5cm) 13.50" (34.5cm) to center of rear vent 27.0" (68.5cm) electrical supply on rear of unit centerline height for rear vent 39" (99cm) * To obtain these minimal depth dimensions, dryer must be vented straight back. Using a quick-turn 90° elbow (right or down...) 71.5" (182cm) gas supply pipe on rear of gas unit 37" (94cm) electrical supply on pedestal-mounted or freestanding dryer adds approximately 3.75 in. (9.5 cm) to installation depth. Downward venting of exhaust on stacked dryer adds approximately 4 in. (10.2 cm) to installation depth. Upward venting of exhaust ...
...5cm) 13.50" (34.5cm) to center of rear vent 27.0" (68.5cm) electrical supply on rear of unit centerline height for rear vent 39" (99cm) * To obtain these minimal depth dimensions, dryer must be vented straight back. Using a quick-turn 90° elbow (right or down...) 71.5" (182cm) gas supply pipe on rear of gas unit 37" (94cm) electrical supply on pedestal-mounted or freestanding dryer adds approximately 3.75 in. (9.5 cm) to installation depth. Downward venting of exhaust on stacked dryer adds approximately 4 in. (10.2 cm) to installation depth. Upward venting of exhaust ...
Installation Instructions (All Languages)
Page 12
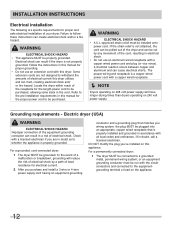
... and a grounding plug that is a copper wired power cord with this dryer utilizes and can create electrical shock and/or a fire hazard. For a permanently connected dryer: 1 The dryer MUST be plugged into an appropriate, copper wired receptacle that matches you wiring...be connected to follow these instructions can melt, creating electrical shock and/ or fire hazard. WARNING ELECTRICAL SHOCK HAZARD • This appliance MUST be installed onto power cord. Electric dryer (USA) WARNING ELECTRICAL SHOCK HAZARD Improper connection of the equipment grounding conductor can...
... and a grounding plug that is a copper wired power cord with this dryer utilizes and can create electrical shock and/or a fire hazard. For a permanently connected dryer: 1 The dryer MUST be plugged into an appropriate, copper wired receptacle that matches you wiring...be connected to follow these instructions can melt, creating electrical shock and/ or fire hazard. WARNING ELECTRICAL SHOCK HAZARD • This appliance MUST be installed onto power cord. Electric dryer (USA) WARNING ELECTRICAL SHOCK HAZARD Improper connection of the equipment grounding conductor can...
Installation Instructions (All Languages)
Page 13
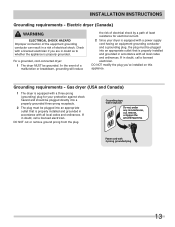
...Grounding requirements - In the event of a malfunction or breakdown, grounding will reduce the risk of electrical shock by a path of least resistance for your dryer is equipped with a power supply cord having an equipment-grounding conductor and a grounding plug, the... are in accordance with all local codes and ordinances. Electric dryer (Canada) WARNING ELECTRICAL SHOCK HAZARD Improper connection of electrical shock. Gas dryer (USA and Canada) 1 The dryer is equipped with a three-prong (grounding) plug for electrical current. 2 Since your protection against shock hazard and ...
...Grounding requirements - In the event of a malfunction or breakdown, grounding will reduce the risk of electrical shock by a path of least resistance for your dryer is equipped with a power supply cord having an equipment-grounding conductor and a grounding plug, the... are in accordance with all local codes and ordinances. Electric dryer (Canada) WARNING ELECTRICAL SHOCK HAZARD Improper connection of electrical shock. Gas dryer (USA and Canada) 1 The dryer is equipped with a three-prong (grounding) plug for electrical current. 2 Since your protection against shock hazard and ...

Installation Instructions (All Languages)
Page 15
... 10-30R) WARNING ELECTRICAL SHOCK HAZARD Failure to disconnect power source before servicing could result in personal injury or even death. 1 Turn off power supply to outlet. 2 Remove the screw securing the terminal block access cover in the lower corner on the back of the dryer. 3 Install a UL...Tighten both screws securely. DO NOT remove internal ground in the power cord entry hole below the access panel. Neutral terminal IMPORTANT If moving dryer from the center terminal back to the GREEN screw next to the outer, BRASS colored terminals on the terminal block. Tighten the screw securely...
... 10-30R) WARNING ELECTRICAL SHOCK HAZARD Failure to disconnect power source before servicing could result in personal injury or even death. 1 Turn off power supply to outlet. 2 Remove the screw securing the terminal block access cover in the lower corner on the back of the dryer. 3 Install a UL...Tighten both screws securely. DO NOT remove internal ground in the power cord entry hole below the access panel. Neutral terminal IMPORTANT If moving dryer from the center terminal back to the GREEN screw next to the outer, BRASS colored terminals on the terminal block. Tighten the screw securely...

Installation Instructions (All Languages)
Page 16
Tighten the screw securely. 7 Move the internal dryer harness ground (BLACK) wire to the terminal block and attach it can be loosely in the terminal screw recovery slot below the access panel. INSTALLATION INSTRUCTIONS Electrical connection (non-Canada) - 4 wire cord 4-wire receptacle (NEMA type 14-30R) WARNING ELECTRICAL SHOCK HAZARD Failure to disconnect power...
Tighten the screw securely. 7 Move the internal dryer harness ground (BLACK) wire to the terminal block and attach it can be loosely in the terminal screw recovery slot below the access panel. INSTALLATION INSTRUCTIONS Electrical connection (non-Canada) - 4 wire cord 4-wire receptacle (NEMA type 14-30R) WARNING ELECTRICAL SHOCK HAZARD Failure to disconnect power...


