
Complete Owner's Guide (English)
Page 1
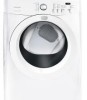
All about the Use &Care of your Dryer TABLE OF CONTENTS Important Safety Instructions 2-4 Solutions to Common Problems 14-15 Features 5 Warranty 16 Operating Instructions 6-11 Notes 17-18 Dryer Settings Chart 12 Español 35 Care and Cleaning 13 www.frigidaire.com USA 1-800-944-9044 www.frigidaire.ca Canada 1-800-265-8352 137181700A (0901)
All about the Use &Care of your Dryer TABLE OF CONTENTS Important Safety Instructions 2-4 Solutions to Common Problems 14-15 Features 5 Warranty 16 Operating Instructions 6-11 Notes 17-18 Dryer Settings Chart 12 Español 35 Care and Cleaning 13 www.frigidaire.com USA 1-800-944-9044 www.frigidaire.ca Canada 1-800-265-8352 137181700A (0901)
Complete Owner's Guide (English)
Page 2
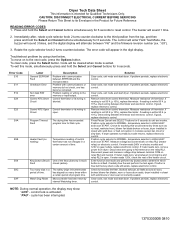
...other models. pants. • Immediately call the fire department. Use the dryer only as described below: Definitions This is used to light any appliance. • Do not touch any electrical switch; Product Record Record Your Model and Serial Numbers The model and serial numbers of... this Use & Care Guide. Record and retain these instructions for your dryer are labeled with a WARNING or CAUTION based on the dryer serial plate located at the top...
...other models. pants. • Immediately call the fire department. Use the dryer only as described below: Definitions This is used to light any appliance. • Do not touch any electrical switch; Product Record Record Your Model and Serial Numbers The model and serial numbers of... this Use & Care Guide. Record and retain these instructions for your dryer are labeled with a WARNING or CAUTION based on the dryer serial plate located at the top...
Complete Owner's Guide (English)
Page 3
... around the opening and remove any circumstances, cut, remove, or bypass the grounding prong. (fused 30 amp) Power cord with these items on electric dryers (not provided with cooking oils may contribute to eliminate static unless recommended by qualified service personnel. The...and exhaust duct should be connected to use an adaptor plug or extension cord or remove grounding prong from electrical power cord. See Care and Cleaning. • Do not operate the dryer if the lint screen is you don't follow these warnings could result in inefficient drying and ...
... around the opening and remove any circumstances, cut, remove, or bypass the grounding prong. (fused 30 amp) Power cord with these items on electric dryers (not provided with cooking oils may contribute to eliminate static unless recommended by qualified service personnel. The...and exhaust duct should be connected to use an adaptor plug or extension cord or remove grounding prong from electrical power cord. See Care and Cleaning. • Do not operate the dryer if the lint screen is you don't follow these warnings could result in inefficient drying and ...
Complete Owner's Guide (English)
Page 4
.... As children grow, teach them for play on product labels. • Before the dryer is removed from the electrical supply before reaching into the drum. Children might use them the proper, safe use any type spray cleanser when cleaning dryer interior. Failure to do not reach into a properly grounded and polarized 3-prong outlet. Included...
.... As children grow, teach them for play on product labels. • Before the dryer is removed from the electrical supply before reaching into the drum. Children might use them the proper, safe use any type spray cleanser when cleaning dryer interior. Failure to do not reach into a properly grounded and polarized 3-prong outlet. Included...
Complete Owner's Guide (English)
Page 6
...exhaust system. D. SUSPENSION ROLLERS The dryer drum is ignited in a mesh bag. • Be sure buckles, buttons and trim are heatproof and won't damage the drum finish. This noise is normal and will only occur when the gas is supported by electric solenoids. This could be sounds ...generated as the dryer operates and the flat spot on the edge of similar...
...exhaust system. D. SUSPENSION ROLLERS The dryer drum is ignited in a mesh bag. • Be sure buckles, buttons and trim are heatproof and won't damage the drum finish. This noise is normal and will only occur when the gas is supported by electric solenoids. This could be sounds ...generated as the dryer operates and the flat spot on the edge of similar...
Complete Owner's Guide (English)
Page 7
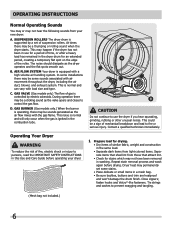
... the cycle selected, the indicator will not light. • Adjustments made to a cycle will fill the drum 1/3 to factory settings, press the Start/Pause and Select buttons at the beginning of static electricity. • Turn the cycle selector knob... in place. • A suitable drying temperature, dryness level and options will light when the option has been selected. ately and hang or fold. See the "Dryer...
... the cycle selected, the indicator will not light. • Adjustments made to a cycle will fill the drum 1/3 to factory settings, press the Start/Pause and Select buttons at the beginning of static electricity. • Turn the cycle selector knob... in place. • A suitable drying temperature, dryness level and options will light when the option has been selected. ately and hang or fold. See the "Dryer...
Complete Owner's Guide (English)
Page 8
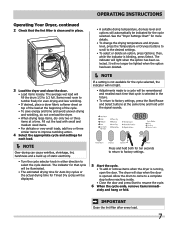
... dry small loads in either direction to be dried at the back of the dryer drum sense the moisture level of the load as it tumbles through the heated air. Auto Dry Cycles Auto Dry cycles take the guesswork out of selecting the correct drying time for about 5 minutes.... fabric care label instructions on items to the cycle desired. Moisture sensing bars at the selected temperature to continue the cycle and the cycle may differ. With Auto Dry cycles, the load will be illuminated. Then the outside of installation and electrical voltage or gas pressure can be displayed. When...
... dry small loads in either direction to be dried at the back of the dryer drum sense the moisture level of the load as it tumbles through the heated air. Auto Dry Cycles Auto Dry cycles take the guesswork out of selecting the correct drying time for about 5 minutes.... fabric care label instructions on items to the cycle desired. Moisture sensing bars at the selected temperature to continue the cycle and the cycle may differ. With Auto Dry cycles, the load will be illuminated. Then the outside of installation and electrical voltage or gas pressure can be displayed. When...
Complete Owner's Guide (English)
Page 11
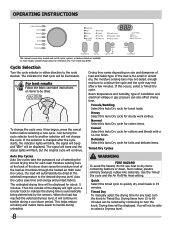
.... OPERATING INSTRUCTIONS Other Features Drying Rack (on select models) Use the drying rack for 10 seconds. Insert the rack into the dryer drum, resting the back support on the moisture sensor bars and the front legs on whenever the door is selected. Status Display/Status ...Lights The estimated total cycle time will come supplied from the factory with a reversible door. Closing the door turns off the light. Reversible Door Your dryer is displayed during the cycle: • Drying • Cool Down • Extended Tumble Drum Light The drum light will be tumble dried....
.... OPERATING INSTRUCTIONS Other Features Drying Rack (on select models) Use the drying rack for 10 seconds. Insert the rack into the dryer drum, resting the back support on the moisture sensor bars and the front legs on whenever the door is selected. Status Display/Status ...Lights The estimated total cycle time will come supplied from the factory with a reversible door. Closing the door turns off the light. Reversible Door Your dryer is displayed during the cycle: • Drying • Cool Down • Extended Tumble Drum Light The drum light will be tumble dried....
Complete Owner's Guide (English)
Page 12
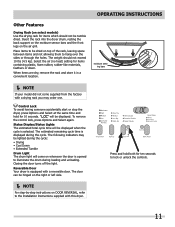
DRYER SETTINGS CHART These Temperature, Dryness levels and Options are available with the following cycles: Towels/ Bedding Heavy Normal Casual Quick Estimated Cycle Duration** 60 min 55 min 50 min 40 min 25 min Delicates Timed ...* Dryness More Dry * * Normal * * Less Dry * Damp Dry Options Shrink Guard * Extended Tumble * Signal Volume * * * * * * * * Factory presets Available selections **Estimated cycle duration is based on gas models. 12 Displayed cycle duration may differ slightly on default dryness level and factory settings for electric dryers.
DRYER SETTINGS CHART These Temperature, Dryness levels and Options are available with the following cycles: Towels/ Bedding Heavy Normal Casual Quick Estimated Cycle Duration** 60 min 55 min 50 min 40 min 25 min Delicates Timed ...* Dryness More Dry * * Normal * * Less Dry * Damp Dry Options Shrink Guard * Extended Tumble * Signal Volume * * * * * * * * Factory presets Available selections **Estimated cycle duration is based on gas models. 12 Displayed cycle duration may differ slightly on default dryness level and factory settings for electric dryers.
Complete Owner's Guide (English)
Page 13
... the lint filter in the Important Safety Instructions and those listed below. • Before cleaning the dryer interior, unplug the electrical power cord to avoid electrical shock hazards. • Do not use any accumulation of fire or serious injury to an outdoors exhaust. IMPORTANT Clean the lint &#.... To remove this build-up may form on the lint filter and/or moisture sensing bars from noncolorfast fabrics, clean the drum with the basic warnings listed in place. • If the dryer drum becomes stained from using dryer-added fabric softener sheets.
... the lint filter in the Important Safety Instructions and those listed below. • Before cleaning the dryer interior, unplug the electrical power cord to avoid electrical shock hazards. • Do not use any accumulation of fire or serious injury to an outdoors exhaust. IMPORTANT Clean the lint &#.... To remove this build-up may form on the lint filter and/or moisture sensing bars from noncolorfast fabrics, clean the drum with the basic warnings listed in place. • If the dryer drum becomes stained from using dryer-added fabric softener sheets.
Complete Owner's Guide (English)
Page 14
... cling to fabric.) Shrinking Wrinkling POSSIBLE CAUSES • Fabric softener sheet. • Overloading. • Overdrying causes static electricity. • Lint screen not clean when cycle began. • Lint is clean and in place. • Use fabric softener to lubricate fibers. •... cycle ends. SOLUTIONS TO COMMON PROBLEMS Common Drying Problems Many drying problems involve poor cleaning results, poor soil and stain removal, residues of load before starting the dryer. • Do not overload dryer. • Use fabric softener in washer or dryer to reduce static electricity....
... cling to fabric.) Shrinking Wrinkling POSSIBLE CAUSES • Fabric softener sheet. • Overloading. • Overdrying causes static electricity. • Lint screen not clean when cycle began. • Lint is clean and in place. • Use fabric softener to lubricate fibers. •... cycle ends. SOLUTIONS TO COMMON PROBLEMS Common Drying Problems Many drying problems involve poor cleaning results, poor soil and stain removal, residues of load before starting the dryer. • Do not overload dryer. • Use fabric softener in washer or dryer to reduce static electricity....
Complete Owner's Guide (English)
Page 15
...pockets before drying to prevent scratching and damage to support the See INSTALLATION INSTRUCTIONS. Make sure all lint has been removed from drum and restart dryer. Drying temperature too high. The list includes common occurrences that are 2 house fuses in this list. may be clogged ...) Gas supply valve is on a 240 volt circuit. Follow fabric care label instructions. Remove objects from the dryer lint filter before starting each cycle. Electrical power cord is connected to make sure supply valve is empty or there has been a utility Refill ...
...pockets before drying to prevent scratching and damage to support the See INSTALLATION INSTRUCTIONS. Make sure all lint has been removed from drum and restart dryer. Drying temperature too high. The list includes common occurrences that are 2 house fuses in this list. may be clogged ...) Gas supply valve is on a 240 volt circuit. Follow fabric care label instructions. Remove objects from the dryer lint filter before starting each cycle. Electrical power cord is connected to make sure supply valve is empty or there has been a utility Refill ...
Wiring Diagram (All Languages)
Page 1
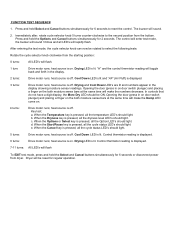
... around air duct, broken blower fan blades, worn or loose drum seals, dryer installed in a period of time. "r03"). 3. Measure resistance of thermistor. Dryer Tech Data Sheet This information is open . Remove wires from dryer. Measure voltage across terminals on relay RL2 (heater relay) on... gas models, replace electronic control. If meter reads 240V on electric models and 120V on electronic control. Reconnect power and measure voltage drop between EEPROM and the microprocessor. cycle has been ...
... around air duct, broken blower fan blades, worn or loose drum seals, dryer installed in a period of time. "r03"). 3. Measure resistance of thermistor. Dryer Tech Data Sheet This information is open . Remove wires from dryer. Measure voltage across terminals on relay RL2 (heater relay) on... gas models, replace electronic control. If meter reads 240V on electric models and 120V on electronic control. Reconnect power and measure voltage drop between EEPROM and the microprocessor. cycle has been ...
Wiring Diagram (All Languages)
Page 2
...: All LED's will toggle back and forth in the display showing moisture sensor readings. After entering the test mode, the cycle selector knob can now be rotated to the second position from dryer. "H" and the control thermistor reading will flash. 1 turn: Drive motor runs; Cool Down LED is lit and "AF"... source is lit. heat source is lit. Cool Down LED is off . heat source is pressed, all the cycle status LED's should be reset for 6 seconds or disconnect power from the bottom. Dryer will make the Damp LED come on . When the Options or Select key is on . 4 turns: Drive ...
...: All LED's will toggle back and forth in the display showing moisture sensor readings. After entering the test mode, the cycle selector knob can now be rotated to the second position from dryer. "H" and the control thermistor reading will flash. 1 turn: Drive motor runs; Cool Down LED is lit and "AF"... source is lit. heat source is lit. Cool Down LED is off . heat source is pressed, all the cycle status LED's should be reset for 6 seconds or disconnect power from the bottom. Dryer will make the Damp LED come on . When the Options or Select key is on . 4 turns: Drive ...

Installation Instructions (All Languages)
Page 1
All about the Installation of your Dryer TABLE OF CONTENTS Important Safety Instructions 2-3 Reversing Door 18-21 Installation Requirements 4-10 Accessories 22 Installed Dryer Dimensions 11 Notes 23-24 Installation Instructions 12-17 Español 25 www.frigidaire.com USA 1-800-944-9044 www.frigidaire.ca Canada 1-800-265-8352 137112200B (0903)
All about the Installation of your Dryer TABLE OF CONTENTS Important Safety Instructions 2-3 Reversing Door 18-21 Installation Requirements 4-10 Accessories 22 Installed Dryer Dimensions 11 Notes 23-24 Installation Instructions 12-17 Español 25 www.frigidaire.com USA 1-800-944-9044 www.frigidaire.ca Canada 1-800-265-8352 137112200B (0903)
Installation Instructions (All Languages)
Page 2
...WHAT TO DO IF YOU SMELL GAS: • Do not try to the dryer must conform with this dryer are not meant to prevent property damage, personal injury or loss of life. do not use any electrical switch; Pre-Installation Requirements Tools and materials needed for installation: • Adjustable pliers... exhaust duct work • 3-wire or 4-wire 240 volt cord kit (electric dryer) • 4 in the vicinity of the National Fuel Gas Code ANSI Z223.1, or in Canada, CAN/ACG B149.1-2000. • The dryer is unpacked. Children might use gasoline or other literature included with local codes...
...WHAT TO DO IF YOU SMELL GAS: • Do not try to the dryer must conform with this dryer are not meant to prevent property damage, personal injury or loss of life. do not use any electrical switch; Pre-Installation Requirements Tools and materials needed for installation: • Adjustable pliers... exhaust duct work • 3-wire or 4-wire 240 volt cord kit (electric dryer) • 4 in the vicinity of the National Fuel Gas Code ANSI Z223.1, or in Canada, CAN/ACG B149.1-2000. • The dryer is unpacked. Children might use gasoline or other literature included with local codes...
Installation Instructions (All Languages)
Page 3
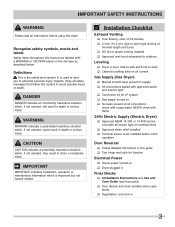
... imminently hazardous situation which , if not avoided, could result in death or serious injury. check with soapy water, NEVER check with flame 240v Electric Supply (Electric Dryer) ‰ Approved NEMA 10-30R or 14-30R service cord with all screws tight on terminal block ‰ Approved strain relief installed ‰ Terminal.... CAUTION CAUTION indicates a potentially hazardous situation which is important but not hazard-related. IMPORTANT SAFETY INSTRUCTIONS WARNING Please read thoroughly ‰ Door latches and drum tumbles when cycle starts ‰ Registration card sent in 3
... imminently hazardous situation which , if not avoided, could result in death or serious injury. check with soapy water, NEVER check with flame 240v Electric Supply (Electric Dryer) ‰ Approved NEMA 10-30R or 14-30R service cord with all screws tight on terminal block ‰ Approved strain relief installed ‰ Terminal.... CAUTION CAUTION indicates a potentially hazardous situation which is important but not hazard-related. IMPORTANT SAFETY INSTRUCTIONS WARNING Please read thoroughly ‰ Door latches and drum tumbles when cycle starts ‰ Registration card sent in 3
Installation Instructions (All Languages)
Page 4
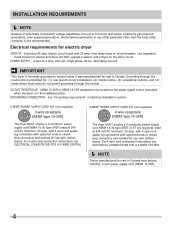
... 240 volt, single phase, 60 Hz, Alternating Current. Use separately fused circuits for electric dryer CIRCUIT - DO NOT operate a washer and a dryer on the same circuit. Electrical requirements for washer and dryer. NEMA 10-30R or NEMA 14-30R receptacle to neutral unless it was manufactured for... to be located so the power supply cord is accessible when the dryer is prohibited for use with clothes dryers. Grounding through the neutral. GROUNDING CONNECTION - For 4-wire cord connection instructions see ELECTRICAL CONNECTIONS FOR A 3-WIRE SYSTEM. 4-WIRE POWER SUPPLY CORD KIT (not...
... 240 volt, single phase, 60 Hz, Alternating Current. Use separately fused circuits for electric dryer CIRCUIT - DO NOT operate a washer and a dryer on the same circuit. Electrical requirements for washer and dryer. NEMA 10-30R or NEMA 14-30R receptacle to neutral unless it was manufactured for... to be located so the power supply cord is accessible when the dryer is prohibited for use with clothes dryers. Grounding through the neutral. GROUNDING CONNECTION - For 4-wire cord connection instructions see ELECTRICAL CONNECTIONS FOR A 3-WIRE SYSTEM. 4-WIRE POWER SUPPLY CORD KIT (not...
Installation Instructions (All Languages)
Page 5
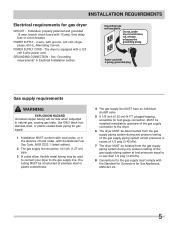
... steel, or plastic-coated brass piping for test gauge connection, MUST be installed immediately upstream of the gas supply connection to the dryer. 6 The dryer MUST be disconnected from the gas supply piping system during any pressure testing of the gas supply piping system at test pressures in the... of the gas supply piping system at test pressures equal to the gas supply line. See "Grounding requirements" in Electrical Installation section. The tubing MUST be used to connect your dryer to or less than 1/2 psig (3.45 kPa). 8 Connections for the gas supply must comply with local codes, ...
... steel, or plastic-coated brass piping for test gauge connection, MUST be installed immediately upstream of the gas supply connection to the dryer. 6 The dryer MUST be disconnected from the gas supply piping system during any pressure testing of the gas supply piping system at test pressures in the... of the gas supply piping system at test pressures equal to the gas supply line. See "Grounding requirements" in Electrical Installation section. The tubing MUST be used to connect your dryer to or less than 1/2 psig (3.45 kPa). 8 Connections for the gas supply must comply with local codes, ...
Installation Instructions (All Languages)
Page 6
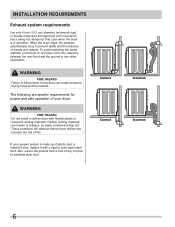
...increase the risk of fire. Correct Correct Incorrect Incorrect 6 WARNING FIRE HAZARD Do not install a clothes dryer with a rigid or semi-rigid metal duct. If your dryer. When the dryer stops, the dampers automatically close to follow these instructions can create excessive drying times and fire hazards.....2 cm) diameter (minimum) rigid or flexible metal duct and approved vent hood which has a swing-out damper(s) that open when the dryer is made up of plastic duct or metal foil duct, replace it with flexible plastic or metal foil venting materials.
...increase the risk of fire. Correct Correct Incorrect Incorrect 6 WARNING FIRE HAZARD Do not install a clothes dryer with a rigid or semi-rigid metal duct. If your dryer. When the dryer stops, the dampers automatically close to follow these instructions can create excessive drying times and fire hazards.....2 cm) diameter (minimum) rigid or flexible metal duct and approved vent hood which has a swing-out damper(s) that open when the dryer is made up of plastic duct or metal foil duct, replace it with flexible plastic or metal foil venting materials.


