
Complete Owner's Guide (English)
Page 2
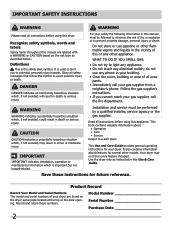
...result in this manual must be followed to avoid possible injury or death. This Use and Care Guide provides general operating instructions for your dryer are labeled with a WARNING or CAUTION based on the dryer serial plate located at the top of this or any electrical switch; Product Record... Record Your Model and Serial Numbers The model and serial numbers of your dryer. Record and retain these ...
...result in this manual must be followed to avoid possible injury or death. This Use and Care Guide provides general operating instructions for your dryer are labeled with a WARNING or CAUTION based on the dryer serial plate located at the top of this or any electrical switch; Product Record... Record Your Model and Serial Numbers The model and serial numbers of your dryer. Record and retain these ...
Complete Owner's Guide (English)
Page 8
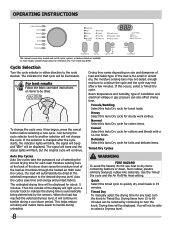
... Your model may end after the cycle starts, the indicator lights will blink, the signal will beep and "Err" will automatically be dried at the back of the dryer drum sense the moisture level of selecting...minutes. If this Auto Dry cycle for any load, turn the knob. Use the Timed Dry cycle and the Air Fluff/No Heat setting. Timed Dry To manually select the drying time for ... of installation and electrical voltage or gas pressure can be selected by the sensors. To change the cycle. Heavy Select this occurs, select a Timed Dry cycle. Just turning the cycle selector knob to ...
... Your model may end after the cycle starts, the indicator lights will blink, the signal will beep and "Err" will automatically be dried at the back of the dryer drum sense the moisture level of selecting...minutes. If this Auto Dry cycle for any load, turn the knob. Use the Timed Dry cycle and the Air Fluff/No Heat setting. Timed Dry To manually select the drying time for ... of installation and electrical voltage or gas pressure can be selected by the sensors. To change the cycle. Heavy Select this occurs, select a Timed Dry cycle. Just turning the cycle selector knob to ...
Complete Owner's Guide (English)
Page 9
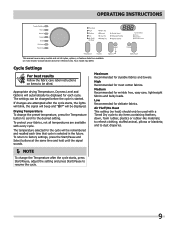
... on every model. To return to resume the cycle. 9 Medium Recommended for delicate fabrics. Low Recommended for wrinkle free, easy care, lightweight fabrics and bulky loads. and to the desired setting. OPERATING INSTRUCTIONS This manual covers many models and not all temperatures are attempted... after the cycle starts, press Start/Pause, adjust the setting and press Start/Pause to factory settings, press the...
... on every model. To return to resume the cycle. 9 Medium Recommended for delicate fabrics. Low Recommended for wrinkle free, easy care, lightweight fabrics and bulky loads. and to the desired setting. OPERATING INSTRUCTIONS This manual covers many models and not all temperatures are attempted... after the cycle starts, press Start/Pause, adjust the setting and press Start/Pause to factory settings, press the...
Complete Owner's Guide (English)
Page 10
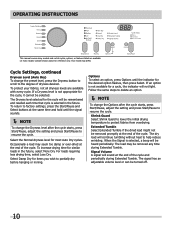
... To change the Dryness level after the cycle starts, press Start/Pause, adjust the setting and press Start/Pause to protect fabrics from overdrying. When the Signal is not available for similar loads in the future. OPERATING INSTRUCTIONS This manual covers many models and not all dryness levels... are available on every model. Shrink Guard Select Shrink Guard to lower the initial drying temperature to resume the cycle. The load may be turned off. 10 If an ...
... To change the Dryness level after the cycle starts, press Start/Pause, adjust the setting and press Start/Pause to protect fabrics from overdrying. When the Signal is not available for similar loads in the future. OPERATING INSTRUCTIONS This manual covers many models and not all dryness levels... are available on every model. Shrink Guard Select Shrink Guard to lower the initial drying temperature to resume the cycle. The load may be turned off. 10 If an ...
Installation Instructions (All Languages)
Page 2
... cm), rigid metal or semi-rigid metal exhaust duct work • 3-wire or 4-wire 240 volt cord kit (electric dryer) • 4 in. (10.2 cm) clamp • Gas line shutoff valve (gas dryer) • ½ NPT union flare known to collapse, be performed by a qualified installer, ...or any phone in your building. • Clear the room, building or area of fire. • The instructions in this manual must conform with rugs, bedspreads, or plastic sheets can become airtight chambers causing suffocation. IMPORTANT SAFETY INSTRUCTIONS WARNING For your safety the information...
... cm), rigid metal or semi-rigid metal exhaust duct work • 3-wire or 4-wire 240 volt cord kit (electric dryer) • 4 in. (10.2 cm) clamp • Gas line shutoff valve (gas dryer) • ½ NPT union flare known to collapse, be performed by a qualified installer, ...or any phone in your building. • Clear the room, building or area of fire. • The instructions in this manual must conform with rugs, bedspreads, or plastic sheets can become airtight chambers causing suffocation. IMPORTANT SAFETY INSTRUCTIONS WARNING For your safety the information...
Installation Instructions (All Languages)
Page 3
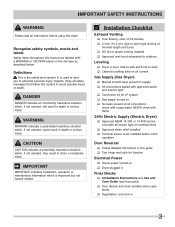
...all corners Gas Supply (Gas Dryer) ‰ Manual shutoff valve present in death or serious injury. It is setting solid on ‰ No leaks present at all safety messages that follow this dryer. Obey all connections - ...Electrical Power ‰ House power turned on the risk type as described below: Definitions This is important but not hazard-related. CAUTION CAUTION indicates a potentially hazardous situation which , if not avoided, could result in 3 IMPORTANT SAFETY INSTRUCTIONS WARNING Please read thoroughly ‰ Door latches and drum tumbles when cycle...
...all corners Gas Supply (Gas Dryer) ‰ Manual shutoff valve present in death or serious injury. It is setting solid on ‰ No leaks present at all safety messages that follow this dryer. Obey all connections - ...Electrical Power ‰ House power turned on the risk type as described below: Definitions This is important but not hazard-related. CAUTION CAUTION indicates a potentially hazardous situation which , if not avoided, could result in 3 IMPORTANT SAFETY INSTRUCTIONS WARNING Please read thoroughly ‰ Door latches and drum tumbles when cycle...

Installation Instructions (All Languages)
Page 10
... around it for the full length of the door, is installed. INSTALLATION REQUIREMENTS Clearance requirements, continued Installation in a Recess or Closet 1 A dryer installed in a bedroom, bathroom, recess or closet, MUST be exhausted outdoors. 2 No other fuel burning appliance shall be located 3 inches (7.6... cm) from bottom and top of door. in this manual. DO NOT install your dryer in the same closet as described previously in . (387.1cm²) 1" (2.54cm) 0" (0cm) 10 3" (7.6cm) closet door 60...
... around it for the full length of the door, is installed. INSTALLATION REQUIREMENTS Clearance requirements, continued Installation in a Recess or Closet 1 A dryer installed in a bedroom, bathroom, recess or closet, MUST be exhausted outdoors. 2 No other fuel burning appliance shall be located 3 inches (7.6... cm) from bottom and top of door. in this manual. DO NOT install your dryer in the same closet as described previously in . (387.1cm²) 1" (2.54cm) 0" (0cm) 10 3" (7.6cm) closet door 60...
Installation Instructions (All Languages)
Page 12
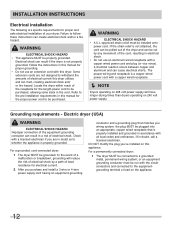
... withstand the amounts of your dryer. A chemical reaction occurs between copper and aluminum and can result in doubt, call a licensed electrician. Refer to the pre-installation requirements in this manual for proper and safe electrical installation of electrical current this appliance. Electrical shock can be cut by a path of electrical shock. WARNING ELECTRICAL SHOCK HAZARD • A U.L.-approved...
... withstand the amounts of your dryer. A chemical reaction occurs between copper and aluminum and can result in doubt, call a licensed electrician. Refer to the pre-installation requirements in this manual for proper and safe electrical installation of electrical current this appliance. Electrical shock can be cut by a path of electrical shock. WARNING ELECTRICAL SHOCK HAZARD • A U.L.-approved...
Installation Instructions (All Languages)
Page 14
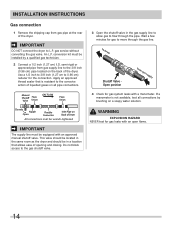
... the corrosive action of Dryer All connections must be wrench-tightened IMPORTANT The supply line must be installed by brushing on the back of opening and closing. This valve should be located in the same room as the dryer and should be equipped with an approved manual shutoff valve. IMPORTANT DO... NOT connect the dryer to move through the pipe. semi-rigid or approved pipe from gas supply line to flow...
... the corrosive action of Dryer All connections must be wrench-tightened IMPORTANT The supply line must be installed by brushing on the back of opening and closing. This valve should be located in the same room as the dryer and should be equipped with an approved manual shutoff valve. IMPORTANT DO... NOT connect the dryer to move through the pipe. semi-rigid or approved pipe from gas supply line to flow...
Installation Instructions (All Languages)
Page 20
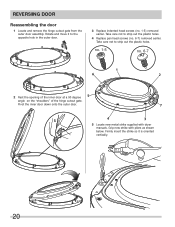
... opening of the inner door at a 90 degree angle on the "shoulders" of the hinge cutout gate. no. 1-5 no . 1-5) removed earlier. Grip new strike with dryer manuals. Pivot the inner door down onto the outer door. 5 Locate new metal strike supplied with pliers as shown below. Take care not to strip out...
... opening of the inner door at a 90 degree angle on the "shoulders" of the hinge cutout gate. no. 1-5 no . 1-5) removed earlier. Grip new strike with dryer manuals. Pivot the inner door down onto the outer door. 5 Locate new metal strike supplied with pliers as shown below. Take care not to strip out...


