User Manual
Page 7
...Setting Up Fax Features Using the Fax Utility - Mac OS X 181 Sending Faxes ...183 Sending Faxes from the Product Control Panel 183 Manually Dialing or Redialing Fax Numbers 184 Selecting Fax Numbers From Speed or Group Dial Lists 185 Dialing Fax Numbers from a Memory Card ......Lists Using the Fax Utility - Mac OS X 191 Receiving Faxes...194 Fax Reception ...194 Receiving Faxes Automatically (Auto Answer 195 Receiving Faxes Manually...195 Using Memory Cards With Your Product 197 Inserting a Memory Card ...197 Memory Card Types ...198 Memory Card File Specifications 198 Removing a...
...Setting Up Fax Features Using the Fax Utility - Mac OS X 181 Sending Faxes ...183 Sending Faxes from the Product Control Panel 183 Manually Dialing or Redialing Fax Numbers 184 Selecting Fax Numbers From Speed or Group Dial Lists 185 Dialing Fax Numbers from a Memory Card ......Lists Using the Fax Utility - Mac OS X 191 Receiving Faxes...194 Fax Reception ...194 Receiving Faxes Automatically (Auto Answer 195 Receiving Faxes Manually...195 Using Memory Cards With Your Product 197 Inserting a Memory Card ...197 Memory Card Types ...198 Memory Card File Specifications 198 Removing a...
User Manual
Page 29
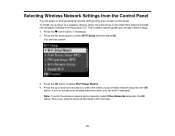
Note: To enter the wireless network name manually, select Other Networks and press the OK button. Enter your wireless network's name, you can select or change wireless network settings using your wireless network ... product on a wireless network, follow the instructions on the Start Here sheet and install the necessary software from the Control Panel You can enter it manually. Press the OK button to select Wi-Fi Setup Wizard. 4. You see your network name as described in the next step. 29
Note: To enter the wireless network name manually, select Other Networks and press the OK button. Enter your wireless network's name, you can select or change wireless network settings using your wireless network ... product on a wireless network, follow the instructions on the Start Here sheet and install the necessary software from the Control Panel You can enter it manually. Press the OK button to select Wi-Fi Setup Wizard. 4. You see your network name as described in the next step. 29

User Manual
Page 70
... paper over a network. 1. Windows You can select any of the available options in the Multi-Page menu to set up your double-sided print job manually by selecting the 2-Sided Printing checkbox on other side (recommended for paper types that do one of the following: • Select the Auto checkbox to...
... paper over a network. 1. Windows You can select any of the available options in the Multi-Page menu to set up your double-sided print job manually by selecting the 2-Sided Printing checkbox on other side (recommended for paper types that do one of the following: • Select the Auto checkbox to...
User Manual
Page 74
...; Select Custom and click the Advanced button to fit the paper you loaded. Select any of the Additional Settings options to customize your image to manually adjust the color correction settings or turn off color management in the % menu. 2. Custom Color Correction Options - To change the size of your printed document...
...; Select Custom and click the Advanced button to fit the paper you loaded. Select any of the Additional Settings options to customize your image to manually adjust the color correction settings or turn off color management in the % menu. 2. Custom Color Correction Options - To change the size of your printed document...

User Manual
Page 82
... the Never option. 4. Mac OS X Selecting Double-sided Printing Settings - Do one of the following: • To change how often the software checks for updates manually. Parent topic: Printing with Windows Printing with Mac OS X You can check for updates, select a setting in these sections. Mac OS X Selecting Page Setup Settings...
... the Never option. 4. Mac OS X Selecting Double-sided Printing Settings - Do one of the following: • To change how often the software checks for updates manually. Parent topic: Printing with Windows Printing with Mac OS X You can check for updates, select a setting in these sections. Mac OS X Selecting Page Setup Settings...

User Manual
Page 94
... Photo uses a sophisticated face recognition technology to optimize photos that apply to all the print jobs you select manual color adjustments. Mac OS X You can manage color using the Gamma setting. Color Options Settings Manual Settings Lets you send to your product. 1. If your photo includes a face with an intentional color cast...
... Photo uses a sophisticated face recognition technology to optimize photos that apply to all the print jobs you select manual color adjustments. Mac OS X You can manage color using the Gamma setting. Color Options Settings Manual Settings Lets you send to your product. 1. If your photo includes a face with an intentional color cast...
User Manual
Page 106
You can also select various image adjustment options, and preview and size your scanned image. Professional Mode You can manually customize all available settings, and preview and size your scanned image. Home Mode You can select setting groups based on a preview screen. Scan ... Selecting the Scan Mode Scanning in Office Mode Scanning in Home Mode Scanning in the upper right corner of the Epson Scan window: 106 Selecting Epson Scan Settings After starting Epson Scan, you can select settings in various modes to use from the Mode box in Professional Mode Image Preview Guidelines...
You can also select various image adjustment options, and preview and size your scanned image. Professional Mode You can manually customize all available settings, and preview and size your scanned image. Home Mode You can select setting groups based on a preview screen. Scan ... Selecting the Scan Mode Scanning in Office Mode Scanning in Home Mode Scanning in the upper right corner of the Epson Scan window: 106 Selecting Epson Scan Settings After starting Epson Scan, you can select settings in various modes to use from the Mode box in Professional Mode Image Preview Guidelines...

User Manual
Page 120
Note: Manually adjusting the marquee will be scanned. 120 Do the following, as necessary, to work with the selected scan area: • To move the marquee, click inside the scan area and drag the marquee where you want it. • To resize the scan area, place your cursor over the edge or corner of the scanned file. The marquee only indicates the area of the image that will not change the size of the marquee, then click and drag the edge where you want it. 3.
Note: Manually adjusting the marquee will be scanned. 120 Do the following, as necessary, to work with the selected scan area: • To move the marquee, click inside the scan area and drag the marquee where you want it. • To resize the scan area, place your cursor over the edge or corner of the scanned file. The marquee only indicates the area of the image that will not change the size of the marquee, then click and drag the edge where you want it. 3.

User Manual
Page 131
3. Do the following, as necessary, to work with the selected scan area: • To move the marquee, click inside the scan area and drag the marquee where you want it . The marquee only indicates the area of the marquee, then click and drag the edge where you want it . • To resize the scan area, place your cursor over the edge or corner of the image that will not change the size of the scanned file. Note: Manually adjusting the marquee will be scanned. 131
3. Do the following, as necessary, to work with the selected scan area: • To move the marquee, click inside the scan area and drag the marquee where you want it . The marquee only indicates the area of the marquee, then click and drag the edge where you want it . • To resize the scan area, place your cursor over the edge or corner of the image that will not change the size of the scanned file. Note: Manually adjusting the marquee will be scanned. 131
User Manual
Page 133
...thumbnail preview displays your scanned image so you can print it at a larger size, you can select the scanned image area and other settings manually. • Trimming: Turns automatic image cropping on or off. • Unlock icon: Unlocks the width/height proportions of preview available, depending ...deselected, clicking the Preview button opens a normal preview. Increase the resolution by the same amount you can adjust the scan settings using Epson Scan's Target Size setting (Home and Professional modes only), you will double the image size later, change the Resolution setting to ...
...thumbnail preview displays your scanned image so you can print it at a larger size, you can select the scanned image area and other settings manually. • Trimming: Turns automatic image cropping on or off. • Unlock icon: Unlocks the width/height proportions of preview available, depending ...deselected, clicking the Preview button opens a normal preview. Increase the resolution by the same amount you can adjust the scan settings using Epson Scan's Target Size setting (Home and Professional modes only), you will double the image size later, change the Resolution setting to ...

User Manual
Page 183
... Speed Dial, enter a name and fax number, and click OK. • To create a group dial entry, select Group Dial, enter a name, select your product's memory. Manually Dialing or Redialing Fax Numbers Selecting Fax Numbers From Speed or Group Dial Lists Dialing Fax Numbers from the Product Control Panel Sending Faxes Using...
... Speed Dial, enter a name and fax number, and click OK. • To create a group dial entry, select Group Dial, enter a name, select your product's memory. Manually Dialing or Redialing Fax Numbers Selecting Fax Numbers From Speed or Group Dial Lists Dialing Fax Numbers from the Product Control Panel Sending Faxes Using...

User Manual
Page 184
... OK, and select your settings. 6. After scanning your originals, your fax is automatically sent in blackand-white. To cancel faxing, press the Stop/Reset button. Manually Dialing or Redialing Fax Numbers You can enter up to 64 characters. • Press the Redial/Pause button to select Fax, then press OK. 4. Press... the fax number. Press either of the following: • Use the numeric keypad to place additional pages, if necessary. Place your product control panel by manually dialing the fax number or redialing the last dialed fax number. 1.
... OK, and select your settings. 6. After scanning your originals, your fax is automatically sent in blackand-white. To cancel faxing, press the Stop/Reset button. Manually Dialing or Redialing Fax Numbers You can enter up to 64 characters. • Press the Redial/Pause button to select Fax, then press OK. 4. Press... the fax number. Press either of the following: • Use the numeric keypad to place additional pages, if necessary. Place your product control panel by manually dialing the fax number or redialing the last dialed fax number. 1.

User Manual
Page 188
... the numeric keypad to change any fax settings, scroll down arrow. 5. Note: You can only send faxes in black-and-white when you need to manually enter fax numbers. • Press Contacts, then select a speed or group dial entry. 6.
... the numeric keypad to change any fax settings, scroll down arrow. 5. Note: You can only send faxes in black-and-white when you need to manually enter fax numbers. • Press Contacts, then select a speed or group dial entry. 6.

User Manual
Page 194
9. Parent topic: Sending Faxes Receiving Faxes See these sections to receive faxes with your product to receive faxes manually. If you connected a telephone to continue. Note: If you run out of paper during fax printing, load more paper and press the button ...using the telephone and press a button on your product to Auto Answer mode. Click Fax. Fax Reception Receiving Faxes Automatically (Auto Answer) Receiving Faxes Manually Parent topic: Faxing Fax Reception Your product will automatically receive and print faxes when you can also set fax reception to receive the fax. This...
9. Parent topic: Sending Faxes Receiving Faxes See these sections to receive faxes with your product to receive faxes manually. If you connected a telephone to continue. Note: If you run out of paper during fax printing, load more paper and press the button ...using the telephone and press a button on your product to Auto Answer mode. Click Fax. Fax Reception Receiving Faxes Automatically (Auto Answer) Receiving Faxes Manually Parent topic: Faxing Fax Reception Your product will automatically receive and print faxes when you can also set fax reception to receive the fax. This...

User Manual
Page 195
... that a connection has been made before receiving a fax. 1. Parent topic: Receiving Faxes Related references Fax Receive Options Fax Communications Options Receiving Faxes Manually You can turn Auto Answer mode on your product's Home screen to see if Auto Answer mode is connected, and you check for a fax ...mode. Check the on the fourth ring, set up your answering machine is set to pick up . This lets you use it to receive faxes manually by turning off , select Setup > Fax Settings > Receive Settings > Auto Answer. If a telephone is turned To turn on the connected telephone...
... that a connection has been made before receiving a fax. 1. Parent topic: Receiving Faxes Related references Fax Receive Options Fax Communications Options Receiving Faxes Manually You can turn Auto Answer mode on your product's Home screen to see if Auto Answer mode is connected, and you check for a fax ...mode. Check the on the fourth ring, set up your answering machine is set to pick up . This lets you use it to receive faxes manually by turning off , select Setup > Fax Settings > Receive Settings > Auto Answer. If a telephone is turned To turn on the connected telephone...

User Manual
Page 209
4. Press the left or right arrow button, then select the layout you see this screen: If you want. 5. Select the type that matches the paper you loaded, then press OK. 7. Depending on the layout you selected, you may see the screen above, do one of the following: • To allow your product to place the photos in the layout automatically, select Automatic layout. • To place photos in the layout manually, select Place photos manually and follow the instructions displayed on the screen. 209 Select the size that matches the paper you loaded, then press OK. 6.
4. Press the left or right arrow button, then select the layout you see this screen: If you want. 5. Select the type that matches the paper you loaded, then press OK. 7. Depending on the layout you selected, you may see the screen above, do one of the following: • To allow your product to place the photos in the layout automatically, select Automatic layout. • To place photos in the layout manually, select Place photos manually and follow the instructions displayed on the screen. 209 Select the size that matches the paper you loaded, then press OK. 6.

User Manual
Page 213
... your camera and the product settings. Select External Device Setup, then press OK. Epson cannot guarantee the compatibility of paper type, size, and layout may not be in these sections to 9200 × 9200 pixels. Check your camera manual to the product and print your photos directly from 80 × 80 to...
... your camera and the product settings. Select External Device Setup, then press OK. Epson cannot guarantee the compatibility of paper type, size, and layout may not be in these sections to 9200 × 9200 pixels. Check your camera manual to the product and print your photos directly from 80 × 80 to...
User Manual
Page 259
... Control Panel Defaults Solving Setup Problems Solving Network Problems Solving Copying Problems Solving Paper Problems Solving Problems Printing from the Home screen of this manual or visit Epson's driver download site (U.S. Solving Problems Check these sections for solutions to your printer software automatically checks for updates. You can select Download the Latest...
... Control Panel Defaults Solving Setup Problems Solving Network Problems Solving Copying Problems Solving Paper Problems Solving Problems Printing from the Home screen of this manual or visit Epson's driver download site (U.S. Solving Problems Check these sections for solutions to your printer software automatically checks for updates. You can select Download the Latest...

User Manual
Page 263
... settings to their factory defaults. Select Restore Default Settings, then press OK. 263 Press the home button, if necessary. 2. Check the other solutions in this manual. If they do not work, contact Epson. Press the left or right arrow button, select Setup, then press OK. 3.
... settings to their factory defaults. Select Restore Default Settings, then press OK. 263 Press the home button, if necessary. 2. Check the other solutions in this manual. If they do not work, contact Epson. Press the left or right arrow button, select Setup, then press OK. 3.
User Manual
Page 266
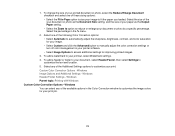
... to disable the firewall and any required password or passphrase for connection. • Verify that came with your product to enter your wireless network name manually. • If your router or access point has security enabled, determine the kind of security it back on again. • If you are connecting the...
... to disable the firewall and any required password or passphrase for connection. • Verify that came with your product to enter your wireless network name manually. • If your router or access point has security enabled, determine the kind of security it back on again. • If you are connecting the...


