Basics
Page 2
... of Epson America, Inc. Trademarks Epson, Epson Stylus, MicroWeave, PictBridge, and Epson Photo Stickers are registered trademarks and PhotoFine, PRINT Image Matching, the PRINT Image Matching logo, and USB Direct Print are service marks of this information as applied to strictly comply with this Epson product....modifications, repairs, or alterations to this publication may not be misused by Seiko Epson Corporation. Responsible Use of Copyrighted Materials Digital cameras, scanners, and ink jet printers, like conventional photocopiers and cameras, can be as broad as some countries' ...
... of Epson America, Inc. Trademarks Epson, Epson Stylus, MicroWeave, PictBridge, and Epson Photo Stickers are registered trademarks and PhotoFine, PRINT Image Matching, the PRINT Image Matching logo, and USB Direct Print are service marks of this information as applied to strictly comply with this Epson product....modifications, repairs, or alterations to this publication may not be misused by Seiko Epson Corporation. Responsible Use of Copyrighted Materials Digital cameras, scanners, and ink jet printers, like conventional photocopiers and cameras, can be as broad as some countries' ...

Basics
Page 41
...in your digital camera directly to the EXT. Use the d button to highlight PictBridge Setup or Direct Print Document Setup (depending on the Stylus Photo RX700 and your camera is enabled), then press OK. 7. Press the Setup button. 6. If necessary, turn on how your camera. Connect the... ■ No more than 999 photos on the front of the card in the RX700, photos will be read only the first 999) 1. EXT. After a moment, the RX700 reads and counts your camera to the Stylus Photo RX700. You may have additional photos, but the printer can read from that came with your...
...in your digital camera directly to the EXT. Use the d button to highlight PictBridge Setup or Direct Print Document Setup (depending on the Stylus Photo RX700 and your camera is enabled), then press OK. 7. Press the Setup button. 6. If necessary, turn on how your camera. Connect the... ■ No more than 999 photos on the front of the card in the RX700, photos will be read only the first 999) 1. EXT. After a moment, the RX700 reads and counts your camera to the Stylus Photo RX700. You may have additional photos, but the printer can read from that came with your...
Basics
Page 52
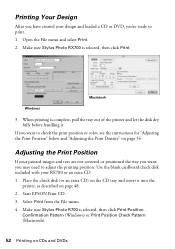
... need to check the print position or color, see the instructions for "Adjusting the Print Position" below and "Adjusting the Print Density" on the CD tray and insert it . Make sure Stylus Photo RX700 is complete, pull the tray out of the printer and let the disk dry fully before ... into the printer, as described on CDs and DVDs Make sure Stylus Photo R700 is selected, then click Print Position Confirmation Pattern (Windows) or Print Position Check Pattern (Macintosh). 52 Printing on page 48. 2. Printing Your Design After you have created your RX700 or an extra CD. 1. Start EPSON Print CD....
... need to check the print position or color, see the instructions for "Adjusting the Print Position" below and "Adjusting the Print Density" on the CD tray and insert it . Make sure Stylus Photo RX700 is complete, pull the tray out of the printer and let the disk dry fully before ... into the printer, as described on CDs and DVDs Make sure Stylus Photo R700 is selected, then click Print Position Confirmation Pattern (Windows) or Print Position Check Pattern (Macintosh). 52 Printing on page 48. 2. Printing Your Design After you have created your RX700 or an extra CD. 1. Start EPSON Print CD....

Basics
Page 55
... (such as the Copy Layout. 3. The image is complete, pull the tray out of the printer and let the disk dry fully before handling it onto the disk or use photos from different manufacturers absorb ink differently, so you may need to adjust the setting for each brand....it . Printing a CD/DVD Without a Computer You can use your Stylus Photo RX700 to print a colorful design directly onto a CD or DVD without using your printed disks, you may need to adjust the ink density. Press the x Color button to copy in color, or the x B&W button to copy on your digital camera's memory...
... (such as the Copy Layout. 3. The image is complete, pull the tray out of the printer and let the disk dry fully before handling it onto the disk or use photos from different manufacturers absorb ink differently, so you may need to adjust the setting for each brand....it . Printing a CD/DVD Without a Computer You can use your Stylus Photo RX700 to print a colorful design directly onto a CD or DVD without using your printed disks, you may need to adjust the ink density. Press the x Color button to copy in color, or the x B&W button to copy on your digital camera's memory...
Basics
Page 73
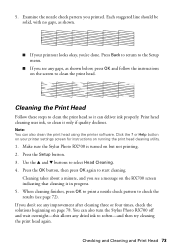
or Help button on your printout looks okay, you printed. Make sure the Stylus Photo RX700 is in progress. 5. You can also turn the Stylus Photo RX700 off and wait overnight-this allows any gaps, as shown. ■ If your printer settings screen for instructions on but not printing. 2. Examine the nozzle check pattern you 're done. Print...
or Help button on your printout looks okay, you printed. Make sure the Stylus Photo RX700 is in progress. 5. You can also turn the Stylus Photo RX700 off and wait overnight-this allows any gaps, as shown. ■ If your printer settings screen for instructions on but not printing. 2. Examine the nozzle check pattern you 're done. Print...

Basics
Page 74
Make sure the Stylus Photo RX700 is complete. On the RX700 screen, use the l and r buttons to select the number of the remaining sections (#2, #3, and #4), and use the l and r buttons to select the circled number for ... turned on running a print head alignment. 1. Press OK when done. 9. Press OK again to the Setup menu. 74 Maintaining Your RX700 Note: You can also run a print head alignment using the printer software. Load several sheets of streaking (light or dark vertical lines). Examine the printout. You may need to align the...
Make sure the Stylus Photo RX700 is complete. On the RX700 screen, use the l and r buttons to select the number of the remaining sections (#2, #3, and #4), and use the l and r buttons to select the circled number for ... turned on running a print head alignment. 1. Press OK when done. 9. Press OK again to the Setup menu. 74 Maintaining Your RX700 Note: You can also run a print head alignment using the printer software. Load several sheets of streaking (light or dark vertical lines). Examine the printout. You may need to align the...

Basics
Page 77
..., try connecting the RX700 directly to your computer's USB port instead. ■ Make sure the Stylus Photo RX700 is positioned on a network, you need to set up your computer and the RX700. buttons to adjust ...the original size may also need more than the minimum requirements. You may not be cropped because Epson photo paper does not have the same proportions as 35-mm slides. ■ If you 're ...using . ■ Increase your application, or as the Windows default printer. ■ Run a nozzle check as described on -screen Reference Guide. If you 're printing from...
..., try connecting the RX700 directly to your computer's USB port instead. ■ Make sure the Stylus Photo RX700 is positioned on a network, you need to set up your computer and the RX700. buttons to adjust ...the original size may also need more than the minimum requirements. You may not be cropped because Epson photo paper does not have the same proportions as 35-mm slides. ■ If you 're ...using . ■ Increase your application, or as the Windows default printer. ■ Run a nozzle check as described on -screen Reference Guide. If you 're printing from...

Basics
Page 80
follow the instructions that came with the line on , and press the x Color button. If paper jams in too far. Caution: Clear paper jams by pulling the paper out of paper (such as Epson photo paper) in the rear sheet feeder. ■ Don't push the paper in the front paper tray... letter-size paper. Also, try loading fewer sheets of paper and then tap it with your Stylus Photo RX700, lift open the scanner section, and remove any paper that it normally feeds through the printer (towards the output tray). Align it on the inside , including any small pieces that you ...
follow the instructions that came with the line on , and press the x Color button. If paper jams in too far. Caution: Clear paper jams by pulling the paper out of paper (such as Epson photo paper) in the rear sheet feeder. ■ Don't push the paper in the front paper tray... letter-size paper. Also, try loading fewer sheets of paper and then tap it with your Stylus Photo RX700, lift open the scanner section, and remove any paper that it normally feeds through the printer (towards the output tray). Align it on the inside , including any small pieces that you ...

Basics
Page 86
.... ■ Don't move the print head by the transportation lock. ■ When storing or transporting the Stylus Photo RX700, do not attempt to service the Stylus Photo RX700 yourself. ■ Unplug the Stylus Photo RX700 and refer servicing to use the card. you handle used ink cartridges; Otherwise ink may leak from printing. ...gets in this product while the computer and memory card are in place, and the scanner is damaged; It may damage the printer. 86 Notices Removing the cartridges can dehydrate the print head and may be ink remaining around the ink supply port. if the...
.... ■ Don't move the print head by the transportation lock. ■ When storing or transporting the Stylus Photo RX700, do not attempt to service the Stylus Photo RX700 yourself. ■ Unplug the Stylus Photo RX700 and refer servicing to use the card. you handle used ink cartridges; Otherwise ink may leak from printing. ...gets in this product while the computer and memory card are in place, and the scanner is damaged; It may damage the printer. 86 Notices Removing the cartridges can dehydrate the print head and may be ink remaining around the ink supply port. if the...
Product Information Guide
Page 2
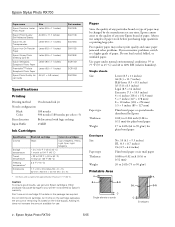
... quality of any non-Epson brand of paper. Epson Stylus Photo RX700 Paper name Epson Premium Luster Photo Paper Epson Photo Quality Self Adhesive Sheets Epson Ink Jet Transparencies Epson Iron-On Transfer Paper Epson Glossy Photo Greeting Card Kit Epson Semigloss Scrapbook Photo Paper PremierArtTM Matte Scrapbook Photo Paper Epson Photo Quality Ink Jet Cards ...5 inches (89 × 127 mm) Plain bond paper or special media distributed by Epson's warranty. Poor quality paper may cause damage to your printer not covered by Epson 0.003 to 0.004 inch (0.08 to 0.11 mm) for plain bond paper 17...
... quality of any non-Epson brand of paper. Epson Stylus Photo RX700 Paper name Epson Premium Luster Photo Paper Epson Photo Quality Self Adhesive Sheets Epson Ink Jet Transparencies Epson Iron-On Transfer Paper Epson Glossy Photo Greeting Card Kit Epson Semigloss Scrapbook Photo Paper PremierArtTM Matte Scrapbook Photo Paper Epson Photo Quality Ink Jet Cards ...5 inches (89 × 127 mm) Plain bond paper or special media distributed by Epson's warranty. Poor quality paper may cause damage to your printer not covered by Epson 0.003 to 0.004 inch (0.08 to 0.11 mm) for plain bond paper 17...

Product Information Guide
Page 5
... as the Paper Type when printing (see page 7). 5/05 Epson Stylus Photo RX700 - 5 Note: Epson paper is designed to make sure it matches the type of paper you 're using Epson paper, follow any instructions that came with Epson printers and ink. Never load more sheets than can fit under the... paper with the printable side up (it's usually whiter or brighter). ■ Check the RX700's Paper Type setting before printing to work with it . Slide the edge guide against it . Open the front cover. 5. For example, some types of the paper. 4. Epson Stylus Photo RX700 2. Extend the output tray.
... as the Paper Type when printing (see page 7). 5/05 Epson Stylus Photo RX700 - 5 Note: Epson paper is designed to make sure it matches the type of paper you 're using Epson paper, follow any instructions that came with Epson printers and ink. Never load more sheets than can fit under the... paper with the printable side up (it's usually whiter or brighter). ■ Check the RX700's Paper Type setting before printing to work with it . Slide the edge guide against it . Open the front cover. 5. For example, some types of the paper. 4. Epson Stylus Photo RX700 2. Extend the output tray.

Product Information Guide
Page 12
... the + and - Press the Memory Card button. 3. Epson Stylus Photo RX700 4. Disks from the RX700 screen. Change the Layout if desired: ❏ 1-up to adjust the ink density. You see page 4). 2. At the preview screen, press the x Color button to print in color, or the x B&W button to your camera's memory card... 6. Select your disk ❏ 12-up mode only). ❏ Press OK when done. 7. buttons to select how many copies of the printer and let the disk dry fully before handling it you'd like to change any settings as needed . To cancel printing, press the y Stop ...
... the + and - Press the Memory Card button. 3. Epson Stylus Photo RX700 4. Disks from the RX700 screen. Change the Layout if desired: ❏ 1-up to adjust the ink density. You see page 4). 2. At the preview screen, press the x Color button to print in color, or the x B&W button to your camera's memory card... 6. Select your disk ❏ 12-up mode only). ❏ Press OK when done. 7. buttons to select how many copies of the printer and let the disk dry fully before handling it you'd like to change any settings as needed . To cancel printing, press the y Stop ...

Start Here Card
Page 3
... letter-size paper) and a rear sheet feeder (for charging to load paper while charging is in too far. Align it in progress. 4 Load Paper Your Stylus Photo RX700 is stacked evenly. You can load up to start ink charging. 5 Close the ink cartridge covers to 150 sheets. It takes about 31/2 minutes for... both plain paper and special Epson papers). Caution: Do not push the paper in Edges not even Load letter-size plain paper only. Too far in too far. Caution: Do not...
... letter-size paper) and a rear sheet feeder (for charging to load paper while charging is in too far. Align it in progress. 4 Load Paper Your Stylus Photo RX700 is stacked evenly. You can load up to start ink charging. 5 Close the ink cartridge covers to 150 sheets. It takes about 31/2 minutes for... both plain paper and special Epson papers). Caution: Do not push the paper in Edges not even Load letter-size plain paper only. Too far in too far. Caution: Do not...

Start Here Card
Page 6
...scan, and print. You see this screen, click Add. 2 On the Printer List screen, click the Add button. 3 On the next screen, select EPSON USB from the pull-down menu. 4 Click Stylus Photo RX700. Selecting the RX700 1 Open the OS X Applications folder, then open screens, remove the CD-...the Add button. continue 3 Click Install. 4 Read the license agreement, then click Agree. Now you see the Stylus Photo RX700 in the Printer List. 6 Quit Print Center or the Printer Setup Utility. Note: Click Quit when each part finishes installing. 8 When installation is turned on -screen Reference ...
...scan, and print. You see this screen, click Add. 2 On the Printer List screen, click the Add button. 3 On the next screen, select EPSON USB from the pull-down menu. 4 Click Stylus Photo RX700. Selecting the RX700 1 Open the OS X Applications folder, then open screens, remove the CD-...the Add button. continue 3 Click Install. 4 Read the license agreement, then click Agree. Now you see the Stylus Photo RX700 in the Printer List. 6 Quit Print Center or the Printer Setup Utility. Note: Click Quit when each part finishes installing. 8 When installation is turned on -screen Reference ...


