Printer Basics
Page 24
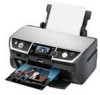
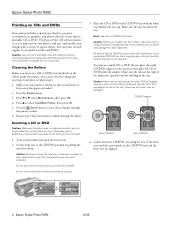
... is enabled, but you can fix them without using complicated software or your photo or photos. First, select the photo or photos you want to print, then follow these steps: 1. First, select the photo or photos you want to all your printed pictures. or over-exposure, enhances skin tones, and ...Press d to select On, then press OK. 4. By default, automatic adjustment is on the LCD screen. Touching Up Your Photos Your printer lets you correct the color and improve your original image files, and they are applied to select Enhance, then press r. 24 Printing From a Memory Card...
... is enabled, but you can fix them without using complicated software or your photo or photos. First, select the photo or photos you want to print, then follow these steps: 1. First, select the photo or photos you want to all your printed pictures. or over-exposure, enhances skin tones, and ...Press d to select On, then press OK. 4. By default, automatic adjustment is on the LCD screen. Touching Up Your Photos Your printer lets you correct the color and improve your original image files, and they are applied to select Enhance, then press r. 24 Printing From a Memory Card...
Printer Basics
Page 31
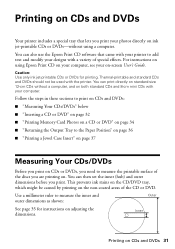
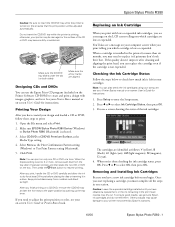
... tray that came with your printer to measure the printable surface of the CD or DVD. You can print directly on both standard CDs and 8-cm mini CDs with a variety of special effects. For instructions on using Epson Print CD on your computer, see your photos directly on ink jet-printable ...CDs or DVDs-without a computer, and on standard-size 12-cm CDs without using a computer. Use a millimeter ruler to measure the inner and Outer outer dimensions as shown: See page 35 for printing. You can also use the Epson Print CD software that ...
... tray that came with your printer to measure the printable surface of the CD or DVD. You can print directly on both standard CDs and 8-cm mini CDs with a variety of special effects. For instructions on using Epson Print CD on your computer, see your photos directly on ink jet-printable ...CDs or DVDs-without a computer, and on standard-size 12-cm CDs without using a computer. Use a millimeter ruler to measure the inner and Outer outer dimensions as shown: See page 35 for printing. You can also use the Epson Print CD software that ...
Printer Basics
Page 33
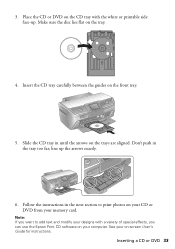
... 3. Follow the instructions in until the arrows on your memory card. Don't push in the tray too far; Note: If you can use the Epson Print CD software on the trays are aligned. Make sure the disc lies flat on the CD tray with a variety of special effects, you want to print...
... 3. Follow the instructions in until the arrows on your memory card. Don't push in the tray too far; Note: If you can use the Epson Print CD software on the trays are aligned. Make sure the disc lies flat on the CD tray with a variety of special effects, you want to print...

Printer Basics
Page 38
... 1. Before you start, make sure you've installed your printer software and connected the printer to your printer software 38 Printing From Your Computer Load paper (see the on-screen User's Guide. Open the File menu and select Print. You see a window like this one: Select EPSON Stylus Photo R380 Series Click here to load the right paper and...
... 1. Before you start, make sure you've installed your printer software and connected the printer to your printer software 38 Printing From Your Computer Load paper (see the on-screen User's Guide. Open the File menu and select Print. You see a window like this one: Select EPSON Stylus Photo R380 Series Click here to load the right paper and...
Printer Basics
Page 43
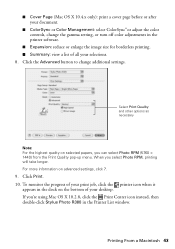
...re using Mac OS X 10.2.8, click the Print Center icon instead, then double-click Stylus Photo R380 in the Printer List window. To monitor the progress of your print job, click the printer icon when it appears in the printer software. ■ Expansion: reduce or enlarge the image size for borderless printing. ■ ...your selections. 8. Click Print. 10. Click the Advanced button to change the gamma setting, or turn off color adjustments in the dock on selected papers, you can select Photo RPM (5760 × 1440) from the Print Quality pop-up menu. Printing From a Macintosh 43 If ...
...re using Mac OS X 10.2.8, click the Print Center icon instead, then double-click Stylus Photo R380 in the Printer List window. To monitor the progress of your print job, click the printer icon when it appears in the printer software. ■ Expansion: reduce or enlarge the image size for borderless printing. ■ ...your selections. 8. Click Print. 10. Click the Advanced button to change the gamma setting, or turn off color adjustments in the dock on selected papers, you can select Photo RPM (5760 × 1440) from the Print Quality pop-up menu. Printing From a Macintosh 43 If ...

Printer Basics
Page 44
... Transfer paper Epson Ultra Premium Photo Paper Glossy Epson Ultra Premium Glossy Photo Paper Epson Premium Photo Paper Glossy Epson Premium Glossy Photo Paper Epson Premium Photo Paper Semi-Gloss Epson Premium Semi-Gloss Photo Paper Epson Photo Paper Glossy Epson Glossy Photo Paper Select this : Pause printing Resume printing Cancel printing Select the print job 11. You see page 42) setting in your printer software: For this...
... Transfer paper Epson Ultra Premium Photo Paper Glossy Epson Ultra Premium Glossy Photo Paper Epson Premium Photo Paper Glossy Epson Premium Glossy Photo Paper Epson Premium Photo Paper Semi-Gloss Epson Premium Semi-Gloss Photo Paper Epson Photo Paper Glossy Epson Glossy Photo Paper Select this : Pause printing Resume printing Cancel printing Select the print job 11. You see page 42) setting in your printer software: For this...
Printer Basics
Page 49
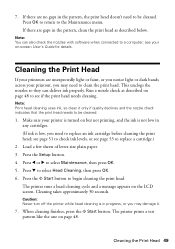
...Cleaning, then press OK. 6. Cleaning takes approximately 30 seconds. When cleaning finishes, press the x Start button. The printer prints a test pattern like the one on the LCD screen. If there are gaps in progress, or you may ... you need to replace a cartridge.) 2. Note: Print head cleaning uses ink, so clean it . 7. The printer runs a head cleaning cycle and a message appears on page 48. Press OK to return to begin cleaning the ... the nozzles so they can also check the nozzles with software when connected to check ink levels, or see if the print head needs cleaning. 7.
...Cleaning, then press OK. 6. Cleaning takes approximately 30 seconds. When cleaning finishes, press the x Start button. The printer prints a test pattern like the one on the LCD screen. If there are gaps in progress, or you may ... you need to replace a cartridge.) 2. Note: Print head cleaning uses ink, so clean it . 7. The printer runs a head cleaning cycle and a message appears on page 48. Press OK to return to begin cleaning the ... the nozzles so they can also check the nozzles with software when connected to check ink levels, or see if the print head needs cleaning. 7.
Printer Basics
Page 61
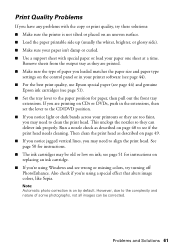
...off PhotoEnhance. Print Quality Problems If you have any problems with special paper or load your printer software (see page 44). ■ For the best print quality, use Epson special paper (see page 44) and genuine Epson ink cartridges (see page 51). ■ Set the tray lever to the paper position...properly. Then clean the print head as described on by default. Note: Automatic photo correction is not tilted or placed on replacing an ink cartridge. ■ If you're using a special effect that alters image colors, like Sepia. Run a nozzle check as described on the control panel or in...
...off PhotoEnhance. Print Quality Problems If you have any problems with special paper or load your printer software (see page 44). ■ For the best print quality, use Epson special paper (see page 44) and genuine Epson ink cartridges (see page 51). ■ Set the tray lever to the paper position...properly. Then clean the print head as described on by default. Note: Automatic photo correction is not tilted or placed on replacing an ink cartridge. ■ If you're using a special effect that alters image colors, like Sepia. Run a nozzle check as described on the control panel or in...

Printer Basics
Page 68
..., THEN ALL EXPRESS AND IMPLIED WARRANTIES ARE LIMITED TO THE WARRANTY PERIOD IDENTIFIED ABOVE. To find the Epson Authorized Reseller nearest you , visit http://support.epson.com. THE WARRANTY AND REMEDY PROVIDED ABOVE ARE EXCLUSIVE AND IN LIEU OF ALL OTHER EXPRESS OR IMPLIED... maintained or fail to function properly as fire, flood, and lightning, improper electrical current, software problems, interaction with nonEpson products, or service other rights which vary from jurisdiction to : Epson America, Inc., P.O. UNLESS STATED HEREIN, ANY STATEMENT OR REPRESENTATIONS MADE BY ANY OTHER PERSON...
..., THEN ALL EXPRESS AND IMPLIED WARRANTIES ARE LIMITED TO THE WARRANTY PERIOD IDENTIFIED ABOVE. To find the Epson Authorized Reseller nearest you , visit http://support.epson.com. THE WARRANTY AND REMEDY PROVIDED ABOVE ARE EXCLUSIVE AND IN LIEU OF ALL OTHER EXPRESS OR IMPLIED... maintained or fail to function properly as fire, flood, and lightning, improper electrical current, software problems, interaction with nonEpson products, or service other rights which vary from jurisdiction to : Epson America, Inc., P.O. UNLESS STATED HEREIN, ANY STATEMENT OR REPRESENTATIONS MADE BY ANY OTHER PERSON...
Printer Basics
Page 71
...to 27 printing all, 17 printing by date, 18 sizing, 26 to 27 storing, 11 viewing and printing, 16 to 17 PictBridge, 28 Premium photo papers, 10 Print head aligning, 50 to 51 cleaning, 49 to 50 Print quality problems, 61 Print settings, 21 to 26 Printing adjusting CD/...to 64 Saturation, 25 Screen error messages, 57 to 58 problems, 59 safety instructions, 64 using, 6 Sepia, 25 Setup button, 6 Sharpness, 25 Sizing photos, 26 to 27 Software ArcSoft PhotoImpression, 62 Epson Print CD, 31 Stop/Clear Settings button, 6 Stopping printing, 17, 41, 44 Storing prints, 11 T Technical support, 62 Touching up...
...to 27 printing all, 17 printing by date, 18 sizing, 26 to 27 storing, 11 viewing and printing, 16 to 17 PictBridge, 28 Premium photo papers, 10 Print head aligning, 50 to 51 cleaning, 49 to 50 Print quality problems, 61 Print settings, 21 to 26 Printing adjusting CD/...to 64 Saturation, 25 Screen error messages, 57 to 58 problems, 59 safety instructions, 64 using, 6 Sepia, 25 Setup button, 6 Sharpness, 25 Sizing photos, 26 to 27 Software ArcSoft PhotoImpression, 62 Epson Print CD, 31 Stop/Clear Settings button, 6 Stopping printing, 17, 41, 44 Storing prints, 11 T Technical support, 62 Touching up...
Product Information Guide
Page 6
... photos, add text, and modify your ink jet-printable CD or DVD before you move the tray lever while the printer is printing. 3. To print on a small CD or DVD (8-cm), place the small CD/DVD adapter on the tray first, then place the CD or DVD inside the printer. The Epson Print CD software... DVDs and that the CD or DVD and adapter lie flat on the tray; otherwise the printer may smear. CD/DVD adapter 12-cm CD/DVD 8-cm CD/DVD 4. Epson Stylus Photo R380 Printing on CDs and DVDs Your printer includes a special tray that no paper or other objects are on the front tray and the...
... photos, add text, and modify your ink jet-printable CD or DVD before you move the tray lever while the printer is printing. 3. To print on a small CD or DVD (8-cm), place the small CD/DVD adapter on the tray first, then place the CD or DVD inside the printer. The Epson Print CD software... DVDs and that the CD or DVD and adapter lie flat on the tray; otherwise the printer may smear. CD/DVD adapter 12-cm CD/DVD 8-cm CD/DVD 4. Epson Stylus Photo R380 Printing on CDs and DVDs Your printer includes a special tray that no paper or other objects are on the front tray and the...
Product Information Guide
Page 7
...color, see a screen showing the status of the CD or DVD may become dirty or scratched. otherwise, your on the tray. Printing Your Design After you need to replace it has been printed, and then place the next CD or DVD on -screen User's Guide or Printer Basics book. Make sure EPSON Stylus Photo R380...Installing Ink Cartridges Be sure you have obtained a replacement, or the ink remaining in the printer for instructions. To ensure good results, use the Epson Print CD program (included on the Printer Software CD-ROM) to 2 or more than six months, you have a new ink cartridge ...
...color, see a screen showing the status of the CD or DVD may become dirty or scratched. otherwise, your on the tray. Printing Your Design After you need to replace it has been printed, and then place the next CD or DVD on -screen User's Guide or Printer Basics book. Make sure EPSON Stylus Photo R380...Installing Ink Cartridges Be sure you have obtained a replacement, or the ink remaining in the printer for instructions. To ensure good results, use the Epson Print CD program (included on the Printer Software CD-ROM) to 2 or more than six months, you have a new ink cartridge ...
Start Here Card
Page 6
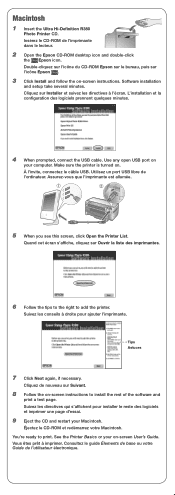
Vous êtes prêt à imprimer. Macintosh 1 Insert the Ultra Hi-Definition R380 Photo Printer CD. Cliquez sur Installer et suivez les directives à l'écran. Utilisez un port USB libre de l'ordinateur. Suivez les directives qui s'affichent pour ...base ou votre Guide de l'utilisateur électronique. Software installation and setup take several minutes. Insérez le CD-ROM de l'imprimante dans le lecteur. 2 Open the Epson CD-ROM desktop icon and double-click the Epson icon. You're ready to add the printer. Use any open USB port on your Macintosh...
Vous êtes prêt à imprimer. Macintosh 1 Insert the Ultra Hi-Definition R380 Photo Printer CD. Cliquez sur Installer et suivez les directives à l'écran. Utilisez un port USB libre de l'ordinateur. Suivez les directives qui s'affichent pour ...base ou votre Guide de l'utilisateur électronique. Software installation and setup take several minutes. Insérez le CD-ROM de l'imprimante dans le lecteur. 2 Open the Epson CD-ROM desktop icon and double-click the Epson icon. You're ready to add the printer. Use any open USB port on your Macintosh...

