Printer Basics
Page 2
...damages or problems arising from the use of any options or any consumable products other printers. While some people assume. and Matsushita Electric Industrial Co., Ltd. SD™ ...instructions. All rights reserved. PremierArt is a trademark. DPOF™ is a trademark of CANON INC., Eastman Kodak Company, Fuji Photo Film Co., Ltd. Copyright Notice All rights reserved. USB DIRECT-PRINT™ and the USB DIRECT-PRINT logo are registered trademarks; xD-Picture Card™ is a trademark of Fuji Photo Film Co.,Ltd. Trademarks Epson, Epson Stylus, Epson Photo...
...damages or problems arising from the use of any options or any consumable products other printers. While some people assume. and Matsushita Electric Industrial Co., Ltd. SD™ ...instructions. All rights reserved. PremierArt is a trademark. DPOF™ is a trademark of CANON INC., Eastman Kodak Company, Fuji Photo Film Co., Ltd. Copyright Notice All rights reserved. USB DIRECT-PRINT™ and the USB DIRECT-PRINT logo are registered trademarks; xD-Picture Card™ is a trademark of Fuji Photo Film Co.,Ltd. Trademarks Epson, Epson Stylus, Epson Photo...

Printer Basics
Page 5
... Software Installation Problems Printer Problems Print Quality Problems Problems With Paper Feeding CD/DVD Printing Problems Miscellaneous Printout Problems Uninstalling Printer Software Windows Mac OS X Where To Get Help Notices Windows System Requirements Macintosh System Requirements Important Safety Instructions Ink Cartridge Safety Instructions Energy Star Compliance FCC Compliance Statement Declaration of Conformity Epson America, Inc.
... Software Installation Problems Printer Problems Print Quality Problems Problems With Paper Feeding CD/DVD Printing Problems Miscellaneous Printout Problems Uninstalling Printer Software Windows Mac OS X Where To Get Help Notices Windows System Requirements Macintosh System Requirements Important Safety Instructions Ink Cartridge Safety Instructions Energy Star Compliance FCC Compliance Statement Declaration of Conformity Epson America, Inc.

Printer Basics
Page 8
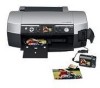
... contains system requirements, important safety information, your warranty, and instructions on: ■ Viewing your on-screen User's Guide ■ Printing all types of photos without a computer, see the Start Here sheet. Viewing Your On-Screen User's Guide Your printer CD-ROM includes an on your printer. For basic printing without a computer ■ Printing with...
... contains system requirements, important safety information, your warranty, and instructions on: ■ Viewing your on-screen User's Guide ■ Printing all types of photos without a computer, see the Start Here sheet. Viewing Your On-Screen User's Guide Your printer CD-ROM includes an on your printer. For basic printing without a computer ■ Printing with...
Printer Basics
Page 10
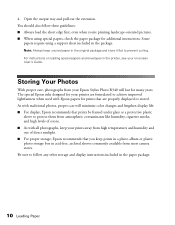
...other storage and display instructions included in the printer, see your Epson Stylus Photo R340 will last for many years. Note: Always keep your printer are properly displayed or stored. The special Epson inks designed for your prints away from most camera stores. Storing Your Photos With proper care,... when used with all photographs, keep unused paper in the package. 4. As with traditional photos, proper care will minimize color changes and lengthen display life: ■ For display, Epson recommends that are formulated to protect them from your on-screen User's Guide.
...other storage and display instructions included in the printer, see your Epson Stylus Photo R340 will last for many years. Note: Always keep your printer are properly displayed or stored. The special Epson inks designed for your prints away from most camera stores. Storing Your Photos With proper care,... when used with all photographs, keep unused paper in the package. 4. As with traditional photos, proper care will minimize color changes and lengthen display life: ■ For display, Epson recommends that are formulated to protect them from your on-screen User's Guide.

Printer Basics
Page 11
..., as shown below ■ "Connecting External Devices" on page 12 ■ "Viewing a Slide Show of Your Photos" on page 15 ■ "Copying Photos to Your Computer" on . 5. Accessing Photos Follow the instructions in these sections to access your Epson Stylus Photo R340. 2. Push the card in carefully until it stops (it is in, the card light comes on...
..., as shown below ■ "Connecting External Devices" on page 12 ■ "Viewing a Slide Show of Your Photos" on page 15 ■ "Copying Photos to Your Computer" on . 5. Accessing Photos Follow the instructions in these sections to access your Epson Stylus Photo R340. 2. Push the card in carefully until it stops (it is in, the card light comes on...

Printer Basics
Page 12
...it. When it's done, your printer using a Zip disk or a thumb drive, it must be formatted as the MicroTech™ ZiO!™) Note: Epson cannot guarantee the compatibility of the slot. Connecting External Devices If you see http://support.epson.com for instructions on the card. If you insert...Memory cards with the printer. 12 Accessing Photos Otherwise, make sure the card light is connected to your images are using a USB cable: ■ Digital camera with PictBridge® or USB DP (USB Direct Print™) support ■ USB thumb drives (see http://support.epson.com for a ...
...it. When it's done, your printer using a Zip disk or a thumb drive, it must be formatted as the MicroTech™ ZiO!™) Note: Epson cannot guarantee the compatibility of the slot. Connecting External Devices If you see http://support.epson.com for instructions on the card. If you insert...Memory cards with the printer. 12 Accessing Photos Otherwise, make sure the card light is connected to your images are using a USB cable: ■ Digital camera with PictBridge® or USB DP (USB Direct Print™) support ■ USB thumb drives (see http://support.epson.com for a ...

Printer Basics
Page 14
... may have a computer, you can try connecting it without losing your external storage device, follow additional instructions on page 17. 14 Accessing Photos Note: Epson cannot guarantee the compatibility of the printer (see page 12). 4. If it's not compatible, you'll see the "Start backup" message, press OK again to start the backup procedure...
... may have a computer, you can try connecting it without losing your external storage device, follow additional instructions on page 17. 14 Accessing Photos Note: Epson cannot guarantee the compatibility of the printer (see page 12). 4. If it's not compatible, you'll see the "Start backup" message, press OK again to start the backup procedure...
Printer Basics
Page 18
...x Start button. If the printer is in Memory Card mode. Follow the instructions in these sections to print: ■ "Printing Photos" below ■ "Choosing Print Settings" on page 20 ■ "Touching Up Your Photos" on page 21 ■ "Cropping and Sizing Your Photos" on page 23 ■...and DVDs" on page 24 ■ "Resetting Default Settings" on page 28 Printing Photos Before you begin, make sure you print photos quickly and easily without a computer. Printing Without a Computer Your Epson Stylus Photo R340 lets you load paper (see page 12). 17 Just load paper, insert your camera...
...x Start button. If the printer is in Memory Card mode. Follow the instructions in these sections to print: ■ "Printing Photos" below ■ "Choosing Print Settings" on page 20 ■ "Touching Up Your Photos" on page 21 ■ "Cropping and Sizing Your Photos" on page 23 ■...and DVDs" on page 24 ■ "Resetting Default Settings" on page 28 Printing Photos Before you begin, make sure you print photos quickly and easily without a computer. Printing Without a Computer Your Epson Stylus Photo R340 lets you load paper (see page 12). 17 Just load paper, insert your camera...

Printer Basics
Page 27
... CD or DVD. Place the CD or DVD on the CD tray with the white or printable side face-up the arrows exactly. Follow the instructions below to print. 1. Push it in too far; Load tray under the tab and the two rollers. Press the Print CD/DVD button to select... CD/DVD print mode if it is not already selected. 26 Printing Without a Computer Insert the tray into the printer carefully, making sure it is level, not tilted up arrows Keep tray level 4. Slide the tray under tab Line up or down.
... CD or DVD. Place the CD or DVD on the CD tray with the white or printable side face-up the arrows exactly. Follow the instructions below to print. 1. Push it in too far; Load tray under the tab and the two rollers. Press the Print CD/DVD button to select... CD/DVD print mode if it is not already selected. 26 Printing Without a Computer Insert the tray into the printer carefully, making sure it is level, not tilted up arrows Keep tray level 4. Slide the tray under tab Line up or down.
Printer Basics
Page 30
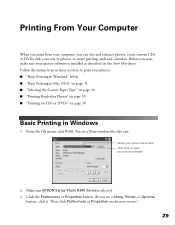
Follow the instructions in these sections to open your printer software 2. You see a Setup, Printer, or Options button, click it. From the File menu, click Print. Before you start, make sure your printer software is selected. 3. Make sure EPSON Stylus Photo R340 Series is installed as described on page 38 Basic Printing in Mac OS X" on page 31 ■...
Follow the instructions in these sections to open your printer software 2. You see a Setup, Printer, or Options button, click it. From the File menu, click Print. Before you start, make sure your printer software is selected. 3. Make sure EPSON Stylus Photo R340 Series is installed as described on page 38 Basic Printing in Mac OS X" on page 31 ■...

Printer Basics
Page 36
... may spray inside your photos without trimming, on these sections for instructions on selecting printer settings: ■ "Windows" on page 36 ■ "Mac OS X" on page 37 Printing Borderless Photos 35 Paper name Epson Matte Paper Heavyweight Epson Photo Paper Epson Glossy Photo Paper Epson Ultra Premium Glossy Photo Paper Epson Premium Glossy Photo Paper Epson Premium Semigloss Photo Paper Epson Premium Luster Photo Paper Sizes Letter...
... may spray inside your photos without trimming, on these sections for instructions on selecting printer settings: ■ "Windows" on page 36 ■ "Mac OS X" on page 37 Printing Borderless Photos 35 Paper name Epson Matte Paper Heavyweight Epson Photo Paper Epson Glossy Photo Paper Epson Ultra Premium Glossy Photo Paper Epson Premium Glossy Photo Paper Epson Premium Semigloss Photo Paper Epson Premium Luster Photo Paper Sizes Letter...

Printer Basics
Page 40
... good idea to print a small sample, then wait a day and check the quality to make sure the printer is turned on the surface may cause errors when you insert a CD or DVD, make sure it is satisfactory.... Otherwise, the disc may damage the printer or tray. 1. Lower CD/DVD tray guide Push in the output tray extension and lower the CD/...DVDs 39 Before you burn the data. Follow these steps to check the print position or color, see the instructions for "Adjusting the Print Position" on page 41 and "Adjusting the Print Density" on page 43...
... good idea to print a small sample, then wait a day and check the quality to make sure the printer is turned on the surface may cause errors when you insert a CD or DVD, make sure it is satisfactory.... Otherwise, the disc may damage the printer or tray. 1. Lower CD/DVD tray guide Push in the output tray extension and lower the CD/...DVDs 39 Before you burn the data. Follow these steps to check the print position or color, see the instructions for "Adjusting the Print Position" on page 41 and "Adjusting the Print Density" on page 43...

Printer Basics
Page 41
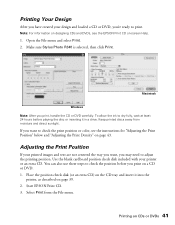
... lies flat on the tray first, then place the CD inside the ring. otherwise the printer may be damaged. Don't push the tray in "Printing Your Design" on the CD tray with 8-cm CDs 3. 2. Follow the instructions in too far; To print on a small CD (8-cm), place the small CD ring on...
... lies flat on the tray first, then place the CD inside the ring. otherwise the printer may be damaged. Don't push the tray in "Printing Your Design" on the CD tray with 8-cm CDs 3. 2. Follow the instructions in too far; To print on a small CD (8-cm), place the small CD ring on...
Printer Basics
Page 42
...Make sure Stylus Photo R340 is selected, then click Print. You can also use these steps to dry fully, wait at least 24 hours before you print on a CD or DVD. 1. Note: For information on designing CDs and DVDs, see the instructions for ".... 2. To allow the ink to check the position before playing the disc or inserting it into the printer, as described on page 39. 2. Start EPSON Print CD. 3. Place the position check disk (or an extra CD) on the CD tray and ...and loaded a CD or DVD, you're ready to check the print position or color, see the EPSON Print CD on-screen Help. 1.
...Make sure Stylus Photo R340 is selected, then click Print. You can also use these steps to dry fully, wait at least 24 hours before you print on a CD or DVD. 1. Note: For information on designing CDs and DVDs, see the instructions for ".... 2. To allow the ink to check the position before playing the disc or inserting it into the printer, as described on page 39. 2. Start EPSON Print CD. 3. Place the position check disk (or an extra CD) on the CD tray and ...and loaded a CD or DVD, you're ready to check the print position or color, see the EPSON Print CD on-screen Help. 1.
Printer Basics
Page 44
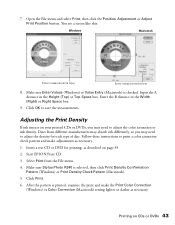
.... You see a screen like this: Windows Macintosh Enter measurements here Enter measurements here 8. Follow these instructions to adjust the density for printing, as necessary. 1. Start EPSON Print CD. 3. Adjusting the Print Density If ink smears on your printed CDs or DVDs, you may... as described on CDs or DVDs 43 Discs from the File menu. 4. Click OK to adjust the color saturation or ink density. Printing on page 39. 2. Make sure Stylus Photo R340 is selected, then click Print Density Confirmation Pattern (Windows) or Print Density Check Pattern (Macintosh). 5....
.... You see a screen like this: Windows Macintosh Enter measurements here Enter measurements here 8. Follow these instructions to adjust the density for printing, as necessary. 1. Start EPSON Print CD. 3. Adjusting the Print Density If ink smears on your printed CDs or DVDs, you may... as described on CDs or DVDs 43 Discs from the File menu. 4. Click OK to adjust the color saturation or ink density. Printing on page 39. 2. Make sure Stylus Photo R340 is selected, then click Print Density Confirmation Pattern (Windows) or Print Density Check Pattern (Macintosh). 5....

Printer Basics
Page 45
... instructions. 44 Printing From Your Computer Then check the saturation levels again. Each pattern is printed, adjust the setting, then repeat steps 3 through 6 again and select Third or Third Time. 9. If you can repeat steps 3 through 6, selecting Second or Second Time to try a third Color ...Correction setting, you want to print the second pattern. After the first pattern is printed in EPSON Print CD to adjust color saturation. See the EPSON Print CD on one disc. 7. Note: You can also use the...
... instructions. 44 Printing From Your Computer Then check the saturation levels again. Each pattern is printed, adjust the setting, then repeat steps 3 through 6 again and select Third or Third Time. 9. If you can repeat steps 3 through 6, selecting Second or Second Time to try a third Color ...Correction setting, you want to print the second pattern. After the first pattern is printed in EPSON Print CD to adjust color saturation. See the EPSON Print CD on one disc. 7. Note: You can also use the...
Printer Basics
Page 46
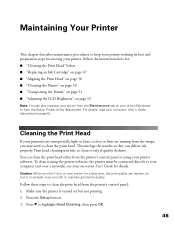
... print head from the Epson Printer Utility (Macintosh). Make sure the printer is turned on page 8). This unclogs the nozzles so they can clean the print head either from the printer's control panel or using the printer software, the printer must be connected directly to your printer. Caution: When you... for details. Print head cleaning uses ink, so clean it using your on-screen User's Guide (described on but not printing. 2. Follow the instructions here for: ■ "Cleaning the Print Head" below ■ "Replacing an Ink Cartridge" on page 47 ■ "Aligning the Print Head...
... print head from the Epson Printer Utility (Macintosh). Make sure the printer is turned on page 8). This unclogs the nozzles so they can clean the print head either from the printer's control panel or using the printer software, the printer must be connected directly to your printer. Caution: When you... for details. Print head cleaning uses ink, so clean it using your on-screen User's Guide (described on but not printing. 2. Follow the instructions here for: ■ "Cleaning the Print Head" below ■ "Replacing an Ink Cartridge" on page 47 ■ "Aligning the Print Head...
Printer Basics
Page 54
...described on the control panel display and follow the instructions provided. Problem Solving See these sections to diagnose and solve printer problems: ■ "Diagnosing Problems" below ■ "Setup or Software Installation Problems" on page 56 ■ "Printer Problems" on page 57 ■ "Print Quality... on page 62 ■ "Miscellaneous Printout Problems" on page 62 ■ "Uninstalling Printer Software" on page 64 ■ "Where To Get Help" on page 65 Diagnosing Problems Your Epson Stylus Photo R340 includes a number of ways to help you diagnose problems: ■ To identify the ...
...described on the control panel display and follow the instructions provided. Problem Solving See these sections to diagnose and solve printer problems: ■ "Diagnosing Problems" below ■ "Setup or Software Installation Problems" on page 56 ■ "Printer Problems" on page 57 ■ "Print Quality... on page 62 ■ "Miscellaneous Printout Problems" on page 62 ■ "Uninstalling Printer Software" on page 64 ■ "Where To Get Help" on page 65 Diagnosing Problems Your Epson Stylus Photo R340 includes a number of ways to help you diagnose problems: ■ To identify the ...

Printer Basics
Page 57
... and install again. ■ If you are using Mac OS X and you do not see the printer name in the Format for instructions. 56 Problem Solving Setup or Software Installation Problems The printer makes noise after ink cartridge installation. ■ The first time you turn it . See the Start Here... as gaps or missing segments in the Print Center or Printer Setup Utility. Connect the printer cable securely to clear the error. Also make sure your printer to connect it back on the Start Here sheet. If there are instructed to the computer until charging finishes before you turn off ...
... and install again. ■ If you are using Mac OS X and you do not see the printer name in the Format for instructions. 56 Problem Solving Setup or Software Installation Problems The printer makes noise after ink cartridge installation. ■ The first time you turn it . See the Start Here... as gaps or missing segments in the Print Center or Printer Setup Utility. Connect the printer cable securely to clear the error. Also make sure your printer to connect it back on the Start Here sheet. If there are instructed to the computer until charging finishes before you turn off ...

Printer Basics
Page 58
... and control panel to process them. See your system. To clean the print head, see your on-screen User's Guide for instructions on configuring your printer for use on your Windows help system for network printing, as though it is working , contact your computer manufacturer. ■ ... you have software installation privileges. If it takes longer for awhile. Printer Problems The printer is on your memory card, it 's not working properly in all directions. Try deleting any photos you don't need to set up your printer for details. Place it on or after it on a flat, ...
... and control panel to process them. See your system. To clean the print head, see your on-screen User's Guide for instructions on configuring your printer for use on your Windows help system for network printing, as though it is working , contact your computer manufacturer. ■ ... you have software installation privileges. If it takes longer for awhile. Printer Problems The printer is on your memory card, it 's not working properly in all directions. Try deleting any photos you don't need to set up your printer for details. Place it on or after it on a flat, ...