
User Manual (P.I.M Plug-in)
Page 2
... Epson Stylus® Photo R200 ■ Epson Stylus Photo R300/R300M ■ Epson Stylus Photo R320 ■ Epson Stylus Photo R800 ■ Epson Stylus Photo RX500 ■ Epson Stylus Photo RX600 ■ Epson Stylus Photo 780 ■ Epson Stylus Photo 785EPX ■ Epson Stylus Photo 820 ■ Epson Stylus Photo 825 ■ Epson Stylus Photo 890 ■ Epson Stylus Photo 900 ■ Epson Stylus Photo 925 ■ Epson Stylus Photo 960 ■ Epson Stylus Photo 1280 ■ Epson Stylus Photo 2000P* ■ Epson Stylus Photo 2200 ■ PictureMate™ by Epson * This printer...
... Epson Stylus® Photo R200 ■ Epson Stylus Photo R300/R300M ■ Epson Stylus Photo R320 ■ Epson Stylus Photo R800 ■ Epson Stylus Photo RX500 ■ Epson Stylus Photo RX600 ■ Epson Stylus Photo 780 ■ Epson Stylus Photo 785EPX ■ Epson Stylus Photo 820 ■ Epson Stylus Photo 825 ■ Epson Stylus Photo 890 ■ Epson Stylus Photo 900 ■ Epson Stylus Photo 925 ■ Epson Stylus Photo 960 ■ Epson Stylus Photo 1280 ■ Epson Stylus Photo 2000P* ■ Epson Stylus Photo 2200 ■ PictureMate™ by Epson * This printer...
Printer Basics
Page 7
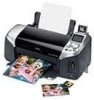
Your Epson Stylus® Photo R320 can print pictures directly from Bluetooth-enabled phones, PDAs, etc. 7 These photos are some of sizes just minutes after taking pictures with family and friends. Here are perfect for albums... A preview monitor helps you select photos for printing. ■ Your printer also supports Bluetooth® technology (using an optional adapter) for superior photo quality and performance, with manageable print file sizes. ■ Three built-in a variety of the printer's outstanding features: ■ Epson's exclusive 6-color ink technology lets you connect a ...
Your Epson Stylus® Photo R320 can print pictures directly from Bluetooth-enabled phones, PDAs, etc. 7 These photos are some of sizes just minutes after taking pictures with family and friends. Here are perfect for albums... A preview monitor helps you select photos for printing. ■ Your printer also supports Bluetooth® technology (using an optional adapter) for superior photo quality and performance, with manageable print file sizes. ■ Three built-in a variety of the printer's outstanding features: ■ Epson's exclusive 6-color ink technology lets you connect a ...
Printer Basics
Page 30
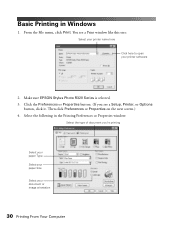
... button. (If you 're printing Select your paper Type Select your paper Size Select your printer software 2. Select the following in Windows 1. Make sure EPSON Stylus Photo R320 Series is selected. 3. Then click Preferences or Properties on the next screen.) 4. You see a Setup, Printer, or Options button, click it. Basic Printing in the Printing Preferences or Properties...
... button. (If you 're printing Select your paper Type Select your paper Size Select your printer software 2. Select the following in Windows 1. Make sure EPSON Stylus Photo R320 Series is selected. 3. Then click Preferences or Properties on the next screen.) 4. You see a Setup, Printer, or Options button, click it. Basic Printing in the Printing Preferences or Properties...
Printer Basics
Page 32
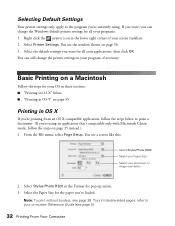
... Follow the steps for all your programs. 1. Select Stylus Photo R320 in OS X If you're printing from an OS X compatible application, follow the steps below to print a document. (If you can still change the Windows default printer settings for all your OS in these sections: ■...Size for pop-up menu. 3. Note: To print without borders, see a screen like this: Select Stylus Photo R320 Select your Paper Size Select your on page 30. 3. Select Printer Settings. To print double-sided pages, refer to your document or image orientation 2. Select the default settings...
... Follow the steps for all your programs. 1. Select Stylus Photo R320 in OS X If you're printing from an OS X compatible application, follow the steps below to print a document. (If you can still change the Windows default printer settings for all your OS in these sections: ■...Size for pop-up menu. 3. Note: To print without borders, see a screen like this: Select Stylus Photo R320 Select your Paper Size Select your on page 30. 3. Select Printer Settings. To print double-sided pages, refer to your document or image orientation 2. Select the default settings...
Printer Basics
Page 33
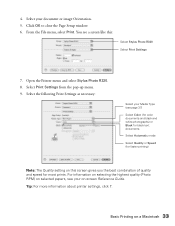
...window. 6. Select the following Print Settings as necessary: Select your Media Type (see page 37) Select Color (for color documents and black and white photographs) or Black for black text documents Select Automatic mode Select Quality or Speed (for most prints. For information on selecting the highest quality (Photo... on a Macintosh 33 You see your document or image Orientation. 5. Tip: For more information about printer settings, click ?. 4. Select your on this : Select Stylus Photo R320 Select Print Settings 7. Open the Printer menu and select Stylus Photo R320. 8.
...window. 6. Select the following Print Settings as necessary: Select your Media Type (see page 37) Select Color (for color documents and black and white photographs) or Black for black text documents Select Automatic mode Select Quality or Speed (for most prints. For information on selecting the highest quality (Photo... on a Macintosh 33 You see your document or image Orientation. 5. Tip: For more information about printer settings, click ?. 4. Select your on this : Select Stylus Photo R320 Select Print Settings 7. Open the Printer menu and select Stylus Photo R320. 8.

Printer Basics
Page 40
You see a screen like this: Select Stylus Photo R320 Choose a borderless Paper Size 2. From the File menu, select Print. 6. Select Stylus Photo R320 in the Format for the paper you've loaded. 4. Choose the borderless Paper Size for pop...Photo Paper ■ Glossy Photo Paper ■ Premium Glossy Photo Paper ■ Premium Semigloss Photo Paper ■ Premium Luster Photo Paper 8. Select Stylus Photo R320 in the Printer pop-up menu. 3. Click OK to start printing. 40 Printing From Your Computer Select other print settings as necessary, then click Print to close the Page Setup window...
You see a screen like this: Select Stylus Photo R320 Choose a borderless Paper Size 2. From the File menu, select Print. 6. Select Stylus Photo R320 in the Format for the paper you've loaded. 4. Choose the borderless Paper Size for pop...Photo Paper ■ Glossy Photo Paper ■ Premium Glossy Photo Paper ■ Premium Semigloss Photo Paper ■ Premium Luster Photo Paper 8. Select Stylus Photo R320 in the Printer pop-up menu. 3. Click OK to start printing. 40 Printing From Your Computer Select other print settings as necessary, then click Print to close the Page Setup window...

Printer Basics
Page 45
... images and text are not centered or positioned the way you want to check the position before playing the disc or inserting it into the printer, as described on the CD tray and insert it in a drive. Place the position check disk (or an extra CD) on page 42. 2. Printing on... and "Adjusting the Print Density" on a CD or DVD. 1. Make sure Stylus Photo R320 is selected, then click Print. You can also use these steps to check the print position or color, see the EPSON Print CD on CDs or DVDs 45 Macintosh Windows Note: After you print, handle the CD or DVD carefully. Use the...
... images and text are not centered or positioned the way you want to check the position before playing the disc or inserting it into the printer, as described on the CD tray and insert it in a drive. Place the position check disk (or an extra CD) on page 42. 2. Printing on... and "Adjusting the Print Density" on a CD or DVD. 1. Make sure Stylus Photo R320 is selected, then click Print. You can also use these steps to check the print position or color, see the EPSON Print CD on CDs or DVDs 45 Macintosh Windows Note: After you print, handle the CD or DVD carefully. Use the...

Printer Basics
Page 46
The confirmation pattern is selected, then click Print Position Confirmation Pattern (Windows) or Print Position Check Pattern (Macintosh). 4. Remove the position check disk or CD and measure the distance from the edge of the hole to the small cross marks (distances labeled A and B as shown). You'll need a metric ruler with millimeters for these measurements. 46 Printing From Your Computer Click Print. Make sure Stylus Photo R320 is printed on the position check disk or CD. 6. Macintosh Windows 5.
The confirmation pattern is selected, then click Print Position Confirmation Pattern (Windows) or Print Position Check Pattern (Macintosh). 4. Remove the position check disk or CD and measure the distance from the edge of the hole to the small cross marks (distances labeled A and B as shown). You'll need a metric ruler with millimeters for these measurements. 46 Printing From Your Computer Click Print. Make sure Stylus Photo R320 is printed on the position check disk or CD. 6. Macintosh Windows 5.

Printer Basics
Page 48
... Pattern (Windows) or Print Density Check Pattern (Macintosh). 5. Insert a test CD or DVD for printing, as described on -screen help for instructions. 48 Printing From Your Computer Select Print from different manufacturers may absorb ink differently, so you may need to adjust the color saturation or ink density. Make sure Stylus Photo R320 is printed...
... Pattern (Windows) or Print Density Check Pattern (Macintosh). 5. Insert a test CD or DVD for printing, as described on -screen help for instructions. 48 Printing From Your Computer Select Print from different manufacturers may absorb ink differently, so you may need to adjust the color saturation or ink density. Make sure Stylus Photo R320 is printed...
Printer Basics
Page 71
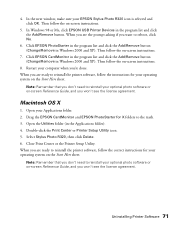
... you won 't see the license agreement. Double-click the Print Center or Printer Setup Utility icon. 5. Select Stylus Photo R320, then click Delete. 6. Close Print Center or the Printer Setup Utility. In the next window, make sure your Applications folder. 2. Then follow the on -screen instructions....sheet. Open the Utilities folder (in Windows 2000 and XP). Uninstalling Printer Software 71 Click EPSON PhotoStarter in the program list and click the Add/Remove button (Change/Remove in the Applications folder). 4. Open your EPSON Stylus Photo R320 icon is selected and click OK....
... you won 't see the license agreement. Double-click the Print Center or Printer Setup Utility icon. 5. Select Stylus Photo R320, then click Delete. 6. Close Print Center or the Printer Setup Utility. In the next window, make sure your Applications folder. 2. Then follow the on -screen instructions....sheet. Open the Utilities folder (in Windows 2000 and XP). Uninstalling Printer Software 71 Click EPSON PhotoStarter in the program list and click the Add/Remove button (Change/Remove in the Applications folder). 4. Open your EPSON Stylus Photo R320 icon is selected and click OK....

Product Brochure
Page 2
...PRINTER EPSON® STYLUS® PHOTOR320 SPECIFICATIONS Printing Technology 6-color (CcMmYK), advanced Micro Piezo®, optimized for connection between computer and printer USB 1.1 host connection between printer and CD-R/DVD-R drives, Zip drives and PictBridge-enabled digital cameras Operating Systems Windows® USB - Epson, Epson Stylus, and Micro Piezo are registered trademarks and PRINT Image Matching is a trademark of Seiko Epson... Speed* Black text Color text 4" x 6" photo 8" x 10" photo Up to 15 ppm Up to 15 ppm 39 sec. 77 sec. Epson disclaims any and all...
...PRINTER EPSON® STYLUS® PHOTOR320 SPECIFICATIONS Printing Technology 6-color (CcMmYK), advanced Micro Piezo®, optimized for connection between computer and printer USB 1.1 host connection between printer and CD-R/DVD-R drives, Zip drives and PictBridge-enabled digital cameras Operating Systems Windows® USB - Epson, Epson Stylus, and Micro Piezo are registered trademarks and PRINT Image Matching is a trademark of Seiko Epson... Speed* Black text Color text 4" x 6" photo 8" x 10" photo Up to 15 ppm Up to 15 ppm 39 sec. 77 sec. Epson disclaims any and all...


