
User Manual (P.I.M Plug-in)
Page 2
...Photo R200 ■ Epson Stylus Photo R300/R300M ■ Epson Stylus Photo R320 ■ Epson Stylus Photo R800 ■ Epson Stylus Photo RX500 ■ Epson Stylus Photo RX600 ■ Epson Stylus Photo 780 ■ Epson Stylus Photo 785EPX ■ Epson Stylus Photo 820 ■ Epson Stylus Photo 825 ■ Epson Stylus Photo 890 ■ Epson Stylus Photo 900 ■ Epson Stylus Photo 925 ■ Epson Stylus Photo 960 ■ Epson Stylus Photo 1280 ■ Epson Stylus Photo 2000P* ■ Epson Stylus Photo 2200 ■ PictureMate™ by Epson * This printer only supports PRINT...
...Photo R200 ■ Epson Stylus Photo R300/R300M ■ Epson Stylus Photo R320 ■ Epson Stylus Photo R800 ■ Epson Stylus Photo RX500 ■ Epson Stylus Photo RX600 ■ Epson Stylus Photo 780 ■ Epson Stylus Photo 785EPX ■ Epson Stylus Photo 820 ■ Epson Stylus Photo 825 ■ Epson Stylus Photo 890 ■ Epson Stylus Photo 900 ■ Epson Stylus Photo 925 ■ Epson Stylus Photo 960 ■ Epson Stylus Photo 1280 ■ Epson Stylus Photo 2000P* ■ Epson Stylus Photo 2200 ■ PictureMate™ by Epson * This printer only supports PRINT...
Printer Basics
Page 7
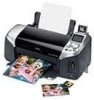
... adapter) for albums or framing or sharing with your printer in a variety of the printer is for connecting the printer to your Windows® or Macintosh® computer and print from your digital camera. Your Epson Stylus® Photo R320 can transfer them immediately to your computer.) ■... sending prints wirelessly from your PC. You can create true BorderFree™ photos directly from your digital camera's memory card. These photos are some of colors. Genuine Epson® ink and papers create long-lasting and water-resistant prints. ■ CD and DVD printing on ...
... adapter) for albums or framing or sharing with your printer in a variety of the printer is for connecting the printer to your Windows® or Macintosh® computer and print from your digital camera. Your Epson Stylus® Photo R320 can transfer them immediately to your computer.) ■... sending prints wirelessly from your PC. You can create true BorderFree™ photos directly from your digital camera's memory card. These photos are some of colors. Genuine Epson® ink and papers create long-lasting and water-resistant prints. ■ CD and DVD printing on ...
Printer Basics
Page 8
..., resolution, and lens use them to produce the best prints possible. Check with your digital camera and printer work together automatically to create accurate print settings. With PRINT Image Matching, the digital camera manufacturer can use in for...color space, color saturation, and noise reduction ■ Shadow point, highlight point, and color balance The camera saves this information in each camera model. About Exif Print The Exif (Exchangeable Image File) Print format includes information about your on printing P.I .M. About PRINT Image Matching Your Epson Stylus Photo R320...
..., resolution, and lens use them to produce the best prints possible. Check with your digital camera and printer work together automatically to create accurate print settings. With PRINT Image Matching, the digital camera manufacturer can use in for...color space, color saturation, and noise reduction ■ Shadow point, highlight point, and color balance The camera saves this information in each camera model. About Exif Print The Exif (Exchangeable Image File) Print format includes information about your on printing P.I .M. About PRINT Image Matching Your Epson Stylus Photo R320...
Printer Basics
Page 12
...: ■ Always load the short edge first, even when you keep your prints away from your on loading special papers and envelopes in the printer, see your Epson Stylus Photo R320 will minimize color changes and lengthen display life: ■ For display, Epson recommends that prints be framed under glass or a protective plastic sleeve to achieve improved lightfastness when...
...: ■ Always load the short edge first, even when you keep your prints away from your on loading special papers and envelopes in the printer, see your Epson Stylus Photo R320 will minimize color changes and lengthen display life: ■ For display, Epson recommends that prints be framed under glass or a protective plastic sleeve to achieve improved lightfastness when...

Printer Basics
Page 13
...When it 's done, your card. Accessing Photos Follow the instructions in these sections to Your Computer" on -screen Reference Guide for printing (see page 19). 13 Insert the memory card into one card at a time. After a moment, the printer reads and counts the number of the three... slots, as shown below ■ "Connecting External Devices" on page 14 ■ "Copying Photos to access your Stylus Photo R320. 2.
...When it 's done, your card. Accessing Photos Follow the instructions in these sections to Your Computer" on -screen Reference Guide for printing (see page 19). 13 Insert the memory card into one card at a time. After a moment, the printer reads and counts the number of the three... slots, as shown below ■ "Connecting External Devices" on page 14 ■ "Copying Photos to access your Stylus Photo R320. 2.

Printer Basics
Page 19
... from the control panel, and press the green x Print button. Press or to print is in Basic mode. Printing Without a Computer Your Epson Stylus Photo R320 lets you begin, make sure the printer is in Advanced mode, press the Basic/Advanced button to select Basic mode. Easy Photo Printing Before you print photos quickly and easily without a computer. Tip: The default number...
... from the control panel, and press the green x Print button. Press or to print is in Basic mode. Printing Without a Computer Your Epson Stylus Photo R320 lets you begin, make sure the printer is in Advanced mode, press the Basic/Advanced button to select Basic mode. Easy Photo Printing Before you print photos quickly and easily without a computer. Tip: The default number...

Printer Basics
Page 24
... can make affect only the current print job and are saved when you turn off the printer or choose a different set of adjustments are turned on in order to turn off the settings when you make manual adjustments while P.I .M. Touching Up Your Photos Your Epson Stylus Photo R320 lets you correct the color and improve the image quality...
... can make affect only the current print job and are saved when you turn off the printer or choose a different set of adjustments are turned on in order to turn off the settings when you make manual adjustments while P.I .M. Touching Up Your Photos Your Epson Stylus Photo R320 lets you correct the color and improve the image quality...

Printer Basics
Page 25
.... 2. Adjust any settings as necessary, then press OK. data). ■ Exif: Uses your camera's Exif Print settings (this if you 're done. Cropping and Sizing Your Photos Your Epson Stylus Photo R320 lets you turn off the printer or choose a different set of your pictures contain Exif Print data). ■ PhotoEnhance: Adjusts the brightness, contrast, and saturation of...
.... 2. Adjust any settings as necessary, then press OK. data). ■ Exif: Uses your camera's Exif Print settings (this if you 're done. Cropping and Sizing Your Photos Your Epson Stylus Photo R320 lets you turn off the printer or choose a different set of your pictures contain Exif Print data). ■ PhotoEnhance: Adjusts the brightness, contrast, and saturation of...
Printer Basics
Page 30
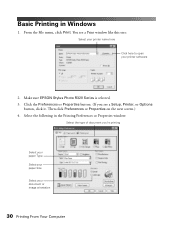
... Preferences or Properties button. (If you 're printing Select your paper Type Select your paper Size Select your printer software 2. Make sure EPSON Stylus Photo R320 Series is selected. 3. You see a Setup, Printer, or Options button, click it. Then click Preferences or Properties on the next screen.) 4. Basic Printing in the Printing Preferences or Properties window: Select the type...
... Preferences or Properties button. (If you 're printing Select your paper Type Select your paper Size Select your printer software 2. Make sure EPSON Stylus Photo R320 Series is selected. 3. You see a Setup, Printer, or Options button, click it. Then click Preferences or Properties on the next screen.) 4. Basic Printing in the Printing Preferences or Properties window: Select the type...
Printer Basics
Page 32
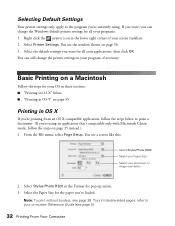
... Page Setup. Note: To print without borders, see a screen like this: Select Stylus Photo R320 Select your Paper Size Select your screen (taskbar). 2. Select Printer Settings. You see the window shown on -screen Reference Guide (see page 9). 32 Printing From Your Computer You can change the printer settings in OS X If you're printing from an OS X compatible...
... Page Setup. Note: To print without borders, see a screen like this: Select Stylus Photo R320 Select your Paper Size Select your screen (taskbar). 2. Select Printer Settings. You see the window shown on -screen Reference Guide (see page 9). 32 Printing From Your Computer You can change the printer settings in OS X If you're printing from an OS X compatible...
Printer Basics
Page 33
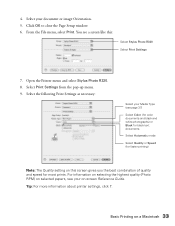
... window. 6. Basic Printing on -screen Reference Guide. You see page 37) Select Color (for color documents and black and white photographs) or Black for black text documents Select Automatic mode Select Quality or Speed (for most prints. Select the following Print Settings as necessary: Select your document or image Orientation. 5. 4. Open the Printer menu and select Stylus Photo R320. 8.
... window. 6. Basic Printing on -screen Reference Guide. You see page 37) Select Color (for color documents and black and white photographs) or Black for black text documents Select Automatic mode Select Quality or Speed (for most prints. Select the following Print Settings as necessary: Select your document or image Orientation. 5. 4. Open the Printer menu and select Stylus Photo R320. 8.

Printer Basics
Page 34
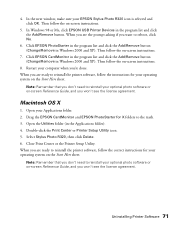
... the Stylus Photo R320 icon when it up menu: ■ Copies & Pages: For selecting the number of copies or a page range. ■ Layout: For selecting page layout options. ■ Color Management: For adjusting the color controls, changing the gamma setting, or turning off color adjustments by the printer software. ■ Summary: For viewing a list of your print job...
... the Stylus Photo R320 icon when it up menu: ■ Copies & Pages: For selecting the number of copies or a page range. ■ Layout: For selecting page layout options. ■ Color Management: For adjusting the color controls, changing the gamma setting, or turning off color adjustments by the printer software. ■ Summary: For viewing a list of your print job...

Printer Basics
Page 40
... of the following media types: ■ Matte Paper Heavyweight ■ Photo Paper ■ Glossy Photo Paper ■ Premium Glossy Photo Paper ■ Premium Semigloss Photo Paper ■ Premium Luster Photo Paper 8. Macintosh OS X 1. Select Stylus Photo R320 in the Printer pop-up menu. 3. From the File menu, select Print. 6. Select Stylus Photo R320 in the Format for the paper you've loaded. 4. You...
... of the following media types: ■ Matte Paper Heavyweight ■ Photo Paper ■ Glossy Photo Paper ■ Premium Glossy Photo Paper ■ Premium Semigloss Photo Paper ■ Premium Luster Photo Paper 8. Macintosh OS X 1. Select Stylus Photo R320 in the Printer pop-up menu. 3. From the File menu, select Print. 6. Select Stylus Photo R320 in the Format for the paper you've loaded. 4. You...

Printer Basics
Page 45
...you may need to print. Start EPSON Print CD. 3. Make sure Stylus Photo R320 is selected, then click Print. Keep printed discs away from the File menu. Adjusting the Print Position If your printed images and text are not centered or positioned the way you want to check the print position or color, see the EPSON Print CD on a CD... allow the ink to check the position before playing the disc or inserting it into the printer, as described on the CD tray and insert it in a drive. Open the File menu and select Print. 2. Place the position check disk (or an extra CD) on page 42. 2. ...
...you may need to print. Start EPSON Print CD. 3. Make sure Stylus Photo R320 is selected, then click Print. Keep printed discs away from the File menu. Adjusting the Print Position If your printed images and text are not centered or positioned the way you want to check the print position or color, see the EPSON Print CD on a CD... allow the ink to check the position before playing the disc or inserting it into the printer, as described on the CD tray and insert it in a drive. Open the File menu and select Print. 2. Place the position check disk (or an extra CD) on page 42. 2. ...

Printer Basics
Page 46
Click Print. 4. Macintosh Windows 5. You'll need a metric ruler with millimeters for these measurements. 46 Printing From Your Computer Remove the position check disk or CD and measure the distance from the edge of the hole to the small cross marks (distances labeled A and B as shown). Make sure Stylus Photo R320 is printed on the position check disk or CD. 6. The confirmation pattern is selected, then click Print Position Confirmation Pattern (Windows) or Print Position Check Pattern (Macintosh).
Click Print. 4. Macintosh Windows 5. You'll need a metric ruler with millimeters for these measurements. 46 Printing From Your Computer Remove the position check disk or CD and measure the distance from the edge of the hole to the small cross marks (distances labeled A and B as shown). Make sure Stylus Photo R320 is printed on the position check disk or CD. 6. The confirmation pattern is selected, then click Print Position Confirmation Pattern (Windows) or Print Position Check Pattern (Macintosh).

Printer Basics
Page 48
... Color Correction (Macintosh) setting lighter or darker as necessary. 1. Then check the saturation levels again. Click Print. 6. You can print three density patterns on page 42. 2. Remove the CD or DVD and let it dry for instructions. 48 Printing From Your Computer Make sure Stylus Photo R320 is printed, examine the print and make adjustments as necessary. See the EPSON Print...
... Color Correction (Macintosh) setting lighter or darker as necessary. 1. Then check the saturation levels again. Click Print. 6. You can print three density patterns on page 42. 2. Remove the CD or DVD and let it dry for instructions. 48 Printing From Your Computer Make sure Stylus Photo R320 is printed, examine the print and make adjustments as necessary. See the EPSON Print...

Printer Basics
Page 59
... page 68 ■ "CD/DVD Printing Problems" on page 68 ■ "Miscellaneous Printout Problems" on page 69 ■ "Uninstalling Printer Software" on page 70 ■ "Where To Get Help" on page 73 Diagnosing Problems Your Epson Stylus Photo R320 includes a number of the suggested solutions solve your printer or the computer, run a printer check as described on page...
... page 68 ■ "CD/DVD Printing Problems" on page 68 ■ "Miscellaneous Printout Problems" on page 69 ■ "Uninstalling Printer Software" on page 70 ■ "Where To Get Help" on page 73 Diagnosing Problems Your Epson Stylus Photo R320 includes a number of the suggested solutions solve your printer or the computer, run a printer check as described on page...
Printer Basics
Page 71
...Add/Remove button (Change/Remove in Windows 2000 and XP). 4. In Windows 98 or Me, click EPSON USB Printer Devices in the Applications folder). 4. Open your EPSON Stylus Photo R320 icon is selected and click OK. Note: Remember that you don't need to reinstall your computer when..., follow the on the Start Here sheet. When you 're done. Drag the EPSON CardMonitor and EPSON PhotoStarter for your optional photo software or on -screen instructions. 8. Double-click the Print Center or Printer Setup Utility icon. 5. Then follow the on -screen Reference Guide, and you want to the...
...Add/Remove button (Change/Remove in Windows 2000 and XP). 4. In Windows 98 or Me, click EPSON USB Printer Devices in the Applications folder). 4. Open your EPSON Stylus Photo R320 icon is selected and click OK. Note: Remember that you don't need to reinstall your computer when..., follow the on the Start Here sheet. When you 're done. Drag the EPSON CardMonitor and EPSON PhotoStarter for your optional photo software or on -screen instructions. 8. Double-click the Print Center or Printer Setup Utility icon. 5. Then follow the on -screen Reference Guide, and you want to the...

Product Brochure
Page 1
... printing- all without a PC! - Key Features Print directly on CDs and DVDs TM Epson Prints. Print CDs and borderless photos-no PC required - The Epson Stylus Photo R320 makes it easy to select, crop and print photos from your digital camera- Brilliance that lasts. Works with fast photo print speeds - 4" x 6" photo as fast as 39 seconds - no PC required! INK JET PRINTER EPSON® STYLUS® PHOTOR320 Superior photo printing...
... printing- all without a PC! - Key Features Print directly on CDs and DVDs TM Epson Prints. Print CDs and borderless photos-no PC required - The Epson Stylus Photo R320 makes it easy to select, crop and print photos from your digital camera- Brilliance that lasts. Works with fast photo print speeds - 4" x 6" photo as fast as 39 seconds - no PC required! INK JET PRINTER EPSON® STYLUS® PHOTOR320 Superior photo printing...

Product Brochure
Page 2
... Size 3 picoliters Print Speed* Black text Color text 4" x 6" photo 8" x 10" photo Up to 15 ppm Up to www.epson.com. The printer ships with full cartridges and some ink from first cartridges is a trademark of Epson America, Inc. INK JET PRINTER EPSON® STYLUS® PHOTOR320 SPECIFICATIONS Printing Technology 6-color (CcMmYK), advanced Micro Piezo®, optimized for photo printing Ink Type 6-color dye based (individual...
... Size 3 picoliters Print Speed* Black text Color text 4" x 6" photo 8" x 10" photo Up to 15 ppm Up to www.epson.com. The printer ships with full cartridges and some ink from first cartridges is a trademark of Epson America, Inc. INK JET PRINTER EPSON® STYLUS® PHOTOR320 SPECIFICATIONS Printing Technology 6-color (CcMmYK), advanced Micro Piezo®, optimized for photo printing Ink Type 6-color dye based (individual...


