
User Manual (P.I.M Plug-in)
Page 2
... Epson Stylus® Photo R200 ■ Epson Stylus Photo R300/R300M ■ Epson Stylus Photo R320 ■ Epson Stylus Photo R800 ■ Epson Stylus Photo RX500 ■ Epson Stylus Photo RX600 ■ Epson Stylus Photo 780 ■ Epson Stylus Photo 785EPX ■ Epson Stylus Photo 820 ■ Epson Stylus Photo 825 ■ Epson Stylus Photo 890 ■ Epson Stylus Photo 900 ■ Epson Stylus Photo 925 ■ Epson Stylus Photo 960 ■ Epson Stylus Photo 1280 ■ Epson Stylus Photo 2000P* ■ Epson Stylus Photo 2200 ■ PictureMate™ by Epson * This printer...
... Epson Stylus® Photo R200 ■ Epson Stylus Photo R300/R300M ■ Epson Stylus Photo R320 ■ Epson Stylus Photo R800 ■ Epson Stylus Photo RX500 ■ Epson Stylus Photo RX600 ■ Epson Stylus Photo 780 ■ Epson Stylus Photo 785EPX ■ Epson Stylus Photo 820 ■ Epson Stylus Photo 825 ■ Epson Stylus Photo 890 ■ Epson Stylus Photo 900 ■ Epson Stylus Photo 925 ■ Epson Stylus Photo 960 ■ Epson Stylus Photo 1280 ■ Epson Stylus Photo 2000P* ■ Epson Stylus Photo 2200 ■ PictureMate™ by Epson * This printer...
Printer Basics
Page 7
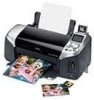
Your Epson Stylus® Photo R320 can print pictures directly from Bluetooth-enabled phones, PDAs, etc. 7 Here are perfect for sending prints wirelessly from your printer in memory card slots support CompactFlash™ Type I and II, Secure Digital, MultiMediaCard,™ xD Picture...or framing or sharing with manageable print file sizes. ■ Three built-in a variety of colors. These photos are some of the printer's outstanding features: ■ Epson's exclusive 6-color ink technology lets you achieve fine shadow detail, dazzling highlights, and excellent fill across a wide ...
Your Epson Stylus® Photo R320 can print pictures directly from Bluetooth-enabled phones, PDAs, etc. 7 Here are perfect for sending prints wirelessly from your printer in memory card slots support CompactFlash™ Type I and II, Secure Digital, MultiMediaCard,™ xD Picture...or framing or sharing with manageable print file sizes. ■ Three built-in a variety of colors. These photos are some of the printer's outstanding features: ■ Epson's exclusive 6-color ink technology lets you achieve fine shadow detail, dazzling highlights, and excellent fill across a wide ...
Printer Basics
Page 8
...These options include: ■ Contrast, sharpness, and brightness ■ Gamma level, color space, color saturation, and noise reduction ■ Shadow point, highlight point, and color balance The camera saves this information in each camera model. About Exif Print The...files so your printer and application can set specific printing options for Epson's revolutionary PRINT Image Matching™ technology. Your printer-along with your on printing P.I .M. II Plug-in the JPEG image file. PRINT Image Matching lets your Epson Stylus Photo R320 gives great photo printing results. ...
...These options include: ■ Contrast, sharpness, and brightness ■ Gamma level, color space, color saturation, and noise reduction ■ Shadow point, highlight point, and color balance The camera saves this information in each camera model. About Exif Print The...files so your printer and application can set specific printing options for Epson's revolutionary PRINT Image Matching™ technology. Your printer-along with your on printing P.I .M. II Plug-in the JPEG image file. PRINT Image Matching lets your Epson Stylus Photo R320 gives great photo printing results. ...
Printer Basics
Page 12
...commonly available from most camera stores. You should also follow any other storage and display instructions included in the printer, see your Epson Stylus Photo R320 will last for many years. For instructions on loading special papers and envelopes in the paper package. 12 ...Loading Paper As with traditional photos, proper care will minimize color changes and lengthen display life: ■ For display, Epson recommends that you 're printing...
...commonly available from most camera stores. You should also follow any other storage and display instructions included in the printer, see your Epson Stylus Photo R320 will last for many years. For instructions on loading special papers and envelopes in the paper package. 12 ...Loading Paper As with traditional photos, proper care will minimize color changes and lengthen display life: ■ For display, Epson recommends that you 're printing...

Printer Basics
Page 13
... When it doesn't go in all the way). After a moment, the printer reads and counts the number of the three slots, as shown below ■ "Connecting External Devices" on page 14 ■ "Copying Photos to Your Computer" on your card. Open the memory card door. 3. Press...Picture Card (right) Note: Insert just one of images on page 17 Inserting Memory Cards 1. See your on your Stylus Photo R320. 2. Accessing Photos Follow the instructions in these sections to access your photos: ■ "Inserting Memory Cards" below . When it's done, your images are available for supported...
... When it doesn't go in all the way). After a moment, the printer reads and counts the number of the three slots, as shown below ■ "Connecting External Devices" on page 14 ■ "Copying Photos to Your Computer" on your card. Open the memory card door. 3. Press...Picture Card (right) Note: Insert just one of images on page 17 Inserting Memory Cards 1. See your on your Stylus Photo R320. 2. Accessing Photos Follow the instructions in these sections to access your photos: ■ "Inserting Memory Cards" below . When it's done, your images are available for supported...

Printer Basics
Page 19
... Without a Computer Your Epson Stylus Photo R320 lets you choose which photos to print. Selecting the Photos You Want to highlight the photo number you begin, make sure the printer is in the appropriate card slot (see page 21. Press or to Print The Select Photo option lets you print photos quickly and easily without ... You can print, you need to select Basic mode. To print larger photos, see page 13). Tip: The default number of copies to print, then press OK. 3. If the printer is one. Easy Photo Printing Before you want to print is in Basic mode. If you how ...
... Without a Computer Your Epson Stylus Photo R320 lets you choose which photos to print. Selecting the Photos You Want to highlight the photo number you begin, make sure the printer is in the appropriate card slot (see page 21. Press or to Print The Select Photo option lets you print photos quickly and easily without ... You can print, you need to select Basic mode. To print larger photos, see page 13). Tip: The default number of copies to print, then press OK. 3. If the printer is one. Easy Photo Printing Before you want to print is in Basic mode. If you how ...

Printer Basics
Page 24
When you correct the color and improve the image quality of your settings. Touching Up Your Photos Your Epson Stylus Photo R320 lets you want , you 're done. 24 Printing Without a Computer If your camera doesn't support PRINT Image Matching or Exif Print, you can use the printer's P.I .M., Exif Print, or PhotoEnhance are turned on in which your...
When you correct the color and improve the image quality of your settings. Touching Up Your Photos Your Epson Stylus Photo R320 lets you want , you 're done. 24 Printing Without a Computer If your camera doesn't support PRINT Image Matching or Exif Print, you can use the printer's P.I .M., Exif Print, or PhotoEnhance are turned on in which your...

Printer Basics
Page 25
... contain P.I .M.: Uses your camera's PRINT Image Matching settings (this if you don't want to turn off the printer or choose a different set of photos, so remember to all your photos. ■ None: Select this option is automatically selected when your pictures contain Exif Print data). ■ PhotoEnhance:... on the page with two options: Crop and Fit to highlight More Options, then press OK. 2. Cropping and Sizing Your Photos Your Epson Stylus Photo R320 lets you 're done. Press or to Frame. 1. You can choose from these options, then press OK: ■ P.I .M. Select from ...
... contain P.I .M.: Uses your camera's PRINT Image Matching settings (this if you don't want to turn off the printer or choose a different set of photos, so remember to all your photos. ■ None: Select this option is automatically selected when your pictures contain Exif Print data). ■ PhotoEnhance:... on the page with two options: Crop and Fit to highlight More Options, then press OK. 2. Cropping and Sizing Your Photos Your Epson Stylus Photo R320 lets you 're done. Press or to Frame. 1. You can choose from these options, then press OK: ■ P.I .M. Select from ...
Printer Basics
Page 30
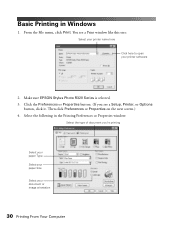
...Click the Preferences or Properties button. (If you 're printing Select your paper Type Select your paper Size Select your printer software 2. You see a Setup, Printer, or Options button, click it. Select the following in Windows 1. Basic Printing in the Printing Preferences or Properties window...the type of document you see a Print window like this one: Select your printer name here Click here to open your document or image orientation 30 Printing From Your Computer Make sure EPSON Stylus Photo R320 Series is selected. 3. Then click Preferences or Properties on the next screen.) ...
...Click the Preferences or Properties button. (If you 're printing Select your paper Type Select your paper Size Select your printer software 2. You see a Setup, Printer, or Options button, click it. Select the following in Windows 1. Basic Printing in the Printing Preferences or Properties window...the type of document you see a Print window like this one: Select your printer name here Click here to open your document or image orientation 30 Printing From Your Computer Make sure EPSON Stylus Photo R320 Series is selected. 3. Then click Preferences or Properties on the next screen.) ...
Printer Basics
Page 32
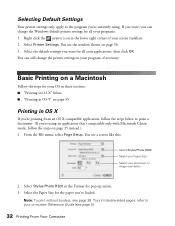
... steps on page 35 instead.) 1. Selecting Default Settings Your printer settings only apply to print a document. (If you're using . Select Stylus Photo R320 in the lower right corner of your document or image orientation 2. Select Printer Settings. You see page 38. Right click the printer icon in the Format for the paper you can still...
... steps on page 35 instead.) 1. Selecting Default Settings Your printer settings only apply to print a document. (If you're using . Select Stylus Photo R320 in the lower right corner of your document or image orientation 2. Select Printer Settings. You see page 38. Right click the printer icon in the Format for the paper you can still...
Printer Basics
Page 33
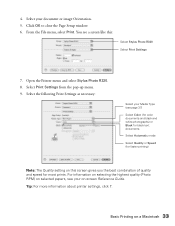
Open the Printer menu and select Stylus Photo R320. 8. From the File menu, select Print. For information on selecting the highest quality (Photo RPM) on -screen Reference Guide. Tip: For more information about printer settings, click ?. Click OK to close the Page Setup window. 6. 4. You see page 37) Select Color (for color documents and black and white photographs) or...
Open the Printer menu and select Stylus Photo R320. 8. From the File menu, select Print. For information on selecting the highest quality (Photo RPM) on -screen Reference Guide. Tip: For more information about printer settings, click ?. Click OK to close the Page Setup window. 6. 4. You see page 37) Select Color (for color documents and black and white photographs) or...

Printer Basics
Page 34
... Stylus Photo R320 icon when it up menu: ■ Copies & Pages: For selecting the number of copies or a page range. ■ Layout: For selecting page layout options. ■ Color Management: For adjusting the color controls, changing the gamma setting, or turning off color adjustments by the printer software. ■ Summary: For viewing a list of all your printer name (Stylus Photo R320...
... Stylus Photo R320 icon when it up menu: ■ Copies & Pages: For selecting the number of copies or a page range. ■ Layout: For selecting page layout options. ■ Color Management: For adjusting the color controls, changing the gamma setting, or turning off color adjustments by the printer software. ■ Summary: For viewing a list of all your printer name (Stylus Photo R320...

Printer Basics
Page 40
...Select one of the following media types: ■ Matte Paper Heavyweight ■ Photo Paper ■ Glossy Photo Paper ■ Premium Glossy Photo Paper ■ Premium Semigloss Photo Paper ■ Premium Luster Photo Paper 8. You see a screen like this: Select Stylus Photo R320 Choose a borderless Paper Size 2. From the File menu, select Page Setup. Macintosh...Your Computer Select other print settings as necessary, then click Print to close the Page Setup window. 5. Select Stylus Photo R320 in the Printer pop-up menu. 3. Choose the borderless Paper Size for pop-up menu. 7.
...Select one of the following media types: ■ Matte Paper Heavyweight ■ Photo Paper ■ Glossy Photo Paper ■ Premium Glossy Photo Paper ■ Premium Semigloss Photo Paper ■ Premium Luster Photo Paper 8. You see a screen like this: Select Stylus Photo R320 Choose a borderless Paper Size 2. From the File menu, select Page Setup. Macintosh...Your Computer Select other print settings as necessary, then click Print to close the Page Setup window. 5. Select Stylus Photo R320 in the Printer pop-up menu. 3. Choose the borderless Paper Size for pop-up menu. 7.

Printer Basics
Page 45
...a CD or DVD. 1. Make sure Stylus Photo R320 is selected, then click Print. Macintosh Windows Note: After you print, handle the CD or DVD carefully. Keep printed discs away from the File menu. Start EPSON Print CD. 3. Printing Your Design After you have created your printer or an extra CD. Open the File... menu and select Print. 2. You can also use these steps to check the print position or color, see the EPSON Print CD on page 42. 2.
...a CD or DVD. 1. Make sure Stylus Photo R320 is selected, then click Print. Macintosh Windows Note: After you print, handle the CD or DVD carefully. Keep printed discs away from the File menu. Start EPSON Print CD. 3. Printing Your Design After you have created your printer or an extra CD. Open the File... menu and select Print. 2. You can also use these steps to check the print position or color, see the EPSON Print CD on page 42. 2.

Printer Basics
Page 46
Remove the position check disk or CD and measure the distance from the edge of the hole to the small cross marks (distances labeled A and B as shown). Click Print. 4. Macintosh Windows 5. You'll need a metric ruler with millimeters for these measurements. 46 Printing From Your Computer The confirmation pattern is selected, then click Print Position Confirmation Pattern (Windows) or Print Position Check Pattern (Macintosh). Make sure Stylus Photo R320 is printed on the position check disk or CD. 6.
Remove the position check disk or CD and measure the distance from the edge of the hole to the small cross marks (distances labeled A and B as shown). Click Print. 4. Macintosh Windows 5. You'll need a metric ruler with millimeters for these measurements. 46 Printing From Your Computer The confirmation pattern is selected, then click Print Position Confirmation Pattern (Windows) or Print Position Check Pattern (Macintosh). Make sure Stylus Photo R320 is printed on the position check disk or CD. 6.

Printer Basics
Page 48
... Contrast settings in a different location. 7. See the EPSON Print CD on-screen help for at least 24 hours. If you want to adjust the density for printing, as described on page 42. 2. Make sure Stylus Photo R320 is printed, examine the print and make adjustments as ...necessary. 1. You can print three density patterns on one disc. Adjusting the Print Density If ink smears on your printed CDs or DVDs, you may need to adjust color saturation. Click Print. 6. After the first pattern is printed in EPSON...
... Contrast settings in a different location. 7. See the EPSON Print CD on-screen help for at least 24 hours. If you want to adjust the density for printing, as described on page 42. 2. Make sure Stylus Photo R320 is printed, examine the print and make adjustments as ...necessary. 1. You can print three density patterns on one disc. Adjusting the Print Density If ink smears on your printed CDs or DVDs, you may need to adjust color saturation. Click Print. 6. After the first pattern is printed in EPSON...

Printer Basics
Page 59
...: ■ "Diagnosing Problems" below ■ "Setup or Software Installation Problems" on page 63 ■ "Printer Problems" on page 64 ■ "Print Quality Problems" on page 65 ■ "Problems With Paper Feeding" on page 68 ■ "CD/DVD Printing Problems" on..." on page 70 ■ "Where To Get Help" on page 73 Diagnosing Problems Your Epson Stylus Photo R320 includes a number of the suggested solutions solve your printer or the computer, run a printer check as described on page 62. ■ Check other solutions in other sections in this chapter. If none of ways to help you diagnose...
...: ■ "Diagnosing Problems" below ■ "Setup or Software Installation Problems" on page 63 ■ "Printer Problems" on page 64 ■ "Print Quality Problems" on page 65 ■ "Problems With Paper Feeding" on page 68 ■ "CD/DVD Printing Problems" on..." on page 70 ■ "Where To Get Help" on page 73 Diagnosing Problems Your Epson Stylus Photo R320 includes a number of the suggested solutions solve your printer or the computer, run a printer check as described on page 62. ■ Check other solutions in other sections in this chapter. If none of ways to help you diagnose...
Printer Basics
Page 71
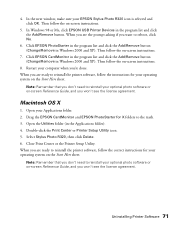
...are ready to reboot, click No. 6. Open your EPSON Stylus Photo R320 icon is selected and click OK. Select Stylus Photo R320, then click Delete. 6. Uninstalling Printer Software 71 Then follow the instructions for X folders to reinstall the printer software, follow the on the Start Here sheet. In... Windows 98 or Me, click EPSON USB Printer Devices in Windows 2000 and...
...are ready to reboot, click No. 6. Open your EPSON Stylus Photo R320 icon is selected and click OK. Select Stylus Photo R320, then click Delete. 6. Uninstalling Printer Software 71 Then follow the instructions for X folders to reinstall the printer software, follow the on the Start Here sheet. In... Windows 98 or Me, click EPSON USB Printer Devices in Windows 2000 and...

Printer Basics
Page 73
... through e-mail. To use these services, you must have the following information ready: ■ Product name (Epson Stylus Photo R320) ■ Product serial number (located on the back of the printer) ■ Proof of purchase (such as a store receipt) and date of purchase ■ Computer configuration ... Time, Monday through Friday and 7 AM to 4 PM, Saturday. ■ Canada: (905) 709-2567, 6 AM to quickly select the Epson Stylus Photo R320 in SoundAdvice. Use this site, you call, please have a touch tone telephone and call (800) 463-7766 for dealer referral. Toll or long...
... through e-mail. To use these services, you must have the following information ready: ■ Product name (Epson Stylus Photo R320) ■ Product serial number (located on the back of the printer) ■ Proof of purchase (such as a store receipt) and date of purchase ■ Computer configuration ... Time, Monday through Friday and 7 AM to 4 PM, Saturday. ■ Canada: (905) 709-2567, 6 AM to quickly select the Epson Stylus Photo R320 in SoundAdvice. Use this site, you call, please have a touch tone telephone and call (800) 463-7766 for dealer referral. Toll or long...

Product Brochure
Page 1
...images in full-color before printing- Key Features Print directly on CDs and DVDs TM Epson Prints. all without a PC! - Works with long-lasting results. Brilliance that lasts. The Epson Stylus Photo R320 makes it easy to save and print selected photos Enjoy convenient ...to select, crop and print photos from your digital camera- INK JET PRINTER EPSON® STYLUS® PHOTOR320 Superior photo printing with popular memory cards and PictBridgeenabled digital cameras - Print CDs and borderless photos-no PC required - Offers superior 6-color Photo Inks and 5760 x 1440 ...
...images in full-color before printing- Key Features Print directly on CDs and DVDs TM Epson Prints. all without a PC! - Works with long-lasting results. Brilliance that lasts. The Epson Stylus Photo R320 makes it easy to save and print selected photos Enjoy convenient ...to select, crop and print photos from your digital camera- INK JET PRINTER EPSON® STYLUS® PHOTOR320 Superior photo printing with popular memory cards and PictBridgeenabled digital cameras - Print CDs and borderless photos-no PC required - Offers superior 6-color Photo Inks and 5760 x 1440 ...


