
Technical Brief (Ink Jet Printers)
Page 1
... on the core technologies used in Epson printers and all ink solution. This combination of core technologies used in Epson ink jet printers work together to produce brilliant Photo Quality color, sharp text, and incredible print speeds Small Ink Droplet Size Small ink droplets produce smoother gradations and greater tonal control Epson Inks Epson innovates ink solutions tailored to...
... on the core technologies used in Epson printers and all ink solution. This combination of core technologies used in Epson ink jet printers work together to produce brilliant Photo Quality color, sharp text, and incredible print speeds Small Ink Droplet Size Small ink droplets produce smoother gradations and greater tonal control Epson Inks Epson innovates ink solutions tailored to...

Technical Brief (Ink Jet Printers)
Page 2
... cause the ink reservoir wall to precisely print crisp details in dense coverage areas allowing Epson to achieve more color combinations and smoother color gradations. Small ink droplet size: Most Epson printers produce ink droplets so small you cannot...print speeds without satellites (unwanted ink spray) or misting. Epson MicroPiezo Technology: Epson Micro Piezo print heads use halftone algorithms with satellites and misting. 2. Also, Epson's variable ink droplet sizes and high resolutions combine to improve color ranges and accuracy because Epson printers can be used in photos...
... cause the ink reservoir wall to precisely print crisp details in dense coverage areas allowing Epson to achieve more color combinations and smoother color gradations. Small ink droplet size: Most Epson printers produce ink droplets so small you cannot...print speeds without satellites (unwanted ink spray) or misting. Epson MicroPiezo Technology: Epson Micro Piezo print heads use halftone algorithms with satellites and misting. 2. Also, Epson's variable ink droplet sizes and high resolutions combine to improve color ranges and accuracy because Epson printers can be used in photos...

Technical Brief (Ink Jet Printers)
Page 3
... format prints, Epson has the right ink for applying ink droplets to get sharp black text, superb photo quality photos, or both on the content, selected output quality, and paper type. Ink Jet Printer Technical Brief Page 3 High Quality Halftoning: Every ink jet printer uses a method referred to as halftoning, that produces fast, high-quality, color-accurate...
... format prints, Epson has the right ink for applying ink droplets to get sharp black text, superb photo quality photos, or both on the content, selected output quality, and paper type. Ink Jet Printer Technical Brief Page 3 High Quality Halftoning: Every ink jet printer uses a method referred to as halftoning, that produces fast, high-quality, color-accurate...
User Manual (P.I.M Plug-in)
Page 1
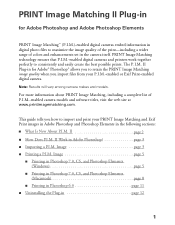
...photo files to maximize the image quality of the print-including a wider range of P.I .M. II page 2 ■ How Does P.I .M.-enabled camera models and software titles, visit the web site at www.printimagematching.com. For more information about PRINT Image Matching, including a complete list of colors... the PRINT Image Matching image quality when you how to import and print your P.I.M.-enabled or Exif Print-enabled digital camera. The P.I .M.-enabled digital cameras and printers work together perfectly to consistently and easily create the best possible prints. PRINT Image Matching...
...photo files to maximize the image quality of the print-including a wider range of P.I .M. II page 2 ■ How Does P.I .M.-enabled camera models and software titles, visit the web site at www.printimagematching.com. For more information about PRINT Image Matching, including a complete list of colors... the PRINT Image Matching image quality when you how to import and print your P.I.M.-enabled or Exif Print-enabled digital camera. The P.I .M.-enabled digital cameras and printers work together perfectly to consistently and easily create the best possible prints. PRINT Image Matching...

User Manual (P.I.M Plug-in)
Page 2
...Photo R200 ■ Epson Stylus Photo R300/R300M ■ Epson Stylus Photo R320 ■ Epson Stylus Photo R800 ■ Epson Stylus Photo RX500 ■ Epson Stylus Photo RX600 ■ Epson Stylus Photo 780 ■ Epson Stylus Photo 785EPX ■ Epson Stylus Photo 820 ■ Epson Stylus Photo 825 ■ Epson Stylus Photo 890 ■ Epson Stylus Photo 900 ■ Epson Stylus Photo 925 ■ Epson Stylus Photo 960 ■ Epson Stylus Photo 1280 ■ Epson Stylus Photo 2000P* ■ Epson Stylus Photo 2200 ■ PictureMate™ by Epson * This printer only supports PRINT...
...Photo R200 ■ Epson Stylus Photo R300/R300M ■ Epson Stylus Photo R320 ■ Epson Stylus Photo R800 ■ Epson Stylus Photo RX500 ■ Epson Stylus Photo RX600 ■ Epson Stylus Photo 780 ■ Epson Stylus Photo 785EPX ■ Epson Stylus Photo 820 ■ Epson Stylus Photo 825 ■ Epson Stylus Photo 890 ■ Epson Stylus Photo 900 ■ Epson Stylus Photo 925 ■ Epson Stylus Photo 960 ■ Epson Stylus Photo 1280 ■ Epson Stylus Photo 2000P* ■ Epson Stylus Photo 2200 ■ PictureMate™ by Epson * This printer only supports PRINT...
User Manual (P.I.M Plug-in)
Page 3
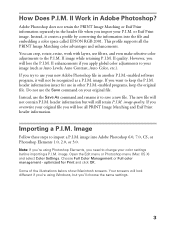
... .M. Importing a P.I .M. image. Open the Edit menu or Photoshop menu (Mac OS X) and select Color Settings. Adobe Photoshop does not retain the PRINT Image Matching or Exif Print information separately in other P.I.M.-enabled programs, keep the P.I .M.-enabled software program, it will lose the P.I ....M. This profile supports all PRINT Image Matching and Exif Print header information. You can crop, rotate, resize, work with layers, use your color settings before importing a P.I .M. image quality. image into the file and embedding a color space called EPSON RGB 2001. optimized for ...
... .M. Importing a P.I .M. image. Open the Edit menu or Photoshop menu (Mac OS X) and select Color Settings. Adobe Photoshop does not retain the PRINT Image Matching or Exif Print information separately in other P.I.M.-enabled programs, keep the P.I .M.-enabled software program, it will lose the P.I ....M. This profile supports all PRINT Image Matching and Exif Print header information. You can crop, rotate, resize, work with layers, use your color settings before importing a P.I .M. image quality. image into the file and embedding a color space called EPSON RGB 2001. optimized for ...
User Manual (P.I.M Plug-in)
Page 4
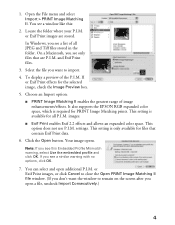
1. It also supports the EPSON RGB expanded color space, which is required for files that are stored. This setting is available for the selected image, check the Image Preview box. 5. Locate the folder where your P.I .M. In Windows, you see only files that contain Exif Print data. 6. On a ... You can select and open a file, uncheck Import Consecutively.) 4 and Exif Print files. 3. images. ■ Exif Print enables Exif 2.2 effects and allows an expanded color space. Your image opens. II or Exif Print effects for all JPEG and Tiff files stored in the folder. This setting is...
1. It also supports the EPSON RGB expanded color space, which is required for files that are stored. This setting is available for the selected image, check the Image Preview box. 5. Locate the folder where your P.I .M. In Windows, you see only files that contain Exif Print data. 6. On a ... You can select and open a file, uncheck Import Consecutively.) 4 and Exif Print files. 3. images. ■ Exif Print enables Exif 2.2 effects and allows an expanded color space. Your image opens. II or Exif Print effects for all JPEG and Tiff files stored in the folder. This setting is...
User Manual (P.I.M Plug-in)
Page 5
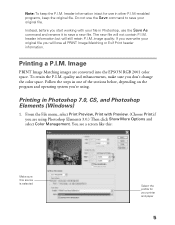
... you start working with your file in other P.I .M. image quality. Instead, before you are converted into the EPSON RGB 2001 color space. Image PRINT Image Matching images are using . If you overwrite your printer and paper 5 Printing a P.I .M. quality and enhancements, make sure you will not contain P.I .M.-enabled programs, keep the P.I .M. You see a screen like this...
... you start working with your file in other P.I .M. image quality. Instead, before you are converted into the EPSON RGB 2001 color space. Image PRINT Image Matching images are using . If you overwrite your printer and paper 5 Printing a P.I .M. quality and enhancements, make sure you will not contain P.I .M.-enabled programs, keep the P.I .M. You see a screen like this...

User Manual (P.I.M Plug-in)
Page 6
... paper you don't see your printer and click the Properties or Preferences button. Click Setup, then select your printer Properties or Preferences window: . Select your paper Select your printer and the paper you're using. Click Print. 5. In the Source Space box, make sure EPSON RGB 2001 is selected. 3. In the Print Space box, select the...
... paper you don't see your printer and click the Properties or Preferences button. Click Setup, then select your printer Properties or Preferences window: . Select your paper Select your printer and the paper you're using. Click Print. 5. In the Source Space box, make sure EPSON RGB 2001 is selected. 3. In the Print Space box, select the...
User Manual (P.I.M Plug-in)
Page 7
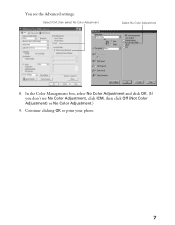
Continue clicking OK to print your photo. 7 In the Color Management box, select No Color Adjustment and click OK. (If you don't see the Advanced settings: Select ICM, then select No Color Adjustment Select No Color Adjustment 8. You see No Color Adjustment, click ICM, then click Off (Not Color Adjustment) or No Color Adjustment.) 9.
Continue clicking OK to print your photo. 7 In the Color Management box, select No Color Adjustment and click OK. (If you don't see the Advanced settings: Select ICM, then select No Color Adjustment Select No Color Adjustment 8. You see No Color Adjustment, click ICM, then click Off (Not Color Adjustment) or No Color Adjustment.) 9.
User Manual (P.I.M Plug-in)
Page 8
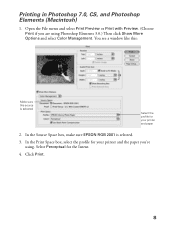
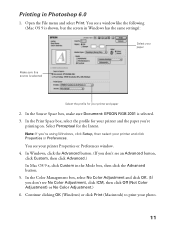
Click Print. 8 In the Source Space box, make sure EPSON RGB 2001 is selected Select the profile for your printer and the paper you are using . In the Print Space box, select the profile for the Intent. 4. Printing in Photoshop 7.0, CS, and Photoshop Elements (Macintosh) 1. You see a window like this: Make sure this source is selected. 3. Open the File menu and select Print Preview or Print with Preview. (Choose Print if you 're using Photoshop Elements 3.0.) Then click Show More Options and select Color Management. Select Perceptual for your printer and paper 2.
Click Print. 8 In the Source Space box, make sure EPSON RGB 2001 is selected Select the profile for your printer and the paper you are using . In the Print Space box, select the profile for the Intent. 4. Printing in Photoshop 7.0, CS, and Photoshop Elements (Macintosh) 1. You see a window like this: Make sure this source is selected. 3. Open the File menu and select Print Preview or Print with Preview. (Choose Print if you 're using Photoshop Elements 3.0.) Then click Show More Options and select Color Management. Select Perceptual for your printer and paper 2.
User Manual (P.I.M Plug-in)
Page 9
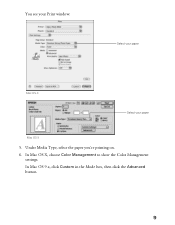
In Mac OS 9.x, click Custom in the Mode box, then click the Advanced button. 9 Select your paper Mac OS X Select your Print window: . In Mac OS X, choose Color Management to show the Color Management settings. Under Media Type, select the paper you're printing on. 6. You see your paper Mac OS 9 5.
In Mac OS 9.x, click Custom in the Mode box, then click the Advanced button. 9 Select your paper Mac OS X Select your Print window: . In Mac OS X, choose Color Management to show the Color Management settings. Under Media Type, select the paper you're printing on. 6. You see your paper Mac OS 9 5.
User Manual (P.I.M Plug-in)
Page 10
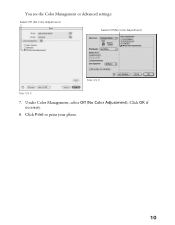
Click Print to print your photo. 10 Under Color Management, select Off (No Color Adjustment). You see the Color Management or Advanced settings: Select Off (No Color Adjustment) Select Off (No Color Adjustment) Mac OS 9 Mac OS X 7. Click OK if necessary. 8.
Click Print to print your photo. 10 Under Color Management, select Off (No Color Adjustment). You see the Color Management or Advanced settings: Select Off (No Color Adjustment) Select Off (No Color Adjustment) Mac OS 9 Mac OS X 7. Click OK if necessary. 8.
User Manual (P.I.M Plug-in)
Page 11
... Windows, click Setup, then select your printer and paper 2. In the Print Space box, select the profile for your paper Make sure this source is selected. 3. In the Color Management box, select No Color Adjustment and click OK. (If you 're printing on. You see an Advanced button, ...box, then click the Advanced button. 5. Continue clicking OK (Windows) or click Print (Macintosh) to print your printer Properties or Preferences window. 4. Note: If you don't see your photo. 11 In the Source Space box, make sure Document: EPSON RGB 2001 is selected Select the profile for the Intent...
... Windows, click Setup, then select your printer and paper 2. In the Print Space box, select the profile for your paper Make sure this source is selected. 3. In the Color Management box, select No Color Adjustment and click OK. (If you 're printing on. You see an Advanced button, ...box, then click the Advanced button. 5. Continue clicking OK (Windows) or click Print (Macintosh) to print your printer Properties or Preferences window. 4. Note: If you don't see your photo. 11 In the Source Space box, make sure Document: EPSON RGB 2001 is selected Select the profile for the Intent...
User Manual (P.I.M Plug-in)
Page 12
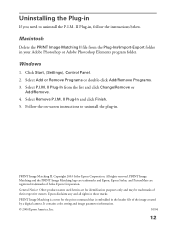
...and click Change/Remove or Add/Remove. 4. Select P.I .M. Select Remove P.I .M. PRINT Image Matching and the PRINT Image Matching logo are trademarks and Epson, Epson Stylus, and PictureMate are for the print command that is a term for identification purposes only and may be trademarks of the image... created by a digital camera. It contains color setting and image parameter information. © 2004 Epson America, Inc. ...
...and click Change/Remove or Add/Remove. 4. Select P.I .M. Select Remove P.I .M. PRINT Image Matching and the PRINT Image Matching logo are trademarks and Epson, Epson Stylus, and PictureMate are for the print command that is a term for identification purposes only and may be trademarks of the image... created by a digital camera. It contains color setting and image parameter information. © 2004 Epson America, Inc. ...

How to Insert the CD/DVD Tray
Page 1
You must install your USB cable. CPD-17101 4047702-00 XXX 9/03 Printed in XXXXXX XX.XX-XX See the enclosed Start Here sheet before connecting the printer to the computer with your software BEFORE connecting the cable. © 2003 Epson America, Inc.
You must install your USB cable. CPD-17101 4047702-00 XXX 9/03 Printed in XXXXXX XX.XX-XX See the enclosed Start Here sheet before connecting the printer to the computer with your software BEFORE connecting the cable. © 2003 Epson America, Inc.

How to Insert the CD/DVD Tray
Page 2
... the tray too far; Tab Arrows See your printer. Lower tray guide 2 Place the CD or DVD on the tray, making sure the disc lays flat in XXXXXX XX.XX-XX Keep tray level CPD-18565 © 2004 Epson America, Inc. 7/04 4051366-00 XXX Printed in the tray. 3 Insert the tray carefully..., making sure it is level, not tilted up the arrows exactly. Push the tray under the tab and the two rollers. IMPORTANT How to Insert the CD/DVD Tray Follow these steps to load CDs and DVDs in your Printer Basics book...
... the tray too far; Tab Arrows See your printer. Lower tray guide 2 Place the CD or DVD on the tray, making sure the disc lays flat in XXXXXX XX.XX-XX Keep tray level CPD-18565 © 2004 Epson America, Inc. 7/04 4051366-00 XXX Printed in the tray. 3 Insert the tray carefully..., making sure it is level, not tilted up the arrows exactly. Push the tray under the tab and the two rollers. IMPORTANT How to Insert the CD/DVD Tray Follow these steps to load CDs and DVDs in your Printer Basics book...

How to Insert the CD/DVD Tray
Page 3
...as the Windows default printer. Epson is the default Windows printer and change it to check if your printer is no checkmark on the printer icon, your printer is a registered trademark of Seiko Epson Corporation. Close the windows on your screen and go ahead with printing. Close the windows on... your screen and go ahead with printing. If there is selected as Default Printer in USA CPD-18837 Epson disclaims any and all rights in those marks. © 2004 Epson America, Inc. 8/04 Printed in the drop-down ...
...as the Windows default printer. Epson is the default Windows printer and change it to check if your printer is no checkmark on the printer icon, your printer is a registered trademark of Seiko Epson Corporation. Close the windows on your screen and go ahead with printing. Close the windows on... your screen and go ahead with printing. If there is selected as Default Printer in USA CPD-18837 Epson disclaims any and all rights in those marks. © 2004 Epson America, Inc. 8/04 Printed in the drop-down ...

Printer Basics
Page 2
... the prior written permission of Copyrighted Materials Digital cameras and scanners, like photocopiers, conventional cameras, and ink jet printers, can be responsible and respectful of this Epson printer. Trademarks Epson, Epson Stylus, Epson Photo Stickers, and MicroWeave are registered trademarks and PRINT Image Matching and the PRINT Image Matching logo are registered trademarks; A Note Concerning the Responsible Use of Seiko...
... the prior written permission of Copyrighted Materials Digital cameras and scanners, like photocopiers, conventional cameras, and ink jet printers, can be responsible and respectful of this Epson printer. Trademarks Epson, Epson Stylus, Epson Photo Stickers, and MicroWeave are registered trademarks and PRINT Image Matching and the PRINT Image Matching logo are registered trademarks; A Note Concerning the Responsible Use of Seiko...

Printer Basics
Page 3
... Cards Connecting External Devices Saving Your Photos to an External Device Copying Photos to Your Computer Configuring PhotoStarter Removing a Memory Card Printing Without a Computer Easy Photo Printing Selecting the Photos You Want to Print Setting the Number of Copies Custom Photo Printing Saving Print Settings Touching Up Your Photos Automatically Adjusting Your Photos Manually Adjusting Your Photos 7 8 8 9 9 9 11 11 12 13 13 14...
... Cards Connecting External Devices Saving Your Photos to an External Device Copying Photos to Your Computer Configuring PhotoStarter Removing a Memory Card Printing Without a Computer Easy Photo Printing Selecting the Photos You Want to Print Setting the Number of Copies Custom Photo Printing Saving Print Settings Touching Up Your Photos Automatically Adjusting Your Photos Manually Adjusting Your Photos 7 8 8 9 9 9 11 11 12 13 13 14...


