
User Manual (P.I.M Plug-in)
Page 2
... Windows®, the profiles are installed along with the printer driver. II Plug-in has been updated to standard JPEG files ■ Support of all the great aspects of P.I .M. II Plug-in : ■ Epson Stylus® Photo R200 ■ Epson Stylus Photo R300/R300M ■ Epson Stylus Photo R320 ■ Epson Stylus Photo R800 ■ Epson Stylus Photo RX500 ■ Epson Stylus Photo RX600 ■ Epson Stylus Photo 780 ■ Epson Stylus Photo 785EPX ■ Epson Stylus Photo 820 ■ Epson Stylus Photo...
... Windows®, the profiles are installed along with the printer driver. II Plug-in has been updated to standard JPEG files ■ Support of all the great aspects of P.I .M. II Plug-in : ■ Epson Stylus® Photo R200 ■ Epson Stylus Photo R300/R300M ■ Epson Stylus Photo R320 ■ Epson Stylus Photo R800 ■ Epson Stylus Photo RX500 ■ Epson Stylus Photo RX600 ■ Epson Stylus Photo 780 ■ Epson Stylus Photo 785EPX ■ Epson Stylus Photo 820 ■ Epson Stylus Photo...
Printer Basics
Page 7
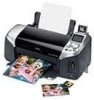
...174; Microdrive.™ ■ An extra USB port on the back of the printer is for connecting the printer to save your memory card contents to your Windows® or Macintosh® computer and print from your computer.) ■ A preview...Epson Stylus® Photo R320 can transfer them immediately to a Zip disk or CD-R and access stored photos without a computer. ■ Ground-breaking Resolution Performance Management™ (RPM®) technology optimizes the number and placement of ink droplets on a variety of the printer's outstanding features: ■ Epson's exclusive 6-color...
...174; Microdrive.™ ■ An extra USB port on the back of the printer is for connecting the printer to save your memory card contents to your Windows® or Macintosh® computer and print from your computer.) ■ A preview...Epson Stylus® Photo R320 can transfer them immediately to a Zip disk or CD-R and access stored photos without a computer. ■ Ground-breaking Resolution Performance Management™ (RPM®) technology optimizes the number and placement of ink droplets on a variety of the printer's outstanding features: ■ Epson's exclusive 6-color...
Printer Basics
Page 30
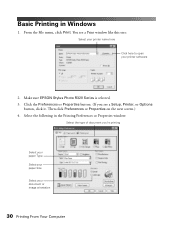
... on the next screen.) 4. Make sure EPSON Stylus Photo R320 Series is selected. 3. From the File menu, click Print. You see a Setup, Printer, or Options button, click it. Basic Printing in the Printing Preferences or Properties window: Select the type of document you see a Print window like this one: Select your printer name here Click here to open...
... on the next screen.) 4. Make sure EPSON Stylus Photo R320 Series is selected. 3. From the File menu, click Print. You see a Setup, Printer, or Options button, click it. Basic Printing in the Printing Preferences or Properties window: Select the type of document you see a Print window like this one: Select your printer name here Click here to open...
Printer Basics
Page 32
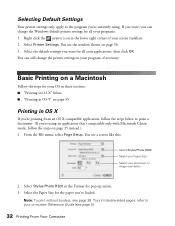
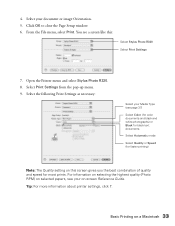
...your program, if necessary. Select the default settings you want , you can still change the Windows default printer settings for all your programs. 1. You see a screen like this: Select Stylus Photo R320 Select your Paper Size Select your on page 30. 3. From the File menu, select Page ... Paper Size for your screen (taskbar). 2. Selecting Default Settings Your printer settings only apply to print a document. (If you're using . You see the window shown on -screen Reference Guide (see page 38. Select Stylus Photo R320 in OS X If you 've loaded. Basic Printing on a ...
...your program, if necessary. Select the default settings you want , you can still change the Windows default printer settings for all your programs. 1. You see a screen like this: Select Stylus Photo R320 Select your Paper Size Select your on page 30. 3. From the File menu, select Page ... Paper Size for your screen (taskbar). 2. Selecting Default Settings Your printer settings only apply to print a document. (If you're using . You see the window shown on -screen Reference Guide (see page 38. Select Stylus Photo R320 in OS X If you 've loaded. Basic Printing on a ...
Printer Basics
Page 33
... window. 6. For information on selecting the highest quality (Photo RPM) on selected papers, see page 37) Select Color (for color documents and black and white photographs) or Black for black text documents Select Automatic mode Select Quality or Speed (for faster printing) Note: The Quality setting on a Macintosh 33 Open the Printer menu and select Stylus Photo R320...
... window. 6. For information on selecting the highest quality (Photo RPM) on selected papers, see page 37) Select Color (for color documents and black and white photographs) or Black for black text documents Select Automatic mode Select Quality or Speed (for faster printing) Note: The Quality setting on a Macintosh 33 Open the Printer menu and select Stylus Photo R320...

Printer Basics
Page 40
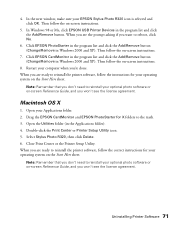
... Your Computer From the File menu, select Page Setup. Select other print settings as necessary, then click Print to close the Page Setup window. 5. Select Stylus Photo R320 in the Printer pop-up menu. 3. Choose the borderless Paper Size for pop-up menu. 7. Select Stylus Photo R320 in the Format for the paper you've loaded. 4. Macintosh OS X 1.
... Your Computer From the File menu, select Page Setup. Select other print settings as necessary, then click Print to close the Page Setup window. 5. Select Stylus Photo R320 in the Printer pop-up menu. 3. Choose the borderless Paper Size for pop-up menu. 7. Select Stylus Photo R320 in the Format for the paper you've loaded. 4. Macintosh OS X 1.

Printer Basics
Page 45
...Stylus Photo R320 is selected, then click Print. If you want , you may need to adjust the printing position. Place the position check disk (or an extra CD) on the CD tray and insert it in a drive. Start EPSON...Windows Note: After you print on -screen Help. 1. Printing on page 42. 2. Printing Your Design After you have created your printed images and text are not centered or positioned the way you want to check the print position or color, see the EPSON...menu. Use the blank cardboard position check disk included with your printer or an extra CD. Note: For information on designing CDs ...
...Stylus Photo R320 is selected, then click Print. If you want , you may need to adjust the printing position. Place the position check disk (or an extra CD) on the CD tray and insert it in a drive. Start EPSON...Windows Note: After you print on -screen Help. 1. Printing on page 42. 2. Printing Your Design After you have created your printed images and text are not centered or positioned the way you want to check the print position or color, see the EPSON...menu. Use the blank cardboard position check disk included with your printer or an extra CD. Note: For information on designing CDs ...

Printer Basics
Page 46
Macintosh Windows 5. You'll need a metric ruler with millimeters for these measurements. 46 Printing From Your Computer The confirmation pattern is selected, then click Print Position Confirmation Pattern (Windows) or Print Position Check Pattern (Macintosh). Remove the position check disk or CD and measure the distance from the edge of the hole to the small cross marks (distances labeled A and B as shown). Make sure Stylus Photo R320 is printed on the position check disk or CD. 6. 4. Click Print.
Macintosh Windows 5. You'll need a metric ruler with millimeters for these measurements. 46 Printing From Your Computer The confirmation pattern is selected, then click Print Position Confirmation Pattern (Windows) or Print Position Check Pattern (Macintosh). Remove the position check disk or CD and measure the distance from the edge of the hole to the small cross marks (distances labeled A and B as shown). Make sure Stylus Photo R320 is printed on the position check disk or CD. 6. 4. Click Print.

Printer Basics
Page 48
... density for printing, as necessary. Make sure Stylus Photo R320 is printed in EPSON Print CD to try a third Color Correction setting, you can print three density patterns on one disc. Each pattern is selected, then click Print Density Confirmation Pattern (Windows) or Print Density Check Pattern (Macintosh). 5. Start EPSON Print CD. 3. After the pattern is printed...
... density for printing, as necessary. Make sure Stylus Photo R320 is printed in EPSON Print CD to try a third Color Correction setting, you can print three density patterns on one disc. Each pattern is selected, then click Print Density Confirmation Pattern (Windows) or Print Density Check Pattern (Macintosh). 5. Start EPSON Print CD. 3. After the pattern is printed...
Printer Basics
Page 71
... or Me, click EPSON USB Printer Devices in the Applications folder). 4. In the next window, make sure your Applications folder. 2. Click EPSON PhotoStarter in the program list and click the Add/Remove button (Change/Remove in Windows 2000 and XP). Note: Remember that you don't need to the trash. 3. Open your EPSON Stylus Photo R320 icon is selected and...
... or Me, click EPSON USB Printer Devices in the Applications folder). 4. In the next window, make sure your Applications folder. 2. Click EPSON PhotoStarter in the program list and click the Add/Remove button (Change/Remove in Windows 2000 and XP). Note: Remember that you don't need to the trash. 3. Open your EPSON Stylus Photo R320 icon is selected and...

Product Brochure
Page 2
...Windows® USB - Windows 98SE, 2000, Me, and XP Macintosh® USB - Extended warranties available beyond one year. * Pages per color Warranty Standard one-year limited warranty in Draft Mode on Glossy Photo Paper. Cartridge yields will vary based on black text and color... complexity. ** For more information about supplies for this printer and cartridge yields, go to www.epson.com. and Canada including Epson Exchange program. Color photo is used for initialization. CPD-18841 15K 9/04 WP Epson, Epson Stylus, and Micro Piezo are registered trademarks and PRINT Image ...
...Windows® USB - Windows 98SE, 2000, Me, and XP Macintosh® USB - Extended warranties available beyond one year. * Pages per color Warranty Standard one-year limited warranty in Draft Mode on Glossy Photo Paper. Cartridge yields will vary based on black text and color... complexity. ** For more information about supplies for this printer and cartridge yields, go to www.epson.com. and Canada including Epson Exchange program. Color photo is used for initialization. CPD-18841 15K 9/04 WP Epson, Epson Stylus, and Micro Piezo are registered trademarks and PRINT Image ...


