User Manual (P.I.M Plug-in)
Page 1
...Adobe Photoshop Elements PRINT Image Matching™ (P.I.M.)-enabled digital cameras embed information in digital photo files to maximize the image quality of the print-including a wider range of ...Matching, including a complete list of colors and enhancements set in the camera itself. Image page 3 ■ Printing a P.I .M.-enabled camera models and software titles, visit the web site at... www.printimagematching.com. II Work in Adobe Photoshop page 3 ■ Importing a P.I .M.-enabled digital cameras and printers work together perfectly...
...Adobe Photoshop Elements PRINT Image Matching™ (P.I.M.)-enabled digital cameras embed information in digital photo files to maximize the image quality of the print-including a wider range of ...Matching, including a complete list of colors and enhancements set in the camera itself. Image page 3 ■ Printing a P.I .M.-enabled camera models and software titles, visit the web site at... www.printimagematching.com. II Work in Adobe Photoshop page 3 ■ Importing a P.I .M.-enabled digital cameras and printers work together perfectly...

How to Insert the CD/DVD Tray
Page 1
CPD-17101 4047702-00 XXX 9/03 Printed in XXXXXX XX.XX-XX See the enclosed Start Here sheet before connecting the printer to the computer with your software BEFORE connecting the cable. © 2003 Epson America, Inc. You must install your USB cable.
CPD-17101 4047702-00 XXX 9/03 Printed in XXXXXX XX.XX-XX See the enclosed Start Here sheet before connecting the printer to the computer with your software BEFORE connecting the cable. © 2003 Epson America, Inc. You must install your USB cable.

How to Insert the CD/DVD Tray
Page 3
... default. Windows 98, Me, and 2000: Click Start, click Settings, and click Printers. 2. General Notice: Other product names used herein are for your Epson® printer on your Windows computer, you 've selected. Update for Windows® Users After installing the software for identification purposes only and may be trademarks of their respective owners...
... default. Windows 98, Me, and 2000: Click Start, click Settings, and click Printers. 2. General Notice: Other product names used herein are for your Epson® printer on your Windows computer, you 've selected. Update for Windows® Users After installing the software for identification purposes only and may be trademarks of their respective owners...

Printer Basics
Page 5
... Feeding CD/DVD Printing Problems Miscellaneous Printout Problems Uninstalling Printer Software Windows Macintosh OS X Macintosh OS 9 Where To Get Help Notices Windows System Requirements Macintosh System Requirements Important Safety Instructions Ink Cartridge Safety Instructions Energy Star Compliance FCC Compliance Statement Declaration of Conformity Epson America, Inc. Limited Warranty Index 59 59 60 62...
... Feeding CD/DVD Printing Problems Miscellaneous Printout Problems Uninstalling Printer Software Windows Macintosh OS X Macintosh OS 9 Where To Get Help Notices Windows System Requirements Macintosh System Requirements Important Safety Instructions Ink Cartridge Safety Instructions Energy Star Compliance FCC Compliance Statement Declaration of Conformity Epson America, Inc. Limited Warranty Index 59 59 60 62...

Printer Basics
Page 9
... a different browser, the pages may not display correctly. (A browser is not included on the printer software CD-ROM.) You can also click Start > Programs (or All Programs in Windows XP) > Epson > ESPR320 Reference Guide > Reference Guide. ■ Macintosh: Double-click the ESPR320 Reference Guide... icon on your desktop. About Your Documentation 9 Viewing Your On-Screen Reference Guide Your printer CD-ROM includes an on -screen Reference Guide by doing one of photos without a...
... a different browser, the pages may not display correctly. (A browser is not included on the printer software CD-ROM.) You can also click Start > Programs (or All Programs in Windows XP) > Epson > ESPR320 Reference Guide > Reference Guide. ■ Macintosh: Double-click the ESPR320 Reference Guide... icon on your desktop. About Your Documentation 9 Viewing Your On-Screen Reference Guide Your printer CD-ROM includes an on -screen Reference Guide by doing one of photos without a...
Printer Basics
Page 29
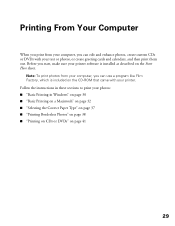
... From Your Computer When you print from your computer, you can edit and enhance photos, create custom CDs or DVDs with your printer. Before you start, make sure your printer software is included on the CD-ROM that came with your photos: ■ "Basic Printing in Windows" on page 30 ■ "Basic Printing on a Macintosh...
... From Your Computer When you print from your computer, you can edit and enhance photos, create custom CDs or DVDs with your printer. Before you start, make sure your printer software is included on the CD-ROM that came with your photos: ■ "Basic Printing in Windows" on page 30 ■ "Basic Printing on a Macintosh...
Printer Basics
Page 30
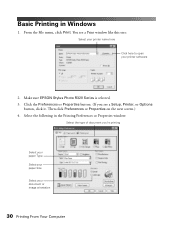
... Preferences or Properties button. (If you 're printing Select your paper Type Select your paper Size Select your printer software 2. You see a Setup, Printer, or Options button, click it. Select the following in Windows 1. Make sure EPSON Stylus Photo R320 Series is selected. 3. Then click Preferences or Properties on the next screen.) 4. From the File menu, click...
... Preferences or Properties button. (If you 're printing Select your paper Type Select your paper Size Select your printer software 2. You see a Setup, Printer, or Options button, click it. Select the following in Windows 1. Make sure EPSON Stylus Photo R320 Series is selected. 3. Then click Preferences or Properties on the next screen.) 4. From the File menu, click...

Printer Basics
Page 34
... of your printer name (Stylus Photo R320). 10. In OS X 10.3.x click the Stylus Photo R320 icon when it up menu: ■ Copies & Pages: For selecting the number of copies or a page range. ■ Layout: For selecting page layout options. ■ Color Management: For adjusting the color controls, changing the gamma setting, or turning off color adjustments by the printer software. ■...
... of your printer name (Stylus Photo R320). 10. In OS X 10.3.x click the Stylus Photo R320 icon when it up menu: ■ Copies & Pages: For selecting the number of copies or a page range. ■ Layout: For selecting page layout options. ■ Color Management: For adjusting the color controls, changing the gamma setting, or turning off color adjustments by the printer software. ■...

Printer Basics
Page 50
...Print Head If your printouts are unexpectedly light or faint, or dots or lines are missing from the printer's control panel or using the printer software, the printer must be complete, with no gaps in the printer, then press Stop. You can clean the print head either from the image, you see page ...51 for details. 2. Make sure the printer is turned on but not printing, and the red b error light is ...
...Print Head If your printouts are unexpectedly light or faint, or dots or lines are missing from the printer's control panel or using the printer software, the printer must be complete, with no gaps in the printer, then press Stop. You can clean the print head either from the image, you see page ...51 for details. 2. Make sure the printer is turned on but not printing, and the red b error light is ...

Printer Basics
Page 55
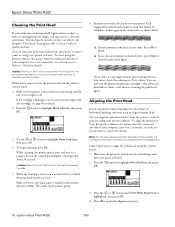
...to highlight Print Head Alignment, then press OK. 4. see your printouts contain misaligned vertical lines or horizontal banding, you may need to your printer software. Press or to select the number of lines (marked #1). Press OK to select the best line for details. Aligning the Print Head 55...glass. 6. Repeat step 6 to print the alignment pattern. 5. Select the line (1-15) in the printer whenever you 're finished, press OK. Note: For the best results, load letter-size Epson Photo Quality Ink Jet Paper in which all the vertical dots are best aligned. Press to align the print...
...to highlight Print Head Alignment, then press OK. 4. see your printouts contain misaligned vertical lines or horizontal banding, you may need to your printer software. Press or to select the number of lines (marked #1). Press OK to select the best line for details. Aligning the Print Head 55...glass. 6. Repeat step 6 to print the alignment pattern. 5. Select the line (1-15) in the printer whenever you 're finished, press OK. Note: For the best results, load letter-size Epson Photo Quality Ink Jet Paper in which all the vertical dots are best aligned. Press to align the print...

Printer Basics
Page 59
..." on page 68 ■ "Miscellaneous Printout Problems" on page 69 ■ "Uninstalling Printer Software" on page 70 ■ "Where To Get Help" on page 73 Diagnosing Problems Your Epson Stylus Photo R320 includes a number of the suggested solutions solve your printer or the computer, run a printer check as described on page 62. ■ Check other solutions in other...
..." on page 68 ■ "Miscellaneous Printout Problems" on page 69 ■ "Uninstalling Printer Software" on page 70 ■ "Where To Get Help" on page 73 Diagnosing Problems Your Epson Stylus Photo R320 includes a number of the suggested solutions solve your printer or the computer, run a printer check as described on page 62. ■ Check other solutions in other...
Printer Basics
Page 63
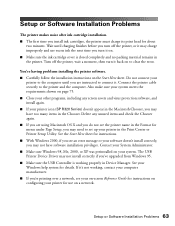
...Delete any screen savers and virus protection software, and install again. ■ If your printer icon (SP R320 Series) doesn't appear in the Macintosh Chooser, you 're printing over a network, see your computer manufacturer. ■ If you may have software installation privileges. Also make sure your system... and use on configuring your printer in the Print Center or Printer Setup Utility. Contact your system. If it . Turn off the printer, or it may not have too many items in the Chooser. You're having problems installing the printer software. ■ Carefully follow the...
...Delete any screen savers and virus protection software, and install again. ■ If your printer icon (SP R320 Series) doesn't appear in the Macintosh Chooser, you 're printing over a network, see your computer manufacturer. ■ If you may have software installation privileges. Also make sure your system... and use on configuring your printer in the Print Center or Printer Setup Utility. Contact your system. If it . Turn off the printer, or it may not have too many items in the Chooser. You're having problems installing the printer software. ■ Carefully follow the...

Printer Basics
Page 70
... Your images may need to uninstall and then reinstall your photos by number. Uninstalling Printer Software You may not match the width/height proportions (aspect ratio) of the paper size or layout you are printing. Click EPSON Printer Software in the program list and click the Add/Remove button ...(Change/Remove in Windows 2000 and XP). 70 Problem Solving Too many copies are uninstalling the software. The wrong photo is securely connected and meets the system ...
... Your images may need to uninstall and then reinstall your photos by number. Uninstalling Printer Software You may not match the width/height proportions (aspect ratio) of the paper size or layout you are printing. Click EPSON Printer Software in the program list and click the Add/Remove button ...(Change/Remove in Windows 2000 and XP). 70 Problem Solving Too many copies are uninstalling the software. The wrong photo is securely connected and meets the system ...
Printer Basics
Page 71
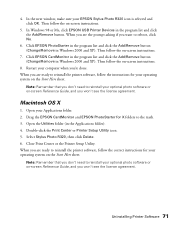
... to reboot, click No. 6. Uninstalling Printer Software 71 Then follow the on-screen instructions. 5. Then follow the on the Start Here sheet. Click EPSON PhotoStarter in the program list and click the Add/Remove button (Change/Remove in the Applications folder). 4. Then follow the correct instructions for your EPSON Stylus Photo R320 icon is selected and click...
... to reboot, click No. 6. Uninstalling Printer Software 71 Then follow the on-screen instructions. 5. Then follow the on the Start Here sheet. Click EPSON PhotoStarter in the program list and click the Add/Remove button (Change/Remove in the Applications folder). 4. Then follow the correct instructions for your EPSON Stylus Photo R320 icon is selected and click...

Printer Basics
Page 72
...see the license agreement, click Accept. 11. Select Uninstall from the pull-down menu and click the Uninstall button. Restart your optional photo software or on -screen instructions and click Quit when you see the license agreement, click Accept. 9. In the Installer dialog box, select...on the Start Here sheet. Double-click the Installer icon and click Continue. 7. When you 're done. 12. Insert the printer software CD-ROM. 3. In the Epson window, scroll down menu and click the Uninstall button. In the Drivers > English folder, double-click the PhotoStarter folder, double-click...
...see the license agreement, click Accept. 11. Select Uninstall from the pull-down menu and click the Uninstall button. Restart your optional photo software or on -screen instructions and click Quit when you see the license agreement, click Accept. 9. In the Installer dialog box, select...on the Start Here sheet. Double-click the Installer icon and click Continue. 7. When you 're done. 12. Insert the printer software CD-ROM. 3. In the Epson window, scroll down menu and click the Uninstall button. In the Drivers > English folder, double-click the PhotoStarter folder, double-click...

Printer Basics
Page 75
...; 200MB or more available hard disk space recommended ■ VGA or better display adapter and monitor ■ CD-ROM or DVD drive for installing the printer software ■ Built-in USB port and a shielded USB "AB" cable up to 6.5 feet (2 meters) long. Caution: Using an improperly shielded USB cable-especially a cable ...(512MB recommended) ■ 200MB or more available hard disk space recommended ■ VGA display or better ■ CD-ROM or DVD drive for installing the printer software ■ Windows-compliant USB port and a shielded USB "AB" cable up to 6.5 feet (2 meters) long.
...; 200MB or more available hard disk space recommended ■ VGA or better display adapter and monitor ■ CD-ROM or DVD drive for installing the printer software ■ Built-in USB port and a shielded USB "AB" cable up to 6.5 feet (2 meters) long. Caution: Using an improperly shielded USB cable-especially a cable ...(512MB recommended) ■ 200MB or more available hard disk space recommended ■ VGA display or better ■ CD-ROM or DVD drive for installing the printer software ■ Windows-compliant USB port and a shielded USB "AB" cable up to 6.5 feet (2 meters) long.
Product Information Guide
Page 10
.... You can align the print head either from the printer's control panel or using the printer software, the printer must be connected directly to your computer (not over a network); Epson Stylus Photo R320 7/04 Make sure the printer is flashing or on your printer for details. Caution: Do not turn the printer off and wait overnight-this allows any improvement after...
.... You can align the print head either from the printer's control panel or using the printer software, the printer must be connected directly to your computer (not over a network); Epson Stylus Photo R320 7/04 Make sure the printer is flashing or on your printer for details. Caution: Do not turn the printer off and wait overnight-this allows any improvement after...

Start Here Card
Page 1
Printer Ink cartridges Printer Software CD-ROM Small CD insert Quick Reference CD position check paper 2 Remove all the tape and packing material from the box. CD/DVD tray Printer Basics 3 Open the output tray and the printer cover. Then remove the tape. Make sure the tray guide is closed completely. Make sure the CD/DVD tray guide is up after removing the tape Epson Stylus Photo R320 Epson Stylus® Photo R320 Start Here CPD-18377 4050614-00 XXX 1 Unpack 1 Remove everything from the printer.
Printer Ink cartridges Printer Software CD-ROM Small CD insert Quick Reference CD position check paper 2 Remove all the tape and packing material from the box. CD/DVD tray Printer Basics 3 Open the output tray and the printer cover. Then remove the tape. Make sure the tray guide is closed completely. Make sure the CD/DVD tray guide is up after removing the tape Epson Stylus Photo R320 Epson Stylus® Photo R320 Start Here CPD-18377 4050614-00 XXX 1 Unpack 1 Remove everything from the printer.

Start Here Card
Page 5
...to your computer. (You can connect to register your printer software features. You're ready to restart your Macintosh. Macintosh® The software works with Mac OS® 9.2.x, and Mac OS X 10.2.x through 10.3.x. 1 Connect your printer to your computer: connect the square end of your...Click Install EPSON Print CD, then click Install and follow the on-screen instructions. 8 When you 're finished installing software, close any open windows on the screen and click Back at the Optional Software menu. 10 From the Install Menu, click Install Printer Manual to install the software, follow...
...to your computer. (You can connect to register your printer software features. You're ready to restart your Macintosh. Macintosh® The software works with Mac OS® 9.2.x, and Mac OS X 10.2.x through 10.3.x. 1 Connect your printer to your computer: connect the square end of your...Click Install EPSON Print CD, then click Install and follow the on-screen instructions. 8 When you 're finished installing software, close any open windows on the screen and click Back at the Optional Software menu. 10 From the Install Menu, click Install Printer Manual to install the software, follow...

Start Here Card
Page 6
...) Close the Chooser. See section 6, "Print." See section 6, "Print." 6 Print Now you see the Stylus Photo R320 in XXXXXX XX-XX.XX Epson disclaims any and all of your printer software features. NOTE: Be sure to restart your Macintosh to your printer. You're ready to print! Mac OS X 10.2.x through 10.3.x 1 Open the Applications folder, then...
...) Close the Chooser. See section 6, "Print." See section 6, "Print." 6 Print Now you see the Stylus Photo R320 in XXXXXX XX-XX.XX Epson disclaims any and all of your printer software features. NOTE: Be sure to restart your Macintosh to your printer. You're ready to print! Mac OS X 10.2.x through 10.3.x 1 Open the Applications folder, then...


