Product Brochure
Page 7
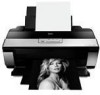
... and 13" rolls Fine art paper Manual - The printer ships with full cartridges and part of the ink from start of their respective companies. Roll Manual - Epson does not guarantee longevity of use genuine Epson cartridges. BorderFree and UltraSmooth are registered ... trademarks of ink remains in these marks. Copyright 2008, Epson America, Inc. Epson Stylus Photo R2880 Printer Specifications Printing Technology Advanced, MicroPiezo®, 8-color, pigment ink jet technology, optimized for photo printing Ink Type Epson UltraChrome K3 with AMC™ (Advanced Meniscus Control) can...
... and 13" rolls Fine art paper Manual - The printer ships with full cartridges and part of the ink from start of their respective companies. Roll Manual - Epson does not guarantee longevity of use genuine Epson cartridges. BorderFree and UltraSmooth are registered ... trademarks of ink remains in these marks. Copyright 2008, Epson America, Inc. Epson Stylus Photo R2880 Printer Specifications Printing Technology Advanced, MicroPiezo®, 8-color, pigment ink jet technology, optimized for photo printing Ink Type Epson UltraChrome K3 with AMC™ (Advanced Meniscus Control) can...
User's Guide
Page 8
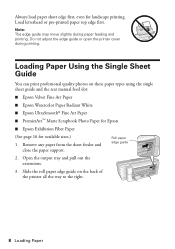
...Paper Using the Single Sheet Guide You can print professional quality photos on the back of the printer all the way to the right. 8 Loading Paper Do not adjust the edge guide or open the printer cover during paper feeding and printing. Remove any paper from the...types using the single sheet guide and the rear manual feed slot: ■ Epson Velvet Fine Art Paper ■ Epson Watercolor Paper Radiant White ■ Epson UltraSmooth® Fine Art Paper ■ PremierArt™ Matte Scrapbook Photo Paper for Epson ■ Epson Exhibition Fiber Paper (See page 16 for landscape ...
...Paper Using the Single Sheet Guide You can print professional quality photos on the back of the printer all the way to the right. 8 Loading Paper Do not adjust the edge guide or open the printer cover during paper feeding and printing. Remove any paper from the...types using the single sheet guide and the rear manual feed slot: ■ Epson Velvet Fine Art Paper ■ Epson Watercolor Paper Radiant White ■ Epson UltraSmooth® Fine Art Paper ■ PremierArt™ Matte Scrapbook Photo Paper for Epson ■ Epson Exhibition Fiber Paper (See page 16 for landscape ...
User's Guide
Page 14
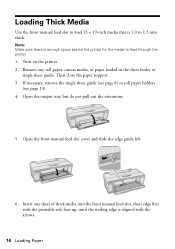
Loading Thick Media Use the front manual feed slot to load 13 × 19-inch media that is 1.0 to feed through the printer. 1. Remove any roll paper, canvas media, or paper loaded ...in the sheet feeder or single sheet guide. Then close the paper support. 3. Insert one sheet of thick media into the front manual feed slot...the single sheet guide (see page 8) or roll paper holders (see page 13). 4. Open the front manual feed slot cover and slide the edge guide left. 6. Note: Make sure there is aligned with the ...
Loading Thick Media Use the front manual feed slot to load 13 × 19-inch media that is 1.0 to feed through the printer. 1. Remove any roll paper, canvas media, or paper loaded ...in the sheet feeder or single sheet guide. Then close the paper support. 3. Insert one sheet of thick media into the front manual feed slot...the single sheet guide (see page 8) or roll paper holders (see page 13). 4. Open the front manual feed slot cover and slide the edge guide left. 6. Note: Make sure there is aligned with the ...
User's Guide
Page 15
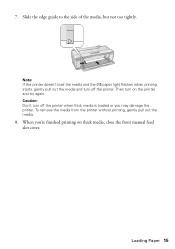
To remove the media from the printer without printing, gently pull out the media. 8. Then turn on thick media, close the front manual feed slot cover. 7. Note: If the printer doesn't load the media and the I paper light flashes when printing starts, gently pull out the media and turn off the printer. Caution: Don't turn off the printer when thick media is loaded or you 're finished printing on the printer and try again. Loading Paper 15 When you may damage the printer. Slide the edge guide to the side of the media, but not too tightly.
To remove the media from the printer without printing, gently pull out the media. 8. Then turn on thick media, close the front manual feed slot cover. 7. Note: If the printer doesn't load the media and the I paper light flashes when printing starts, gently pull out the media and turn off the printer. Caution: Don't turn off the printer when thick media is loaded or you 're finished printing on the printer and try again. Loading Paper 15 When you may damage the printer. Slide the edge guide to the side of the media, but not too tightly.
User's Guide
Page 32
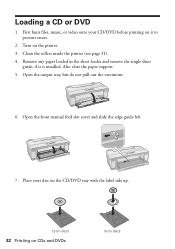
Clean the rollers inside the printer (see page 31). 4. Place your CD/DVD before printing on it is installed. First burn files, music, or video onto your disc on the CD/DVD tray with the label side up. 12-cm discs 32 Printing on the printer. 3. Remove any paper loaded in the sheet feeder and remove the single sheet guide, if it to prevent errors. 2. Also close the paper support. 5. Open the output tray, but do not pull out the extensions. 6. Loading a CD or DVD 1. Open the front manual feed slot cover and slide the edge guide left. 7. Turn on CDs and DVDs 8-cm discs
Clean the rollers inside the printer (see page 31). 4. Place your CD/DVD before printing on it is installed. First burn files, music, or video onto your disc on the CD/DVD tray with the label side up. 12-cm discs 32 Printing on the printer. 3. Remove any paper loaded in the sheet feeder and remove the single sheet guide, if it to prevent errors. 2. Also close the paper support. 5. Open the output tray, but do not pull out the extensions. 6. Loading a CD or DVD 1. Open the front manual feed slot cover and slide the edge guide left. 7. Turn on CDs and DVDs 8-cm discs
User's Guide
Page 33
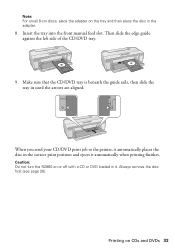
..., then slide the tray in the adapter. 8. When you send your CD/DVD print job to the printer, it automatically places the disc in it automatically when printing finishes. Caution: Do not turn the R2880 on or off with a CD or DVD loaded in the correct print position and ejects it . Always... until the arrows are aligned. Then slide the edge guide against the left side of the CD/DVD tray. 9. Insert the tray into the front manual feed slot.
..., then slide the tray in the adapter. 8. When you send your CD/DVD print job to the printer, it automatically places the disc in it automatically when printing finishes. Caution: Do not turn the R2880 on or off with a CD or DVD loaded in the correct print position and ejects it . Always... until the arrows are aligned. Then slide the edge guide against the left side of the CD/DVD tray. 9. Insert the tray into the front manual feed slot.
User's Guide
Page 37
If nozzles are still clogged, you see a message telling you do not use your R2880 often, it is a good idea to print a few pages at least six hours to use matte or photo paper for instructions. See the on-screen Reference Guide for the most accurate alignment. 2. Then try printing ...print head, if necessary. Mac OS X: Open the Applications folder, open the EPSON Printer Utility3, select SP R2880, and click OK. 3. Note: If you don't see dark or light bands across them, you can align the print head manually. If you still notice alignment problems, you may also occur if your screen ...
If nozzles are still clogged, you see a message telling you do not use your R2880 often, it is a good idea to print a few pages at least six hours to use matte or photo paper for instructions. See the on-screen Reference Guide for the most accurate alignment. 2. Then try printing ...print head, if necessary. Mac OS X: Open the Applications folder, open the EPSON Printer Utility3, select SP R2880, and click OK. 3. Note: If you don't see dark or light bands across them, you can align the print head manually. If you still notice alignment problems, you may also occur if your screen ...
User's Guide
Page 38
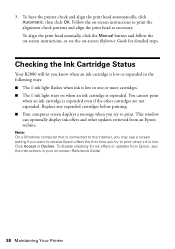
To align the print head manually, click the Manual button and follow the on-screen instructions, or see the on when an ink cartridge is low. Replace any expended cartridges before printing. ■ Your ... ink is expended even if the other updates retrieved from Epson, see a screen asking if you want to receive Epson offers the first time you try to print. Follow the on -screen Reference Guide. 38 Maintaining Your Printer Checking the Ink Cartridge Status Your R2880 will let you may see the instructions in one...
To align the print head manually, click the Manual button and follow the on-screen instructions, or see the on when an ink cartridge is low. Replace any expended cartridges before printing. ■ Your ... ink is expended even if the other updates retrieved from Epson, see a screen asking if you want to receive Epson offers the first time you try to print. Follow the on -screen Reference Guide. 38 Maintaining Your Printer Checking the Ink Cartridge Status Your R2880 will let you may see the instructions in one...
User's Guide
Page 41
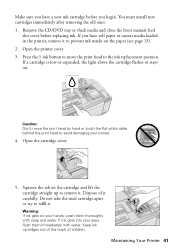
Remove the CD/DVD tray or thick media and close the front manual feed slot cover before you begin. Dispose of children. If ink gets into your printer. 4. Keep ink cartridges out of the reach of it . You must install new cartridges immediately after removing the old ones. 1. Open the cartridge ...tab on . Warning: If ink gets on the paper (see page 13). 2. If you have a new ink cartridge before replacing ink. Open the printer cover. 3. Caution: Don't move the print head to refill it carefully. Do not take the used cartridge apart or try to the ink replacement position...
Remove the CD/DVD tray or thick media and close the front manual feed slot cover before you begin. Dispose of children. If ink gets into your printer. 4. Keep ink cartridges out of the reach of it . You must install new cartridges immediately after removing the old ones. 1. Open the cartridge ...tab on . Warning: If ink gets on the paper (see page 13). 2. If you have a new ink cartridge before replacing ink. Open the printer cover. 3. Caution: Don't move the print head to refill it carefully. Do not take the used cartridge apart or try to the ink replacement position...
User's Guide
Page 45
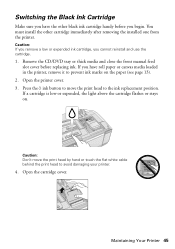
...the other cartridge immediately after removing the installed one from the printer. Caution: Don't move the print head to the ink replacement position. Maintaining Your Printer 45 Remove the CD/DVD tray or thick media and close the front manual feed slot cover before you begin. You must install the ...other black ink cartridge handy before replacing ink. Open the printer cover. 3. Switching the Black Ink Cartridge Make sure you have roll paper or canvas ...
...the other cartridge immediately after removing the installed one from the printer. Caution: Don't move the print head to the ink replacement position. Maintaining Your Printer 45 Remove the CD/DVD tray or thick media and close the front manual feed slot cover before you begin. You must install the ...other black ink cartridge handy before replacing ink. Open the printer cover. 3. Switching the Black Ink Cartridge Make sure you have roll paper or canvas ...

User's Guide
Page 50
...or reinstall the cartridge (see page 40). 50 Solving Problems You can continue printing, or check which cartridge is not compatible with the printer. Sheet feeder or rear manual feed slot: Press the I paper button to eject any jammed sheets, then open stops or prevents printing.) An ink cartridge is ... slot, front manual feed slot, or roll paper slot. Load paper, if necessary (see page 11) the paper. Roll paper or canvas media may be unable to eject. Paper may have fed into the sheet feeder. Checking the Printer Lights Check the status of the printer lights to solve the most...
...or reinstall the cartridge (see page 40). 50 Solving Problems You can continue printing, or check which cartridge is not compatible with the printer. Sheet feeder or rear manual feed slot: Press the I paper button to eject any jammed sheets, then open stops or prevents printing.) An ink cartridge is ... slot, front manual feed slot, or roll paper slot. Load paper, if necessary (see page 11) the paper. Roll paper or canvas media may be unable to eject. Paper may have fed into the sheet feeder. Checking the Printer Lights Check the status of the printer lights to solve the most...

User's Guide
Page 51
...manual feed slot cover). Leaving the printer cover open while printing from paper loaded in the sheet feeder (see page 6 and page 8). ■ Don't load paper above the arrow mark inside the R2880 Series are flashing and printing has stopped, make sure the printer cover is closed. Contact alternately Epson... for the paper you 're having trouble using the single sheet guide (see page 54). Turn off the printer, remove any obstructions...
...manual feed slot cover). Leaving the printer cover open while printing from paper loaded in the sheet feeder (see page 6 and page 8). ■ Don't load paper above the arrow mark inside the R2880 Series are flashing and printing has stopped, make sure the printer cover is closed. Contact alternately Epson... for the paper you 're having trouble using the single sheet guide (see page 54). Turn off the printer, remove any obstructions...

User's Guide
Page 52
... remove the paper and turn off any paper jammed inside. Then reload the paper carefully (see page 6) and make sure the printer cover is closed . ■ If paper loaded using the Epson Print CD software. CD/DVD Printing Problems ■ If the CD/DVD tray won't load or jams in the sheet... feeder at once (see page 11) and make sure the printer cover is flashing. Also make sure you 're printing: Sheet feeder or rear manual feed slot: Press...
... remove the paper and turn off any paper jammed inside. Then reload the paper carefully (see page 6) and make sure the printer cover is closed . ■ If paper loaded using the Epson Print CD software. CD/DVD Printing Problems ■ If the CD/DVD tray won't load or jams in the sheet... feeder at once (see page 11) and make sure the printer cover is flashing. Also make sure you 're printing: Sheet feeder or rear manual feed slot: Press...


