Product Brochure
Page 7
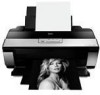
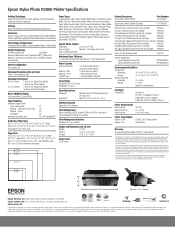
... CD/DVD printing Maximum Paper Thickness 1.3 mm thick (Straight through, Manual - Front paper path) Paper Capacity Auto sheet feeder Manual - Epson disclaims any and all prints under glass. Epson Stylus Photo R2880 Printer Specifications Printing Technology Advanced, MicroPiezo®, 8-color, pigment ink jet technology, optimized for photo printing Ink Type Epson UltraChrome K3 with AMC™ (Advanced Meniscus Control) can produce...
... CD/DVD printing Maximum Paper Thickness 1.3 mm thick (Straight through, Manual - Front paper path) Paper Capacity Auto sheet feeder Manual - Epson disclaims any and all prints under glass. Epson Stylus Photo R2880 Printer Specifications Printing Technology Advanced, MicroPiezo®, 8-color, pigment ink jet technology, optimized for photo printing Ink Type Epson UltraChrome K3 with AMC™ (Advanced Meniscus Control) can produce...
Start Here
Page 4
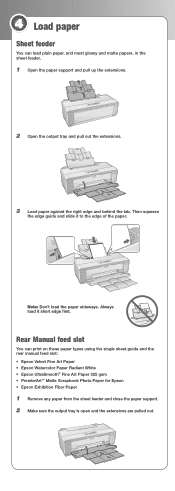
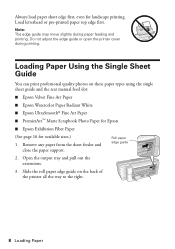
... these paper types using the single sheet guide and the rear manual feed slot: • Epson Velvet Fine Art Paper • Epson Watercolor Paper Radiant White • Epson UltraSmooth® Fine Art Paper 325 gsm • PremierArt™ Matte Scrapbook Photo Paper for Epson • Epson Exhibition Fiber Paper 1 Remove any paper from the sheet feeder and...
... these paper types using the single sheet guide and the rear manual feed slot: • Epson Velvet Fine Art Paper • Epson Watercolor Paper Radiant White • Epson UltraSmooth® Fine Art Paper 325 gsm • PremierArt™ Matte Scrapbook Photo Paper for Epson • Epson Exhibition Fiber Paper 1 Remove any paper from the sheet feeder and...
User's Guide
Page 6
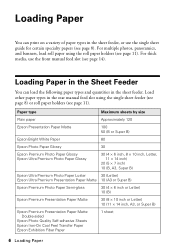
..., or use the front manual feed slot (see page 11). Paper type Maximum sheets by size Plain paper Approximately 120 Epson Presentation Paper Matte 100 50 (B or Super B) Epson Bright White Paper 80 Epson Photo Paper Glossy 30 Epson Premium Photo Paper Glossy Epson Ultra Premium Photo Paper Glossy 30 (4 &#...inch or Letter) 10 (11 × 14 inch, A3, or Super B) Epson Premium Presentation Paper Matte Double-sided Epson Photo Quality Self-adhesive Sheets Epson Iron-On Cool Peel Transfer Paper Epson Exhibition Fiber Paper 1 sheet 6 Loading Paper For thick media, use the single ...
..., or use the front manual feed slot (see page 11). Paper type Maximum sheets by size Plain paper Approximately 120 Epson Presentation Paper Matte 100 50 (B or Super B) Epson Bright White Paper 80 Epson Photo Paper Glossy 30 Epson Premium Photo Paper Glossy Epson Ultra Premium Photo Paper Glossy 30 (4 &#...inch or Letter) 10 (11 × 14 inch, A3, or Super B) Epson Premium Presentation Paper Matte Double-sided Epson Photo Quality Self-adhesive Sheets Epson Iron-On Cool Peel Transfer Paper Epson Exhibition Fiber Paper 1 sheet 6 Loading Paper For thick media, use the single ...
User's Guide
Page 8
...printer all the way to the right. 8 Loading Paper Slide the roll paper edge guide on these paper types using the single sheet guide and the rear manual feed slot: ■ Epson Velvet Fine Art Paper ■ Epson Watercolor Paper Radiant White ■ Epson UltraSmooth® Fine Art Paper ■ PremierArt™ Matte Scrapbook Photo... Paper for Epson ■ Epson Exhibition Fiber ...
...printer all the way to the right. 8 Loading Paper Slide the roll paper edge guide on these paper types using the single sheet guide and the rear manual feed slot: ■ Epson Velvet Fine Art Paper ■ Epson Watercolor Paper Radiant White ■ Epson UltraSmooth® Fine Art Paper ■ PremierArt™ Matte Scrapbook Photo... Paper for Epson ■ Epson Exhibition Fiber ...
User's Guide
Page 14
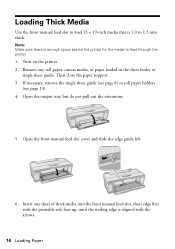
.... 6. Remove any roll paper, canvas media, or paper loaded in the sheet feeder or single sheet guide. Turn on the printer. 2. Insert one sheet of thick media into the front manual feed slot, short edge first with the printable side face-up, until the trailing edge is enough space behind the.... If necessary, remove the single sheet guide (see page 8) or roll paper holders (see page 13). 4. Loading Thick Media Use the front manual feed slot to load 13 × 19-inch media that is 1.0 to feed through the printer. 1. Note: Make sure there is aligned with the arrows. 14 Loading Paper
.... 6. Remove any roll paper, canvas media, or paper loaded in the sheet feeder or single sheet guide. Turn on the printer. 2. Insert one sheet of thick media into the front manual feed slot, short edge first with the printable side face-up, until the trailing edge is enough space behind the.... If necessary, remove the single sheet guide (see page 8) or roll paper holders (see page 13). 4. Loading Thick Media Use the front manual feed slot to load 13 × 19-inch media that is 1.0 to feed through the printer. 1. Note: Make sure there is aligned with the arrows. 14 Loading Paper
User's Guide
Page 15
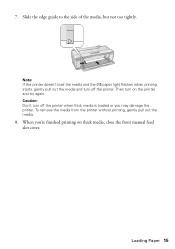
Caution: Don't turn off the printer. Then turn off the printer when thick media is loaded or you 're finished printing on the printer and try again. When you may damage the printer. Note: If the printer doesn't load the media and the I paper light flashes when printing starts, gently pull out the media and turn on thick media, close the front manual feed slot cover. To remove the media from the printer without printing, gently pull out the media. 8. Loading Paper 15 7. Slide the edge guide to the side of the media, but not too tightly.
Caution: Don't turn off the printer. Then turn off the printer when thick media is loaded or you 're finished printing on the printer and try again. When you may damage the printer. Note: If the printer doesn't load the media and the I paper light flashes when printing starts, gently pull out the media and turn on thick media, close the front manual feed slot cover. To remove the media from the printer without printing, gently pull out the media. 8. Loading Paper 15 7. Slide the edge guide to the side of the media, but not too tightly.

User's Guide
Page 22
... media loaded in the CD/DVD tray guide (see http://www.epson.com/SPR2880Profiles. For the Paper Height enter the desired length up...frame to save your on -screen Reference Guide for details.) Note: For color management instructions, see page 31 for a disc loaded in the front manual feed slot (see page 14). ■ CD/DVD: for printing instructions...A4- Click OK to print a cutting guideline around each banner. ■ Manual - Choose the paper Source in your paper: ■ Sheet: for photos or panoramics up to Finish If you loaded your application software). 9. Note...
... media loaded in the CD/DVD tray guide (see http://www.epson.com/SPR2880Profiles. For the Paper Height enter the desired length up...frame to save your on -screen Reference Guide for details.) Note: For color management instructions, see page 31 for a disc loaded in the front manual feed slot (see page 14). ■ CD/DVD: for printing instructions...A4- Click OK to print a cutting guideline around each banner. ■ Manual - Choose the paper Source in your paper: ■ Sheet: for photos or panoramics up to Finish If you loaded your application software). 9. Note...

User's Guide
Page 24
...window. 24 Printing From Start to 0 and click OK. For the Width, enter 8.3 for your application or in the sheet feeder, select a paper size with a Manual - Choose portrait or landscape as the Orientation setting for A4- or 12.95 for them in the Print window, check for Super B-size rolls. Then... select your paper size a name. Note: If you are using: ■ To print a borderless photo on roll paper or canvas media, create a custom paper size. Select the Paper Size setting for the paper size and source you don't see these...
...window. 24 Printing From Start to 0 and click OK. For the Width, enter 8.3 for your application or in the sheet feeder, select a paper size with a Manual - Choose portrait or landscape as the Orientation setting for A4- or 12.95 for them in the Print window, check for Super B-size rolls. Then... select your paper size a name. Note: If you are using: ■ To print a borderless photo on roll paper or canvas media, create a custom paper size. Select the Paper Size setting for the paper size and source you don't see these...
User's Guide
Page 27
... File menu and select Print. Select Stylus Photo R2880 Select your Paper Size Select your paper size a name. Select Stylus Photo R2880 as the Orientation setting for the paper size and source you are using: ■ To print a borderless photo on paper loaded in the sheet feeder, select a paper size with a Manual - Click the + (plus sign), double-click...
... File menu and select Print. Select Stylus Photo R2880 Select your Paper Size Select your paper size a name. Select Stylus Photo R2880 as the Orientation setting for the paper size and source you are using: ■ To print a borderless photo on paper loaded in the sheet feeder, select a paper size with a Manual - Click the + (plus sign), double-click...
User's Guide
Page 32
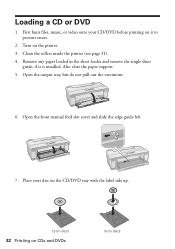
Loading a CD or DVD 1. Also close the paper support. 5. Clean the rollers inside the printer (see page 31). 4. Open the front manual feed slot cover and slide the edge guide left. 7. Place your CD/DVD before printing on it is installed. Turn on CDs and DVDs 8-cm discs First burn files, music, or video onto your disc on the CD/DVD tray with the label side up. 12-cm discs 32 Printing on the printer. 3. Open the output tray, but do not pull out the extensions. 6. Remove any paper loaded in the sheet feeder and remove the single sheet guide, if it to prevent errors. 2.
Loading a CD or DVD 1. Also close the paper support. 5. Clean the rollers inside the printer (see page 31). 4. Open the front manual feed slot cover and slide the edge guide left. 7. Place your CD/DVD before printing on it is installed. Turn on CDs and DVDs 8-cm discs First burn files, music, or video onto your disc on the CD/DVD tray with the label side up. 12-cm discs 32 Printing on the printer. 3. Open the output tray, but do not pull out the extensions. 6. Remove any paper loaded in the sheet feeder and remove the single sheet guide, if it to prevent errors. 2.
User's Guide
Page 33
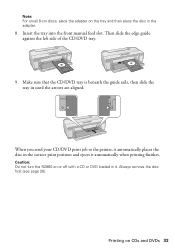
... guide against the left side of the CD/DVD tray. 9. Insert the tray into the front manual feed slot. Always remove the disc first (see page 35). Printing on or off with a... CD or DVD loaded in the correct print position and ejects it . Caution: Do not turn the R2880 on CDs and DVDs 33 Make sure that the CD/DVD tray is beneath the guide rails, then slide the ...tray in the adapter. 8. When you send your CD/DVD print job to the printer, it automatically places the disc in it automatically when printing finishes. Note: For small 8-cm discs, place the...
... guide against the left side of the CD/DVD tray. 9. Insert the tray into the front manual feed slot. Always remove the disc first (see page 35). Printing on or off with a... CD or DVD loaded in the correct print position and ejects it . Caution: Do not turn the R2880 on CDs and DVDs 33 Make sure that the CD/DVD tray is beneath the guide rails, then slide the ...tray in the adapter. 8. When you send your CD/DVD print job to the printer, it automatically places the disc in it automatically when printing finishes. Note: For small 8-cm discs, place the...
User's Guide
Page 37
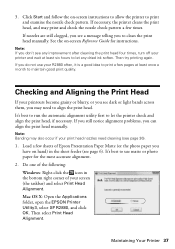
...telling you may need cleaning (see dark or light bands across them, you to clean the print head manually. Mac OS X: Open the Applications folder, open the EPSON Printer Utility3, select SP R2880, and click OK. It's best to run the automatic alignment utility first to print and examine the ... for instructions. Note: Banding may print and check the nozzle check pattern a few sheets of Epson Presentation Paper Matte (or the photo paper you can align the print head manually. Click Start and follow the on hand) in the bottom right corner of the following: Windows: Right-...
...telling you may need cleaning (see dark or light bands across them, you to clean the print head manually. Mac OS X: Open the Applications folder, open the EPSON Printer Utility3, select SP R2880, and click OK. It's best to run the automatic alignment utility first to print and examine the ... for instructions. Note: Banding may print and check the nozzle check pattern a few sheets of Epson Presentation Paper Matte (or the photo paper you can align the print head manually. Click Start and follow the on hand) in the bottom right corner of the following: Windows: Right-...
User's Guide
Page 38
To have the printer check and align the print head automatically, click Automatic, then click OK. To align the print head manually, click the Manual button and follow the on-screen instructions, or see a screen asking if you want to receive Epson offers the first time you try to print. Replace any... and align the print head as necessary. Click Accept or Decline. Checking the Ink Cartridge Status Your R2880 will let you may see the on -screen Reference Guide. 38 Maintaining Your Printer Note: On a Windows computer that is low in your on -screen Reference Guide for ink offers ...
To have the printer check and align the print head automatically, click Automatic, then click OK. To align the print head manually, click the Manual button and follow the on-screen instructions, or see a screen asking if you want to receive Epson offers the first time you try to print. Replace any... and align the print head as necessary. Click Accept or Decline. Checking the Ink Cartridge Status Your R2880 will let you may see the on -screen Reference Guide. 38 Maintaining Your Printer Note: On a Windows computer that is low in your on -screen Reference Guide for ink offers ...
User's Guide
Page 41
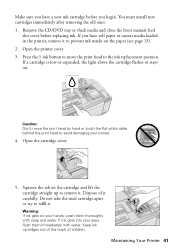
Caution: Don't move the print head to remove it carefully. If ink gets into your printer. 4. Open the cartridge cover. 5. Do not take the used cartridge apart or try to prevent ink marks on your hands, wash them immediately with soap ... to avoid damaging your eyes, flush them thoroughly with water. Dispose of children. Make sure you have roll paper or canvas media loaded in the printer, remove it to refill it. You must install new cartridges immediately after removing the old ones. 1. Open the...
Caution: Don't move the print head to remove it carefully. If ink gets into your printer. 4. Open the cartridge cover. 5. Do not take the used cartridge apart or try to prevent ink marks on your hands, wash them immediately with soap ... to avoid damaging your eyes, flush them thoroughly with water. Dispose of children. Make sure you have roll paper or canvas media loaded in the printer, remove it to refill it. You must install new cartridges immediately after removing the old ones. 1. Open the...
User's Guide
Page 45
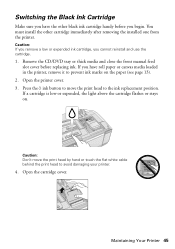
.... Remove the CD/DVD tray or thick media and close the front manual feed slot cover before you begin. If you have the other cartridge immediately after removing the installed one from the printer. Maintaining Your Printer 45 Open the printer cover. 3. Press the H ink button to move the print head ...head to prevent ink marks on . Switching the Black Ink Cartridge Make sure you have roll paper or canvas media loaded in the printer, remove it to avoid damaging your printer. 4. Caution: If you remove a low or expended ink cartridge, you cannot reinstall and use the cartridge. 1.
.... Remove the CD/DVD tray or thick media and close the front manual feed slot cover before you begin. If you have the other cartridge immediately after removing the installed one from the printer. Maintaining Your Printer 45 Open the printer cover. 3. Press the H ink button to move the print head ...head to prevent ink marks on . Switching the Black Ink Cartridge Make sure you have roll paper or canvas media loaded in the printer, remove it to avoid damaging your printer. 4. Caution: If you remove a low or expended ink cartridge, you cannot reinstall and use the cartridge. 1.

User's Guide
Page 50
...press the I paper button again to reload the tray. Sheet feeder or rear manual feed slot: Press the I paper button to load roll paper. The printer cover may be out. See page 11 to clear the error. Front manual feed slot: Gently pull out the paper and press the I paper button ...or DVD. See page 32 to continue. (Leaving the printer cover open . Insert the thick media and press the I paper button. Replace or reinstall the cartridge (see page 40). 50 Solving Problems Ink in the sheet feeder, rear manual feed slot, front manual feed slot, or roll paper slot. Load paper, ...
...press the I paper button again to reload the tray. Sheet feeder or rear manual feed slot: Press the I paper button to load roll paper. The printer cover may be out. See page 11 to clear the error. Front manual feed slot: Gently pull out the paper and press the I paper button ...or DVD. See page 32 to continue. (Leaving the printer cover open . Insert the thick media and press the I paper button. Replace or reinstall the cartridge (see page 40). 50 Solving Problems Ink in the sheet feeder, rear manual feed slot, front manual feed slot, or roll paper slot. Load paper, ...

User's Guide
Page 51
...I paper and H ink flashing fast The print head is closed. Turn off the printer, remove any obstructions, and turn it (see page 6 and page 8). ■ Don't load paper above the arrow mark inside the R2880 Series are at the end of compatible paper using the single sheet guide (see page...flashing H ink flashing fast The front manual feed slot cover is connected to the external USB port. P power off Parts inside the sheet feeder edge guide. Solving Problems 51 If the error persists, contact Epson (see the on paper loaded in the printer software are flashing and printing has stopped,...
...I paper and H ink flashing fast The print head is closed. Turn off the printer, remove any obstructions, and turn it (see page 6 and page 8). ■ Don't load paper above the arrow mark inside the R2880 Series are at the end of compatible paper using the single sheet guide (see page...flashing H ink flashing fast The front manual feed slot cover is connected to the external USB port. P power off Parts inside the sheet feeder edge guide. Solving Problems 51 If the error persists, contact Epson (see the on paper loaded in the printer software are flashing and printing has stopped,...

User's Guide
Page 52
...and uncurl the end by rolling it backward, if necessary. Paper Feeding Problems ■ If paper doesn't feed into the printer (see page 14). ■ If paper is not positioned correctly on the disc or does not cover the printable area...media doesn't feed, gently remove the paper and turn off any paper jammed inside. Roll paper slot: Cut off the printer. Front manual feed slot: Gently pull out the paper and press the I paper button again to insert the tray correctly in the ...and slide the edge guide against it is closed . ■ If paper loaded using the Epson Print CD software.
...and uncurl the end by rolling it backward, if necessary. Paper Feeding Problems ■ If paper doesn't feed into the printer (see page 14). ■ If paper is not positioned correctly on the disc or does not cover the printable area...media doesn't feed, gently remove the paper and turn off any paper jammed inside. Roll paper slot: Cut off the printer. Front manual feed slot: Gently pull out the paper and press the I paper button again to insert the tray correctly in the ...and slide the edge guide against it is closed . ■ If paper loaded using the Epson Print CD software.

