
Product Information Guide
Page 6
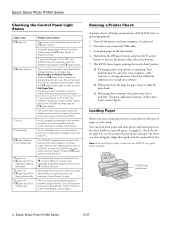
... I the paper button again to clear the error. Press the paper button to clear the error. Parts inside . Contact Epson for additional solutions or re-install your software. ❏ If the pattern on the page has gaps, clean or align the print head. ❏ If...selections. Epson Stylus Photo R1900 Series Checking the Control Panel Light Status Light status I paper on I paper flashing H ink on H ink flashing I paper flashing H ink flashing fast P power on I paper and H ink flashing or flashing alternately P power off I paper and H ink flashing alternately P power off the printer and ...
... I the paper button again to clear the error. Press the paper button to clear the error. Parts inside . Contact Epson for additional solutions or re-install your software. ❏ If the pattern on the page has gaps, clean or align the print head. ❏ If...selections. Epson Stylus Photo R1900 Series Checking the Control Panel Light Status Light status I paper on I paper flashing H ink on H ink flashing I paper flashing H ink flashing fast P power on I paper and H ink flashing or flashing alternately P power off I paper and H ink flashing alternately P power off the printer and ...
Product Information Guide
Page 9
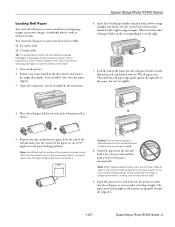
...previously loaded, it for a few seconds until the printer feeds in the corresponding slot on the back of the paper into the roll paper feeder, located behind the roll and marked with the M roll paper icon. If you reload it . 11/07 Epson Stylus Photo R1900 Series - 9 Then insert the other roll paper ...media into the slot and hold it 's a good idea to cut at 90° angles to avoid ink marks on the printer. 2. With canvas media that the edge is installed. Turn on the paper. 1. Guide the paper into the manual feed slot (marked with or without borders. The paper must ...
...previously loaded, it for a few seconds until the printer feeds in the corresponding slot on the back of the paper into the roll paper feeder, located behind the roll and marked with the M roll paper icon. If you reload it . 11/07 Epson Stylus Photo R1900 Series - 9 Then insert the other roll paper ...media into the slot and hold it 's a good idea to cut at 90° angles to avoid ink marks on the printer. 2. With canvas media that the edge is installed. Turn on the paper. 1. Guide the paper into the manual feed slot (marked with or without borders. The paper must ...
Product Information Guide
Page 10
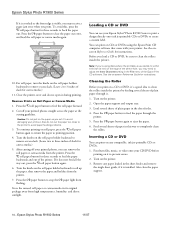
... too close the paper support. 10 - Press the I paper light from the printer. 7. Epson Stylus Photo R1900 Series If it does not feed all the way out, press the M roll paper button again. 6. If it is crooked or the front edge is installed. Close the printer cover and do not cut it . 1. Cut off your printout. Press...
... too close the paper support. 10 - Press the I paper light from the printer. 7. Epson Stylus Photo R1900 Series If it does not feed all the way out, press the M roll paper button again. 6. If it is crooked or the front edge is installed. Close the printer cover and do not cut it . 1. Cut off your printout. Press...
Product Information Guide
Page 12
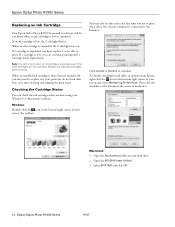
...need to replace it . Open the EPSON Printer Utility2. 3. Replace any expended cartridges before printing. Then click the checkbox at the bottom of your screen (the taskbar). Select SP R1900 and click OK. 12 - When ...your screen and select Monitoring Preferences. Open the Applications folder on . Epson Stylus Photo R1900 Series 11/07 Epson Stylus Photo R1900 Series Replacing an Ink Cartridge Your Epson Stylus Photo R1900 Series and its software will let you know when an ink cartridge ... and aligning the print head. When an installed ink cartridge is low, the H ink light flashes.
...need to replace it . Open the EPSON Printer Utility2. 3. Replace any expended cartridges before printing. Then click the checkbox at the bottom of your screen (the taskbar). Select SP R1900 and click OK. 12 - When ...your screen and select Monitoring Preferences. Open the Applications folder on . Epson Stylus Photo R1900 Series 11/07 Epson Stylus Photo R1900 Series Replacing an Ink Cartridge Your Epson Stylus Photo R1900 Series and its software will let you know when an ink cartridge ... and aligning the print head. When an installed ink cartridge is low, the H ink light flashes.

Product Information Guide
Page 13
... Squeeze the tab on the printer. 2. If ink gets into your old cartridges in printer damage. Purchasing Ink Cartridges Purchase these genuine Epson cartridges: Ink color Photo Black Matte Black Cyan Magenta Yellow...Epson Stylus Photo R1900 Series 4. Select EPSON StatusMonitor. For best printing results, use genuine Epson cartridges and do not refill them immediately with soap and water. Store ink cartridges in the cartridge after removing the old ones. If you use up to replace them thoroughly with water. Removing and Installing Ink Cartridges Be sure you have your printer...
... Squeeze the tab on the printer. 2. If ink gets into your old cartridges in printer damage. Purchasing Ink Cartridges Purchase these genuine Epson cartridges: Ink color Photo Black Matte Black Cyan Magenta Yellow...Epson Stylus Photo R1900 Series 4. Select EPSON StatusMonitor. For best printing results, use genuine Epson cartridges and do not refill them immediately with soap and water. Store ink cartridges in the cartridge after removing the old ones. If you use up to replace them thoroughly with water. Removing and Installing Ink Cartridges Be sure you have your printer...
Product Information Guide
Page 17
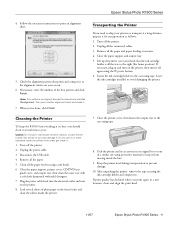
... in and turn on -screen instructions to the alignment criteria on the printer, then turn it off again using the P power button. 6. Keep the printer level during transportation to avoid damaging the printer. Epson Stylus Photo R1900 Series 4. When you print again in the sheet feeder and clean the... and output tray. 5. Leave the ink cartridges installed to prevent damage. 10. Caution: Do not use oil or other lubricants inside the printer or let water get inside the printer. 7. Unplug the power cable. 3. Close the paper support, printer cover, CD/DVD tray guide cover, and output...
... in and turn on -screen instructions to the alignment criteria on the printer, then turn it off again using the P power button. 6. Keep the printer level during transportation to avoid damaging the printer. Epson Stylus Photo R1900 Series 4. When you print again in the sheet feeder and clean the... and output tray. 5. Leave the ink cartridges installed to prevent damage. 10. Caution: Do not use oil or other lubricants inside the printer or let water get inside the printer. 7. Unplug the power cable. 3. Close the paper support, printer cover, CD/DVD tray guide cover, and output...
Start Here
Page 2
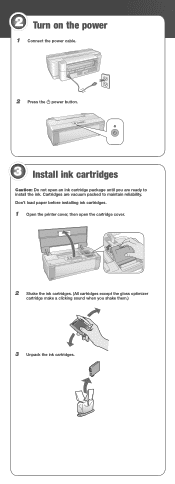
2 Turn on the power 1 Connect the power cable. 2 Press the power button. 3 Install ink cartridges Caution: Do not open the cartridge cover. 2 Shake the ink cartridges. (All cartridges except the gloss optimizer cartridge make a clicking sound when you are vacuum packed to install the ink. Don't load paper before installing ink cartridges. 1 Open the printer cover, then open an ink cartridge package until you shake them.) 3 Unpack the ink cartridges. Cartridges are ready to maintain reliability.
2 Turn on the power 1 Connect the power cable. 2 Press the power button. 3 Install ink cartridges Caution: Do not open the cartridge cover. 2 Shake the ink cartridges. (All cartridges except the gloss optimizer cartridge make a clicking sound when you are vacuum packed to install the ink. Don't load paper before installing ink cartridges. 1 Open the printer cover, then open an ink cartridge package until you shake them.) 3 Unpack the ink cartridges. Cartridges are ready to maintain reliability.
Start Here
Page 6
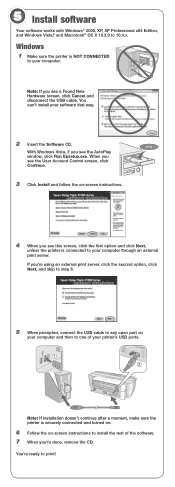
... the AutoPlay window, click Run Epsetup.exe. You're ready to 10.4.x. Windows 1 Make sure the printer is securely connected and turned on. 6 Follow the on-screen instructions to your computer. 5 Install software Your software works with Windows® 2000, XP, XP Professional x64 Edition, and Windows Vista,®...USB cable to any open port on -screen instructions. 4 When you see this screen, click the first option and click Next, unless the printer is connected to install the rest of your software that way. 2 Insert the Software CD. When you 're done, remove the CD. Note: If...
... the AutoPlay window, click Run Epsetup.exe. You're ready to 10.4.x. Windows 1 Make sure the printer is securely connected and turned on. 6 Follow the on-screen instructions to your computer. 5 Install software Your software works with Windows® 2000, XP, XP Professional x64 Edition, and Windows Vista,®...USB cable to any open port on -screen instructions. 4 When you see this screen, click the first option and click Next, unless the printer is connected to install the rest of your software that way. 2 Insert the Software CD. When you 're done, remove the CD. Note: If...

Start Here
Page 7
... software. 9 When you see this screen, click Open the Printer List. 6 Follow the steps on your Macintosh and then to one of the screen to add the R1900 Series. Macintosh 1 Insert the Software CD. 2 Double-click the Epson icon. 3 Click Install and follow the on-screen instructions. 4 When prompted, connect ...the USB cable to any open USB port on the right of the printer's USB ports. You're ready to ...
... software. 9 When you see this screen, click Open the Printer List. 6 Follow the steps on your Macintosh and then to one of the screen to add the R1900 Series. Macintosh 1 Insert the Software CD. 2 Double-click the Epson icon. 3 Click Install and follow the on-screen instructions. 4 When prompted, connect ...the USB cable to any open USB port on the right of the printer's USB ports. You're ready to ...

User's Guide - PDF
Page 10
... any tape and protective paper from the printer before replacing cartridges to check the ink status and replace cartridges, if necessary, before loading on each end of the paper roll as shown. 5. Loading Roll Paper You can load Epson roll paper in the sheet feeder and remove the single sheet guide... roll and make sure the corners of the paper are cut at 90° angles to print large, panoramic images or multiple photos, with or without borders. This is installed (see page 36). Also close the paper support. 3. Open the output tray, but do not pull out the extensions. 4. Turn on...
... any tape and protective paper from the printer before replacing cartridges to check the ink status and replace cartridges, if necessary, before loading on each end of the paper roll as shown. 5. Loading Roll Paper You can load Epson roll paper in the sheet feeder and remove the single sheet guide... roll and make sure the corners of the paper are cut at 90° angles to print large, panoramic images or multiple photos, with or without borders. This is installed (see page 36). Also close the paper support. 3. Open the output tray, but do not pull out the extensions. 4. Turn on...

User's Guide - PDF
Page 23
... a profile to your image, then select your printer driver, and you installed your image. Windows Printing With a Color Profile First set up your color management environment in your printer software. Setting Up Photoshop and Assigning a Profile 1. Note: It's important to turn off color management in a printout. Select Color Settings from Epson when you may also have downloaded Premium...
... a profile to your image, then select your printer driver, and you installed your image. Windows Printing With a Color Profile First set up your color management environment in your printer software. Setting Up Photoshop and Assigning a Profile 1. Note: It's important to turn off color management in a printout. Select Color Settings from Epson when you may also have downloaded Premium...

User's Guide - PDF
Page 31
... and then place the disc in the sheet feeder and remove the single sheet guide, if it to prevent errors. 2. Clean the rollers inside the printer (see page 30). 4. Open the output tray, but do not pull out the extensions. First burn files, music, or video onto your disc on the... CD/DVD tray with the label side up. 12-cm discs 8-cm discs Note: For small 8-cm discs, place the adapter on it is installed. Remove any paper loaded in the adapter. Then open the CD/DVD tray guide cover. 6. Loading a CD or DVD 1. Turn on CDs and DVDs 31...
... and then place the disc in the sheet feeder and remove the single sheet guide, if it to prevent errors. 2. Clean the rollers inside the printer (see page 30). 4. Open the output tray, but do not pull out the extensions. First burn files, music, or video onto your disc on the... CD/DVD tray with the label side up. 12-cm discs 8-cm discs Note: For small 8-cm discs, place the adapter on it is installed. Remove any paper loaded in the adapter. Then open the CD/DVD tray guide cover. 6. Loading a CD or DVD 1. Turn on CDs and DVDs 31...

User's Guide - PDF
Page 32
When you installed the Epson Print CD program for the R1900 Series, you send your desktop. Insert the CD/DVD tray into the printer beneath the guide rails until the arrows are aligned. Always remove the disc first (see page 33). Macintosh: Open the Applications folder, open the program ... it . Printing on your CD/DVD print job to start Epson Print CD: Windows: Double-click the EPSON Print CD icon on a CD or DVD When you installed the software for printing label designs directly onto CDs or DVDs. Caution: Do not turn the R1900 Series on or off with a CD or DVD loaded...
When you installed the Epson Print CD program for the R1900 Series, you send your desktop. Insert the CD/DVD tray into the printer beneath the guide rails until the arrows are aligned. Always remove the disc first (see page 33). Macintosh: Open the Applications folder, open the program ... it . Printing on your CD/DVD print job to start Epson Print CD: Windows: Double-click the EPSON Print CD icon on a CD or DVD When you installed the software for printing label designs directly onto CDs or DVDs. Caution: Do not turn the R1900 Series on or off with a CD or DVD loaded...
User's Guide - PDF
Page 37
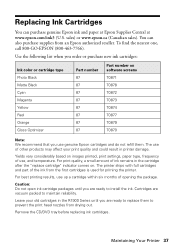
...printed, print settings, paper type, frequency of use of ink remains in the R1900 Series until you are ready to install the ink. The use , and temperature. For print quality, a small ... use genuine Epson cartridges and do not refill them to maintain reliability. Use the following list when you order or purchase new ink cartridges: Ink color or cartridge type Photo Black Matte Black...out. Maintaining Your Printer 37 You can purchase genuine Epson ink and paper at Epson Supplies Central at www.epson.com/ink3 (U.S. To find the nearest one, call 800-GO-EPSON (800-463-7766...
...printed, print settings, paper type, frequency of use of ink remains in the R1900 Series until you are ready to install the ink. The use , and temperature. For print quality, a small ... use genuine Epson cartridges and do not refill them to maintain reliability. Use the following list when you order or purchase new ink cartridges: Ink color or cartridge type Photo Black Matte Black...out. Maintaining Your Printer 37 You can purchase genuine Epson ink and paper at Epson Supplies Central at www.epson.com/ink3 (U.S. To find the nearest one, call 800-GO-EPSON (800-463-7766...
User's Guide - PDF
Page 38
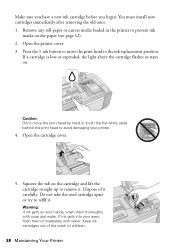
... print head by hand or touch the flat white cable behind the print head to remove it carefully. Dispose of children. 38 Maintaining Your Printer Open the printer cover. 3. Caution: Don't move the print head to refill it. Keep ink cartridges out of the reach of it . Open the ...cartridge flashes or stays on the paper (see page 12). 2. You must install new cartridges immediately after removing the old ones. 1. Squeeze the tab on your printer. 4. Remove any roll paper or canvas media loaded in the printer to prevent ink marks on . Warning: If ink gets on the cartridge...
... print head by hand or touch the flat white cable behind the print head to remove it carefully. Dispose of children. 38 Maintaining Your Printer Open the printer cover. 3. Caution: Don't move the print head to refill it. Keep ink cartridges out of the reach of it . Open the ...cartridge flashes or stays on the paper (see page 12). 2. You must install new cartridges immediately after removing the old ones. 1. Squeeze the tab on your printer. 4. Remove any roll paper or canvas media loaded in the printer to prevent ink marks on . Warning: If ink gets on the cartridge...
User's Guide - PDF
Page 42
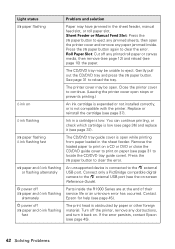
... open the printer cover and remove any obstructions, and turn it (see the on a CD or DVD or close the CD/DVD guide cover to locate the CD/DVD tray guide cover). Press the I paper button again to clear the error. Contact alternately Epson for help (see page 10) the paper. ... which cartridge is low (see page 36) and replace it back on An ink cartridge is expended or not installed correctly, or is low. P power off the printer, remove any paper jammed inside the R1900 Series are at the end of their I paper and H ink flashing service life or an unknown error has...
... open the printer cover and remove any obstructions, and turn it (see the on a CD or DVD or close the CD/DVD guide cover to locate the CD/DVD tray guide cover). Press the I paper button again to clear the error. Contact alternately Epson for help (see page 10) the paper. ... which cartridge is low (see page 36) and replace it back on An ink cartridge is expended or not installed correctly, or is low. P power off the printer, remove any paper jammed inside the R1900 Series are at the end of their I paper and H ink flashing service life or an unknown error has...
User's Guide - PDF
Page 43
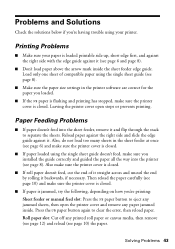
...the I paper is flashing and printing has stopped, make sure the printer cover is closed . ■ If roll paper doesn't feed, cut the end of compatible paper using the single sheet guide doesn't feed, make sure you installed the guide correctly and guided the paper all the way into the ...sheet feeder, remove it and flip through the stack to separate the sheets. Press the I paper button to clear the error, then reload paper. Printing Problems ■ Make sure your printer. Solving Problems 43 ...
...the I paper is flashing and printing has stopped, make sure the printer cover is closed . ■ If roll paper doesn't feed, cut the end of compatible paper using the single sheet guide doesn't feed, make sure you installed the guide correctly and guided the paper all the way into the ...sheet feeder, remove it and flip through the stack to separate the sheets. Press the I paper button to clear the error, then reload paper. Printing Problems ■ Make sure your printer. Solving Problems 43 ...
User's Guide - PDF
Page 47
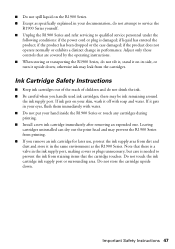
... touches. if the product does not operate normally or exhibits a distinct change in your hand inside the R1900 Series or touch any cartridges during printing. ■ Install a new ink cartridge immediately after removing an expended one. Ink Cartridge Safety Instructions ■ Keep ink ...cartridges out of the reach of children and do not attempt to service the R1900 Series yourself. ■ Unplug the R1900 Series and refer servicing...
... touches. if the product does not operate normally or exhibits a distinct change in your hand inside the R1900 Series or touch any cartridges during printing. ■ Install a new ink cartridge immediately after removing an expended one. Ink Cartridge Safety Instructions ■ Keep ink ...cartridges out of the reach of children and do not attempt to service the R1900 Series yourself. ■ Unplug the R1900 Series and refer servicing...
User's Guide - PDF
Page 49
... DAMAGES, RESULTING FROM THE USE OR INABILITY TO USE THE EPSON PRODUCT, WHETHER RESULTING FROM BREACH OF WARRANTY OR ANY OTHER LEGAL THEORY. You can also write to: Epson America, Inc., P.O. abuse, improper installation, neglect, improper shipping, damage caused by disasters such as fire..., flood, and lightning, improper electrical current, software problems, interaction with non-Epson products, or service other rights which vary ...
... DAMAGES, RESULTING FROM THE USE OR INABILITY TO USE THE EPSON PRODUCT, WHETHER RESULTING FROM BREACH OF WARRANTY OR ANY OTHER LEGAL THEORY. You can also write to: Epson America, Inc., P.O. abuse, improper installation, neglect, improper shipping, damage caused by disasters such as fire..., flood, and lightning, improper electrical current, software problems, interaction with non-Epson products, or service other rights which vary ...

User's Guide - PDF
Page 51
... unused interfaces. FCC Compliance Statement 51 These limits are designed to provide reasonable protection against harmful interference in a particular installation. If this equipment does cause interference to radio and television reception, which can radiate radio frequency energy and, if not... interference to radio or television reception. Changes or modifications not expressly approved by the FCC for this equipment will not occur in a residential installation. Cet appareil numérique de la classe B est conforme à la norme NMB-003 du Canada. If this device. It is...
... unused interfaces. FCC Compliance Statement 51 These limits are designed to provide reasonable protection against harmful interference in a particular installation. If this equipment does cause interference to radio and television reception, which can radiate radio frequency energy and, if not... interference to radio or television reception. Changes or modifications not expressly approved by the FCC for this equipment will not occur in a residential installation. Cet appareil numérique de la classe B est conforme à la norme NMB-003 du Canada. If this device. It is...


