Product Information Guide
Page 8
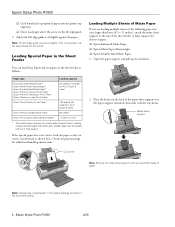
... extensions. 2. Note: Always keep unused paper in as shown here. Matte sheet support Cut corner Note: Remove the matte sheet support when you are loading multiple sheets of paper: ❏ Epson Enhanced Matte Paper ❏ Epson Matte Paper Heavyweight ❏ Epson Double-Sided Matte Paper 1. Epson Stylus Photo R1800 ❏ Load letterhead or preprinted paper into the printer. Epson Stylus Photo R1800 2/05 Note: The left edge guide...
... extensions. 2. Note: Always keep unused paper in as shown here. Matte sheet support Cut corner Note: Remove the matte sheet support when you are loading multiple sheets of paper: ❏ Epson Enhanced Matte Paper ❏ Epson Matte Paper Heavyweight ❏ Epson Double-Sided Matte Paper 1. Epson Stylus Photo R1800 ❏ Load letterhead or preprinted paper into the printer. Epson Stylus Photo R1800 2/05 Note: The left edge guide...
Product Information Guide
Page 9
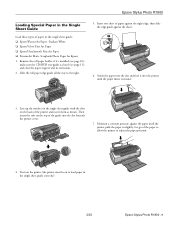
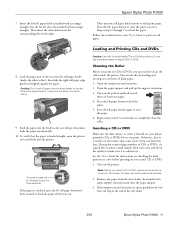
... the tabs on the top of the guide into the slot and feed it 's installed (see page 11); Remove the roll paper holder, if it into the printer until the printer pulls the paper in slightly. make sure the CD/DVD tray guide is closed (...paper into the slot beneath the printer cover. 7. Insert one sheet of paper against the right edge, then slide the edge guide against the paper until the paper meets resistance. 3. Epson Stylus Photo R1800 Loading Special Paper in the Single Sheet Guide Load these types of paper in the single sheet guide correctly). 2/05 Epson Stylus Photo R1800...
... the tabs on the top of the guide into the slot and feed it 's installed (see page 11); Remove the roll paper holder, if it into the printer until the printer pulls the paper in slightly. make sure the CD/DVD tray guide is closed (...paper into the slot beneath the printer cover. 7. Insert one sheet of paper against the right edge, then slide the edge guide against the paper until the paper meets resistance. 3. Epson Stylus Photo R1800 Loading Special Paper in the Single Sheet Guide Load these types of paper in the single sheet guide correctly). 2/05 Epson Stylus Photo R1800...
Product Information Guide
Page 10
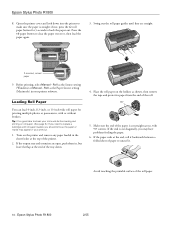
... the flap at the end of the printer. 2. Place the roll paper on the printer and remove any paper loaded in your printout. 1. Avoid touching the printable surface of the roll. 90° 5. Epson Stylus Photo R1800 2/05 Epson Stylus Photo R1800 8. Swing out the roll paper guides until they are open, push them in your printer software. If the output tray and extension...
... the flap at the end of the printer. 2. Place the roll paper on the printer and remove any paper loaded in your printout. 1. Avoid touching the printable surface of the roll. 90° 5. Epson Stylus Photo R1800 2/05 Epson Stylus Photo R1800 8. Swing out the roll paper guides until they are open, push them in your printer software. If the output tray and extension...
Product Information Guide
Page 11
...three seconds to eject the paper. 6. Epson Stylus Photo R1800 7. Load the paper part of the way into the feeder as far as it 's a good idea to print a small sample, then wait a day and check the quality to clean the roller inside the printer. the printer feeds the paper automatically. 10. Cleaning the ... that the paper is crooked, press the z roll paper button for instructions on checking the print position or color before you plan to print large numbers of letter-size paper. 4. Do not use thermal-printable or regular CDs or DVDs. You can do this by feeding and ejecting several...
...three seconds to eject the paper. 6. Epson Stylus Photo R1800 7. Load the paper part of the way into the feeder as far as it 's a good idea to print a small sample, then wait a day and check the quality to clean the roller inside the printer. the printer feeds the paper automatically. 10. Cleaning the ... that the paper is crooked, press the z roll paper button for instructions on checking the print position or color before you plan to print large numbers of letter-size paper. 4. Do not use thermal-printable or regular CDs or DVDs. You can do this by feeding and ejecting several...


