Product Information Guide
Page 10
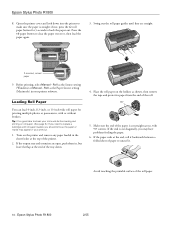
... sure the end of the roll paper. 10 - Epson Stylus Photo R1800 2/05 Roll as the Paper Source setting (Macintosh) in the sheet feeder at the top of the tray down into the printer to make sure the paper is straight; Open the printer cover and look down . 4. If the output tray...roll paper on the holders as the Source setting (Windows) or Manual - If the paper curls at the end of the printer. 2. Loading Roll Paper You can load 4-inch, 8.3-inch, or 13-inch wide roll paper for 3 seconds to clear the paper out error, then load the paper again. 3. Epson Stylus Photo R1800 8.
... sure the end of the roll paper. 10 - Epson Stylus Photo R1800 2/05 Roll as the Paper Source setting (Macintosh) in the sheet feeder at the top of the tray down into the printer to make sure the paper is straight; Open the printer cover and look down . 4. If the output tray...roll paper on the holders as the Source setting (Windows) or Manual - If the paper curls at the end of the printer. 2. Loading Roll Paper You can load 4-inch, 8.3-inch, or 13-inch wide roll paper for 3 seconds to clear the paper out error, then load the paper again. 3. Epson Stylus Photo R1800 8.
Product Information Guide
Page 14
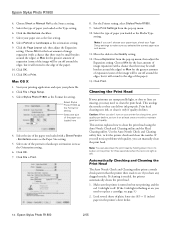
.... 9. Select the type of paper you can manually clean the print head. Click the Page Layout... (with a Sheet Feeder - Epson Stylus Photo R1800 2/05 Epson Stylus Photo R1800 4. Select Portrait or Landscape as the Source setting. 5. Click File > Page Setup. 3. Select Stylus Photo R1800 as the Type setting. 6. Select Stylus Photo R1800 as the Media Type setting. ... plain, letter-size (8.5 × 11 inches) paper in the printer's sheet feeder. 14 - Click File > Print. 8. For the Printer setting, select Stylus Photo R1800. 9. Select Print Settings from the pop-up menu. 10. Use...
.... 9. Select the type of paper you can manually clean the print head. Click the Page Layout... (with a Sheet Feeder - Epson Stylus Photo R1800 2/05 Epson Stylus Photo R1800 4. Select Portrait or Landscape as the Source setting. 5. Click File > Page Setup. 3. Select Stylus Photo R1800 as the Type setting. 6. Select Stylus Photo R1800 as the Media Type setting. ... plain, letter-size (8.5 × 11 inches) paper in the printer's sheet feeder. 14 - Click File > Print. 8. For the Printer setting, select Stylus Photo R1800. 9. Select Print Settings from the pop-up menu. 10. Use...
Product Information Guide
Page 15
...overnight-this allows any dried ink to manually clean the print head. Do one of your taskbar (in the printer. If you to soften-and then clean the print head again. 2/05 Epson Stylus Photo R1800 - 15 Select Auto Head Cleaning. Select SP R1800, click OK, and select Auto Nozzle ... the icon on but not printing, and the red H ink light is off the printer while the green P power light is flashing, unless the printer hasn't moved or made noise for more than letter, including 8.5 × 10 inches, won't work. 3. Epson Stylus Photo R1800 Note: Sizes smaller than 5 minutes. 5.
...overnight-this allows any dried ink to manually clean the print head. Do one of your taskbar (in the printer. If you to soften-and then clean the print head again. 2/05 Epson Stylus Photo R1800 - 15 Select Auto Head Cleaning. Select SP R1800, click OK, and select Auto Nozzle ... the icon on but not printing, and the red H ink light is off the printer while the green P power light is flashing, unless the printer hasn't moved or made noise for more than letter, including 8.5 × 10 inches, won't work. 3. Epson Stylus Photo R1800 Note: Sizes smaller than 5 minutes. 5.
Product Information Guide
Page 16
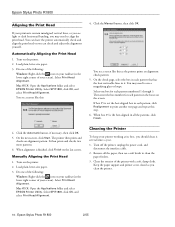
... alignment is the best-aligned in the lower right corner of your screen). Epson Stylus Photo R1800 2/05 Manually Aligning the Print Head 1. If box #5 is not the best-aligned box in the lower right corner of the printer with a soft, damp cloth. Epson Stylus Photo R1800 Aligning the Print Head If your printouts contain misaligned vertical lines, or you...
... alignment is the best-aligned in the lower right corner of your screen). Epson Stylus Photo R1800 2/05 Manually Aligning the Print Head 1. If box #5 is not the best-aligned box in the lower right corner of the printer with a soft, damp cloth. Epson Stylus Photo R1800 Aligning the Print Head If your printouts contain misaligned vertical lines, or you...
User's Guide
Page 4
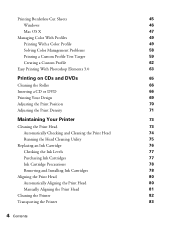
Printing Borderless Cut Sheets 45 Windows 46 Mac OS X 47 Managing Color With Profiles 49 Printing With a Color Profile 49 Solving Color Management Problems 58 Printing a Custom Profile Test Target 59 Creating a Custom Profile 62 Easy Printing With Photoshop Elements 3.0 63 Printing on CDs and DVDs ...Purchasing Ink Cartridges 77 Ink Cartridge Precautions 78 Removing and Installing Ink Cartridges 78 Aligning the Print Head 80 Automatically Aligning the Print Head 80 Manually Aligning the Print Head 81 Cleaning the Printer 82 Transporting the Printer 83 4 Contents
Printing Borderless Cut Sheets 45 Windows 46 Mac OS X 47 Managing Color With Profiles 49 Printing With a Color Profile 49 Solving Color Management Problems 58 Printing a Custom Profile Test Target 59 Creating a Custom Profile 62 Easy Printing With Photoshop Elements 3.0 63 Printing on CDs and DVDs ...Purchasing Ink Cartridges 77 Ink Cartridge Precautions 78 Removing and Installing Ink Cartridges 78 Aligning the Print Head 80 Automatically Aligning the Print Head 80 Manually Aligning the Print Head 81 Cleaning the Printer 82 Transporting the Printer 83 4 Contents

User's Guide
Page 10
...: If you are using a different browser, the pages may not display correctly. 1. Double-click the SPR1800 Reference Guide icon on the left to view the manual. If you see an icon for a graphic when viewing your desktop. 2. Closed list, click to expand Click to go to load the graphic. 10 Welcome...
...: If you are using a different browser, the pages may not display correctly. 1. Double-click the SPR1800 Reference Guide icon on the left to view the manual. If you see an icon for a graphic when viewing your desktop. 2. Closed list, click to expand Click to go to load the graphic. 10 Welcome...
User's Guide
Page 19
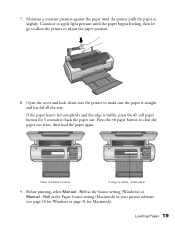
... the paper in your printer software (see page 26 for Windows or page 31 for 3 seconds to make sure the paper is visible, reload paper 9. Before printing, select Manual - Loading Paper 19 Paper is loaded correctly If edge is straight and has fed all the way. Roll as ... (Macintosh) in slightly. Press the ) paper button to adjust the paper position. 8. Roll as the Source setting (Windows) or Manual - 7. Maintain a constant pressure against the paper until the paper begins feeding, then let go to allow the printer to clear the paper out error, then load the paper again.
... the paper in your printer software (see page 26 for Windows or page 31 for 3 seconds to make sure the paper is visible, reload paper 9. Before printing, select Manual - Loading Paper 19 Paper is loaded correctly If edge is straight and has fed all the way. Roll as ... (Macintosh) in slightly. Press the ) paper button to adjust the paper position. 8. Roll as the Source setting (Windows) or Manual - 7. Maintain a constant pressure against the paper until the paper begins feeding, then let go to allow the printer to clear the paper out error, then load the paper again.
User's Guide
Page 27
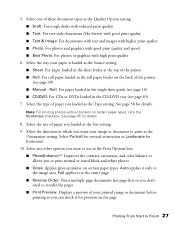
...the Source setting: ■ Sheet: For paper loaded in the sheet feeder at the top of the printer ■ Roll: For roll paper loaded in which you to print neutral or toned black-and-white photos ■ Gloss: Applies gloss optimizer on the page Printing From Start to reorder the pages ■... the CD/DVD tray (see page 39) ■ Manual - Roll: For paper loaded in the single sheet guide (see page 16) ■ CD/DVD: For CDs or DVDs loaded in the Print Options box: ■ PhotoEnhanceTM: Improves the contrast, saturation, and color balance or allows you want your printed image or...
...the Source setting: ■ Sheet: For paper loaded in the sheet feeder at the top of the printer ■ Roll: For roll paper loaded in which you to print neutral or toned black-and-white photos ■ Gloss: Applies gloss optimizer on the page Printing From Start to reorder the pages ■... the CD/DVD tray (see page 39) ■ Manual - Roll: For paper loaded in the single sheet guide (see page 16) ■ CD/DVD: For CDs or DVDs loaded in the Print Options box: ■ PhotoEnhanceTM: Improves the contrast, saturation, and color balance or allows you want your printed image or...

User's Guide
Page 32
... the printable area for that size. Choose the paper size Choose a source setting ■ For prints on paper loaded in the sheet feeder with Manual - Roll as the source. ■ For borderless prints on paper loaded in the single sheet guide, select a size with borders around the image...from the submenu for your paper length. 32 Printing From Start to Finish For example, never choose a paper size wider than your printer's sheet feeder or longer than your printer. Roll (Borderless) as the source. ■ For prints with borders around the image, select just a paper size in the ...
... the printable area for that size. Choose the paper size Choose a source setting ■ For prints on paper loaded in the sheet feeder with Manual - Roll as the source. ■ For borderless prints on paper loaded in the single sheet guide, select a size with borders around the image...from the submenu for your paper length. 32 Printing From Start to Finish For example, never choose a paper size wider than your printer's sheet feeder or longer than your printer. Roll (Borderless) as the source. ■ For prints with borders around the image, select just a paper size in the ...
User's Guide
Page 40
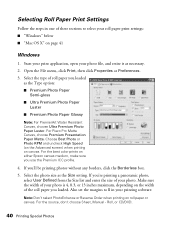
...photo, select User Defined from the Size list and enter the size of your photo. Choose Best Photo or Photo RPM and uncheck High Speed (on the Advanced screen) when printing on either Epson... Photo Paper Semi-gloss ■ Ultra Premium Photo Paper Luster ■ Premium Photo Paper Glossy Note: For PremierArt Water Resistant Canvas, choose Ultra Premium Photo Paper... one of roll paper you 'll be printing photos without any borders, click the Borderless box. ... OS X" on roll paper or canvas. For the best color prints on canvas. Note: Don't select PhotoEnhance or Reverse Order when printing ...
...photo, select User Defined from the Size list and enter the size of your photo. Choose Best Photo or Photo RPM and uncheck High Speed (on the Advanced screen) when printing on either Epson... Photo Paper Semi-gloss ■ Ultra Premium Photo Paper Luster ■ Premium Photo Paper Glossy Note: For PremierArt Water Resistant Canvas, choose Ultra Premium Photo Paper... one of roll paper you 'll be printing photos without any borders, click the Borderless box. ... OS X" on roll paper or canvas. For the best color prints on canvas. Note: Don't select PhotoEnhance or Reverse Order when printing ...
User's Guide
Page 73
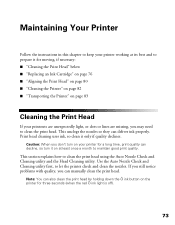
... a long time, print quality can deliver ink properly. Caution: When you can also clean the print head by holding down the H ink button on your printer for moving, if necessary: ■ "Cleaning the Print Head" below ■ "Replacing an Ink Cartridge" on page 76 ■ "Aligning the Print Head" ... head using the Auto Nozzle Check and Cleaning utility and the Head Cleaning utility. This section explains how to let the printer check and clean the nozzles. Note: You can manually clean the print head. If you still notice problems with quality, you don't turn it on at its best and...
... a long time, print quality can deliver ink properly. Caution: When you can also clean the print head by holding down the H ink button on your printer for moving, if necessary: ■ "Cleaning the Print Head" below ■ "Replacing an Ink Cartridge" on page 76 ■ "Aligning the Print Head" ... head using the Auto Nozzle Check and Cleaning utility and the Head Cleaning utility. This section explains how to let the printer check and clean the nozzles. Note: You can manually clean the print head. If you still notice problems with quality, you don't turn it on at its best and...

User's Guide
Page 74
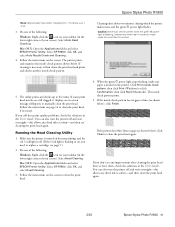
... page 75 to five times. Note: If the icon does not appear, click Start > Printer (and Faxes), right-click on -screen message telling you still have any dried ink to manually clean the print head. Automatically Checking and Cleaning the Print Head The Auto Nozzle Check and... you need to see page 76.) 2. You can also turn the printer off . (If the H ink light is turned on your screen). If cleaning is necessary, it displays an on EPSON Stylus Photo R1800, and select Printing Preferences. Select SP R1800, click OK, and select Auto Nozzle Check and Cleaning. 4. If ...
... page 75 to five times. Note: If the icon does not appear, click Start > Printer (and Faxes), right-click on -screen message telling you still have any dried ink to manually clean the print head. Automatically Checking and Cleaning the Print Head The Auto Nozzle Check and... you need to see page 76.) 2. You can also turn the printer off . (If the H ink light is turned on your screen). If cleaning is necessary, it displays an on EPSON Stylus Photo R1800, and select Printing Preferences. Select SP R1800, click OK, and select Auto Nozzle Check and Cleaning. 4. If ...

User's Guide
Page 81
...EPSON Printer Utility. Click the Manual button, then click OK. If box #5 is the best-aligned in all the patterns, click Finish. Select the Maintenance tab and click Print Head Alignment. On the check page, select the box in the lower right corner of the following: Windows: Right-click the icon on EPSON Stylus Photo R1800..., and select Printing Preferences. Select one of your screen). Load letter-size Epson Presentation Paper Matte. 3. Note: If the icon does not appear, click Start > Printer (and Faxes), right-click on ...
...EPSON Printer Utility. Click the Manual button, then click OK. If box #5 is the best-aligned in all the patterns, click Finish. Select the Maintenance tab and click Print Head Alignment. On the check page, select the box in the lower right corner of the following: Windows: Right-click the icon on EPSON Stylus Photo R1800..., and select Printing Preferences. Select one of your screen). Load letter-size Epson Presentation Paper Matte. 3. Note: If the icon does not appear, click Start > Printer (and Faxes), right-click on ...
User's Guide
Page 104
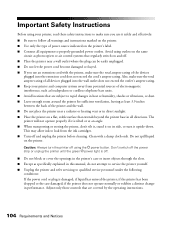
... circuit as photocopiers or air control systems that regularly switch on and off. ■ Place the printer near a radiator or heating vent or in this manual, do not attempt to service the printer yourself. ■ Unplug the printer and refer servicing to qualified service personnel under the following conditions: If the power cord or...
... circuit as photocopiers or air control systems that regularly switch on and off. ■ Place the printer near a radiator or heating vent or in this manual, do not attempt to service the printer yourself. ■ Unplug the printer and refer servicing to qualified service personnel under the following conditions: If the power cord or...
User's Guide
Page 112
...Smoothing setting color management, 53, 57, 60, 62 Windows, 29 Electronic manual, 9 to 10 Enhanced Matte Paper, 14, 38 Epson help, 101...setting, Windows, 27 Glossy Photo Paper, 14, 38, 40, 42, 45 Grainy prints, 94 H Head Cleaning utility, 75 to 76 Help Epson, 101 to 102 other ...software, 102 see also Troubleshooting High Speed setting, 92 to 93 112 Index I ICM (Image Color Matching) setting, 30, 57, 62 Incorrect characters, 99 colors... settings Macintosh, 34 Windows, 30 Letterhead, 13 Lights, 88 to 89 Luster Photo Paper, 14, 38, 40, 42 M Macintosh basic printing, 31 to 35...
...Smoothing setting color management, 53, 57, 60, 62 Windows, 29 Electronic manual, 9 to 10 Enhanced Matte Paper, 14, 38 Epson help, 101...setting, Windows, 27 Glossy Photo Paper, 14, 38, 40, 42, 45 Grainy prints, 94 H Head Cleaning utility, 75 to 76 Help Epson, 101 to 102 other ...software, 102 see also Troubleshooting High Speed setting, 92 to 93 112 Index I ICM (Image Color Matching) setting, 30, 57, 62 Incorrect characters, 99 colors... settings Macintosh, 34 Windows, 30 Letterhead, 13 Lights, 88 to 89 Luster Photo Paper, 14, 38, 40, 42 M Macintosh basic printing, 31 to 35...

