Basics
Page 2
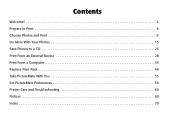
Contents Welcome 2 Prepare to Print 6 Choose Photos and Print 9 Do More With Your Photos 15 Save Photos to a CD 25 Print From an External Device 28 Print From a Computer 34 Replace Print Pack 49 Take PictureMate With You 53 Set PictureMate Preferences 56 Printer Care and Troubleshooting 60 Notices 69 Index 79
Contents Welcome 2 Prepare to Print 6 Choose Photos and Print 9 Do More With Your Photos 15 Save Photos to a CD 25 Print From an External Device 28 Print From a Computer 34 Replace Print Pack 49 Take PictureMate With You 53 Set PictureMate Preferences 56 Printer Care and Troubleshooting 60 Notices 69 Index 79
Basics
Page 5
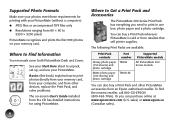
... at www.epsonstore.com (U.S. sales) or www.epson.ca (Canadian sales). Where to the Lock position. 6 Close the cartridge door. PictureMate Power adapter Power cable I/ On button PictureMate photo paper Initial PictureMate photo cartridge Basics book Printer Software CD 1 Remove all the way right, to Find Information Your manuals cover both PictureMate Dash and Zoom. Basics (this on the...
... at www.epsonstore.com (U.S. sales) or www.epson.ca (Canadian sales). Where to the Lock position. 6 Close the cartridge door. PictureMate Power adapter Power cable I/ On button PictureMate photo paper Initial PictureMate photo cartridge Basics book Printer Software CD 1 Remove all the way right, to Find Information Your manuals cover both PictureMate Dash and Zoom. Basics (this on the...
Basics
Page 10
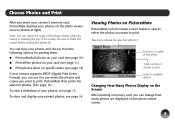
... card (see page 11) ● Print photos taken on the photo viewer screen. 9 Choose Photos and Print After you want to lower the screen before closing the printer lid. Viewing Photos on PictureMate PictureMate's photo viewer screen makes it to pre-select the photos and copies you insert your camera's memory card, PictureMate displays your camera supports DPOF (Digital Print...
... card (see page 11) ● Print photos taken on the photo viewer screen. 9 Choose Photos and Print After you want to lower the screen before closing the printer lid. Viewing Photos on PictureMate PictureMate's photo viewer screen makes it to pre-select the photos and copies you insert your camera's memory card, PictureMate displays your camera supports DPOF (Digital Print...

Basics
Page 20
...Photos PictureMate's automatic image adjustments are turned on in the current print job. 1 After inserting a card, press Menu. 2 Press u or d to highlight Print Settings, then press OK. 3 Press u or d to fine-tune your camera supports PRINT Image Matching® (P.I.M.) or Exif Print, the printer...brightness or control the saturation and sharpness. setting automatically adjusts your photos for the best results. ● Manual adjustments If your photos' colors and increases contrast and sharpness. Fixing Photos PictureMate lets you can make manual adjustments while P.I .M. You can ...
...Photos PictureMate's automatic image adjustments are turned on in the current print job. 1 After inserting a card, press Menu. 2 Press u or d to highlight Print Settings, then press OK. 3 Press u or d to fine-tune your camera supports PRINT Image Matching® (P.I.M.) or Exif Print, the printer...brightness or control the saturation and sharpness. setting automatically adjusts your photos for the best results. ● Manual adjustments If your photos' colors and increases contrast and sharpness. Fixing Photos PictureMate lets you can make manual adjustments while P.I .M. You can ...

Basics
Page 22
... is incorrect, adjust the date setting on the screen to the bottom right corner of expansion and cropping. 21 You see the color correction icon on your photo next to the menu: 5 Press u or d to remind you about the setting. Adjusting Borderless Expansion When you can adjust ...edges, you print borderless pictures, your photos were originally taken to remind you about the setting. Or repeat steps 1 through 7 to make other adjustments to highlight Date Stamp, then press OK. 4 Highlight On, then press OK. Note: The date comes from the printer. Adding a Date Stamp You can...
... is incorrect, adjust the date setting on the screen to the bottom right corner of expansion and cropping. 21 You see the color correction icon on your photo next to the menu: 5 Press u or d to remind you about the setting. Adjusting Borderless Expansion When you can adjust ...edges, you print borderless pictures, your photos were originally taken to remind you about the setting. Or repeat steps 1 through 7 to make other adjustments to highlight Date Stamp, then press OK. 4 Highlight On, then press OK. Note: The date comes from the printer. Adding a Date Stamp You can...
Basics
Page 26
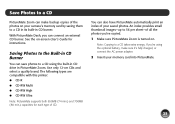
...drive in CD burner. See the on-screen User's Guide for each type of all the photos you can also have PictureMate automatically print an index of the photos on . Save Photos to a CD PictureMate Zoom can make sure it's fully charged, or connect the AC power adapter. 2 Insert ...following types are compatible with this printer: ● CD-R ● CD-RW Multi ● CD-RW High ● CD-RW Ultra Note: PictureMate supports both 650MB (74 min.) and 700MB (80 min.) capacities for instructions. With PictureMate Dash, you 've copied. 1 Make sure PictureMate Zoom is turned on your camera's...
...drive in CD burner. See the on-screen User's Guide for each type of all the photos you can also have PictureMate automatically print an index of the photos on . Save Photos to a CD PictureMate Zoom can make sure it's fully charged, or connect the AC power adapter. 2 Insert ...following types are compatible with this printer: ● CD-R ● CD-RW Multi ● CD-RW High ● CD-RW Ultra Note: PictureMate supports both 650MB (74 min.) and 700MB (80 min.) capacities for instructions. With PictureMate Dash, you 've copied. 1 Make sure PictureMate Zoom is turned on your camera's...
Basics
Page 28
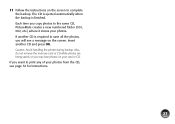
11 Follow the instructions on the screen to the same CD, PictureMate creates a new numbered folder (001, 002, etc.) where it stores your card or CD. If you want to save all the photos, you will see page 32 for instructions. 27 If another CD and press OK. Also, do not remove... the memory card or CD while photos are being saved, or you copy photos to complete the backup. Each time you may lose photos on the screen. Caution: Avoid handling the printer during backup. The CD is ejected automatically when the backup is required to print...
11 Follow the instructions on the screen to the same CD, PictureMate creates a new numbered folder (001, 002, etc.) where it stores your card or CD. If you want to save all the photos, you will see page 32 for instructions. 27 If another CD and press OK. Also, do not remove... the memory card or CD while photos are being saved, or you copy photos to complete the backup. Each time you may lose photos on the screen. Caution: Avoid handling the printer during backup. The CD is ejected automatically when the backup is required to print...

Basics
Page 29
...drive, Zip drive, or flash memory (thumb) drive (see if it supports PictBridge or USB DIRECT-PRINT. see page 30) ● CD using PictureMate's built-in PictureMate's slots. Printing From a Digital Camera You can copy photos from a camera. 3 Turn on -screen User's Guide for safekeeping. see page 32... USB DIRECT-PRINT printing to PictureMate and use the camera to control printing. (Check your camera's memory card to see page 29) ● Bluetooth-enabled device (requires an optional Bluetooth Photo Print adapter; Note: You must remove your memory card or the printer will read photos from...
...drive, Zip drive, or flash memory (thumb) drive (see if it supports PictBridge or USB DIRECT-PRINT. see page 30) ● CD using PictureMate's built-in PictureMate's slots. Printing From a Digital Camera You can copy photos from a camera. 3 Turn on -screen User's Guide for safekeeping. see page 32... USB DIRECT-PRINT printing to PictureMate and use the camera to control printing. (Check your camera's memory card to see page 29) ● Bluetooth-enabled device (requires an optional Bluetooth Photo Print adapter; Note: You must remove your memory card or the printer will read photos from...

Basics
Page 33
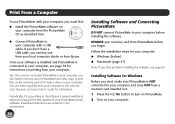
... CD drive. Note: If you're using PictureMate Dash and you want to print photos from a CD or DVD, you can print photos from a CD or DVD using PictureMate Zoom's built-in CD Drive You can install the PictureMate software and connect the printer to your device or while PictureMate is not printing, then pull the adapter out...
... CD drive. Note: If you're using PictureMate Dash and you want to print photos from a CD or DVD, you can print photos from a CD or DVD using PictureMate Zoom's built-in CD Drive You can install the PictureMate software and connect the printer to your device or while PictureMate is not printing, then pull the adapter out...
Basics
Page 35
You can buy one from your local computer dealer or from Epson. If you don't have a USB cable, you can even copy files from your computer to the memory card. Tip: Once you've connected PictureMate to your computer, you can insert a memory card in ... start, make sure PictureMate is connected to turn on PictureMate. 2 Turn on your computer. See your memory card from PictureMate before installing the software. Installing Software for your convenience. 34 Installing Software and Connecting PictureMate DO NOT connect PictureMate to your PictureMate printer software. REMOVE your ...
You can buy one from your local computer dealer or from Epson. If you don't have a USB cable, you can even copy files from your computer to the memory card. Tip: Once you've connected PictureMate to your computer, you can insert a memory card in ... start, make sure PictureMate is connected to turn on PictureMate. 2 Turn on your computer. See your memory card from PictureMate before installing the software. Installing Software for your convenience. 34 Installing Software and Connecting PictureMate DO NOT connect PictureMate to your PictureMate printer software. REMOVE your ...
Basics
Page 38
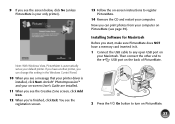
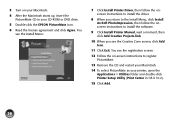
...of PictureMate. 2 Press the On button to any open USB port on PictureMate. 37 Note: With Windows Vista, PictureMate is your computer on -screen User's Guide are installed. 11 When you see the Creative Zone screen, click Add Icon. 12 When you can print photos from your only printer). ...ArcSoft® PhotoImpression™ and your computer. Installing Software for Macintosh Before you start, make sure PictureMate does NOT have another printer, you 're finished, click Exit. If you see page ...
...of PictureMate. 2 Press the On button to any open USB port on PictureMate. 37 Note: With Windows Vista, PictureMate is your computer on -screen User's Guide are installed. 11 When you see the Creative Zone screen, click Add Icon. 12 When you can print photos from your only printer). ...ArcSoft® PhotoImpression™ and your computer. Installing Software for Macintosh Before you start, make sure PictureMate does NOT have another printer, you 're finished, click Exit. If you see page ...
Basics
Page 39
...12 Follow the on your Macintosh. 4 After the Macintosh starts up, insert the PictureMate CD in your printer, open the Applications > Utilities folder and double-click Printer Setup Utility (Print Center in OS X 10.2). 15 Click Add. 38 You...Printer Driver, then follow the onscreen instructions to install the driver. 8 When you return to the Install Menu, click Install ArcSoft PhotoImpression, then follow the onscreen instructions to register PictureMate. 13 Remove the CD and restart your Macintosh. 14 To select PictureMate as your CD-ROM or DVD drive. 5 Double-click the EPSON PictureMate...
...12 Follow the on your Macintosh. 4 After the Macintosh starts up, insert the PictureMate CD in your printer, open the Applications > Utilities folder and double-click Printer Setup Utility (Print Center in OS X 10.2). 15 Click Add. 38 You...Printer Driver, then follow the onscreen instructions to install the driver. 8 When you return to the Install Menu, click Install ArcSoft PhotoImpression, then follow the onscreen instructions to register PictureMate. 13 Remove the CD and restart your Macintosh. 14 To select PictureMate as your CD-ROM or DVD drive. 5 Double-click the EPSON PictureMate...
Basics
Page 40
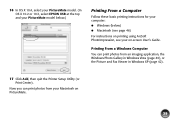
...application, the Windows Photo Gallery in Windows Vista (page 40), or the Picture and Fax Viewer in Windows XP (page 42). 17 Click Add, then quit the Printer Setup Utility (or Print Center). 16 In OS X 10.4, select your PictureMate model. (In OS X 10.2 or 10.3, select EPSON USB at the top... and your PictureMate model below.) Printing From a Computer Follow these basic printing instructions for ...
...application, the Windows Photo Gallery in Windows Vista (page 40), or the Picture and Fax Viewer in Windows XP (page 42). 17 Click Add, then quit the Printer Setup Utility (or Print Center). 16 In OS X 10.4, select your PictureMate model. (In OS X 10.2 or 10.3, select EPSON USB at the top... and your PictureMate model below.) Printing From a Computer Follow these basic printing instructions for ...
Basics
Page 41
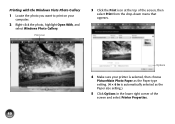
Printing with the Windows Vista Photo Gallery 1 Locate the photo you want to print on your printer is selected, then choose PictureMate Photo Paper as the Paper type setting. (4 × 6 in is automatically selected as the Paper size setting.) 5 Click Options in the lower right corner of the screen, then select Print from the drop-down menu that appears. Options 4 Make sure your computer. 2 Right-click the photo, highlight Open With, and select Windows Photo Gallery. Print icon 3 Click the Print icon at the top of the screen and select Printer Properties. 40
Printing with the Windows Vista Photo Gallery 1 Locate the photo you want to print on your printer is selected, then choose PictureMate Photo Paper as the Paper type setting. (4 × 6 in is automatically selected as the Paper size setting.) 5 Click Options in the lower right corner of the screen, then select Print from the drop-down menu that appears. Options 4 Make sure your computer. 2 Right-click the photo, highlight Open With, and select Windows Photo Gallery. Print icon 3 Click the Print icon at the top of the screen and select Printer Properties. 40
Basics
Page 42
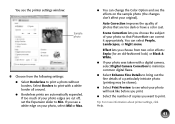
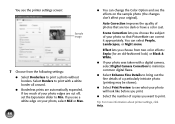
Select Borders to print. Scene Correction lets you print. ● Select the number of photos that PictureMate can correct it appropriately. Auto Correction improves the quality of copies you want to print with a digital camera, select Digital Camera Correction to... your original). If too much of your photo so that are cut off, set the Expansion slider to print a photo without borders. If you choose from the following settings: ● Select Borderless to Min. You see the printer settings window: Sample photo 6 Choose from two color effects: Sepia (for an old-fashioned look...
Select Borders to print. Scene Correction lets you print. ● Select the number of photos that PictureMate can correct it appropriately. Auto Correction improves the quality of copies you want to print with a digital camera, select Digital Camera Correction to... your original). If too much of your photo so that are cut off, set the Expansion slider to print a photo without borders. If you choose from the following settings: ● Select Borderless to Min. You see the printer settings window: Sample photo 6 Choose from two color effects: Sepia (for an old-fashioned look...
Basics
Page 45
... you choose the subject of photos that PictureMate can correct it appropriately. Tip: For more information about printer settings, click Help. Auto Correction improves the quality of your photo so that are cut off, set the Expansion slider to print. You see the printer settings screen: Sample image 7 Choose from two color effects: Sepia (for an...
... you choose the subject of photos that PictureMate can correct it appropriately. Tip: For more information about printer settings, click Help. Auto Correction improves the quality of your photo so that are cut off, set the Expansion slider to print. You see the printer settings screen: Sample image 7 Choose from two color effects: Sepia (for an...

Basics
Page 48
... sides of an image to the maximum print area, so you see a white edge on the sample photo (the changes don't affect your photo, select Mid or Max. Black & White changes a color photo to brown for an oldfashioned look. Sample image Tip: To check your selections 11 Click Print. 47 ...see the effects on your original). Sepia changes the colors to black-and-white. ● Borderless prints are cut off, set the Expansion slider to view a list of all your Print Pack status, click the maintenance icon. For more information about printer settings, click ?. 9 Choose from the pop-up ...
... sides of an image to the maximum print area, so you see a white edge on the sample photo (the changes don't affect your photo, select Mid or Max. Black & White changes a color photo to brown for an oldfashioned look. Sample image Tip: To check your selections 11 Click Print. 47 ...see the effects on your original). Sepia changes the colors to black-and-white. ● Borderless prints are cut off, set the Expansion slider to view a list of all your Print Pack status, click the maintenance icon. For more information about printer settings, click ?. 9 Choose from the pop-up ...
Basics
Page 50
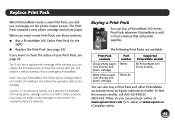
...page 50) If you want to your Print Pack, see page 52. Note: Use your PictureMate 200 Series photo cartridge within six months of your printer not covered by Epson's warranty. Replace Print Pack When PictureMate needs a new Print Pack, you will see a message on the package. sales) or... www.epson.ca (Canadian sales). 49 Caution: To ensure good results, use a genuine PictureMate 200 Series photo cartridge and do ...
...page 50) If you want to your Print Pack, see page 52. Note: Use your PictureMate 200 Series photo cartridge within six months of your printer not covered by Epson's warranty. Replace Print Pack When PictureMate needs a new Print Pack, you will see a message on the package. sales) or... www.epson.ca (Canadian sales). 49 Caution: To ensure good results, use a genuine PictureMate 200 Series photo cartridge and do ...
Basics
Page 55
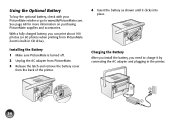
...remove the battery cover from PictureMate Zoom's built-in the printer. 54 Using the Optional Battery To buy the optional battery, check with your PictureMate retailer or go to charge it clicks into place. See page 68 for more information on purchasing PictureMate supplies and accessories. With... a fully charged battery, you need to www.MyPictureMate.com. Charging the Battery After you install the battery, you can print about 100 photos (or 60 photos when printing from the back of the printer. 4 Insert the battery...
...remove the battery cover from PictureMate Zoom's built-in the printer. 54 Using the Optional Battery To buy the optional battery, check with your PictureMate retailer or go to charge it clicks into place. See page 68 for more information on purchasing PictureMate supplies and accessories. With... a fully charged battery, you need to www.MyPictureMate.com. Charging the Battery After you install the battery, you can print about 100 photos (or 60 photos when printing from the back of the printer. 4 Insert the battery...
Basics
Page 56
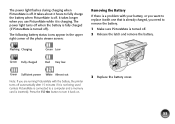
... The following battery status icons appear in the upper right corner of the photo viewer screen: Removing the Battery If there is a problem with your battery, or you need to fully charge the battery when PictureMate is turned off . The power light turns off when the battery is ... Replace the battery cover. 55 The power light flashes during charging when PictureMate is inserted). Press the On button to a computer and a memory card is off automatically after 15 minutes if it is not being used (unless PictureMate is connected to turn it with the battery, the printer turns off .
... The following battery status icons appear in the upper right corner of the photo viewer screen: Removing the Battery If there is a problem with your battery, or you need to fully charge the battery when PictureMate is turned off . The power light turns off when the battery is ... Replace the battery cover. 55 The power light flashes during charging when PictureMate is inserted). Press the On button to a computer and a memory card is off automatically after 15 minutes if it is not being used (unless PictureMate is connected to turn it with the battery, the printer turns off .

