

Product Information Guide
Page 3
...015 inch (0.065 to 0.39 mm) Perforated edges (gathering area) up to 60% RH Do not load paper that has been folded or is damaged, wrinkled, or curled. Epson LX-300+II Electrical Input voltage range Rated frequency range Input frequency range Rated current Power consumption 120 V 220 to 240...EN 55022 Class B EN 61000-3-2 EN 61000-3-3 EN 55024 Paper Use recycled paper, envelopes, and single-sheet multipart forms only under normal temperature and humidity conditions, as follows: Temperature: 59 to 77 °F (15 to 25 °C) Humidity: 30 to 0.035 inch (0.9 mm) 7/06 Epson LX-300+II - 3
...015 inch (0.065 to 0.39 mm) Perforated edges (gathering area) up to 60% RH Do not load paper that has been folded or is damaged, wrinkled, or curled. Epson LX-300+II Electrical Input voltage range Rated frequency range Input frequency range Rated current Power consumption 120 V 220 to 240...EN 55022 Class B EN 61000-3-2 EN 61000-3-3 EN 55024 Paper Use recycled paper, envelopes, and single-sheet multipart forms only under normal temperature and humidity conditions, as follows: Temperature: 59 to 77 °F (15 to 25 °C) Humidity: 30 to 0.035 inch (0.9 mm) 7/06 Epson LX-300+II - 3
Product Information Guide
Page 5
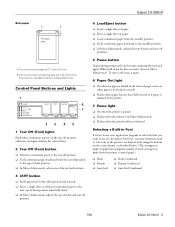
...; Roman Condensed ❏ Sans Serif Condensed 7/06 Epson LX-300+II - 5 To turn it off, press it again. 6 Paper Out light ❏ On when no paper is loaded in the selected paper source or when paper is not loaded correctly. ❏ Flashes when paper has not been fully ejected or if paper is jammed in the printer. 7 Pause light ❏ On when the...
...; Roman Condensed ❏ Sans Serif Condensed 7/06 Epson LX-300+II - 5 To turn it off, press it again. 6 Paper Out light ❏ On when no paper is loaded in the selected paper source or when paper is not loaded correctly. ❏ Flashes when paper has not been fully ejected or if paper is jammed in the printer. 7 Pause light ❏ On when the...

Product Information Guide
Page 6
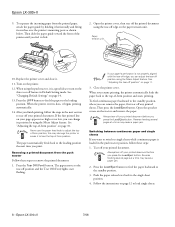
...-off edge. The paper is paused. The printer feeds the paper to turn off the Pause light. f Paper Out - n Paper Out ••• n Pause ••• ••• f Paper Out ••• n Pause ••• ••• Problem Solution The printer is not loaded correctly. Epson LX-300+II 7/06 Standby Position Continuous paper is in the...
...-off edge. The paper is paused. The printer feeds the paper to turn off the Pause light. f Paper Out - n Paper Out ••• n Pause ••• ••• f Paper Out ••• n Pause ••• ••• Problem Solution The printer is not loaded correctly. Epson LX-300+II 7/06 Standby Position Continuous paper is in the...

Product Information Guide
Page 7
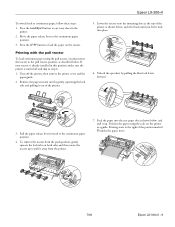
... tractor). Make sure your continuous paper behind the printer. Remove the printer cover and the paper guide, and pull the paper release lever forward to load continuous paper on the push tractor: 1. Then slide the right sprocket to match the width of your paper, but do not lock it in place. 7/06 Epson LX-300+II - 7 Stack your paper has a clean, straight, leading...
... tractor). Make sure your continuous paper behind the printer. Remove the printer cover and the paper guide, and pull the paper release lever forward to load continuous paper on the push tractor: 1. Then slide the right sprocket to match the width of your paper, but do not lock it in place. 7/06 Epson LX-300+II - 7 Stack your paper has a clean, straight, leading...
Product Information Guide
Page 8
... paper moves to load single sheets. 8 - Follow the instructions on the Auto tear off position using the Micro Adjust feature. Open the printer cover, then tear off any printed sheets. If the first printed line on page 11. 3. The paper automatically feeds back to the top-of -form position" on page 14. 13. Epson LX-300+II 7/06 Epson LX-300+II...
... paper moves to load single sheets. 8 - Follow the instructions on the Auto tear off position using the Micro Adjust feature. Open the printer cover, then tear off any printed sheets. If the first printed line on page 11. 3. The paper automatically feeds back to the top-of -form position" on page 14. 13. Epson LX-300+II 7/06 Epson LX-300+II...
Product Information Guide
Page 9
...paper now). 7/06 Epson LX-300+II - 9 Pull the paper release lever forward to continuous paper, follow these steps: 1. Position the paper using the pull tractor, you feel it lock into the rear paper slot as shown below, and pull it away from the push position, gently squeeze the lock tabs on the printer...any sheet in this position, make sure the printer is turned off the printer; Turn off and skip to load the paper on the tractor. Press the Load/Eject button to the continuous paper position. 3. then remove the printer cover and the paper guide. 2. Lower the tractor onto the ...
...paper now). 7/06 Epson LX-300+II - 9 Pull the paper release lever forward to continuous paper, follow these steps: 1. Position the paper using the pull tractor, you feel it lock into the rear paper slot as shown below, and pull it away from the push position, gently squeeze the lock tabs on the printer...any sheet in this position, make sure the printer is turned off the printer; Turn off and skip to load the paper on the tractor. Press the Load/Eject button to the continuous paper position. 3. then remove the printer cover and the paper guide. 2. Lower the tractor onto the ...

Product Information Guide
Page 10
... knob to adjust the loading position. Turn the paper feed knob to feed the paper forward. Epson LX-300+II 8. If you set the top-of -form position, and then see the next section to adjust the top-ofform position; Fit the first holes of -form position, the printer beeps and stops moving the paper. Hold it beyond these...
... knob to adjust the loading position. Turn the paper feed knob to feed the paper forward. Epson LX-300+II 8. If you set the top-of -form position, and then see the next section to adjust the top-ofform position; Fit the first holes of -form position, the printer beeps and stops moving the paper. Hold it beyond these...

Product Information Guide
Page 11
... (Font) button. If you press the Tear Off (Font) button again, the printer feeds your paper to adjust the tear-off position: 1. Press the LF/FF D button to feed the paper backward, or press the Load/Eject U button to adjust the tear-off position beyond these steps to the next...down the Pause button for instructions. Tear-off the printed pages. See page 14 for continuous paper in Default Setting mode. You can reset the printer. You can save the paper normally lost between documents. Epson LX-300+II Your top-of-form position setting remains in effect until you change it, even if you...
... (Font) button. If you press the Tear Off (Font) button again, the printer feeds your paper to adjust the tear-off position: 1. Press the LF/FF D button to feed the paper backward, or press the Load/Eject U button to adjust the tear-off position beyond these steps to the next...down the Pause button for instructions. Tear-off the printed pages. See page 14 for continuous paper in Default Setting mode. You can reset the printer. You can save the paper normally lost between documents. Epson LX-300+II Your top-of-form position setting remains in effect until you change it, even if you...
Product Information Guide
Page 12
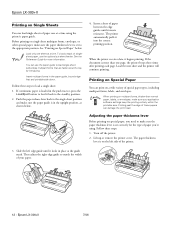
... the printer. 3. Epson LX-300+II 7/06 Load the next sheet and the printer will continue printing. When printing on Single Sheets You can use the optional cut-sheet feeder. Printing on Special Paper You can damage the print head. Turn off the printer. 2. Push the paper release lever back to load a single sheet: 1. Lift up or remove the printer cover. Epson LX-300+II Printing...
... the printer. 3. Epson LX-300+II 7/06 Load the next sheet and the printer will continue printing. When printing on Single Sheets You can use the optional cut-sheet feeder. Printing on Special Paper You can damage the print head. Turn off the printer. 2. Push the paper release lever back to load a single sheet: 1. Lift up or remove the printer cover. Epson LX-300+II Printing...
Product Information Guide
Page 13
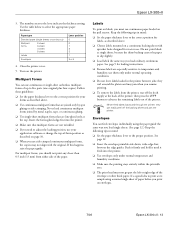
... down, wide-edge-first, between jobs; The numbers next to select the appropriate paper thickness. Epson LX-300+II 3. Labels To print on labels, you print on the printer. Never feed labels backward through the printer; It's a good idea to the proper position. Never load continuous multipart forms joined by spot gluing or side-crimping. Push it firmly...
... down, wide-edge-first, between jobs; The numbers next to select the appropriate paper thickness. Epson LX-300+II 3. Labels To print on labels, you print on the printer. Never feed labels backward through the printer; It's a good idea to the proper position. Never load continuous multipart forms joined by spot gluing or side-crimping. Push it firmly...

Product Information Guide
Page 14
...Off (Font) button. When you finish making settings, turn off the printer to exit Default Setting mode. Make sure paper is loaded and the printer is on the printer. 14 - The printer prints instructions for selecting the language. Your new settings remain in effect until...) Settings Page length for the selected setting until you see the one you want to change. 8. Epson LX-300+II 7/06 The table below to load a new sheet of all the factory default settings, turn on the printer. Changing Default Settings Follow the steps below lists the default settings (in inches: 3, 3.5, 4, ...
...Off (Font) button. When you finish making settings, turn off the printer to exit Default Setting mode. Make sure paper is loaded and the printer is on the printer. 14 - The printer prints instructions for selecting the language. Your new settings remain in effect until...) Settings Page length for the selected setting until you see the one you want to change. 8. Epson LX-300+II 7/06 The table below to load a new sheet of all the factory default settings, turn on the printer. Changing Default Settings Follow the steps below lists the default settings (in inches: 3, 3.5, 4, ...
Product Information Guide
Page 15
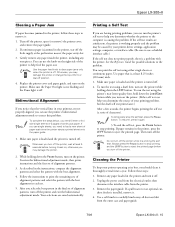
...the Reference Guide for possible solutions to load a new sheet of your printer driver settings, application settings, computer, or interface cable. (Be sure to carefully brush away all dust and dirt from the outer case and paper guide. 7/06 Epson LX-300+II - 15 To run the test ...automatically. To run the test using either single sheets or continuous paper. Use a soft brush to use the printer's bidirectional adjustment mode to stop printing. Epson LX-300+II Clearing a Paper Jam If paper becomes jammed in the printer, follow these steps: 1. As described in the instructions, ...
...the Reference Guide for possible solutions to load a new sheet of your printer driver settings, application settings, computer, or interface cable. (Be sure to carefully brush away all dust and dirt from the outer case and paper guide. 7/06 Epson LX-300+II - 15 To run the test ...automatically. To run the test using either single sheets or continuous paper. Use a soft brush to use the printer's bidirectional adjustment mode to stop printing. Epson LX-300+II Clearing a Paper Jam If paper becomes jammed in the printer, follow these steps: 1. As described in the instructions, ...

Product Information Guide
Page 16
... or equivalent packaging. Remove the paper guide, the USB cable holder, paper supports, and knob. 4. If any paper loaded in water. Make sure the print head is turned off. 2. Remove any options are installed, remove them and pack them in their original boxes. 6. Make sure the printer is not hot. Epson LX-300+II 7/06 Be careful not to...
... or equivalent packaging. Remove the paper guide, the USB cable holder, paper supports, and knob. 4. If any paper loaded in water. Make sure the print head is turned off. 2. Remove any options are installed, remove them and pack them in their original boxes. 6. Make sure the printer is not hot. Epson LX-300+II 7/06 Be careful not to...
Reference Guide
Page 9
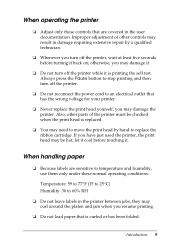
... resume printing. ❏ Do not load paper that has the wrong voltage for your printer. ❏ Never replace the print head yourself; they may curl around the platen and jam when you may damage it. ❏ Do not turn off the printer, wait at least five seconds before touching... cool before turning it is curled or has been folded. When handling paper ❏ Because labels are covered in the user documentation. Also, other controls may damage the printer. Introduction 9 you turn off the printer. ❏ Do not reconnect the power cord to an electrical outlet that...
... resume printing. ❏ Do not load paper that has the wrong voltage for your printer. ❏ Never replace the print head yourself; they may curl around the platen and jam when you may damage it. ❏ Do not turn off the printer, wait at least five seconds before touching... cool before turning it is curled or has been folded. When handling paper ❏ Because labels are covered in the user documentation. Also, other controls may damage the printer. Introduction 9 you turn off the printer. ❏ Do not reconnect the power cord to an electrical outlet that...
Reference Guide
Page 77
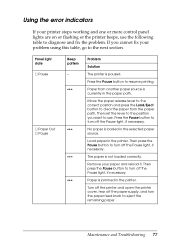
...8226; Problem Solution The printer is currently in the selected paper source. The paper is loaded in the paper path. No paper is not loaded correctly. Remove your paper and reload it. Paper is jammed in the printer. Move the paper release lever to the correct position and press the Load/Eject button to turn off...to turn off the Pause light, if necessary. If you want to use the following table to resume printing. Load paper in the printer. Using the error indicators If your printer stops working and one or more control panel lights are on or flashing or the...
...8226; Problem Solution The printer is currently in the selected paper source. The paper is loaded in the paper path. No paper is not loaded correctly. Remove your paper and reload it. Paper is jammed in the printer. Move the paper release lever to the correct position and press the Load/Eject button to turn off...to turn off the Pause light, if necessary. If you want to use the following table to resume printing. Load paper in the printer. Using the error indicators If your printer stops working and one or more control panel lights are on or flashing or the...

Reference Guide
Page 81
...error occurs when you switch between single sheets and continuous paper, make sure the paper release lever is printed. Cause What to do No paper is loaded. The printer makes a strange noise, beeps five times, and stops printing abruptly. The Paper Out and Pause lights are on page 105. Cause ...Replacing the Ribbon Cartridge" on and the printer beeps three times. If it on page 96. If the problem persists, check for a paper jam or a ribbon jam. Turn off the printer and turn it still does not print correctly, see "Where To Get Help" on again. Load paper in the...
...error occurs when you switch between single sheets and continuous paper, make sure the paper release lever is printed. Cause What to do No paper is loaded. The printer makes a strange noise, beeps five times, and stops printing abruptly. The Paper Out and Pause lights are on page 105. Cause ...Replacing the Ribbon Cartridge" on and the printer beeps three times. If it on page 96. If the problem persists, check for a paper jam or a ribbon jam. Turn off the printer and turn it still does not print correctly, see "Where To Get Help" on again. Load paper in the...

Reference Guide
Page 102
Turn off the printer. 2. Pull the paper release lever forward to install and load paper on the push tractor. 102 Options and Consumables Install the first tractor in place. 7. This is especially useful with continuous pre-printed forms and multipart forms. Follow these steps to the continuous-paper position. 4. Remove the paper tension unit by using two...
Turn off the printer. 2. Pull the paper release lever forward to install and load paper on the push tractor. 102 Options and Consumables Install the first tractor in place. 7. This is especially useful with continuous pre-printed forms and multipart forms. Follow these steps to the continuous-paper position. 4. Remove the paper tension unit by using two...

Reference Guide
Page 115
... to 95 °F (5 to 35 °C) -22 to 140 °F (-30 to 60 °C) Humidity (without condensation) 10 to 80% RH 0 to 85% RH Paper Use recycled paper, envelopes, labels and single-sheet multipart forms only under normal temperature and humidity conditions, as follows: ❏ Temperature: 59 to 77 °F (15 to...
... to 95 °F (5 to 35 °C) -22 to 140 °F (-30 to 60 °C) Humidity (without condensation) 10 to 80% RH 0 to 85% RH Paper Use recycled paper, envelopes, labels and single-sheet multipart forms only under normal temperature and humidity conditions, as follows: ❏ Temperature: 59 to 77 °F (15 to...

Reference Guide
Page 127
H Help, EPSON, 96 to 97 High speed draft, 67, 70 Hot parts caution symbol, 7 I I/F mode, 67, 70 IBM character table, ...Internet technical support, 96 L Labels, 29 to 32, 118 Lights, control panel, 63 to 66, 77 to 78 Line spacing, 111 Loading paper envelopes, 29 to 30, 32 labels, 29 to 32 multipart forms, 29 to 31 on the pull tractor, 19 to 21 on the..., 70, 110 Parity, 67, 70 Power cord, 110 Power supply problems, 79 to 80 Printable columns, 111 Print direction, 67, 69 Printer cleaning, 74 to 75 cover, 109 parts, 109 to 110 server, 45 to 49 sharing, 45 to 58 specifications, 111 to 124 transporting...
H Help, EPSON, 96 to 97 High speed draft, 67, 70 Hot parts caution symbol, 7 I I/F mode, 67, 70 IBM character table, ...Internet technical support, 96 L Labels, 29 to 32, 118 Lights, control panel, 63 to 66, 77 to 78 Line spacing, 111 Loading paper envelopes, 29 to 30, 32 labels, 29 to 32 multipart forms, 29 to 31 on the pull tractor, 19 to 21 on the..., 70, 110 Parity, 67, 70 Power cord, 110 Power supply problems, 79 to 80 Printable columns, 111 Print direction, 67, 69 Printer cleaning, 74 to 75 cover, 109 parts, 109 to 110 server, 45 to 49 sharing, 45 to 58 specifications, 111 to 124 transporting...
User's Guide
Page 39
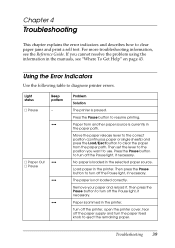
... more troubleshooting information, see "Where To Get Help" on page 43. Press the Pause button to diagnose printer errors. Then set the lever to turn off the Pause light, if necessary. Load paper in the printer. Chapter 4 Troubleshooting This chapter explains the error indicators and describes how to use. Then press the Pause button...
... more troubleshooting information, see "Where To Get Help" on page 43. Press the Pause button to diagnose printer errors. Then set the lever to turn off the Pause light, if necessary. Load paper in the printer. Chapter 4 Troubleshooting This chapter explains the error indicators and describes how to use. Then press the Pause button...


